AMD Ryzen 5 2400G Delidded: Solder vs. Thermal Paste vs. Liquid Metal
Disassembly, Modification & Test System
As we mentioned in AMD Ryzen 5 2400G Review: Zen, Meet Vega and AMD Raven Ridge Thermal/Power Analysis: Ryzen CPUs With Vega, the company is using thermal paste instead of solder between its newest dies and heat spreaders. Measurements in the latter story showed that neither Raven Ridge-based model hit its thermal limit using AMD's boxed cooler, even under Prime95. It was only when we pushed the execution cores and graphics engine at the same time that we overwhelmed its stock heat sink and fan.
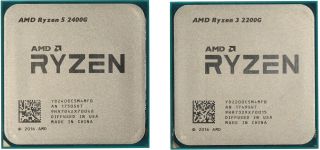
Of course, this doesn't stop enthusiasts from asking what might have been if AMD had used solder instead, or from speculating about the quality of its thermal paste. And the only way we're going to get answers to either of those questions is removing a Ryzen processor's heat spreader and running some experiments.
A Clean Cut: Heat Spreader Removal
Whether you use a de-lidding tool or a good old fashioned razor blade is up to you. But because AMD employs a silicone-like adhesive layer ~0.2mm thick, the razor blade is a reasonably-priced option. Begin your cut exactly where AMD left a gap in its adhesive.
The only real challenge is getting around the surface-mount components placed close to the adhesive layer. Try positioning the processor vertically and cutting from top to bottom, leading the blade at a slightly slanted angle. Use multiple movements, starting from the outside and cutting in. If you feel resistance, stop immediately, then pull the blade slightly upwards and out.
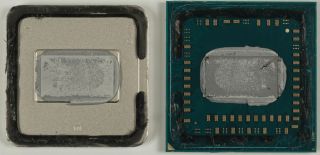
Next, the old thermal paste needs to be removed from the opened processor. We recommend using a thin, dry fleece cloth, rather than a fuzzy kitchen or paper towel. It is best to wipe around the die in a circle, starting from the outside and moving inwards. You may use a bit of isopropyl alcohol or, if necessary, methylated spirits for cleaning up. However, acetone-based solutions are taboo.
Use the blade (a new one, preferably) to remove any remnants of the silicone glue. This is necessary to ensure that the heat spreader has an even surface to mate with once it's reinstalled, and to avoid too large of a gap.
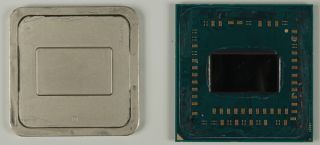
Intermediate Step: Conventional Thermal Paste
If you go to the trouble of removing the heat spreader, it's highly unlikely that you'd simply swap one thermal paste for another. But rather than going straight to liquid metal, we want to know how AMD's proprietary solution compares to off-the-shelf Thermal Grizzly Kryonaut (one of the best non-conductive, silicone-based thermal pastes available).
Stay on the Cutting Edge
Join the experts who read Tom's Hardware for the inside track on enthusiast PC tech news — and have for over 25 years. We'll send breaking news and in-depth reviews of CPUs, GPUs, AI, maker hardware and more straight to your inbox.
So, we're adding one extra step, if only to satisfy our curiosity about AMD's thermal paste and hopefully gain a little more knowledge.
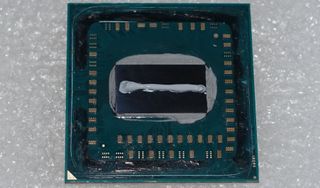
Applying Liquid Metal Paste
For the third and final set of data, we used Thermal Grizzly Conductonaut. This liquid metal "paste" is relatively easy to apply, so long as the die and heat spreader surfaces are absolutely free of grease and dust. Otherwise, the paste won't hold, yielding an unsatisfactory result.
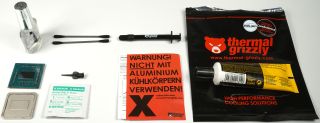
In addition, you need a good, acetone-free clear coat. Try a transparent nail polish without any color or effect pigments. Make sure to shake it well prior to application. To avoid breaking the processor's delicate pins, it helps to rest the chip on a suitable foam surface.
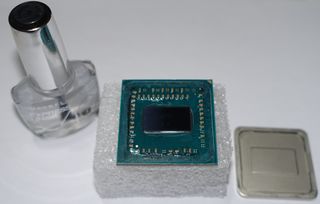
Judiciously cover the surface-mount components and the empty emplacements with your application of polish. Multiple applications may loosen or remove the package's original lacquering, and should thus be avoided. After that, the polish has to be left alone so that it can cure. For the polish to dry properly, wait at least one hour in a warm-enough environment.
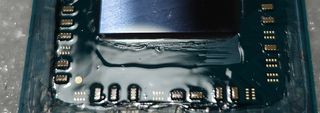
Next, it's time to apply the Conductonaut. For this, we cover the die and matching elevation in the heat spreader with a very thin layer. It is better to use a little less at first, and then add more later if needed. The bundled applicator (the thin, attachable top) has to be used. Otherwise, too much of the liquid comes out.
The liquid is then spread in a circular motion using the included foam sticks. Make sure the desired surfaces are covered completely in a thin layer, and that none of the liquid spills over the edge. Should this happen when you go to press the pieces together, the polish you applied will help protect against potential short-circuits.
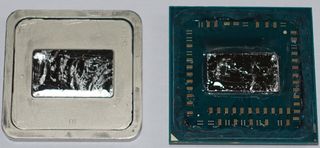
Finally, the heat spreader is reattached and glued in place with either cyanoacrylate or silicone. All-purpose glue isn't sufficient for keeping the head spreader in place, even if its packaging claims the contents are suitable for metal. Keep in mind that the glue must fill a gap of ~0.2mm so the adhesive still safely connects both sides after curing. Glue would be applied to both sides of the heat spreader, while silicone is only applied to the package. Make sure to attach the heat spreader in its correct orientation.
For perfect pressing and drying, carefully put the processor back into the socket, apply a small dot of high-quality thermal paste, and assemble the boxed cooler carefully. Alternately tighten the screws crosswise, and make sure not to tilt or move the heat sink. After a short temperature check with monitoring software like HWiNFO64, being a burn-in process with Prime95 and be ready to keep an eye on its progress. An hour should be more than sufficient to achieve production-ready performance, though silicone needs about a day to cure properly.
Test Setup
In order to establish the limits of AMD's Raven Ridge-based processors, we need to push them as far as they can go. That's where Alphacool's powerful Eiszeit 2000 Chiller comes into play. We combine it with the Alphacool Eisblock XPX, replacing AMD's Wraith Stealth heat sink. Motherboard components are cooled by 22°C air from a large fan blowing across them.
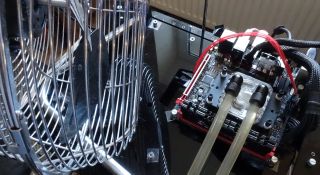
A short summary of our hardware in table form gives you a quick overview of how we test:
| Test System & Measurement | |
|---|---|
| Hardware | AMD Ryzen 5 2400GGigabyte AB350N-Gaming WiFiFlare X 16GB DDR4-3200MX300 SSD 1050GBDark Power Pro 10 (850W) |
| Cooling | AMD Boxed CoolerAlphacool Eisblock XPXAlphacool Eiszeit 2000 Chiller |
| Thermal Paste | Thermal Grizzly KryonautThermal Grizzly Conductonaut |
| Case | Microcool Banchetto 101 |
| Monitor | Eizo EV3237-BK |
| Power Intake | Motherboard Sensors, HWiNFO64, AIDA64, Custom SoftwareContact-free DC measurement at 8-pin EPS connectorDirect voltage measurement at the respective connectors and the power supply1x Rohde & Schwarz HMO 3054, 500 MHz multi-channel oscilloscope with memory function2x Rohde & Schwarz HZO50, clamp-on ammeter adapter (1mA through 30A, 100 kHz, DC)2x Rohde & Schwarz HZ355, test probe (10:1, 500 MHz) |
| Operating System | Windows 10 Pro (1709, alle Updates) |
MORE: Best CPUs
MORE: Intel & AMD Processor Hierarchy
MORE: All CPUs Content
-
AgentLozen You guys ran a delidding article (http://www.tomshardware.com/reviews/kaby-lake-de-lidding-overclocking-test,4970.html) similar to this a while ago for Intel chips. It's focus was measuring the difference between a stock i7 7700k and a delidded one. The article showed how much further the 7700k could overclock when you replaced Intel's TIM. I liked it a lot.Reply
I was hoping this article would similarly show how much further the 2400G would overclock after replacing the TIM. The conclusions that this article reached were interesting. It shows that the TIM AMD uses is pretty good but it was a little anemic otherwise.
edit: changed some wording -
damric AMD has always used paste on APUs. Nothing has "shifted". Even the FM1/2/+ were pasted.Reply -
FormatC Reply
Did you really read the launch review and this one? The barrier for a higher overclock is NOT the temperature. This is an AMD APU and we overclocked it also on the launch review to the stable maximum. And the conclusion said: you get it cooler, but not faster. That's a fact. Intel CPUs are temperature limited, this one not.20721981 said:...
-
BulkZerker @damricReply
AMD used solder for their latest midrange / HEDT chips and that is a very well known fact. -
Nintendork What I want to know is what's the cost of indium solder vs thermal paste per cpu/apu.Reply -
Nintendork We know the answer more or less.Reply
A $7 TIM will probably last you for 10 builds. In a worst case scenario TIM should cost $1 per unit and solder.. $1.5?
Is it really justifiable? I don't think anyone will cry about paying $1-2 more. -
Nintendork @FORMATCReply
The barrier for all current Ryzen is not the cpu or the arch, por temps or power consumption IS THE NODE PROCESS.
It's 14 LOW POWER PERFORMANCE (LPP) which is made to have a high efficiency at low clocks sacrificing a higher wall for base/OC chips, the 12nm LEADING PERFORMANCE (LP) lets you have higher frequencies without sacrificing efficiency.
All Ryzen 2000 cpu's (Non APU) will have around 300Mhz more with the same power consumption) and should easily allow for 4.5Ghz OC~. -
Gillerer Reply20722224 said:@damric
AMD used solder for their latest midrange / HEDT chips and that is a very well known fact.
Damric was talking about APUs - meaning earlier AMD CPUs with integrated graphics - and was comparing these new offerings to them. Ryzen and Ryzen Threadripper definitely don't belong in that product category. -
AgentLozen ReplyFormatC said:Did you really read the launch review and this one? The barrier for a higher overclock is NOT the temperature. This is an AMD APU and we overclocked it also on the launch review to the stable maximum. And the conclusion said: you get it cooler, but not faster. That's a fact. Intel CPUs are temperature limited, this one not.
Thanks for the clarification. I read the review for the Ryzen 2400G, but I guess I missed that detail.
Edit:
I wanted to read more about the overclocking outcomes and limits in the 2400G launch article. What I found instead were optimistic projections about the overclocking capability of that chip. There are lines that read, "Overclocking with AMD's Ryzen Master utility is simple. The execution cores responded readily to our efforts, and the Ryzen 5 2400G floated up to 4 GHz with a 1.4V vCore setting. " and "Specifically, our Ryzen 5 2400G sample overclocked easily.". I guess that's why I was expecting this article to take a different direction.
When I re-read the conclusion of this article I found that "Even during our stress test, Ryzen 5 2400G doesn't achieve an average gain of more than 75 MHz with liquid metal. ". It's disappointing that the 2400G can't go much further than 4.0GHz. -
FormatC @Nintendork:Reply
Solder costs around 5 USD per CPU for the whole process, TIM is significant cheaper, this are only a few Cents. Don't compare the small end-user units and their pharmacy prices with industrial compound, delivered in big cans ;)
I know, that the node process is the reason for this freq wall and that we have no reason to discuss this thing in this review. The sense behind this testing was the question, what it can change (or not). All this crying about TIM and solder... It's simply boring. This is not a high-end CPU with an ultra-high density and a big power draw, it's an APU with a big die and a low power draw. We have no reason to beat AMD for this decision. And I bet: the real target group for this product doesn't even know the difference between TIM and solder. :)
Most Popular


