How To Get The News With Raspberry Pi Pico W and CircuitPython
Get the latest news, straight to your Pico W
The Raspberry Pi Pico certainly put the cat amongst the pigeons in 2021, but it was missing one key feature, Wi-Fi. Sure we can hack our own solution but we had to wait until mid 2022 for Raspberry Pi to announce the Raspberry Pi Pico W in order to get official support.
The Raspberry Pi Pico W was released with a robust MicroPython firmware, but CircuitPython, our favorite microcontroller Python release, was sadly missing support. It may have taken a few months but down to the hard work of @jeffepler we now have CircuitPython 8 Beta 2 which offers Wi-Fi support for the Pico W, while retaining the familiar CircuitPython ecosystem.
To celebrate this milestone we put together a project to highlight CircuitPython on the Raspberry Pi Pico W. We’ll be working with live data from an RSS news feed, converted to JSON and then displayed on a tiny OLED screen.
Building the Circuit
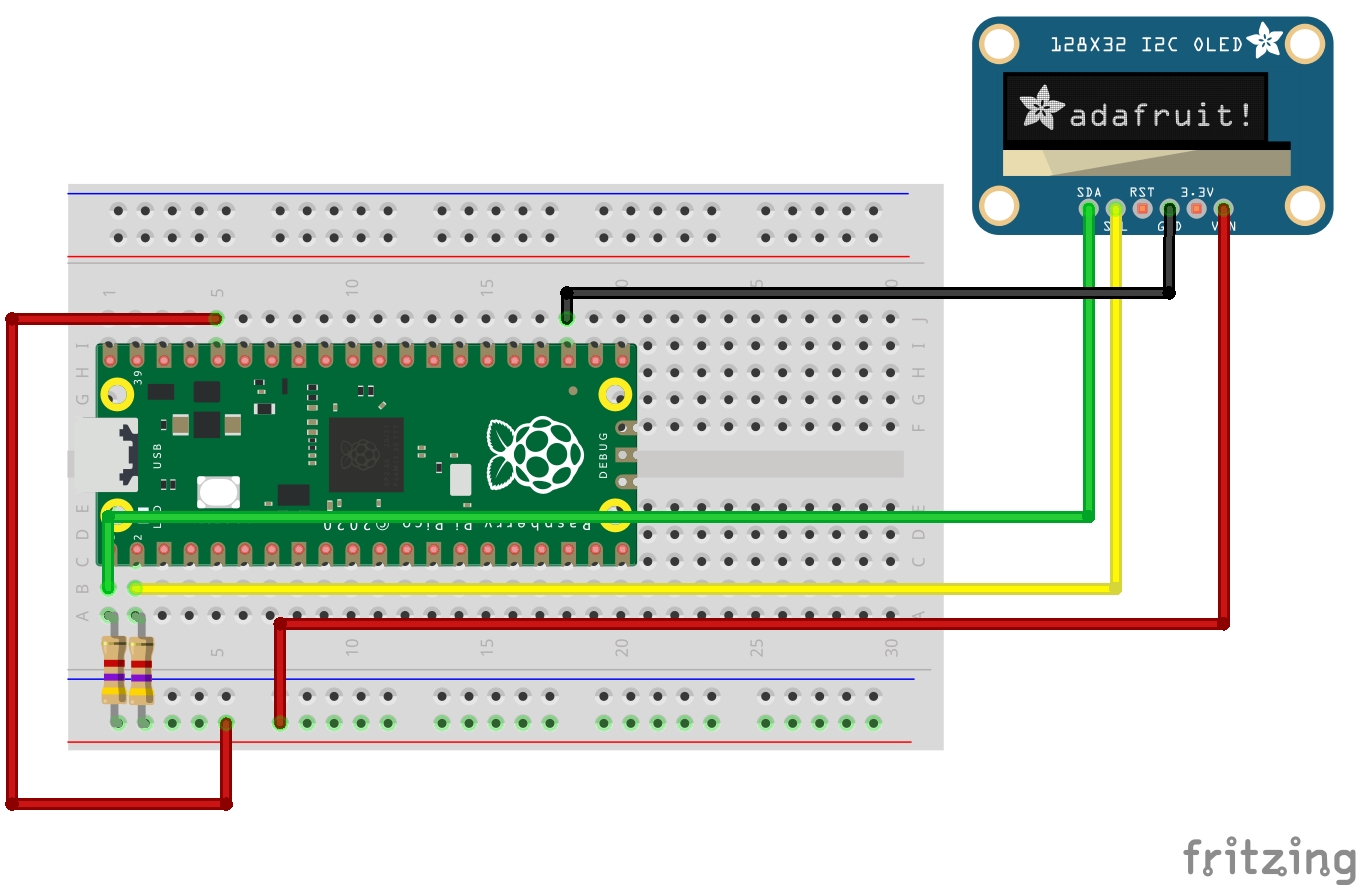
For this project you will need
- A Raspberry Pi Pico W
- 128 x 32 0.91 inch OLED
- 4.7K Ohm Resistors
- Half Breadboard
- Male to male jumper wires
The circuit is essentially just the OLED screen connected to the Raspberry Pi Pico via an I2C connection. The only addition to the circuit are two 4.7K Ohm resistors which connect to the + rail and the SDA and SCL pins of the Pico. This rail is connected to 3.3V, and the resistors are used to pull the pins high, ready for sending and receiving data.
The connections are as follows
| Wire Color | Raspberry Pi Pico W | Breadboard | OLED Display |
| Green | GP0 (SDA) | N/A | SDA |
| Yellow | GP1 (SCL) | N/A | SCL |
| Red | 3V3 Out | + | VIN |
| Black | GND | N/A | GND |
Configuring CircuitPython
1. Go to the official CircuitPython page for the Raspberry Pi Pico W and download the latest release UF2 firmware image. At the time of writing this was CircuitPython 8 Beta 2.
Get Tom's Hardware's best news and in-depth reviews, straight to your inbox.
2. Whilst holding the BOOTSEL button, connect the Raspberry Pi Pico W to your computer. A new drive, RPI-RP2 will appear
3. Copy the downloaded CircuitPython UF2 file to RPI-RP2. This will write CircuitPython to the internal flash storage of the Pico W. A new drive, CIRCUITPY will appear.
We need a number of CircuitPython libraries before we can continue. These libraries of prewritten code add extra features to a project.
1. Download the bundle of libraries for the same version of CircuitPython as installed on the Pico W. We installed CircuitPython 8 so downloaded the bundle for version 8.x.
2. Extract the bundle to your desktop and then open the lib folder contained within.
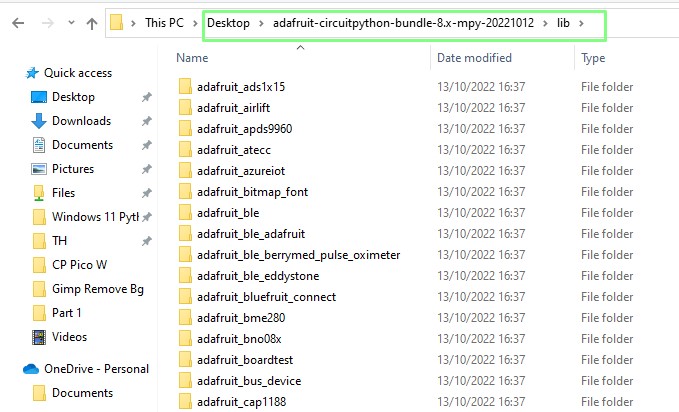
3. Copy the following files / folders from this lib folder to the lib folder on the CIRCUITPY drive.
adafruit_bitmap_font
adafruit_display_text
adafruit_displayio_ssd1306.mpy
adafruit_requests.mpy

Working with CircuitPython
1. Download and install Thonny if you don’t have it already. Thonny is a Python editor which covers Python 3, MicroPython and CircuitPython.
2. Open Thonny and go to Tools >> Options.
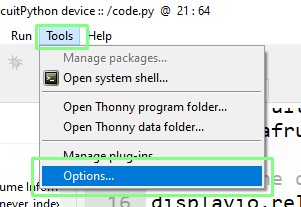
3. Select Interpreter, then set the interpreter as CircuitPython, port to automatic, and click OK. Thonny will now connect to the Pico W running CircuitPython.
Our project code is made up of two files, secrets.py and code.py. The secrets.py file is essentially a Python module with two variables that will contain the SSID of our Wi-Fi access point, and the password. It is best practice to save your Wi-Fi details to a separate file called secrets.py, this reduces the risk of accidentally sharing your credentials. This process works for CircuitPython and MicroPython.
1. Create a new file and in there create two objects, ssid and password.
2. For the ssid object, assign it the name of your Wi-Fi access point / router.
ssid = “YOUR WI-FI AP NAME HERE”3. For the password, assign the Wi-Fi password.
password = “YOUR SECRET PASSWORD”4. Save the file to the CIRCUITPY drive as secrets.py.
Secrets.py Code Listing
ssid = "YOUR WI-FI AP NAME HERE"
password = "YOUR SECRET PASSWORD"
The code for this project is contained in a file called code.py. This file will autorun when the Pico W is powered up, this is a feature of CircuitPython. In MicroPython we would name the file main.py to achieve the same result. We now start the process of writing the code that will make up our project.
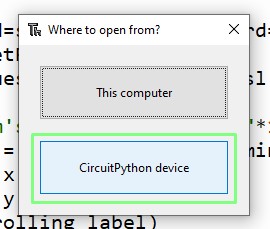
1. Click on File >> Open and select the CircuitPython device. Open code.py on the CIRCUITPY drive. Delete any code in the file.
2. Import modules of pre-written code to handle pause (time) our code, set an IP address, use the Pico W’s Wi-Fi chip and to create web sockets.
import time
import ipaddress
import wifi
import socketpool
3. Import four more modules for secure connections, to make web requests, a module with our Wi-Fi login details and a module to interact with the GPIO.
import ssl
import adafruit_requests
import secrets
import board
4. Import the final group of modules for accelerated bus access, a display library, a terminal style text module, scrolling text, and a driver for the OLED display.
import busio
import displayio
import terminalio
from adafruit_display_text.scrolling_label import ScrollingLabel
import adafruit_displayio_ssd1306
5. Release the display for CircuitPython to use it and then specify the GPIO pins used for I2C.
displayio.release_displays()
i2c = busio.I2C(board.GP1, board.GP0)
6. Specify the I2C interface and I2C address for the OLED screen on the display bus and then use that to create a display object. Don’t forget to set the width and height to match your OLED display. To find the I2C address of the OLED display, consult its datasheet or use an I2C scanner to search for it.
display_bus = displayio.I2CDisplay(i2c, device_address=0x3C)
display = adafruit_displayio_ssd1306.SSD1306(display_bus, width=128, height=32)
7. Connect to the Wi-Fi using the ssid and password stored in the secrets module.
wifi.radio.connect(ssid=secrets.ssid,password=secrets.password)8. Create a pool of sockets that we can use for connections and then create a new HTTP session to be used when making web requests.
pool = socketpool.SocketPool(wifi.radio)
request = adafruit_requests.Session(pool, ssl.create_default_context())
9. Create a while True loop to run the main project code. This loop will continue for as long as the Pico W is powered on.
while True:10. Create a banner, and save it to toms object.The Banner is a string of * followed by “Tom’s Hardware News” then a further 10 more *.
toms = "*"*10+" Tom's Hardware News"+"*"*1011. Create an object to handle scrolling the text stored in the toms object. The animate time handles the scrolling speed, scale is used to increase the text size, with 3 being the largest available for our 128x32 screen.
my_scrolling_label = ScrollingLabel(terminalio.FONT, text=toms, max_characters=20, animate_time=0.1, scale=3)12. Set the position of the text (horizontal, x and vertical, y).
my_scrolling_label.x = 10
my_scrolling_label.y = 10
13. Show the text on the OLED display.
display.show(my_scrolling_label)14. Use a for loop to scroll the banner across the screen. We use the length of the text stored in the toms object, minus six to create a pleasant scroll. This will need to be tweaked to suit your banner text.
for i in range(len(toms)-6):
        my_scrolling_label.update()
        time.sleep(0.1)
15. Create an object, feed to store the URL of the JSON feed that contains the news headlines. We used rss2json.com to convert the Tom’s Hardware RSS feed into JSON, which can be easily worked with in CircuitPython.
feed =
request.get("https://api.rss2json.com/v1/api.json?rss_url=https%3A%2F%2Fwww.tomshardware.com%2Ffeeds%2Fall")
16. Use a for loop to retrieve the first five stories from the feed.
for story in range(5):17. Print the story’s headline to the Python shell.
print(feed.json()['items'][story]['title'])18. Update the scrolling text to scroll the headline, with a buffer of 20 blank spaces before the text and a scale (text size) of 2.
my_scrolling_label = ScrollingLabel(terminalio.FONT, text=" "*20+str(feed.json()['items'][story]['title']), max_characters=20, animate_time=0.1, scale=2)19. Set the position of the text (horizontal, x and vertical, y).
my_scrolling_label.x = 10
my_scrolling_label.y = 10
20. Show the text on the OLED display.
display.show(my_scrolling_label)21. Use another for loop to scroll the headline text. The iterations in the loop are set by the length of the headline, plus 21 characters to create a buffer.
for i in range(len(feed.json()['items'][story]['title'])+21):
            my_scrolling_label.update()
time.sleep(0.1)
22. Finally add a sleep of 30 minutes, (1800 seconds) to set the Pico W to check for new headlines every half hour.
time.sleep(1800)23. Save the project as code.py to CIRCUITPY and click Run to test start the code.
You should see the OLED screen come to life and scroll a banner, then the news headlines. As we saved the project to the code.py file, this code will autorun when the Pico W is powered up.
Complete Code Listing
import time
import ipaddress
import wifi
import socketpool
import ssl
import adafruit_requests
import secrets
import board
import busio
import displayio
import terminalio
from adafruit_display_text.scrolling_label import ScrollingLabel
import adafruit_displayio_ssd1306

# Setup the display
displayio.release_displays()
i2c = busio.I2C(board.GP1, board.GP0)
display_bus = displayio.I2CDisplay(i2c, device_address=0x3C)
display = adafruit_displayio_ssd1306.SSD1306(display_bus, width=128, height=32)

wifi.radio.connect(ssid=secrets.ssid,password=secrets.password)
pool = socketpool.SocketPool(wifi.radio)
request = adafruit_requests.Session(pool, ssl.create_default_context())
while True:
    toms = "*"*10+" Tom's Hardware News"+"*"*10
    my_scrolling_label = ScrollingLabel(terminalio.FONT, text=toms, max_characters=20, animate_time=0.1, scale=3)
    my_scrolling_label.x = 10
    my_scrolling_label.y = 10
    display.show(my_scrolling_label)
    for i in range(len(toms)-6):
        my_scrolling_label.update()
        time.sleep(0.1)

    feed = request.get("https://api.rss2json.com/v1/api.json?rss_url=https%3A%2F%2Fwww.tomshardware.com%2Ffeeds%2Fall")
    for story in range(5):
        print(feed.json()['items'][story]['title'])
        my_scrolling_label = ScrollingLabel(terminalio.FONT, text=" "*20+str(feed.json()['items'][story]['title']), max_characters=20, animate_time=0.1, scale=2)
        my_scrolling_label.x = 10
        my_scrolling_label.y = 10
        display.show(my_scrolling_label)
        for i in range(len(feed.json()['items'][story]['title'])+21):
            my_scrolling_label.update()
            time.sleep(0.1)
time.sleep(1800)
Les Pounder is an associate editor at Tom's Hardware. He is a creative technologist and for seven years has created projects to educate and inspire minds both young and old. He has worked with the Raspberry Pi Foundation to write and deliver their teacher training program "Picademy".