How To Monitor Temperature With a Raspberry Pi Pico
A red hot project that is super cool
The Raspberry Pi Pico is the ideal way to get into microcontrollers. Starting from $4, the board is cheap and easy to work with. The low cost and ease of use means we can easily drop them into a project without fearing the worst for our wallet.
In this how-to, we will use a Raspberry Pi Pico to capture live temperature data using a DS18B20. This sensor comes in many forms, from a bare transistor chip, to a water resistant cable. We’ll be using the latter version, which can be partially submerged in a liquid to monitor the temperature. Our project will take a temperature reading and using a conditional test in MicroPython it will trigger an LED to flash if the temperature goes below 20 degrees Celsius.
For This Project You Will Need
- Raspberry Pi Pico / Pico W
- DS18B20 Sensor
- LED
- 330 Ohm Resistor
- 4.7K Ohm Resistor
- 5 x Male to male jumper wires
- Breadboard
Building The Circuit
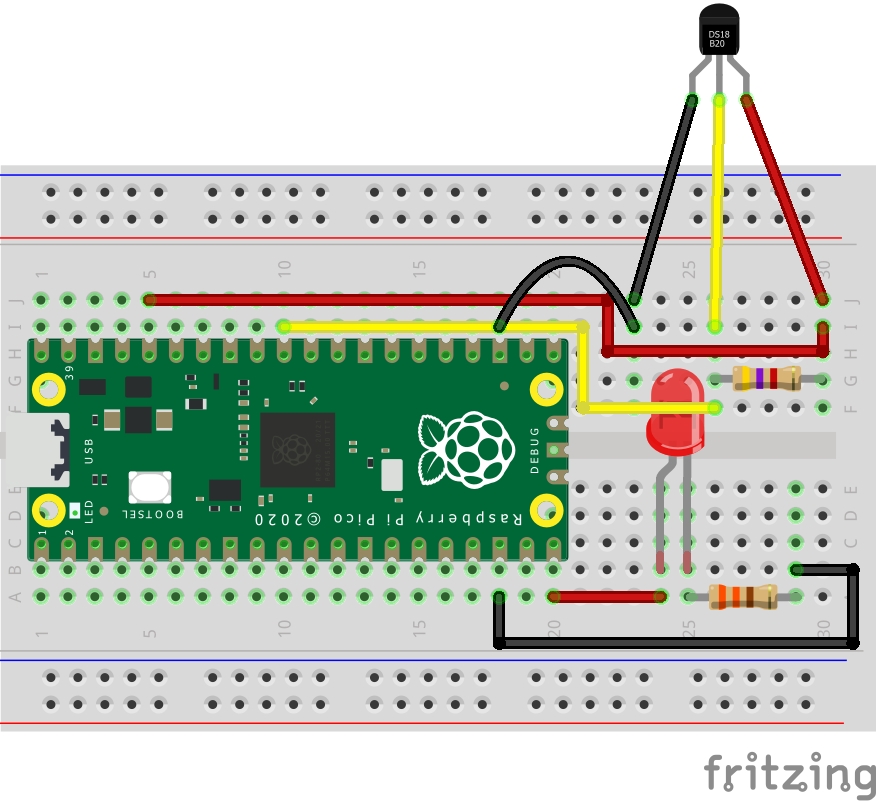
The circuit is made up of two parts. The DS18B20 temperature sensor, and the LED. We’ll break them down into two sections.
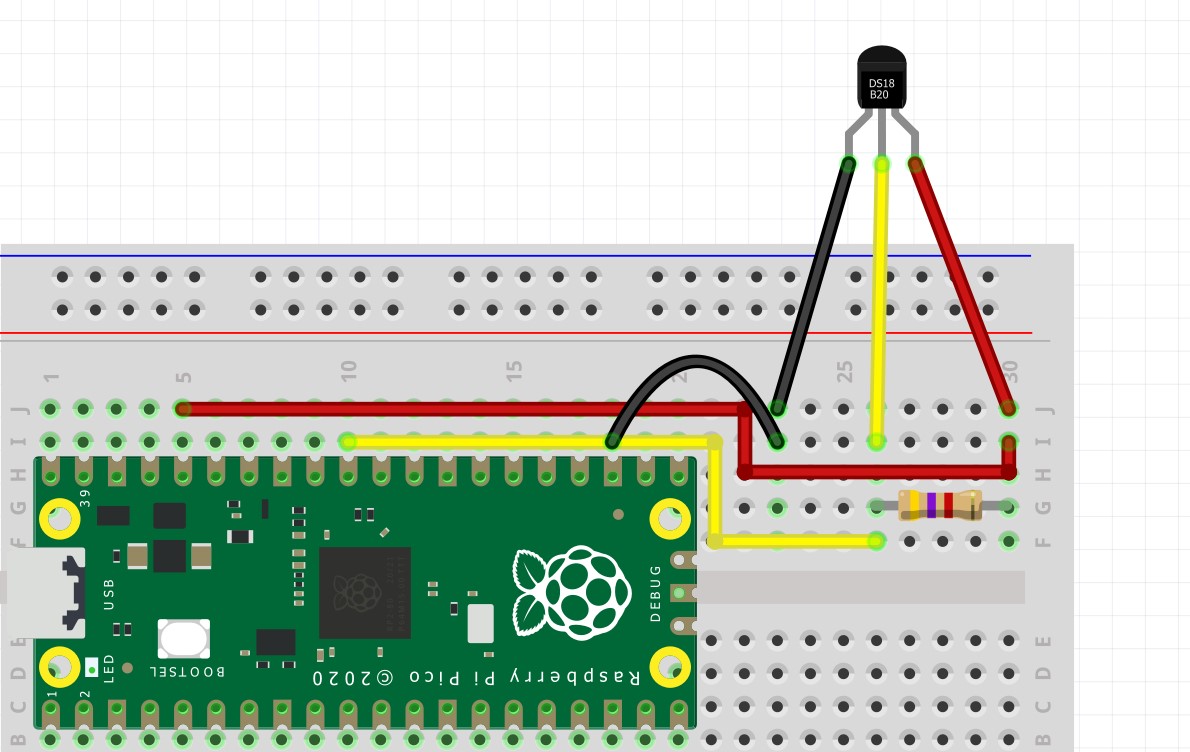
The DS18B20 has three connections to the Raspberry Pi Pico.
| Raspberry Pi Pico | Wire Color | DS18B20 |
|---|---|---|
| 3V3 | Red | VDD |
| GPIO26 | Yellow | Data |
| GND | Black | GND |
All three connections are made into the breadboard, and the wires are used to connect to the Pico. Between the data and 3V3 pins (yellow and red), there is a 4.7K Ohm resistor which is used to pull the data pin high using the 3.3V supplied. This maintains a steady connection between the data pin and Pico.
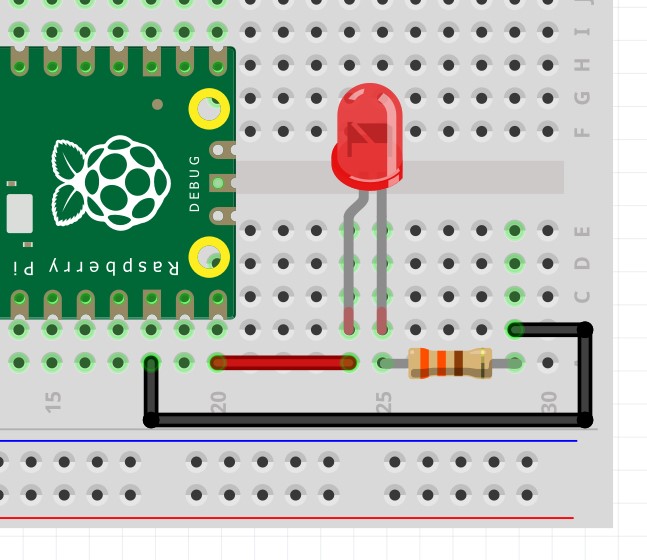
The LED has only two connections to the Raspberry Pi Pico.
| Raspberry Pi Pico | Wire Color | LED |
|---|---|---|
| GPIO15 | Red | Anode (Long leg) |
| GND | Black | Cathode (Short leg) |
The LED has a 330 Ohm resistor on the cathode leg, inline with GND. This reduces the amount of current that the LED can consume.
Get Tom's Hardware's best news and in-depth reviews, straight to your inbox.
Writing the Code
1. Follow this guide to download and install the latest MicroPython release for your model of Raspberry Pi Pico. Follow the steps up to and including connecting the Raspberry Pi Pico to Thonny.
2. Create a new blank project in Thonny.
3. Import three modules of pre-written code. First is onewire, a module that enables the Pico to talk to the one-wire interface of the DS18B20. Next is ds18x20, a module that interprets the sensor data from the DS18B20 and provides us with human readable data. Lastly we import time which is used to pace our project code.
import onewire, ds18x20, time4. From the Machine module import the Pin class. This will enable our code to interact with the components connected to the GPIO.
from machine import Pin5. Create two objects, SensorPin and alert. SensorPin is the GPIO pin used to connect the data pin from the DS18B20 to the Pico. Alert is the GPIO pin that connects to the anode (long leg) of the LED.
SensorPin = Pin(26, Pin.IN)
alert = Pin(15, Pin.OUT)
6. Create an object, sensor and use it to tell the ds18x20 module where to find our DS18B20 temperature sensor. This line also uses the onewire module, as that is the protocol that the sensor uses for connection.
sensor = ds18x20.DS18X20(onewire.OneWire(SensorPin))7. Create an object, roms and use the sensor object to scan the interface to find our DS18B20 temperature sensor. All one-wire devices, such as our DS18B20, have a unique registration number stored in ROM that we need to identify before they can be used.
roms = sensor.scan()8. Use a while True loop to run the next lines of code in a never ending loop.
while True:9. Set the temperature reading to use Celsius. Note that the code within the while True loop is indented to show that it belongs in the loop.
sensor.convert_temp()10. Add a two second pause to the code. This gives the DS18B20 time to settle before we take a reading.
time.sleep(2)11. Use a for loop to iterate through the returned list of ROMs. As we only have one DS18B20 on the one-wire interface, only one ROM will be stored in the list that we iterate over.
for rom in roms:12. Create an object, temperature, and use it to store the output of reading the DS18B20 sensor. The output is wrapped in a round() function that will round the returned data to 1 decimal place.
temperature = round(sensor.read_temp(rom),1)13. Use a conditional test to check the value stored in the temperature object against a hard coded value. In this example, if the temperature is less than or equal to 20 Degrees Celsius then the condition will evaluate as True, and the next section of indented code will run.
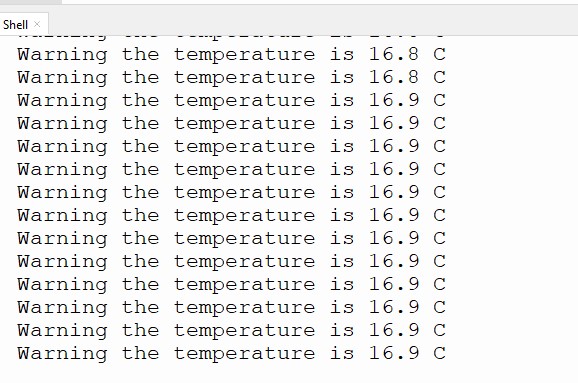
if temperature <= 20:14. Print a message to the Python Shell that warns the user that the temper is below 20 C and include the temperature value in the sentence.
print("Warning the temperature is",temperature,"C")15. Use a for loop to blink the LED 10 times, with a 0.5 second delay.
           for i in range(10):
               alert.toggle()
               time.sleep(0.5)
16. Create an else condition that activates if the temperature is greater than 20 C. This condition will print the current temperature before ending.
       else:
print(temperature,"C")
17. Add a five second pause before ending the loop and returning back to the start of the loop.
time.sleep(5)18. Save the code to the Raspberry Pi Pico as TemperatureMonitor.py.
19. Click on the Run icon to start the code. After a short pause the temperature details will appear in the Python shell. If the temperature is below 20 C, the LED will blink five times to warn us.
Complete Code Listing
import onewire, ds18x20, time
from machine import Pin
SensorPin = Pin(26, Pin.IN)
alert = Pin(15, Pin.OUT)
sensor = ds18x20.DS18X20(onewire.OneWire(SensorPin))
roms = sensor.scan()
print(roms)
while True:
   sensor.convert_temp()
   time.sleep(2)
   for rom in roms:
       temperature = round(sensor.read_temp(rom),1)
       if temperature <= 20:
           print("Warning the temperature is",temperature,"C")
           for i in range(10):
               alert.toggle()
               time.sleep(0.5)
       else:
           print(temperature,"C")
time.sleep(5)
Les Pounder is an associate editor at Tom's Hardware. He is a creative technologist and for seven years has created projects to educate and inspire minds both young and old. He has worked with the Raspberry Pi Foundation to write and deliver their teacher training program "Picademy".


