How To Recover Deleted Files From Any Drive in Linux
Recover those deleted files with ease
Hardware failure and a careless user feeling adventurous with powerful utilities such as dd and fdisk can lead to data loss in Linux. Not only that, sometimes spring cleaning a partition or directory can also lead to accidentally deleting some useful files. Should that happen, there’s no reason to despair. With the PhotoRec utility, you can easily recover a variety of files, be it documents, images, music, archives and so on.
Developed by CGSecurity and released under the GPL, PhotoRec is distributed as a companion utility of Testdisk, which can be used to recover and restore partitions. You can use either of these tools to recover files, but each has a job that it’s best suited for. Testdisk is best suited for recovering lost partitions. Whether this is on account of you overwriting or deleting a partition, or a partition becoming unreadable for any reason, Testdisk can help you restore the partition, or at the very least, recover data from it. But if all you’re interested in is recovering deleted files from a partition, hard disk or even a USB drive, you can use PhotoRec. Although initially designed to only recover image files (hence the name), PhotoRec can be used to recover just about any manner of file.
Even better, PhotoRec works by ignoring the underlying filesystem on the specified partition, disk or USB drive. Instead, it focuses on the unique signatures left by the different file types to identify them. This is why PhotoRec can work with FAT, NTFS, ext3, ext4 and other partition types.
In contrast, Testdisk only supports a limited number of filesystems. The greatest drawback of PhotoRec – if any tool that can seemingly pull deleted files out of the digital ether can have a drawback – is that it doesn’t retain the original filenames. This means that recovered files all sport a gibberish alpha-numeric name. If this is a deal-breaker for you, consider using Testdisk first to recover your lost files.
To Install Testdisk open a terminal window and first update the software repositories before installing testdisk. We’re using an Ubuntu machine for our installation.
$ sudo apt install testdisk
If you are using a Fedora or other RPM based distro, use dnf instead.
$ sudo dnf install testdisk
Get Recoverin’
Before you start using PhotoRec, it’s important to understand how a filesystem handles deleted files. When you delete a file, it isn’t immediately zapped into oblivion. Instead, the file system merely marks the file as deleted and assigns the space the file occupied as available for use. This means that until that space is taken up by another file, the original file is still there and can be retrieved using specialised data recovery tools.
Get Tom's Hardware's best news and in-depth reviews, straight to your inbox.
It’s for this reason why you should ideally stop using the system as soon as you realise that you’ve deleted an important file, because you’ll minimise the risk of its space being occupied. Although both PhotoRec and Testdisk can recover files from deleted and then overwritten partitions, it decreases the chances of recovering all the files.
1. Using the file manager, create a directory where you wish to store the files recovered by PhotoRec. This directory should not be on the same partition or device from which you are attempting to recover files.
2. Open the terminal and fire up PhotoRec with sudo powers.
$ sudo photorec
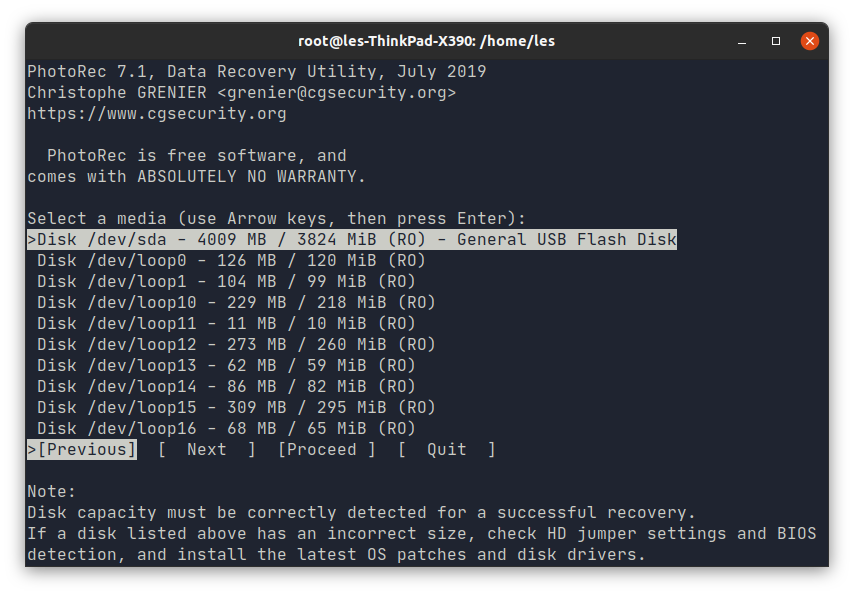
You’ll be presented with the welcome screen that lists all the partitions as well as connected disks and devices.
3. Using the up and down arrow keys select the drive that you wish to recover, then use the left and right keys to select Proceed and press Enter. You can help speed things up by restricting the recovery to search for specific file types, such as pdf, jpg or mp3.
After selecting the device or partition from which you wish to recover deleted files, use the right/left arrow keys to select the File Opt button and press Enter. If your selected device comprises several partitions, PhotoRec will display all the partitions and enable you to choose the partition that was home to the deleted file.
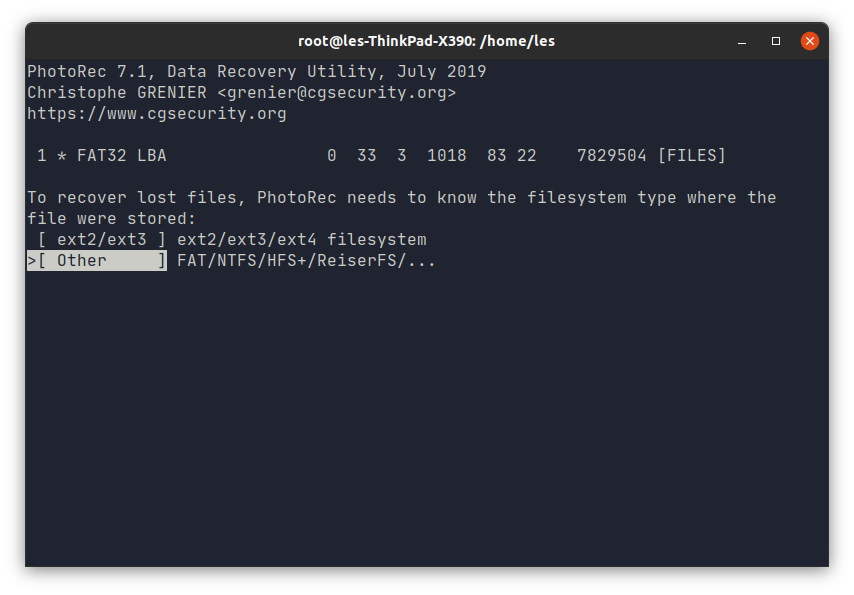
4. Select the filesystem type used on the drive that you wish to recover. If the drive had typical Linux partitions, select ext2/ext3. For anything else, choose the Other option.
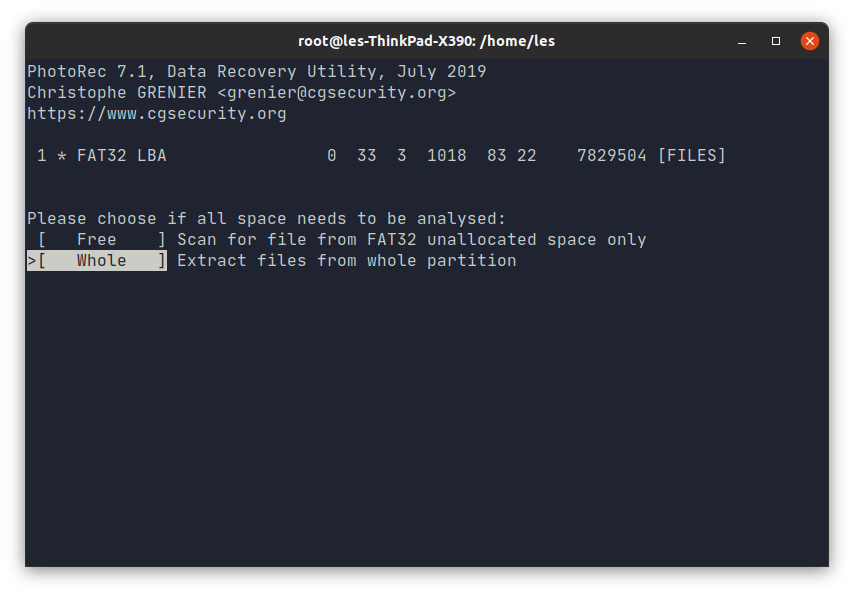
5. Using the up and down arrow keys, select whether to search and recover files from the free space of the drive, or from the entire drive.
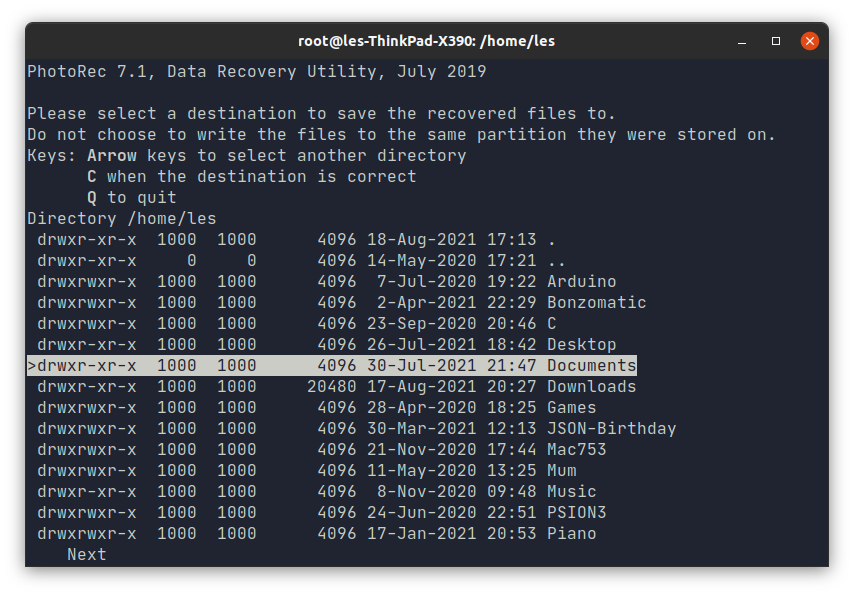
6. Select the destination for the recovered files. Pressing Enter will open directories. When ready press C to set the destination and start the recovery process
Making Sense of Recovered Files
Depending on the size of the partition or device, PhotoRec can take quite a while to perform the complete search for files. PhotoRec creates several directories such as recup_dir.1 or recup_dir.2 within the specified destination directory for recovered files. You’ll find all the recovered files within these directories, but PhotoRec makes no attempt at sorting the different files based on their name or file formats.
You can, however, resort to some quick CLI-fu to organise the recovered files.
1. Create directories for different file formats, such as mp3 or jpg.
2. Use the mv command to move files of a specific format to the relevant directory. For example here we move all of the jpeg images into the images directory.
$ mv ~/miracles-happen/recup_dir.*/*.jpg ~/miracle-happens/images/
This tutorial first appeared in an issue of Linux Format magazine.

Shashank Sharma is a freelance writer for Tom’s Hardware US, where he writes about his triumphs and joys of working with the Linux CLI.


