


Recently, we've seen AI models that produce detailed text-to-video or use run a chatbot on your phone. Now, OpenAI, the company behind ChatGPT, has introduced Shap-E, a model that generates 3D objects you can open in Microsoft Paint 3D or even convert into an STL file you can output on one of the best 3D printers.
The Shap-E model is available for free on GitHub and it runs locally on your PC. Once all of the files and models are downloaded, it doesn't need to ping the Internet. And best of all, it doesn't require an OpenAI API key so you won't be charged for using it.
It is a huge challenge actually getting Shap-E to run. OpenAI provides almost no instructions, just telling you to use the Python pip command to install it. However, the company fails to mention the dependencies you need to make it work and that many of the latest versions of them just won't work. I spent more than 8 hours getting this running and I'll share what worked for me below.
Once I finally got Shap-E installed, I found that the default way to access it is via Jupyter Notebook, which lets you view and execute the sample code in small chunks to see what it does. There are three sample notebooks which demonstrate "text-to-3d" (using a text prompt), "image-to-3d" (turning a 2D image into a 3D object) and "encode_model" which takes an existing 3D model and uses Blender (which you need installed) to transform it into something else and re-render it. I tested the first two of these as the third (using Blender with existing 3D objects) was beyond my skillset.
How Shap-E Text-to-3D Looks
Like so many AI models we test these days, Shap-E is full of potential but the current output is so-so at best. I tried the text-to-video with a few different prompts. In most cases, I got the objects that I asked for but they were low res and missing key details.
When I used the sample_text_to_3d notebook, I got two kinds of output: color animated GIFs which displayed in my browser and monochrome PLY files I could open later in a program like Paint 3D. The animated GIFs always looked a lot better than the PLY files.
The default prompt of "a shark," looked decent as an animated GIF, but when I opened the PLY in Paint 3D, it seemed lacking. By default, the notebook gives you four animated GIFs that are 64 x 64, but I changed the code to up the resolution to 256 x 256 outputted as a single GIF (since all four GIFs looks the same).


When I asked for something that OpenAI had as one of its examples, "an airplane that looks like a banana," I got a pretty good GIF, particularly when I upped the resolution to 256. The PLY, file, though, exposed a lot of holes in the wings.


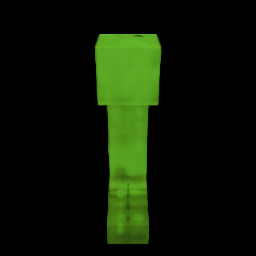
When I asked for a Minecraft creeper, I got something that a GIF that was correctly colored green and black and a PLY that was in the basic shape of a creeper. However, real Minecraft fans would not be satisfied with this and it was too messy of a shape to 3D print (if I had converted it to an STL).

Shap-E Image to 3D Object
I also tried the image-to-3d script which can take an existing 2D image file and turn it into a 3D PLY file object. A sample illustration of a corgi dog became a decent, low-res object that it outputted as a rotating, animated GIF which had less detail. Below, the original image is on the left and the GIF is on the right. You can see that the eyes seem to be missing.

By modifying the code, I was also able to get it output a PLY 3D file that I could open in Paint 3D. This is what it looked like.

I also tried feeding the image-to-3d script some of my own images, including a photo of an SSD, which came out looking broken and a transparent PNG of the Tom's Hardware logo, which didn't look much better.


However, it's likely that if I had a 2D PNG that looked a bit more 3D-ish (the way the corgi does), I'd get better results.
Performance of Shap-E
Whether I was doing text or image to 3D processing, Shap-E required a ton of system resources. On my home desktop, with an RTX 3080 GPU and a Ryzen 9 5900X CPU, it took about five minutes to complete a render. On an Asus ROG Strix Scar 18 with an RTX 4090 laptop GPU and an Intel Core i9-13980HX, it took two to three minutes.
However, when I tried doing text-to-3D on my old laptop, with has an Intel 8th Gen U series CPU and integrated graphics, it had only finished 3 percent of a render after an hour. In short, if you are going to use Shap-E, make sure you have an Nvidia GPU (Shap-E doesn't support other brands of GPUs. The options are CUDA and CPU.). Otherwise, it will just take too long.
I should note that the first time you run any of the scripts, it will need to download the models, which are 2 to 3 GB and could take several minutes to transfer.
How to Install and Run Shap-E on a PC
OpenAI has posted a Shap-E repository to GitHub, along with some instructions on how to run it. I attempted to install and run the software in Windows, using Miniconda to create a dedicated Python environment. However, I kept running into problems, especially because I could not get Pytorch3D, a required library, to install.
However, when I decided to use WSL2 (Windows Subsytem for Linux), I was able to get it up and running with few hassles. So the instructions below will work either in native Linux or in WSL2 under Windows. I tested them in WSL2.
1. Install Miniconda or Anaconda in Linux if you don't already have it. You can find a download and instructions on the Conda site.
2. Create a Conda environment called shap-e with Python 3.9 installed (other versions of Python may work).
conda create -n shap-e python=3.93. Activate the shap-e environment.
conda activate shap-e4. Install Pytorch. If you have an Nvidia graphics card, Use this command.
conda install pytorch=1.13.0 torchvision pytorch-cuda=11.6 -c pytorch -c nvidiaIf you don't have an Nvidia card, you'll need to do a CPU-based install. The install is speedy but processing the actual 3D generation with the CPU was extremely slow in my experience.
conda install pytorch torchvision torchaudio cpuonly -c pytorch5. Build Pytorch. This is the area where it took me hours and hours to find a combination that worked.
pip install "git+https://github.com/facebookresearch/pytorch3d.git"
If you get a cuda error, try running sudo apt install nvidia-cuda-dev and then repeating the process.
6. Install Jupyter Notebook using Conda.
conda install -c anaconda jupyter7. Clone the shap-e repo.
git clone https://github.com/openai/shap-eGit will create a shap-e folder underneath the one you cloned it from.
8. Enter the shap-e folder and run the install using pip.
cd shap-e
pip install -e .
9. Launch a Jupyter Notebook.
jupyter notebook10. Navigate to the localhost URL the software shows you. It will be http://localhost:8888?token= and a token. You'll see a directory of folders and files.

11. Browse to shap-e/examples and double-click on sample_text_to_3d.ipynb.

A notebook will open up with different sections of code.
12. Highlight each section and click the Run button, waiting for it to complete before moving onto the next section.

This process will take a while the first time you go through it, because it will download several large models to your local drive. When everything is done, you should see four 3D models of a shark in your browser. There will also be four .ply files in the examples folder and you will be able to open those in 3D imaging programs such as Paint 3D. You can also convert them to STL files using an online converter.
If you want to change the prompt and try again. Refresh your browser and change "a shark" to something else in the prompt section. Also, if you change size from 64 to a higher number, you get a higher resolution image.

13. Double-click on sample_image_to_3d.ipynb in the examples folder again so you can try the image-to-3d script.
14. Highlight each section and click Run.

You'll end up, by default, with four small images of corgis.

However, I recommend adding the following code to the last notebook section so that it will output PLY files as well as animated GIFs.
from shap_e.util.notebooks import decode_latent_mesh

for i, latent in enumerate(latents):
    with open(f'example_mesh_{i}.ply', 'wb') as f:
decode_latent_mesh(xm, latent).tri_mesh().write_ply(f)
15. Modify the image location in section 3 to change the image. Also, I recommend changing the batch_size to 1 so it only makes one image. Changing the size to 128 or 256 will give you a higher resolution image.

16. Create the following python script and save it as text-to-3d.py or another name. It will allow you to generate PLY files based on text prompts at the command line.
import torch

from shap_e.diffusion.sample import sample_latents
from shap_e.diffusion.gaussian_diffusion import diffusion_from_config
from shap_e.models.download import load_model, load_config
from shap_e.util.notebooks import create_pan_cameras, decode_latent_images, gif_widget

device = torch.device('cuda' if torch.cuda.is_available() else 'cpu')

xm = load_model('transmitter', device=device)
model = load_model('text300M', device=device)
diffusion = diffusion_from_config(load_config('diffusion'))

batch_size = 1
guidance_scale = 15.0
prompt = input("Enter prompt: ")
filename = prompt.replace(" ","_")
latents = sample_latents(
    batch_size=batch_size,
    model=model,
    diffusion=diffusion,
    guidance_scale=guidance_scale,
    model_kwargs=dict(texts=[prompt] * batch_size),
    progress=True,
    clip_denoised=True,
    use_fp16=True,
    use_karras=True,
    karras_steps=64,
    sigma_min=1e-3,
    sigma_max=160,
    s_churn=0,
)

render_mode = 'nerf' # you can change this to 'stf'
size = 64 # this is the size of the renders; higher values take longer to render.

from shap_e.util.notebooks import decode_latent_mesh

for i, latent in enumerate(latents):
    with open(f'{filename}_{i}.ply', 'wb') as f:
        decode_latent_mesh(xm, latent).tri_mesh().write_ply(f)
17. Run python text-to-3d.py and enter your prompt when the program asks for it.

That will give you a PLY output, but not a GIF. If you know Python, you can modify the script to do more with it.
