


Raspberry Pis are so convenient because they're inexpensive and small, but connecting one to its own monitor, keyboard and mouse requires a lot more space and money. If you're just trying to program on the Pi or use it to control electronics such as lights, motors and sensors, there's no need to connect it to a display or input devices. You can just control the system remotely, using a VNC or SSH client on your main computer. We call this screenless install a headless Raspberry Pi setup and it works with any model of Pi that has a network connection, even a Raspberry Pi 5.
By default, the Raspberry Pi's official operating system, Raspberry Pi OS (formerly known as Raspbian), installs with all forms of remote access disabled. But the good news is that you don't need to connect to a monitor and keyboard in order to turn them on.
By following the instructions below, you can create a headless Raspberry Pi that's ready for remote access before you boot it up for the very first time. If you have a monitor and keyboard on hand, you can also see our guide on How to Set Up a Raspberry Pi for the First Time.
Installing Raspberry Pi OS on Your microSD card
1. Insert a microSD card into your computer. Your card should be 8GB or larger (the lite version of Raspberry Pi OS will use less space). We have a list of the best microSD cards for Raspberry Pi to help you choose one that optimizes performance.
2. Download, install and run Raspberry Pi Imager.
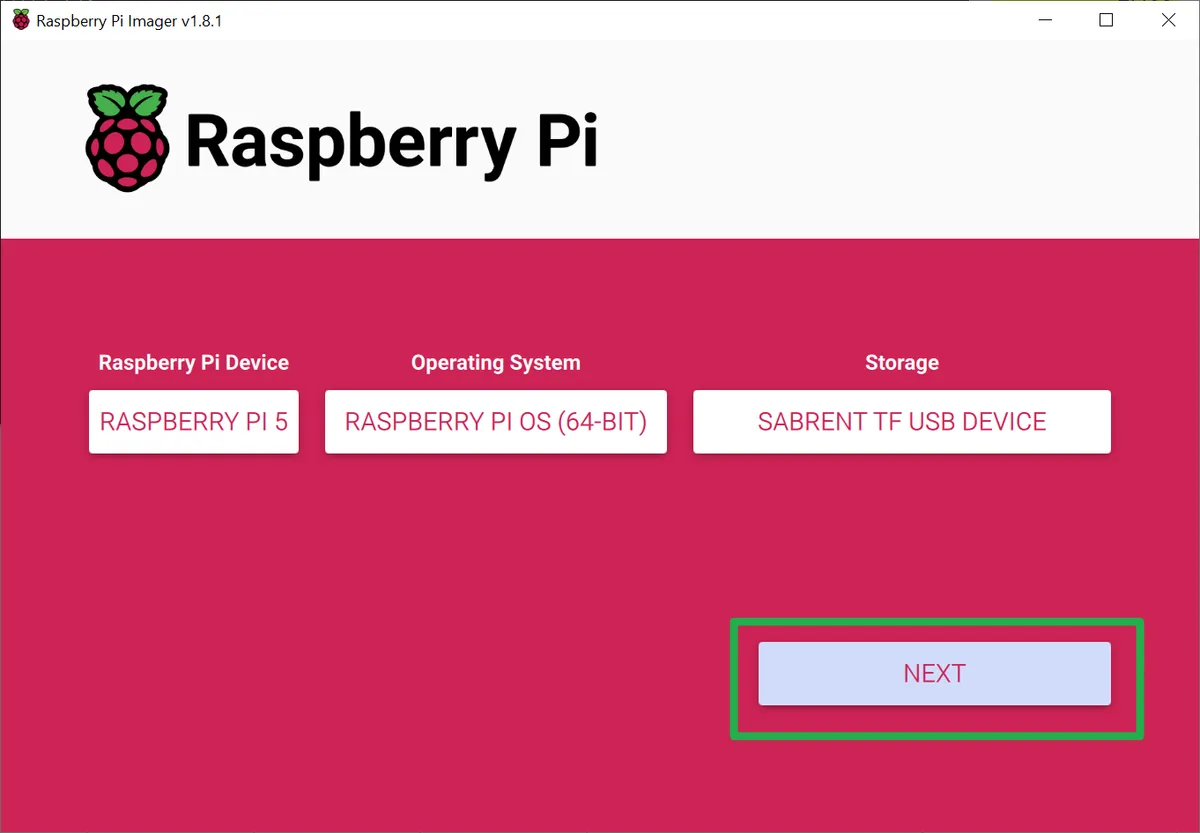
3. Click the Choose Device button. A list of Pi boards appears. This is an optional step because, you can choose none and, as long as you select the right OS image, it should work. This option makes sure you only see compatible OS images in step 5 so we recommend it.

4. Select the Pi board you are making the card for. In our case, we chose a Raspberry Pi 5.

5. Click the Choose OS button. A menu appears.

6. Select your OS. If the top choice is Raspberry Pi OS (64-bit) , the default for Pi 4 and Pi 5, we recommend you go with it. If Raspberry Pi OS (other) is the top choice, click that and choose the latest version that works with your board.

7. Click Choose Storage and select your card from the menu.

8. Click Next.
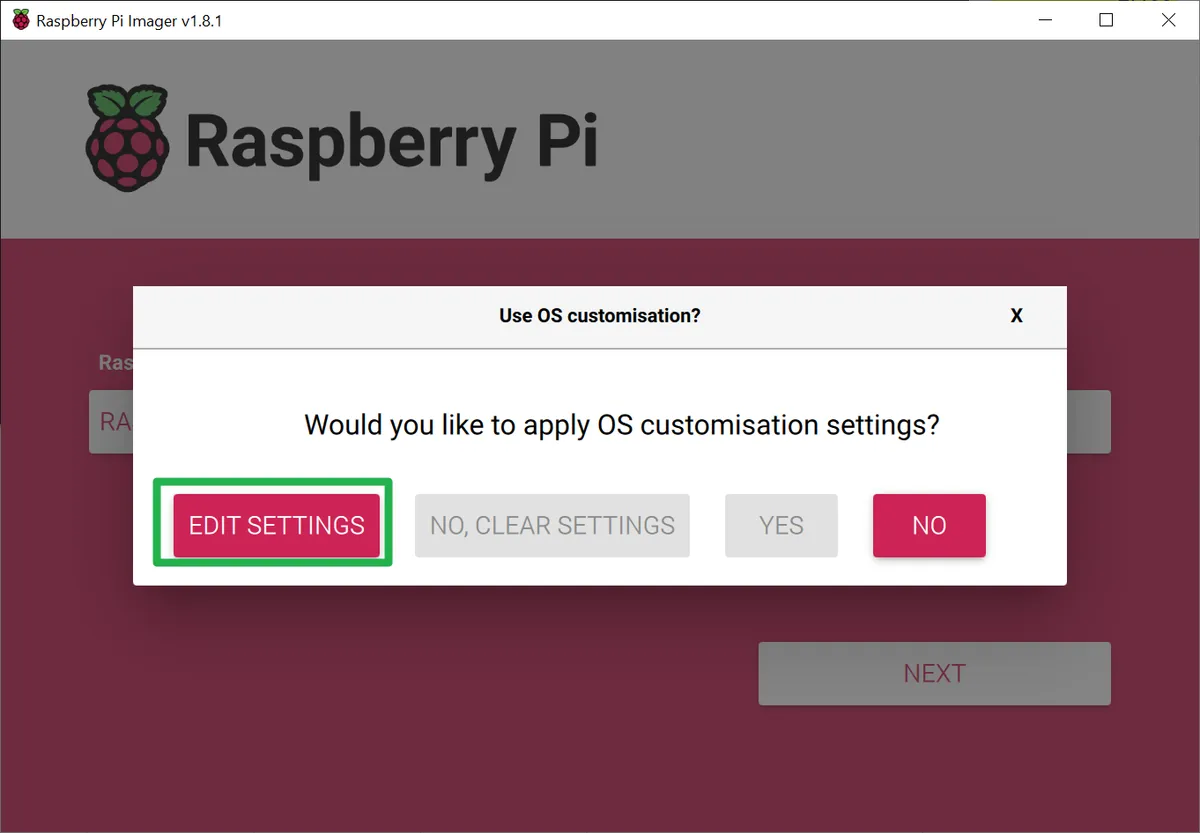
9. Click Edit Settings from the pop-up.
10. Fill in all the fields on the General tab: hostname, username / password, wireless LAN (if you plan to use Wi-Fi, and locale settings.

11. On the Services tab, toggle enable SSH to on and select "Use password authentication." Then click Save.

12. Click Yes to apply OS customization settings.

13. Click Yes to confirm that you want to write to your microSD card.

The system will now take a few minutes to download the OS and write it to your card.

When it's done, you can pop your card into a Raspberry Pi, boot it up, wait a few seconds for it to get onto the network and attempt to log in via SSH, provided that you're using a Wi-Fi network and both the Pi and your client PC are connected to it.
Editing Wi-Fi on a Prewritten Card
Let's say you already wrote a card, but forgot to enter the correct Wi-Fi credentials in Raspberry Pi Imager. Or perhaps you moved to a different Wi-Fi network. You can still change the Wi-Fi network, without attaching a screen and keyboard to the Pi.
To setup a Wi-Fi connection on your headless Raspberry Pi, open the microSD card on your PC. Then create a text file called wpa_supplicant.conf, and place it in the root directory of the microSD card. You will need the following text in the file.
country=US
ctrl_interface=DIR=/var/run/wpa_supplicant GROUP=netdev
update_config=1

network={
scan_ssid=1
ssid="your_wifi_ssid"
psk="your_wifi_password"
}
Change the country to "GB" for the UK or to another country code for a different country, and enter your actual SSID and password. Upon boot up, Raspberry Pi OS will log you into that network. However, if you're on a public Wi-Fi network that requires you to click "Ok" on a splash page before you get Internet, this method won't work.
Prefer to use Ethernet? If you plug your Raspberry Pi directly to a wired network, you should be able to access it by its name (raspberrypi or raspberrypi.local) without changing any other files.
Direct USB Connection (Pi Zero / Zero W Only)
My favorite way to connect is via a direct USB connection, plugging my Pi Zero W directly into a port on my PC. This method is great, because it works no matter where you are (even if there's no available Wi-Fi), and it provides both power and a connection to your Pi, over a single cable. However, you can only do this on a Pi Zero or Zero W.

1. Open the file config.txt in the root directory of the micro SD card, and add the line dtoverlay=dwc2 to the very bottom of the file and save.

2. Open cmdline.txt and add the text modules-load=dwc2,g_ether after the word rootwait, and save the file. There are no linebreaks in this file.

3. Download and install Bonjour Print Services from apple.com (if you have Windows). It seems strange that you would need an Apple program to access a Pi from Windows, but this helps your PC see the Pi. Ignore the name; you're not using this for printing.

4. Connect the micro USB cable to the port labeled "USB" on the Pi Zero. This will not work if you connect to the port labeled "PWR." However, the "USB" port will also supply power to your Pi, so you don't need to connect a dedicated power wire.

Direct Ethernet Connection
If your PC has a spare Ethernet port or you have an Ethernet-to-USB dongle, you can use a network cable to go directly from your Pi to your computer. Just make sure that you have Bonjour installed on your PC and SSH enabled on the Pi (see above). Then, you can just connect the two devices over Ethernet.
If you want the Raspberry Pi to get its Internet connection from your PC over the Ethernet port, you need to do the following in Windows 10 or 11 (see how to get Windows 11 free or cheap)
1. Navigate to the Network Connections menu, which is part of the old-school Control Panel. You can get to this screen by going to Settings->Network & Internet->Wi-Fi and then clicking "Change Adapter Settings" on the right side of the screen. This works whether you are sharing an Internet connection that comes to your PC from Wi-Fi or from Ethernet.

2. Right-click on the adapter that's connected to the Internet, and select properties.

3. Enable "Allow other network users to connect" on the "Sharing" tab.

4. Select the Ethernet port that is connected to the Raspberry Pi from the "Home networking connection" menu, and click Ok.

Connecting to Your Pi via SSH
After you have the Pi connected to your network or directly to your PC, you'll need to establish an SSH connection.
1. Download and install Putty if you don't already have it. Putty is the leading SSH client for Windows.
2. Enter the hostname (by default raspberrypi or raspberrypi.local ) as the address you wish to connect to in Putty, and click Open. You usually need to add the .local if the Pi is directly connected to your PC via USB or Ethernet cable.

3. Click Ok if you get a security warning alert. It's not a problem.
4. Enter your username and password.

Now you're connected at the command prompt, but if you want to access the GUI, complete with a desktop and floating windows, you'll need to enable VNC.
Enabling and Connecting over VNC
1. Enter sudo raspi-config at the command prompt. You can do this when you're connected via SSH.

A configuration app opens.
2. Select Interface Options.

3. Select VNC.

4. Select Yes and Hit Enter.

5. Hit Enter to acknowledge the VNC server is enabled.

6. Select Finish and Hit Enter.

On your PC, you will need a VNC viewer. If you are using Raspberry Pi OS Bookworm (the latest version and the default for Pi 4 and Pi 5), we recommend that you use TigerVNC with the following steps. If you are on an earlier Raspberry Pi OS such as Bullseye or Buster, we recommend VNC Viewer, which sadly doesn't work with Bookworm.
1. Download, install and launch TigerVNC
2. Enter the host name of your VNC server (ex: raspberrypi.local) and click Connect.

3. Click Y es if prompted with a certificate warning.

4. Enter your username and password. Then click Ok.

Your Raspberry Pi desktop will then appear in a window on your main computer's desktop. You'll be able to control everything from there.

