How To Hibernate your Linux computer: Unlike sleep, it uses no battery
Extend your battery life by not sucking up juice during sleep.

Get Tom's Hardware's best news and in-depth reviews, straight to your inbox.
You are now subscribed
Your newsletter sign-up was successful
Hibernation is a power-saving measure where a laptop or desktop has the current state is saved to a hard drive (or more likely one of the best SSDs). Powering on the computer will trigger it to load the state and get us back to work. That would’ve been the case for Editor-in-Chief Avram Piltch, who has undertaken a week with Linux and hit an issue.
The Issue?
It seems that hibernation is not enabled by default. We can close the lid on our laptop, but it doesn’t power down, merely waiting for Avram to open the laptop lid for more work, or for its battery to drain down to zero after several hours or days of sleep mode. The latter is what happened to Avram and that is what triggered the creation of this how to.
The problem that we will solve is triggering hibernation on a laptop running Ubuntu. This will either be via the power menu, or by closing the laptop lid. To do that we need to first create a swap image, then test that we can hibernate the machine.
Before progressing any further, ensure that you have up-to-date backups. With projects like this there is always a slight risk of data loss, and you should take all the necessary precautions before attempting.
Creating a Swap Image and Testing Hibernation
The swap image is where the OS will store the current state of the system. It will dump the contents of RAM to the image, and then use that image to store the state until we power on the laptop. The size of the swap image will be the same as the amount of installed RAM.
So let's get started!
1. Open a terminal and check how much RAM is in your machine using the “free” command. We should already know this, but this is a “belt and braces” step to be certain. By default, free will show the RAM in Kilobytes, passing -m will show it in Megabytes. This will also show any swapfiles / images that are in use.
Get Tom's Hardware's best news and in-depth reviews, straight to your inbox.
free2. Run this command to show any active swap files or images.
swapon --show3. Delete the swap image / file by first turning off the swap, then deleting the file.
swapoff -a
rm /swap.img
rm swapfile
4. Run the “free” command and check that the swap now reports as zero.
free 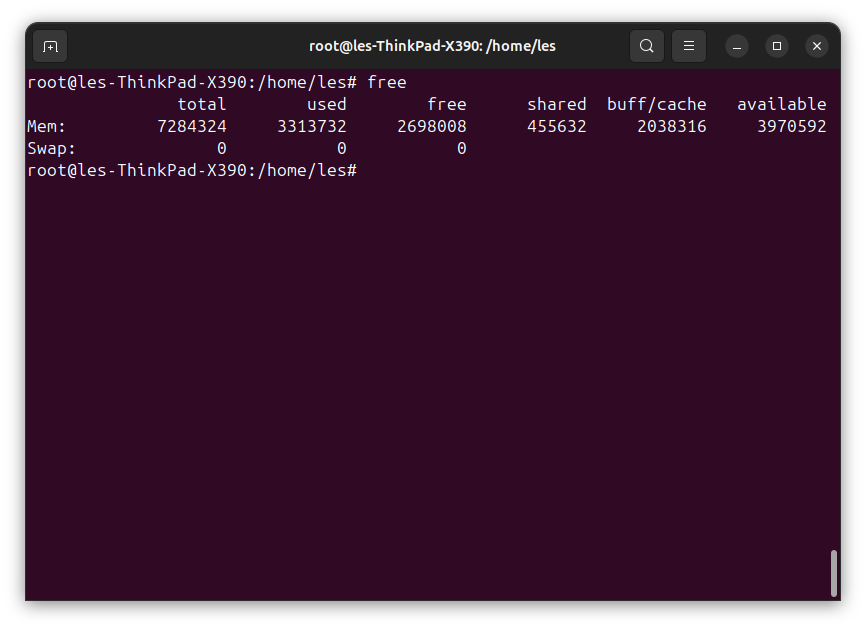
5. Elevate your user to use sudo powers. Take extra care with commands using this power.
sudo su6. Using dd, create a swap.img file in the root directory. Note that we are creating an 8GB swap image (count=8192), but this should be changed to match the RAM installed in your machine. So for 16GB it would be 16384, 32GB, 32768.
dd if=/dev/zero of=/swap.img count=8192 bs=1MiB7. Set the permissions of the swap.img file so that it can be read and written by the owner (6), but not by groups (0) or by others (0).
chmod 600 /swap.img8. Set up a Linux swap area using the freshly created swap.img file.
mkswap /swap.img9. Enable the swap.
swapon /swap.img10. Using free, check that the swap has been enabled.
free 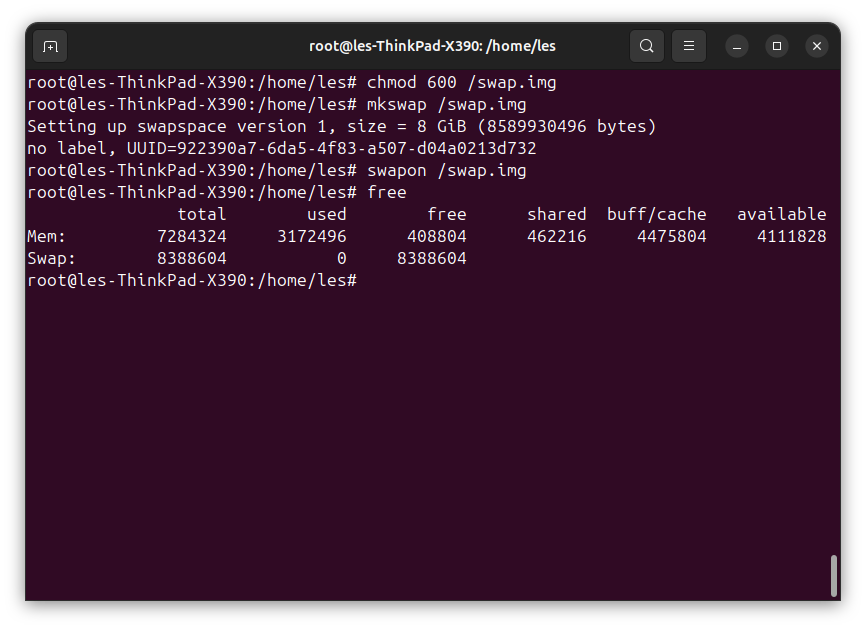
11. Take a look at the Linux boot command line instruction. This is the command used to start the boot process.
cat /proc/cmdline 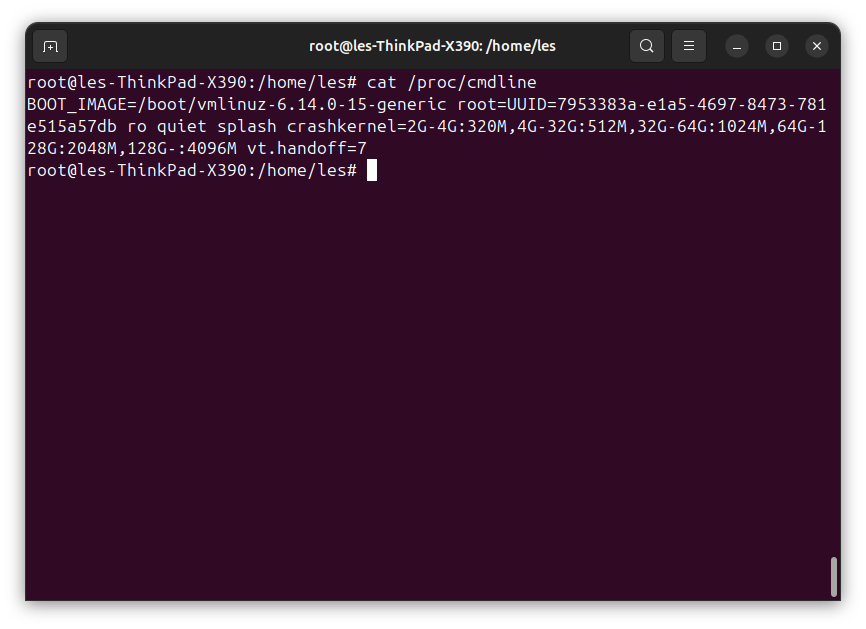
12. Open a text editor, and copy the UUID from the output of the cmdline, and paste it into a text file. Save the file as hibernation_details.txt. Don’t forget the UUID=//IMAGE//
13. In the terminal, locate the physical offset, the specific location in physical memory where a file is located on the partition. The number that we need is located at the top of the fourth column in the returned table.
filefrag -v /swap.img 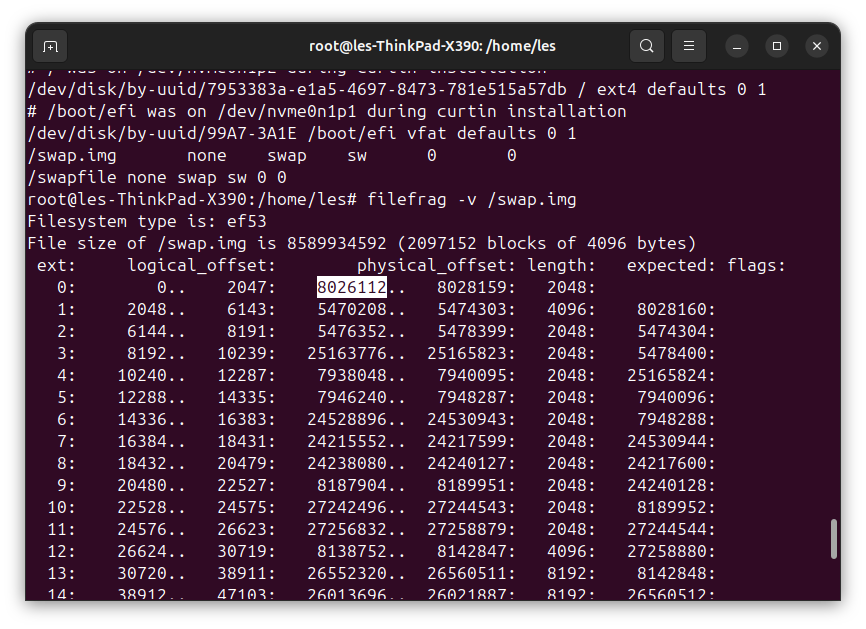
14. Copy the number to the text file and save.
15. Edit the grub file in Nano.
nano /etc/default/grub16. Navigate to the line which starts GRUB_CMDLINE_LINUX_DEFAULT=”quiet splash” and make a space after splash, but inside the “ “.
17. Enter the following text after splash and inside the “. Remember to change the UUID and offset to match your own values saved in the text file. It should look like the image for this step.
resume=UUID=YOUR UUID HERE resume_offset=YOUR OFFSET HERE” 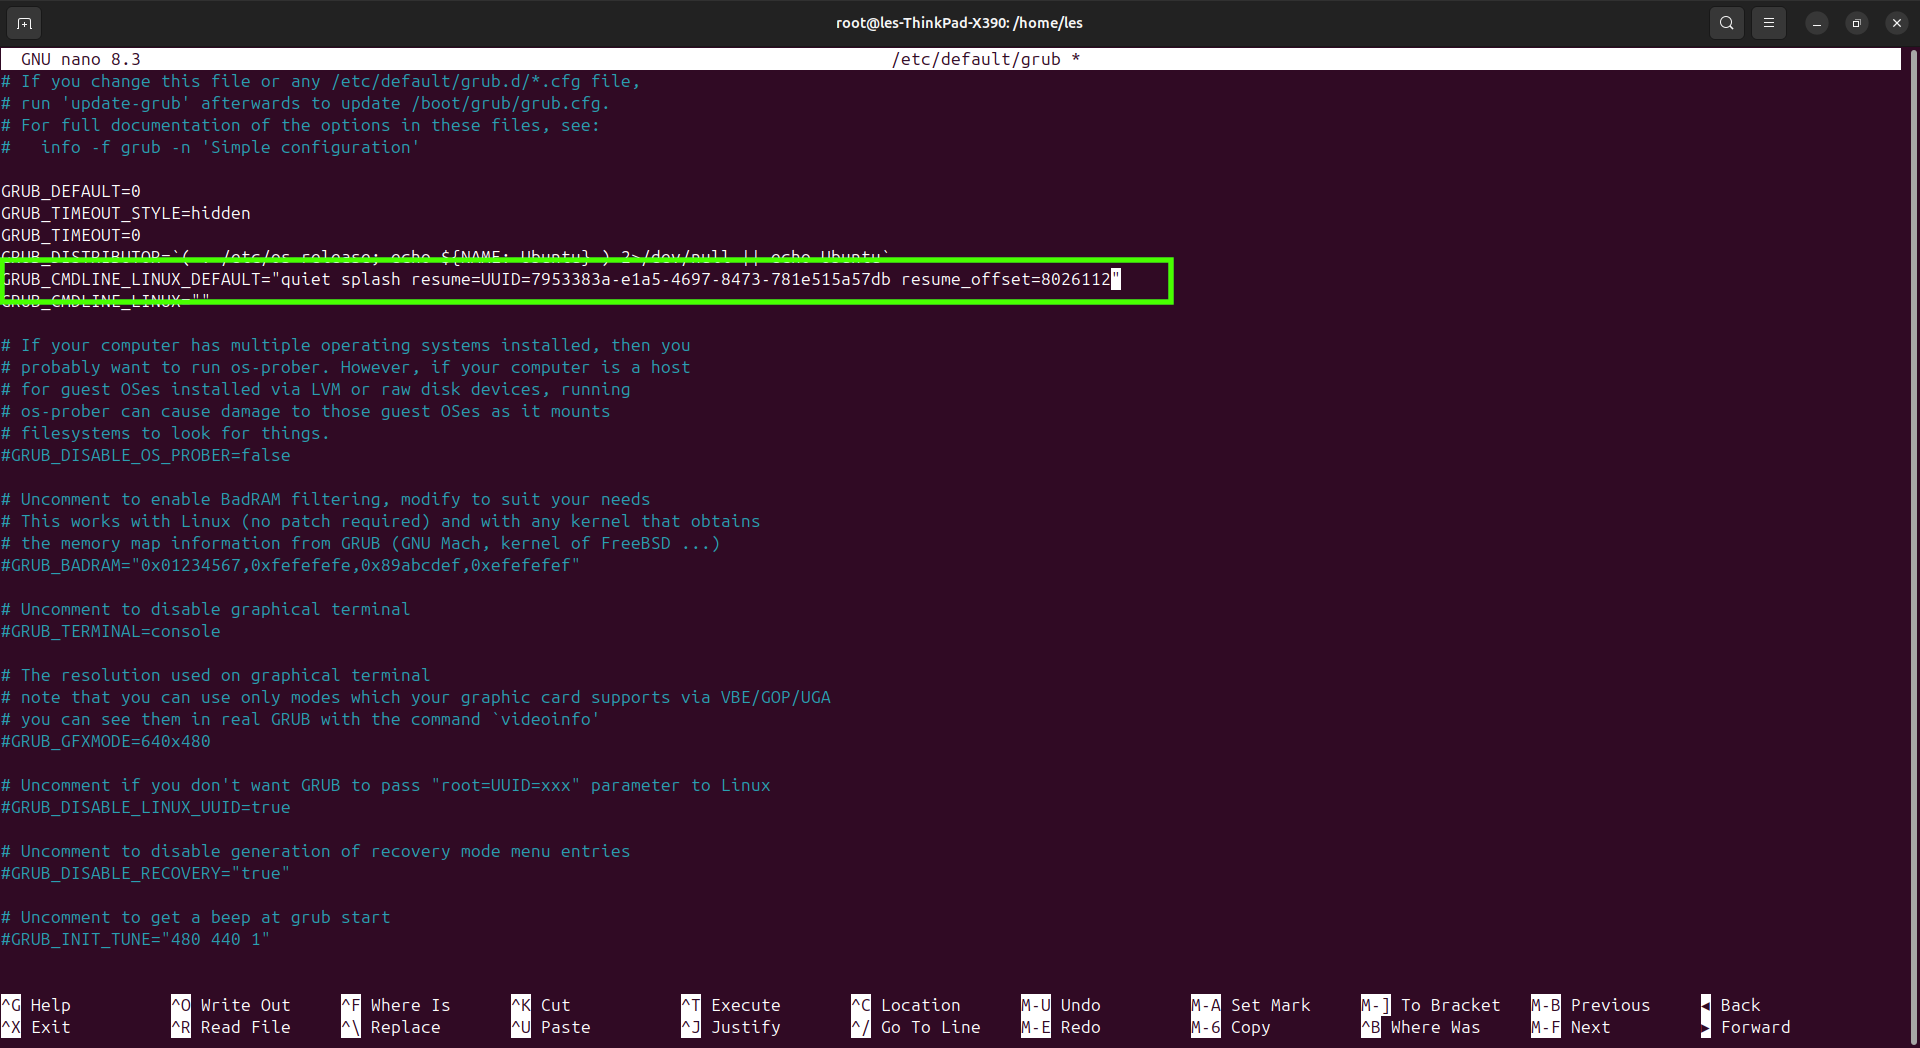
18. Close the grub file by pressing CTRL+X, then Y and Enter.
19. Update the grub file for the changes to take effect.
update-grub20. Reboot your computer.
reboot21. Log back into your computer and in a new terminal check that the cmdline changes have stuck.
cat /proc/cmdline22. In the terminal check that hibernation is now enabled on your system. Note, if it is, then the system will power down. Save any work before trying this.
sudo systemctl hibernate 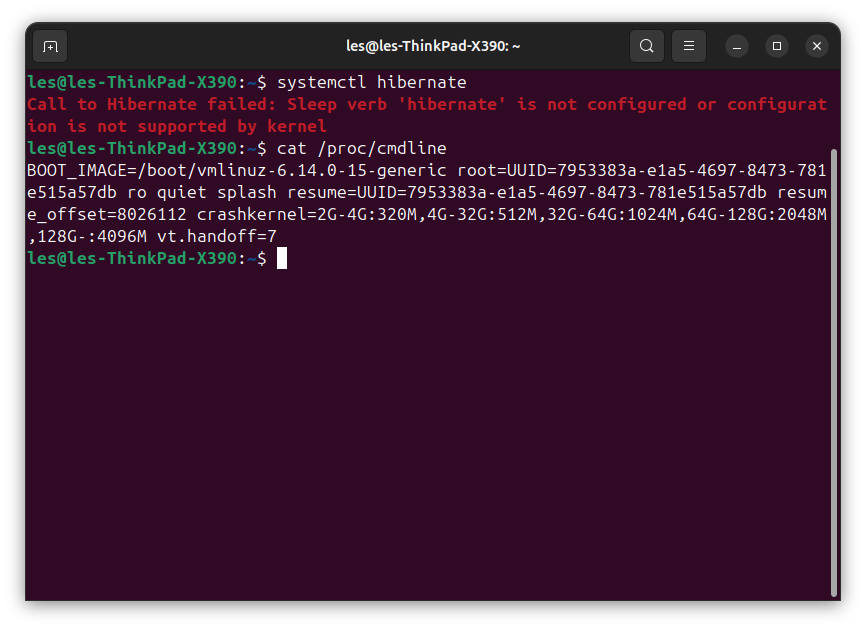
We can now hibernate the system from the terminal, but this isn’t very useful, so now we move on to triggering hibernation via the power menu and when the laptop lid is closed.
Calling Hibernation From the Menu
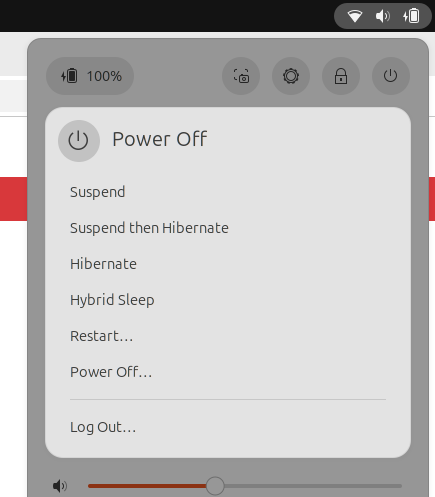
From the standard power menu (top right of the desktop) we have a quick means to power off, reboot or log out of the laptop, but there isn’t an option for hibernation. In this section we will add that feature and then test that it works.
1. Open a terminal and run the following command to create a new file which contains the hibernation rules.
sudo nano /etc/polkit-1/rules.d/10-enable-hibernate.rules2. Copy the following text and paste into nano by pressing SHIFT + CTRL + V.
polkit.addRule(function(action, subject) {
    if (action.id == "org.freedesktop.login1.hibernate" ||
        action.id == "org.freedesktop.login1.hibernate-multiple-sessions" ||
        action.id == "org.freedesktop.upower.hibernate" ||
        action.id == "org.freedesktop.login1.handle-hibernate-key" ||
        action.id == "org.freedesktop.login1.hibernate-ignore-inhibit")
    {
        return polkit.Result.YES;
    }
});
3. Save the file and exit by pressing CTRL +X , then Y and Enter.
4. For Ubuntu users (GNOME) you will need to install GNOME Shell, as we need to install a GNOME Shell extension. Open a terminal and enter the following command.
sudo apt update
sudo apt install chrome-gnome-shell
5. Open this page in a browser and install the GNOME Shell extension.

6. Reboot the laptop for the changes to take effect.
7. Log back in and open a few applications. We’ll use this to prove that the hibernation works as expected.
8. Go to the top right menu and click on the icons, then click on the power icon. From the list select Hibernate. The laptop will go into hibernation and the power button / LED may flicker to show that the system is powering down.

9. Press the power button to wake the laptop from hibernation.
10. Log back in and you will see that all of the applications are as we left them.
How to Suspend then Hibernate
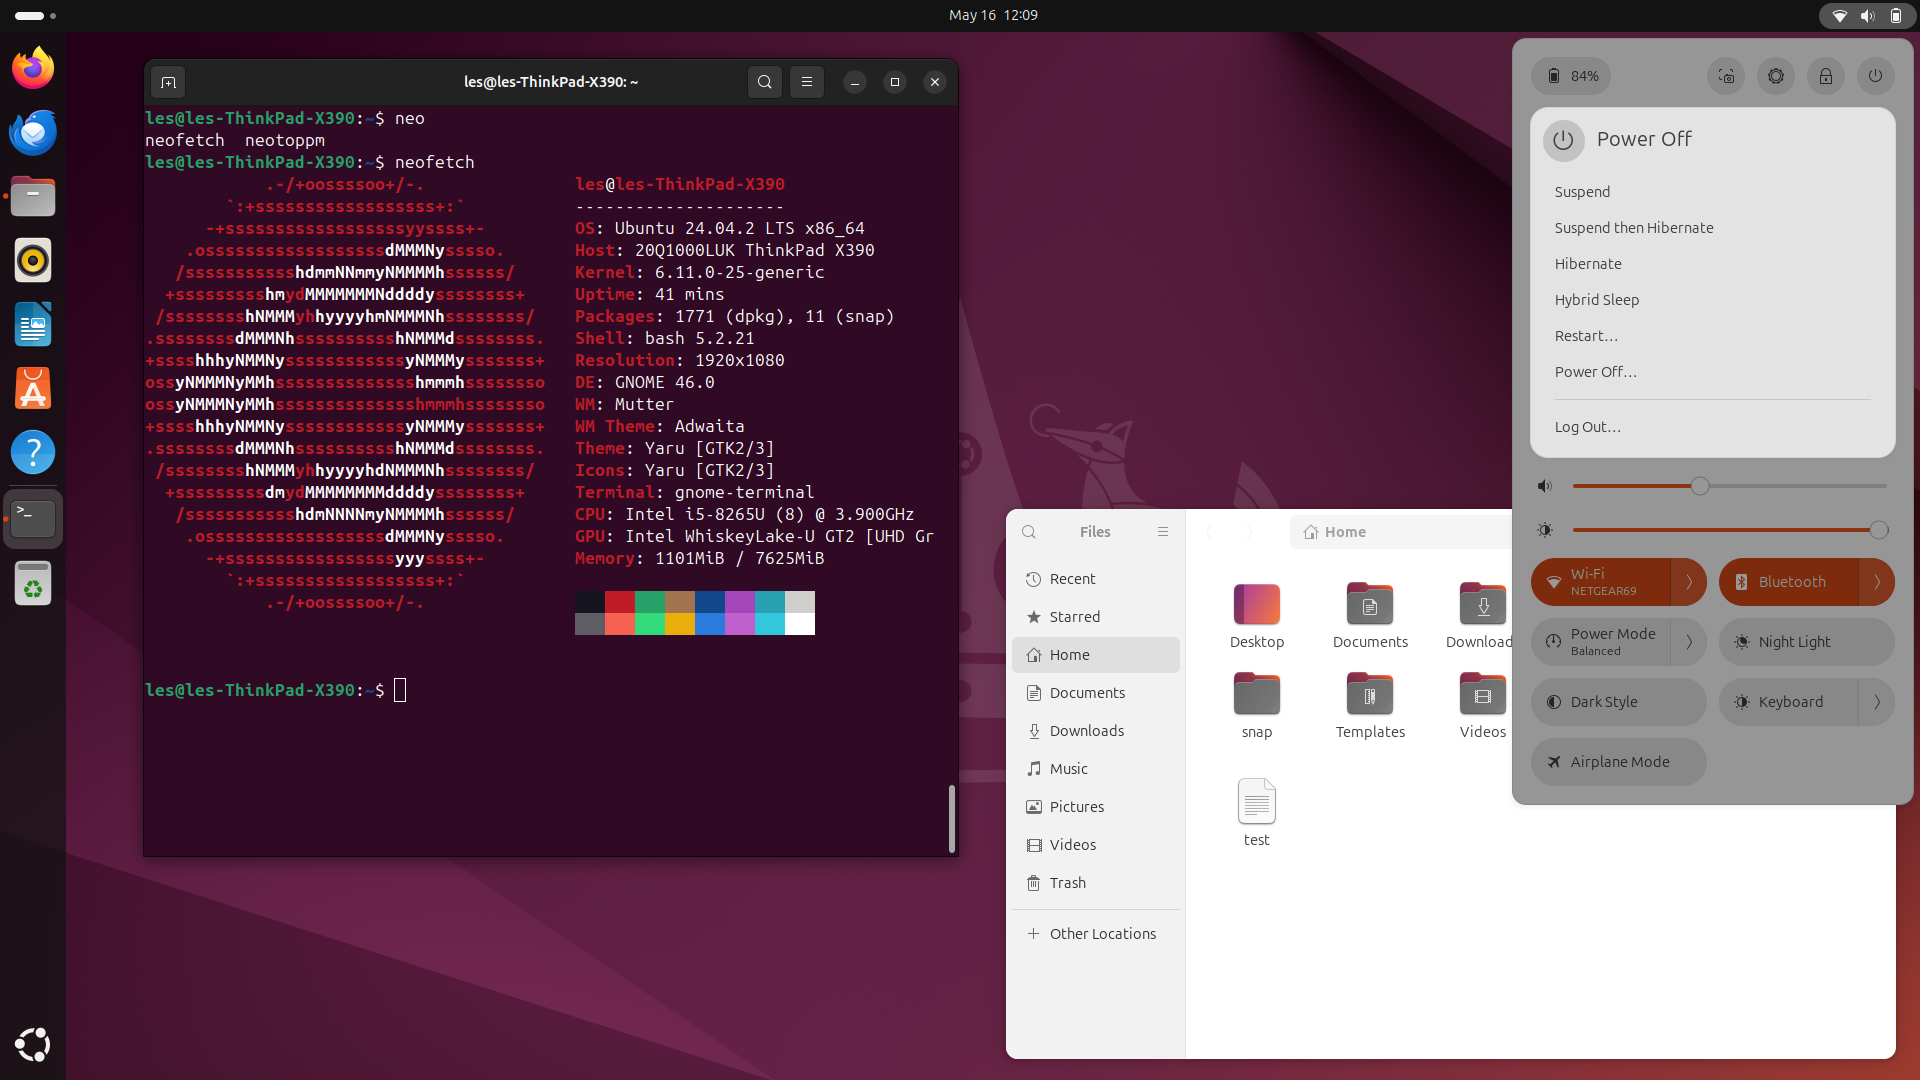
In the Power menu you’ve probably noticed options for:
Suspend: Puts the system into a low-power mode, saving the current state to RAM.
Suspend then Hibernate: This will put your system into a low-power mode, saving the current state to RAM for a pre-determined amount of time. Then the system will hibernate, saving the state to disk.
Hibernate: Saving the current state to disk.
Hybrid Sleep: Your computer will suspend to disk and to RAM at the same time. Providing you with a fast resume speed (suspend to RAM) but your session is protected should the power run out.
Restart: Reboot your computer.
Power Off: Powers off your computer.
Log Out: Logs the current user out and returns to the login screen.
The most interesting entry on this list is Suspend then Hibernate. As mentioned, this has the speed benefit of suspend to RAM, but after a while the system will hibernate and save the state to disk. Useful for when we are moving from the meeting room to office and when we pack up at the end of the day.
If you’re not interested in this, then skip to the next section. But if you are, here are the steps to make it work.
To use Suspend then Hibernate we need to edit a configuration file.
1. Open a terminal and using sudo, edit the configuration file.
sudo nano /etc/systemd/sleep.conf2. Scroll down the list and remove the # from AllowSuspendThenHibernate.
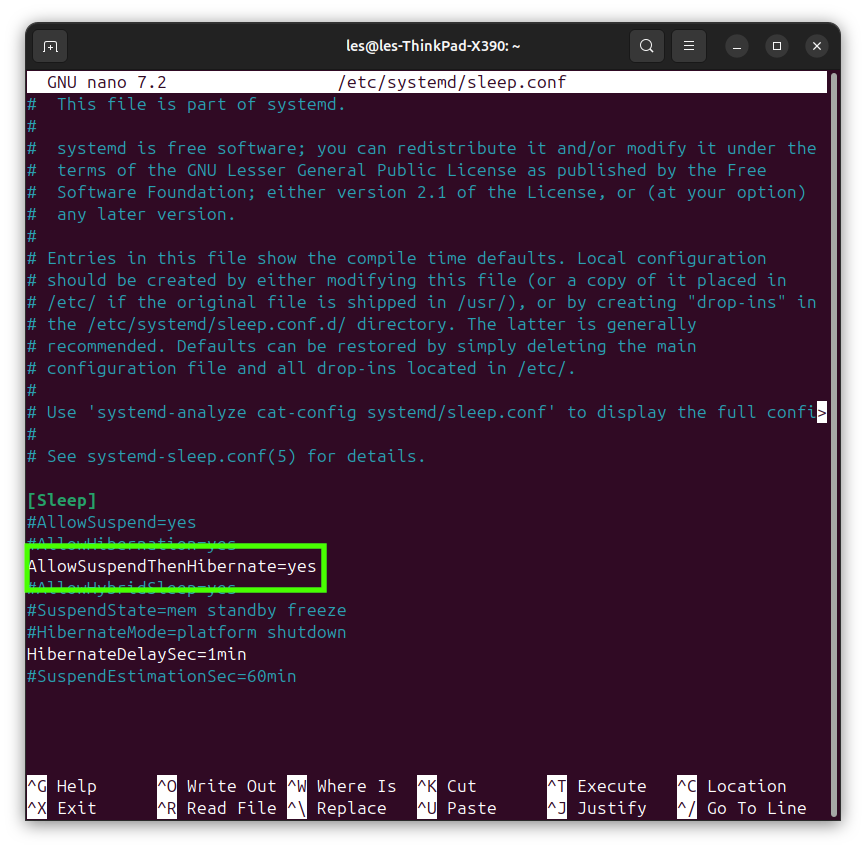
3. Scroll down the list and remove the # from HibernateDelaySec= and add a value after the =. For test purposes I chose 1min, but this should be changed to your requirements, 60min for example.
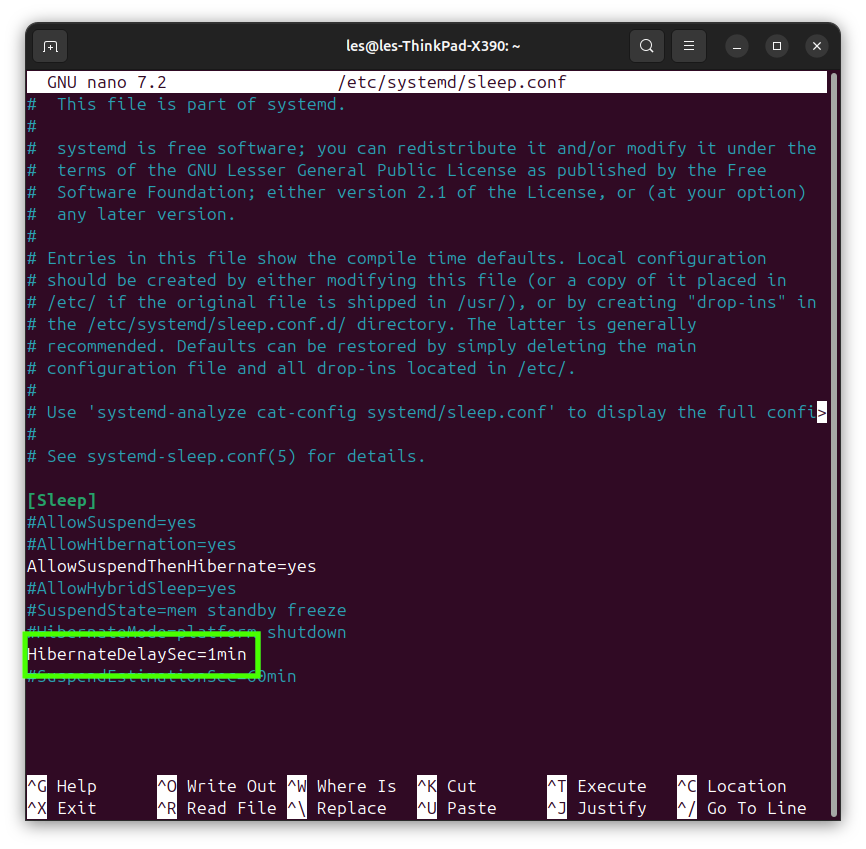
4. Save the file and exit by pressing CTRL +X , then Y and Enter.
5. Reboot the computer and log back in.
6. Open a few applications and then go to the power menu and select Suspend then Hibernate.
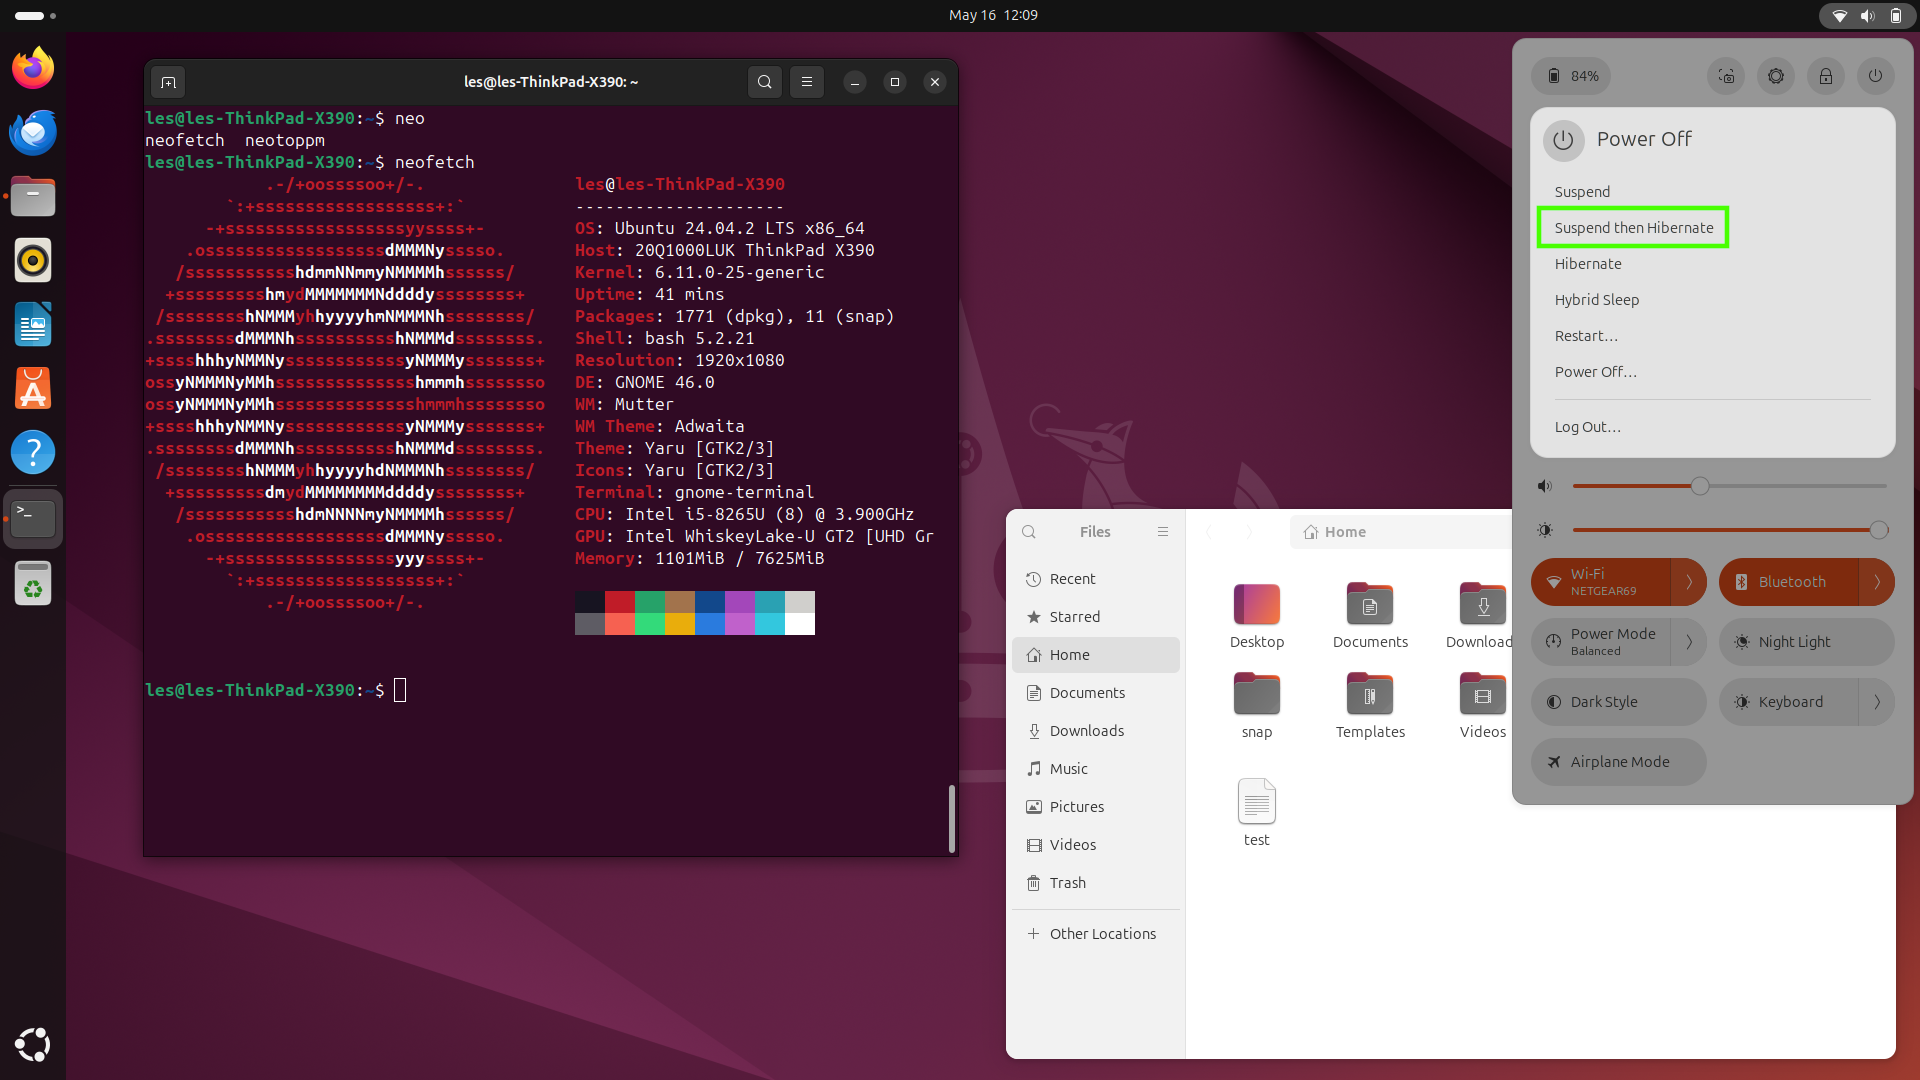
7. If you followed the one minute setting from step 3, then the computer will suspend to RAM, and then one minute later it will start the hibernation process. Remember to change this value to something relevant to your needs.
Hibernating When Closing the Laptop Lid
The most convenient way to trigger hibernation is to close the laptop lid. Think about all of the times we finish work, move to the next meeting. We want to shut the lid and move on. The dropdown menu option that we have previously configured is useful, but closing the laptop lid is almost a reflex action. So let's make it happen!
1. Open a terminal and use this command to create a new directory.
sudo mkdir -p /etc/systemd/logind.conf.d2. Create a configuration file using nano.
sudo nano /etc/systemd/logind.conf.d/lid-close-action.conf3. Copy and paste the text below into nano. Pasting into nano is SHIFT + CTRL + V.
[Login]
HandleLidSwitch=hibernate
HandleLidSwitchExternalPower=ignore
HandleLidSwitchDocked=ignore
4. Save the file and exit by pressing CTRL +X , then Y and Enter.
5. Reboot for the changes to be applied.
6. Log in, open a few applications and then close the lid. On my Lenovo X390 I can see the Thinkpad “i” LED flicker as the laptop saves the state. Then it goes off, showing that the laptop has powered down.
7. Give it a few seconds, and then open the laptop lid. The Ubuntu startup process should appear and in a few seconds login.
8. The desktop should be as you left it.

Les Pounder is an associate editor at Tom's Hardware. He is a creative technologist and for seven years has created projects to educate and inspire minds both young and old. He has worked with the Raspberry Pi Foundation to write and deliver their teacher training program "Picademy".
-
Juglugs When using LVM, the UUID doesn't show when using cat /proc/cmdline, but you can still use the path shown after "root=" root=/dev/mapper/ubuntu--vg-ubuntu--lvReply