G.Skill Ripjaws KM570 Keyboard Review
Why you can trust Tom's Hardware
Macros & Lighting
Macros
The lack of software may be, to put it colloquially, a bummer for some people, but there are several lighting and macro features you can employ on the KM570 using only the keys.
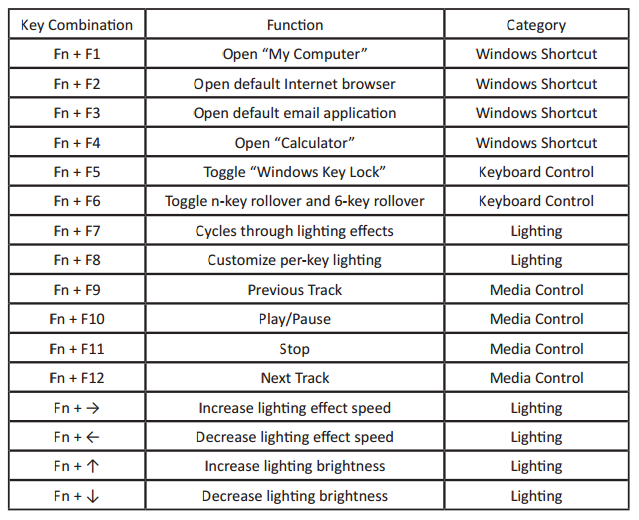
For starters, pressing the Fn key enables secondary functions on the F keys. These include:
Note especially that Fn+F6 toggles between NKRO and 6KRO. (NKRO is the default setting.)
The MR key is locked by default; to unlock it, press Fn+MR. You can program any key on the fly (except for MR and Fn). To start, unlock and press the MR key. Then, press the key you want to assign a macro, perform the action(s) you want to record, and press MR again.
For example, if you want to assign the tilde (`) to perform Alt+Tab, press the MR key (it will blink with it is unlocked and will be solid when it’s ready to record), then the tilde, the Alt+Tab, then MR. That’s it.
If you get yourself into trouble or become confused (haven’t we all been there in macro land?), you can return the KM570 to default settings by pressing both Ctrl keys and the left Alt key and holding them for three seconds. The four LEDs at the top right of the keyboard will flash; when they stop, the keyboard has been reset.
Lighting
Although the KM570 offers just red LEDs, there are some lighting effects you can employ. To enter Lighting Mode, press Fn+F8. (You’ll see the Windows lock LED flash.) Oddly, the default setting when you enter this mode is to have only the QWERASDF keys, spacebar, and 1-6 number keys lit. You can light up any other keys be pressing them individually, or turn off lighting for any lit key by pressing it to toggle the lighting off. To save any change, press Fn+F8 again.
Get Tom's Hardware's best news and in-depth reviews, straight to your inbox.
You use Fn+F7 to cycle through the preset lighting effects. G.Skill’s materials do not elaborate on which feature are on board, but we discovered ten. (For some reason, the product page mentions that there are only seven.) These are, in order:
- All lights off
- Wave (left to right)
- Pulse
- Cluster (small clusters of keys fade in or out)
- Raindrop
- Ripple (press a key and a wave emanates from that point)
- Reactive
- Ripple Part 2 (press a key and a horizontal line of lights emanate from that point)
- All lights on
- Per-key (default or user-configured, as discussed above)
Within each lighting effect, you can adjust the brightness and the speed at which the effects happen. To adjust, press Fn and one of the arrow keys. (The up/down arrows increase and decrease brightness, respectively, and the left/right arrow keys slow or speed the lighting effect, respectively.)
We counted six brightness levels, including lights off. The speed levels seem to depend upon the effect. For the Wave effect, for example, we counted 10 levels; for Pulse, there seemed to be fewer.
Any changes to brightness or speed are automatically saved to the keyboard’s internal memory.
MORE: Best Deals
MORE: How We Test Mechanical Keyboards
MORE: Mechanical Keyboard Switch Testing Explained
MORE: All Keyboard Content
Seth Colaner previously served as News Director at Tom's Hardware. He covered technology news, focusing on keyboards, virtual reality, and wearables.
-
somidiot This could be perfect for work. :-) Don't care about plane jane, if it's solidly built (or made with quality) I'm cool with that, especially since the price isn't stratospheric.Reply

