 Join Tom’s Hardware today


The Raspberry Pi 5 has just been released and it introduced us to a more powerful Pi, but it also changed a few things and most notably it was the GPIO.
We still have the same 40-pin GPIO but it works a little differently now as it is connected to the new RP1 southbridge chip. Why does this matter? Well it all boils down to how we write code that interacts with the GPIO. In the past, alot of projects favored RPi.GPIO. This was a community project by Ben Croston and it served multiple generations of Raspberry Pi well. With the Raspberry Pi 5, we are unable to use RPi.GPIO due to how the GPIO pins are memory mapped. This forces us to use an alternative, and libgpiod is the focus of this how to.
Libgpiod, specifically python3-gpiod is a pure Python module for interacting with the GPIO. It feels similar to RPI.GPIO in that we have to explicitly set the GPIO pins before we use them. We see gpiod as more of an intermediate module for Python and the GPIO. If you are new to this, use GPIO Zero which also works with the Raspberry Pi 5. GPIO Zero was created by Ben Nuttall and Dave Jones and greatly simplifies the GPIO.
We’re going to create two very simple projects using gpiod. The first is an output, an LED. The second is an input, a button which will trigger the LED to turn on and off.
For these projects you will need
- Raspberry Pi 5
- Breadboard
- 4 x male to female jumper wires
- 1x LED
- 100 Ohm resistor (Brown-Black-Brown-Gold)
- Push button
Project 1: Output, Blink an LED

The first goal when learning any language / framework is to create a “Hello World” program. In hardware, hacking and electronics this is a blinking LED.

The circuit is extremely simple. We have the long leg (anode) of an LED connected to GPIO 17 using a jumper wire. The short leg (cathode) is connected to GND via a resistor and another jumper wire. The resistor can be any value between 100 and 330 Ohms (Orange-Orange-Brown-Gold). Check out our resistor reference guide for more information.
1. Open Thonny and import two modules of code. The first module is gpiod, used to control and read the GPIO. Second is time, which is used to add a pause in the code.
import gpiod
import time
2. Create a variable called LED_PIN and store the value 17 inside of it. This variable contains the Broadcom pin reference for a GPIO pin on all models of Raspberry Pi. Broadcom pin references are the standard used by all Raspberry Pi documentation. It uses the breakout from the SoC to the GPIO. It may not look logical to us, but to the engineers creating the boards, the pins are broken out correctly.
LED_PIN = 173. Tell the code where to find the GPIO. Originally the Raspberry Pi had a single gpiomem device, which was mapped into memory and we could use it with Python modules such as RPi.GPIO. With the Raspberry Pi 5 and the RP1 chip we now have dynamically split devices, and our GPIO is at gpiomem4.
chip = gpiod.Chip('gpiochip4')4. Create a variable called led_line and store a reference to the LED GPIO pin. The gpiod module uses lines to refer to the GPIO pins.
led_line = chip.get_line(LED_PIN)5. Set the LED as an output. We want current to flow to the LED.
led_line.request(consumer="LED", type=gpiod.LINE_REQ_DIR_OUT)6. Wrap the main body of code in a try and while True loop.Try is part of an exception handler that will try to run our code, it can handle exceptions and run a section of code when we exit.
try:
   while True:
7. Turn the LED and then wait for one second. This will force the LED to remain on for one second.
       led_line.set_value(1)
       time.sleep(1)
8. Turn the LED off and then wait for one second. The sleep forces the LED to remain off for one second.
       led_line.set_value(0)
       time.sleep(1)  # Sleep for one second
9. Add a section of code to clean up the GPIO when the code exits. With GPIO Zero, we don’t have to do this, but gpiod (and the older RPi.GPIO) we have to clean up before we exit.
finally:
   led_line.release()
10. Save the code as blinky.py and click on Run to start. The LED on GPIO 17 will blink on and off every second. Press CTRL + C or click Stop to end.
Project 1: Complete Code Listing
import gpiod
import time
LED_PIN = 17
chip = gpiod.Chip('gpiochip4')
led_line = chip.get_line(LED_PIN)
led_line.request(consumer="LED", type=gpiod.LINE_REQ_DIR_OUT)
try:
   while True:
       led_line.set_value(1)
       time.sleep(1)
       led_line.set_value(0)
       time.sleep(1)
finally:
led_line.release()
Project 2: Input, React to User Input
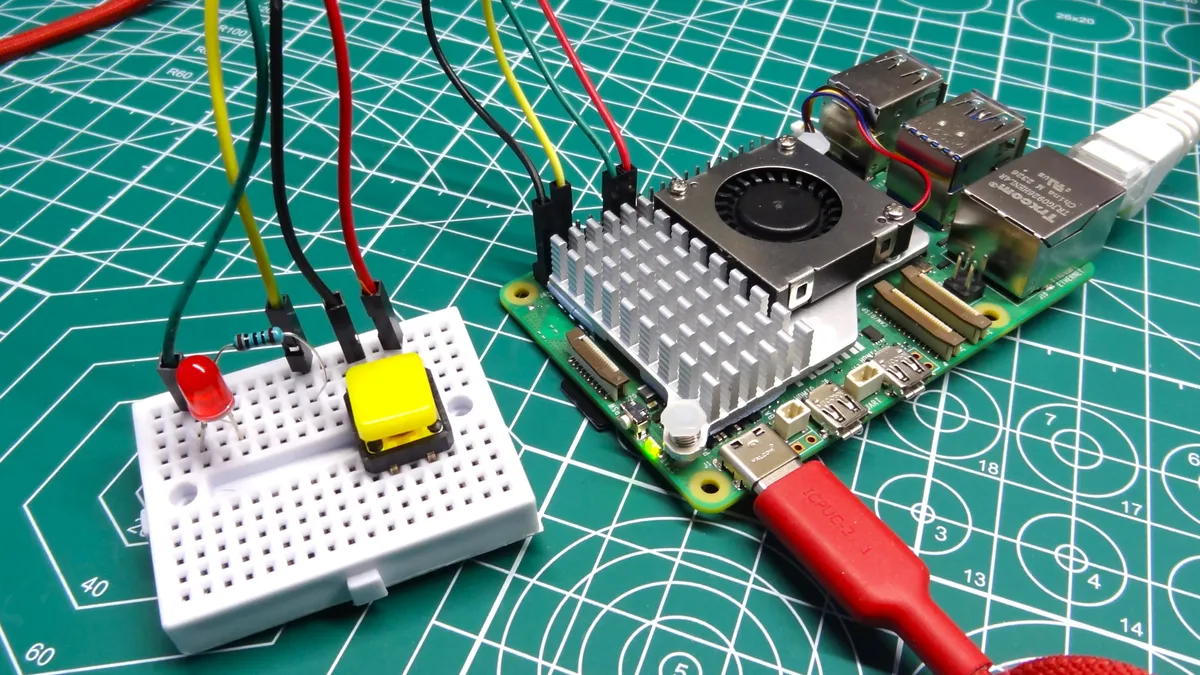
After “Hello World,” the next goal is to create an input. In this example we create a button, one side is connected to the Button GPIO pin, the other to 3V3. The Button GPIO pin default state is no power (0, False, Low) but when we press the button we connect the 3V3 pin to the Button GPIO pin and change its state to powered (1, True, High). Our code will look for this change of state and react accordingly. All we need is the button and two jumper wires.

1. Open Thonny and import two modules of code. The first module is gpiod, used to control and read the GPIO. Second is time, which is used to add a pause in the code.
import gpiod
import time
2. Create a variable called LED_PIN and store the value 17 inside of it. This variable contains the Broadcom pin reference for a GPIO pin on all models of Raspberry Pi. Broadcom pin references are the standard used by all Raspberry Pi documentation. It uses the breakout from the SoC to the GPIO. It may not look logical to us, but to the engineers creating the boards, the pins are broken out correctly.
LED_PIN = 173. Create a variable called BUTTON_PIN and store the value 27 inside of it. GPIO 27 is right next to GPIO 17.
BUTTON_PIN = 274. Tell the code where to find the GPIO. Originally the Raspberry Pi had a single gpiomem device, which was mapped into memory and we could use it with Python modules such as RPi.GPIO. With the Raspberry Pi 5 and the RP1 chip we now have dynamically split devices, and our GPIO is at gpiomem4.
chip = gpiod.Chip('gpiochip4')5. Create a variable called led_line and store a reference to the LED GPIO pin. The gpiod module uses lines to refer to the GPIO pins.
led_line = chip.get_line(LED_PIN)6. Create a variable called button_line and store a reference to the Button GPIO pin.
button_line = chip.get_line(BUTTON_PIN)7. Set the LED as an output. We want current to flow to the LED.
led_line.request(consumer="LED", type=gpiod.LINE_REQ_DIR_OUT)8. Set the Button as an input.
button_line.request(consumer="Button", type=gpiod.LINE_REQ_DIR_IN)9. Wrap the main body of code in a try and while True loop.Try is part of an exception handler that will try to run our code, it can handle exceptions and run a section of code when we exit.
try:
   while True:
10. Get the current status of the Button GPIO pin and store it in a variable called button_state.
button_state = button_line.get_value()11. Use an if conditional to check if the button has been pressed. If so, turn on the LED. The default state of the Button GPIO pin is to be low (0, False). But when we press the button we connect the 3V pin of the Raspberry Pi 5 to the Button GPIO pin. This pulls the Button pin high (1, True). This change of state is the trigger for our code.
       if button_state == 1:  # Button is pressed
           led_line.set_value(1)  # Turn the LED on
12. Use an else condition to turn the LED off when the button is not pressed.
       else:
           led_line.set_value(0)  # Turn the LED off
13. Add a section of code to clean up the GPIO when the code exits. With GPIO Zero we don’t have to do this, but gpiod (and the older RPi.GPIO) we have to clean up before we exit.
finally:
   led_line.release()
   button_line.release()
14. Save the code as button-press.py and click on Run to start. Press the button to turn the LED on and release to turn it off. Press CTRL + C or click Stop to end.
Project 2: Complete Code Listing
import gpiod
LED_PIN = 17
BUTTON_PIN = 27
chip = gpiod.Chip('gpiochip4')
led_line = chip.get_line(LED_PIN)
button_line = chip.get_line(BUTTON_PIN)
led_line.request(consumer="LED", type=gpiod.LINE_REQ_DIR_OUT)
button_line.request(consumer="Button", type=gpiod.LINE_REQ_DIR_IN)
try:
   while True:
       button_state = button_line.get_value()
       if button_state == 1:
           led_line.set_value(1)
       else:
           led_line.set_value(0)
finally:
   led_line.release()
button_line.release()