How To Install Python Modules on Raspberry Pi 5 and Earlier Models
If you’re using Raspberry Pi OS ‘Bookworm,’ the way of installing modules has changed.
Get Tom's Hardware's best news and in-depth reviews, straight to your inbox.
You are now subscribed
Your newsletter sign-up was successful
The Raspberry Pi 5 requires a new version of Raspberry Pi OS which is based on Debian 12 “Bookworm.” If you’re burning a new card for a Raspberry Pi 4, Pi 3, Pi Zero or other, you will probably also be using Bookworm. This new version of the OS changes how Python modules are installed, and at first it can be quite confusing. You will almost certainly need to install Python modules to program any HATs, including the best Raspberry Pi HATs, so this matters a lot.
Python virtual environments are a handy way to keep your Python projects contained and away from your operating system’s default Python installation. In the past we installed Python modules at an OS level and for many of us this worked well, but we always ran a risk of breaking our OS install. There is always a chance that a Python module installed via the Python package manager, pip, would conflict with one installed using the OS’ package manager (in this case APT).
Raspberry Pi OS is now based upon Debian 12 “Bookworm” and the Debian OS team has decided to follow the Python guideline PEP668 and so Raspberry Pi OS must also. If we were to try installing a module via pip we would receive an error message.
Installing a Python Module on Raspberry Pi OS Bookworm
To install a Python module at an OS level we need to check that it is available via the package manager and then we can install.
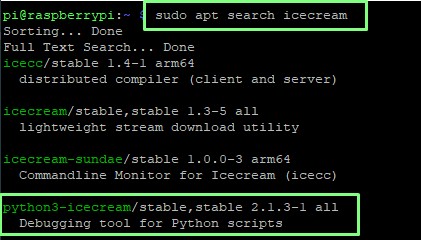
1. Open a terminal and search for the package to be installed. We searched for icecream, a Python debugging tool.
sudo apt search icecream2. Check the output for the Python package and use the name to install. Python packages will start with python3- and then the module name.
3. Open a Python session and import the module. Here we show that we are using the OS level Python, and we import the icecream module into the Python session. Press CTRL + D to exit.
Get Tom's Hardware's best news and in-depth reviews, straight to your inbox.
python3 -iCreating a Python Virtual Environment
If the Python modules that we need are not in the OS package manager, we will need to use the Python package manager, pip. To do this with Raspberry Pi OS and Debian 12, we need to create a virtual environment (venv) so that our Python modules do not interfere with the OS Python modules. Luckily Python has a simple process to create, activate and deactivate a virtual environment.
1. Open a terminal and navigate to where you want the directory to be.
2. Create the Python virtual environment. In our test, we called the virtual environment th-test. It will take a few seconds for Python to create the environment. In the screenshot below, we have shown that the th-test directory is created and populated with files to support the Python environment.
python -m venv th-test3. Change directory to the Python virtual environment.
cd th-test4. Activate the Python virtual environment. Any pip installs will use the Python installed inside the virtual environment. Your OS level Python install remains untouched. You will see the virtual environment’s name in parenthesis.
source bin/activate5. Check that you are using the Python inside of the virtual environment. If we are ever unsure, this command will tell us which Python install we are using. The virtual environment Python will be at /home/pi/th-test/bin/python. The OS level Python install is typically in /usr/bin/python.
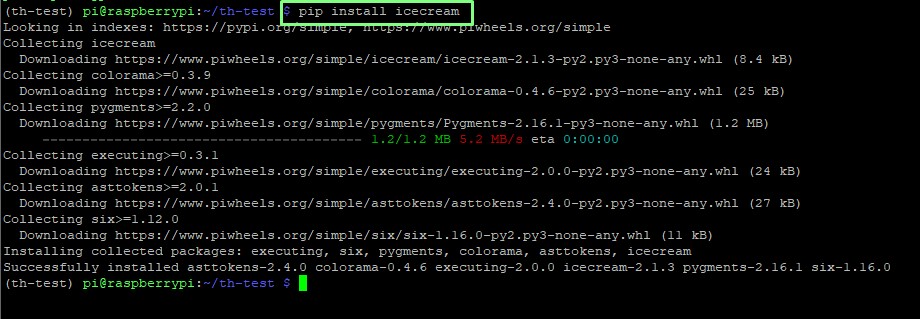
6. Install a Python module using pip. We chose icecream, a Python debugging tool that we have been tinkering with in our spare time.
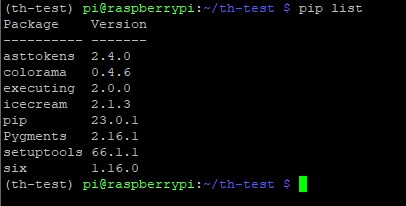
pip install icecream7. List all of the Python packages that are installed via pip. This handy audit tool will list all of the packages installed, automatically when the environment is created, and manually by the user.
pip list8. Deactivate the virtual environment and return to the home directory.This will close the environment and any Python code written will use the OS default Python install.
deactivate
cd ~
Creating a Python Virtual Environment With System Modules
Should we need to create a Python virtual environment with a copy of all the Python modules installed at the OS level we can pass an argument when creating the environment. This argument is handy when we want a bunch of modules ready to go, but this “kitchen-sink” approach is a little overkill for many projects.
It would be better to tailor the installed modules based on what you want to achieve. But there may be a time when this comes in handy.
1. Create a new virtual environment and pass the –system-site-packages argument. We called our virtual environment th-system.
python -m venv --system-site-packages th-system2. Change directory to the newly created directory and activate the virtual environment.
cd th-system
source bin/activate
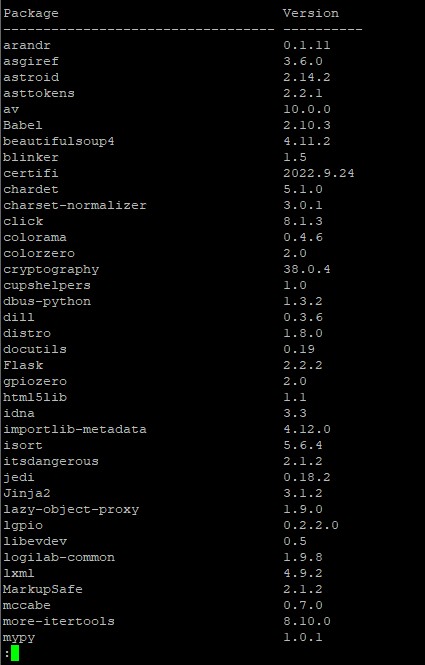
3. List the installed Python modules for the virtual environment. We use a Linux pipe to send the output to the less command so that we can control how fast the output scrolls on the screen. There are many Python modules installed on the OS. Press space to load the next page, and when done, press Q to exit.
pip list | less
Les Pounder is an associate editor at Tom's Hardware. He is a creative technologist and for seven years has created projects to educate and inspire minds both young and old. He has worked with the Raspberry Pi Foundation to write and deliver their teacher training program "Picademy".

