How to Boot Raspberry Pi 4 / 400 From a USB SSD or Flash Drive

Raspberry Pi 4 USB Booting
(Image credit: Tom's Hardware)

Editor's Note (7/24/2021): We have updated this tutorial to include how you can boot your Raspberry Pi 400 from USB.

By default, Raspberry Pi boots up and stores all of its programs on a microSD memory card, which has a maximum theoretical bandwidth of 50 MBps on the Raspberry Pi 4 and just 25 MBps on prior models. In real-life, even the best microSD cards for Raspberry Pi get no faster than about 38 MBps in sequential writes.  Using an external SSD as your main storage drive could speed things up significantly and, with a few commands and a simple firmware update, you can do just that.  

In our real-life tests of a Raspberry Pi 4 with SSD last year we got impressive performance with sequential transfer rates as high as 140 MB / 208 MBps for reading and writing. You can also use a standard USB flash drive, though we found the performance worse than a microSD card on many tasks.

How to Boot Raspberry Pi 4 / 400 from USB 

If you want to start with a fresh install of Raspberry Pi OS, simply follow the instructions in our tutorial on how to set up Raspberry Pi or how to do a Raspberry Pi headless install.

The latest versions of Raspberry Pi OS (as of April 29 2021 or later) have many of the necessary changes built-in. The Raspberry Pi Imager now has a much simpler means to prepare a Raspberry Pi 4 / 400 for USB boot. These instructions will set the Raspberry Pi 4 / 400 to look for a USB boot device, if none is found it will then boot from the micro SD card.

1. Download and install Raspberry Pi Imager from the Raspberry Pi website. 

2. Insert a spare micro SD card into your computer. Note that this card will be erased.

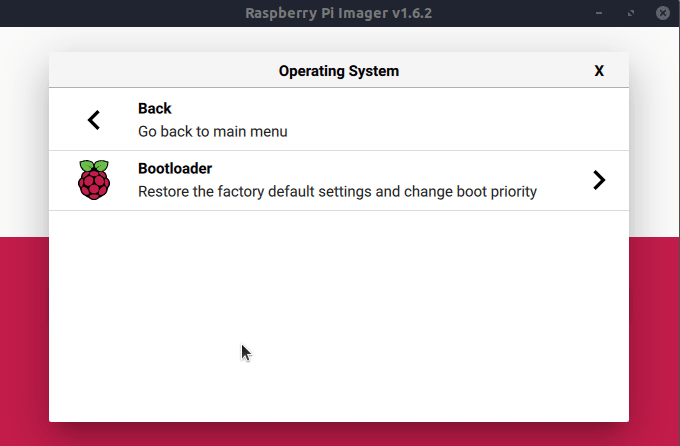
3. Launch Raspberry Pi Imager and under Operating System scroll down to Misc Utility Images and left click to open the next menu. 

(Image credit: Tom's Hardware)

4. Select Bootloader and then Select USB Boot. This will return us to the main menu. 

How to Boot Raspberry Pi 4 / 400 from USB

(Image credit: Tom's Hardware)

5. Under Storage click on the button and select the micro SD card. Double check that you have the right drive before proceeding. 

(Image credit: Tom's Hardware)

6. Click on Write to download and write a configuration image to the micro SD card. When done remove the card from your computer. 

(Image credit: Tom's Hardware)

7. Insert the micro SD card into your Raspberry Pi 4 / 400 and power on. The green activity light will blink a steady pattern once the update has been completed. If you have an HDMI monitor attached, the screen will go green once the update is complete. Allow 10 seconds or more for the update to complete, do not remove the micro SD card until the update is complete.

8. Power off the Raspberry Pi and remove the micro SD card. 

9. Into your Raspberry Pi, insert a micro SD card with Raspberry Pi OS and boot from micro SD to the desktop. This may take a little longer as the Raspberry Pi is looking for USB boot devices. If you do not have a Raspberry Pi OS micro SD card, follow our how to setup Raspberry Pi guide.

10. Launch SD Card Copier from the Accessories section of the start menu. Ensure that your SSD or Flash drive is connected to the Raspberry Pi using a USB 3 port.  

(Image credit: Tom's Hardware)

11. Select the Copy From Device (micro SD card), and the Copy To Device (the SSD). Double check that the correct drives are selected and click Start to copy the files across. The process should take around ten minutes to complete.  

(Image credit: Tom's Hardware)

12. Shut down the Raspberry Pi.

13. Remove the microSD card.

14. Power up the Raspberry Pi and it will boot from the USB SSD or Flash drive. 

(Image credit: Tom's Hardware)

Keep in mind that, if you are using an external drive that saps a lot of power from the bus, you may have issues (which you could probably solve by using a drive that has its own power source or by using a powered USB hub).  

For example, we had problems using a bus-powered, external Kingston HyperX SSD, which booted but -- perhaps because of how much power it was using -- none of our peripherals would work. A SATA SSD in a externally powered dock worked fine as did a USB Flash drive.

Avram Piltch
Avram Piltch is Tom's Hardware's editor-in-chief. When he's not playing with the latest gadgets at work or putting on VR helmets at trade shows, you'll find him rooting his phone, taking apart his PC or coding plugins. With his technical knowledge and passion for testing, Avram developed many real-world benchmarks, including our laptop battery test.
  • RobU
    Any idea if this will enable the Raspberry Pi 4 to be a viable Plex Media Server?
    Reply
  • CS_J
    These instructions resulted in an error and also caused my pi to stop booting from the SD card.

    When restarting after removing the SD card, I got an error on the bootloader screen saying:

    Invalid ELF header: 'start_x.elf'
    Firmware not found

    And it would keep repeating and showing this error.

    Then I tried reinserting my SD card and now it is showing the same error, even without the USB drive plugged in.

    What has happened? I can't boot using my original SD card.
    Reply
  • mmarks9156
    CS_J said:
    These instructions resulted in an error and also caused my pi to stop booting from the SD card.

    When restarting after removing the SD card, I got an error on the bootloader screen saying:

    Invalid ELF header: 'start_x.elf'
    Firmware not found

    And it would keep repeating and showing this error.

    Then I tried reinserting my SD card and now it is showing the same error, even without the USB drive plugged in.

    What has happened? I can't boot using my original SD card.
    I tried this as well and did not have the issue with my sdcard booting on RPI4 but the USB boot did not work and got same error on bootup.
    Reply
  • CS_J
    mmarks9156 said:
    I tried this as well and did not have the issue with my sdcard booting on RPI4 but the USB boot did not work and got same error on bootup.
    Yeah, I'm not sure why my sd card started getting the same error... Maybe I accidentally copied the bad start_x.elf to it or something. Anyway, I think there might be an issue with the current start_x.elf from the Github. Will wait for the OP's response.
    Reply
  • mmarks9156
    CS_J said:
    Yeah, I'm not sure why my sd card started getting the same error... Maybe I accidentally copied the bad start_x.elf to it or something. Anyway, I think there might be an issue with the current start_x.elf from the Github. Will wait for the OP's response.
    I'll do the same.
    Reply
  • FrenchPi
    Hi, that sounds fantastic ! May I ask where is now the previous way of doing described ? (i.e. sudo fdisk -l; sudo mkfs.ext4 /dev/sda1 etc) ?

    BTW, is there a way to upgrade from previous way to this new way so to maintain what was already installed on the SSD, and not to have to re-install it all ?
    Reply
  • Daniel Glasser
    @FrenchPi : I am not an authority on this, but my answer is a qualified "yes". I have successfully done the firmware upgrade without messing up my USB external drive contents or configuration.
    In my case, I had partitioned the external drive (a 1TB Seagate "Backup Plus Portable" USB 3.0) as follows:
    /dev/sda1 vfat (1GiB, Primary) "USBBOOT"
    /dev/sda2 - (938.5 GiB, Extended)
    /dev/sda5 ext4 (128.0 GiB) "/"
    /dev/sda6 swap (8.0 GiB) "swap"
    /dev/sda7 ext4 (223.0 GiB) "/srv"
    /dev/sda8 ext4 (502.0 GiB) "future" (not mounted)Note that this does not follow the SD card partitioning (at least for the "Noobs" image) which appears to have "Recovery" as the primary partition, and in the extended partition, a partitions for "/boot", a "Settings" partition that doesn't seem to get mounted, and the root partition.

    I have been booting off of an SD card with my root file system on the external drive for months now with no problems. It's much faster, and more spacious, than the SD card. "/boot" was still mounted from the SD card in "/etc/fstab", but everything else was mounted from the external hard drive.

    The following are the steps I then followed:
    I followed the directions for from the article, doing the "apt" update and full-upgrade, editing the file "/etc/defaults/rpi-eeprom-update" and performing the "rpi-eeprom-update" followed by a reboot.
    After the update, I checked the firmware with "vcgencmd bootloader_version", but it reported the old firmware.
    I disconnected the external HD and booted off the 32 gig SD card I had originally installed Raspbian on and ran the same steps again.
    After reboot, the "vcgencmd" reported the expected May 15th date.
    I connected the USB drive; all of the partitions of note on the HD auto-mounted under "/media/daniel" (substitute your own username for "daniel"). I copied all of the files from the current "/boot" to the HD's boot partition (/dev/sda1), then edited the "etc/fstab" on /dev/sda5 to mount /dev/sda1 for "/boot" instead of the SD card partition.
    I shut down the Pi, turned off the power, and removed the SD card. Turned the power back on.
    It tried to boot. The monitor showed a text console telling me that it could not find "recovery.elf" and that "start.elf" is not compatible, and I should download the latest from a URL. I turned it off and put my usual boot SD (an 8 gig with a modified "cmdline.txt" file to put root on /dev/sda5) into the board, powered the PI back up and it booted fine.
    I went to the Raspberry Pi "downloads" link and read the release notes for the beta bootloader. It said the ".elf" files would be made available soon. I didn't see any new ".elf" files in the repository.
    I checked around, and found another article that included using the command "rpi-update" after the "apt full-upgrade", with a reboot after the "rpi-upgrade".
    I ran "sudo rpi-update" and confirmed that I wanted to do it. It took a little while, but it completed without errors.
    Note: Because I had edited the "/etc/fstab" on /dev/sda5, when I ran "rpi-upgrade", it put the new files in the vfat filesystem on /dev/sda1, not on the SD card from which the Pi actually booted. This installed the correct "start.elf" on the hard drive.I rebooted with the SD card, then ran the "rpi-eeprom-update" again, just to be safe.
    I rebooted once more with the SD card and verified that "vcgencmd bootloader_version" reported the correct boot firmware.
    I shut down, removed the SD card, and turned the Pi back on.
    The scary messages about not finding "recovery.elf" still appeared, but after a few seconds, the screen blanked, then went through what's pretty much the normal boot (screen has a flashing text cursor in the upper right hand corner, then the cursor goes away, and after a while, the login screen is displayed.)I now have a Pi 4 that boots from an external USB 3.0 hard drive without an SD.

    I hope this rather disorganized and overly long description helps someone.
    Reply
  • deesider
    RobU said:
    Any idea if this will enable the Raspberry Pi 4 to be a viable Plex Media Server?
    It already was before. This latest update doesn't make a huge difference, it just allows for the USB drive to completely replace the SD card. Previously the SD card was still required for the boot files and the root file system could be located on the USB drive.

    The access speed for files from the drive will certainly be fast enough. The limiting factor for use as a Plex server is whether any transcoding needs to take place on the Pi. If it does it will struggle.
    Reply
  • Bears695
    As noted in a reply above, if you flash the Noobs image to your USB or SSD drive your Pi will not boot. You need to use a plain version of Raspbian. The Noobs image has a recovery partition before the boot partition that prevents booting. The Pi imager has plain images
    Reply
  • cwoodhouse
    CS_J said:
    These instructions resulted in an error and also caused my pi to stop booting from the SD card.
    When restarting after removing the SD card, I got an error on the bootloader screen saying:
    Invalid ELF header: 'start_x.elf' Firmware not found

    I got same error.

    Used the method in this link: https://www.raspberrypi.org/documentation/hardware/raspberrypi/bcm2711_bootloader_config.md
    Basically, instead of downloading from Github, use rpi-update to update the boot sector on the SD, then copy *.dat and *.elf from the SD card to the \boot directory on the SSD (I did that in the Windows environment).
    Reply