
Tom's Hardware Verdict
A great piece of hardware, but we can’t fully test it just yet. Once the supporting software is ready, we will revisit and update this review.
Pros
- +
It just works
- +
Uses the Raspberry Pi M.2 HAT+
Cons
- -
Software is not there, yet
Why you can trust Tom's Hardware Our expert reviewers spend hours testing and comparing products and services so you can choose the best for you. Find out more about how we test.
AI (Artificial Intelligence) is everywhere these days and even the humble Raspberry Pi 5 (and previous generations) are not immune to AI. Google’s Coral TPU (Tensor Processing Unit) has been around for some time now, but now there’s a $70 Raspberry Pi AI Kit, which uses an additional processor to bring more AI processing power to everyone’s favorite single-board computer.
Based around the Hailo-8L entry level NPU (Neural Processing Unit) AI accelerator and the Raspberry Pi M.2 HAT+, this kit provides all the hardware that a Raspberry Pi 5 would need to beef up its AI powers.
We got our hands on an early unit, on which this review is based. But before we begin, let's caveat the review. At the time of writing the software was behind the rather excellent hardware and while we were able to run the preview demos, we were unable to write any code of our own. As such this means that we will revisit this kit once the software is ready and this may mean revising the score.
With that in mind, let's start testing!
Raspberry Pi AI Kit Specifications

| M.2 Interface | Raspberry Pi M.2 HAT+ |
| AI Accelerator | Hailo-8L “Entry-Level AI Accelerator in a 2242 package |
| TOPS (Tera-Operations Per Second) | 13 |
| Supported AI Frameworks | TensorFlow, TensorFlow Lite, Keras, PyTorch & ONNX |
| Host Architecture Support | x86 and Arm |
Installation and Setup
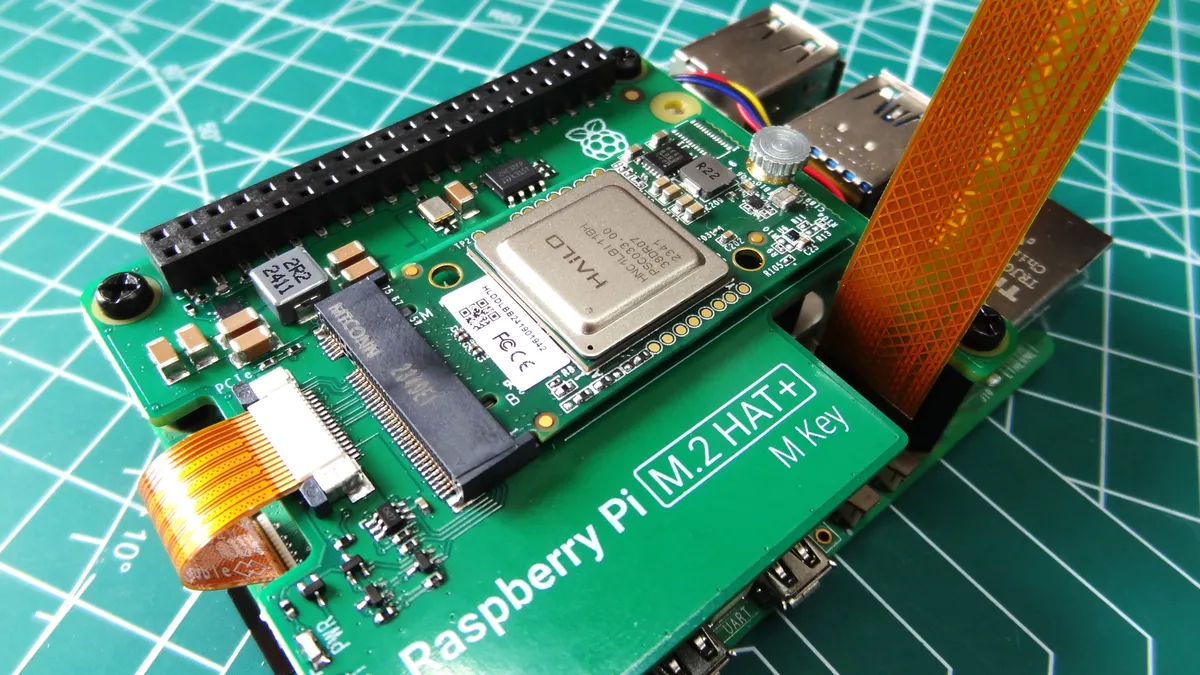
Using the Raspberry Pi M.2 HAT+ board is a smart move. It already exists, and it has the connection and bandwidth for the Hailo-8L board. It also means that it comes with plastic spacers, and a GPIO passthrough, which were a bone of contention for us in our previous review. Installation of the Hailo-8L is as easy as installing an M.2 NVMe SSD, but it does introduce one issue. Unless you have a board with dual M.2 connectors, you can only run the AI or an NVMe SSD. Not both. Fear not, we shall be testing a dual M.2 board later, and spoilers, it works if you put the effort in!

Our review kit came with the unit, Raspberry Pi Camera Module 3 and a micro SD card which had the latest Raspberry Pi OS release written to it. It also contained a directory of models and applications based around the rpicam application suite. For those who don’t know, the rpicam suite replaced the raspicam and raspitill terminal commands that are used to interact with the camera.
Our assumption is that a Raspberry Pi OS update will enable these features. At the time of writing there are no PiCamera v2 based means to use the Hailo-8L and we confirmed this with Raspberry Pi. We spent the best part of two days working in Python virtualenv’s to figure out a means to do it, but alas we drew a blank.
Could we run the models without the Hailo-8L card? We asked Raspberry Pi CEO Eben Upton and he confirmed that there is “currently no way to run these models without the board.” Upton did reveal that “integrated support for running unaccelerated TensorFlow models as a post-process is in the rpicam roadmap”, so in the future we should be able to run our own models.
Using Raspberry Pi AI Kit


Using the rpicam suite of applications we were able to try out a series of models that centered around the Raspberry Pi Camera Module 3. The rpicam-hello application is used as a demo. Passing it the correct series of switches (arguments) enabled us to try out the models without writing any data to the drive.
We tested four object detection demos that identify an object and highlight using a bounding box. A label appears in the bounding box with what the AI thinks it can see, and percentage to indicate its confidence. MobileNetSSD, Yolov5, Yolov8 and YoloX were the models and all apart from MobileNetSSD ran with an input resolution of 640 x 640, MobileNetSSD ran at 300 x 300. MobileNetSSD was the overall fastest, given that it was running at half the resolution of the others. While we can’t quantify the exact speeds, we can give a “feeling” for their performance. MobileNetSSD did feel the fastest, and the reduction in input resolution was not translated into the preview window. In fact all of the object detection models ran remarkably well, but without a frame of reference, CPU performance, we cannot provide any accurate data.
We tested out the image segmentation demo which uses Yolov5 with an input resolution of 640 x 640 at 20 frames per second. This model detects objects and highlights them using a colored mask. It accurately detected a person in the shot, and even our 3D printed banana.
The final demo was pose estimation, and this will estimate up to 17 points of articulation, including face tracking it seems. We fired up the demo and used it to track our pose. Hands, arms, shoulders and head were tracked from our sat position. We could see a wireframe to represent our posture and from that we could control it like a puppet.
The demos worked, but what now? As it stands, at the time of writing there isn’t a clear cut way to use the data. Ordinarily we would use the data with an application to react. For example a Python application which triggers actions based on identifying objects, or triggering motors using poses.
As there is no Picamera2 support at this time, we can only really use the rpicam suite of applications. There is a “-v 2” argument that we can pass to these commands which will write the output to the standard output. With a little Linux-Fu we can then store this information in a file, to be parsed into another application. We could also run the command using the os.system or subprocess Python modules and interact directly. The choice lies with the user.
We’ll revisit this part of the review once the software has been released and is mature enough.
From reading a press release from Hailo, we understand that there will be an online community with tutorials and other resources. We shall be referring to those once they become available.
Earlier, we mentioned that the Raspberry Pi M.2 HAT+ board has only one M.2 connector. If you’ve made the jump to fast NVMe storage, then you don’t really want to go back to micro SD card storage. Even the best Micro SD cards for the Raspberry Pi are not as fast as NVMe, and while a fast drive won’t help your AI projects in general, it helps.

We tested Pimoroni’s NVMe Base Duo with the Hailo-8L and a Phison based 2230 NVMe drive that was leftover from a recent Steam Deck upgrade. The NVMe drive was placed in slot A, Hailo in slot B. After updating the Raspberry Pi 5 firmware to May 17 2024 via micro SD we booted from NVMe! To our delight, it just worked. Raspberry Pi OS booted in seconds! The latest firmware enables boards with dual M.2 connectors the ability to boot from the first drive, leaving the second M.2 slot free for additional storage, or in our case using the Hailo-8L. PCIe Gen 3 speeds are also enabled by default, a nice bonus!
Before we attempted one of the demos, we first checked that Raspberry Pi OS could see the board. Using dmesg and piping the output to grep, we sliced out all references to “hailo” and we could see the device was listed. Buoyed by that news we fired up one of the demos and saw ourselves appear on the screen. Thankfully we were classed as a “person” by AI, and our 3D printed banana for scale (printed on the Elegoo Neptune 3 Pro) was correctly identified.
Who is the Raspberry Pi AI Kit for?
Obviously those who want to integrate AI into their projects. We can see this being used in citizen science projects, classrooms and for robotics projects. At the recent Pi Wars event, AI was on the cusp of being usable for many robots. The Dutch Rescue Team used OpenCV to help their robot identify and follow a line across a treacherous course. For science projects it could be used with a model that identifies birds, insects or animals that visit your garden.
For those that want to embed AI in their projects / products using the Raspberry Pi, this combination could be an interesting avenue to explore.
Bottom Line

We enjoyed our time with the Raspberry Pi AI kit, but it wasn’t plain sailing. At the time of writing, the software is not to the same level as the hardware. The hardware “just works” largely down to running Linux kernel 6.6.31. Raspberry Pi OS understands that the board is there, and it has the firmware to use it. Once the software, in the form of Picamera v2 and rpicam catches up, we’ll revisit this board and put it through its paces. For now, this is a board for those that want to dabble in AI or for those that know their stuff and want to delve deep. It's not a board for everyone, but it could be, one day.
