While wearing a face mask, do people have trouble understanding what you are saying? Now you can make a fashion statement AND express yourself in text while still wearing your face mask. This tutorial brings new meaning to the expression, “It’s written all over your face.”
Johns Hopkins Medicine, WHO, and the CDC recommend that we wear face masks in public places where we may encounter other people to help slow the spread of COVID-19. Face masks should completely cover one’s nose and mouth.
For most of us, face coverings also hinder our ability to communicate verbally. I’ve witnessed many individuals lower their face mask when they speak, and unfortunately, this undermines the use of their face mask. How can we express ourselves clearly while keeping our nose and mouth covered?
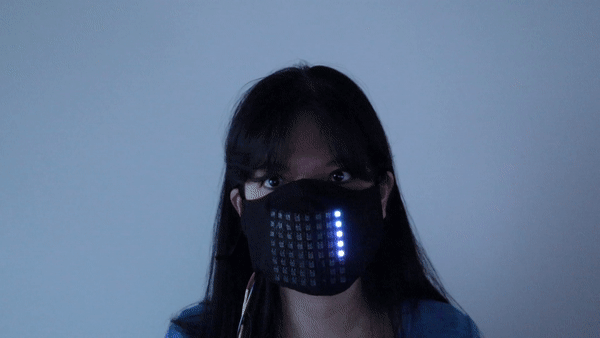
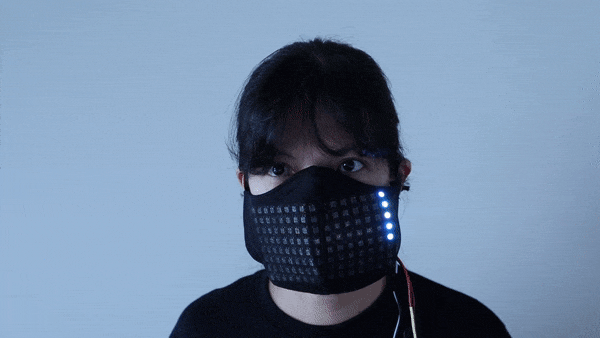
In this article, we’ll show you how to build a scrolling text face mask using a Raspberry Pi and an 8x8 flexible NeoPixel matrix. We will also include 2 variations for this project for 16-pixel and 32-pixel wide matrices. The cloth face mask should have a translucent top layer, and cover your mouth and nose completely. Please remove all electronics prior to washing your face mask.
How does the Raspberry Pi scrolling text face mask work?
With the face mask worn covering your nose and mouth, powered up, navigate to your local web page front end and enter the text to scroll across your face mask.

What You’ll Need
- Raspberry Pi 3, Rasperry Pi 4 or Raspberry Pi Zero W with pre-soldered GPIO headers or you can solder them yourself.
- Power supply/Keyboard/Mouse/Monitor/HDMI Cable (for your Raspberry Pi)
- 8x8 Flexible NeoPixel Matrix with individually addressable LEDs
OR connect 2 flexible 8x8 NeoPixels to create a 16x8 matrix
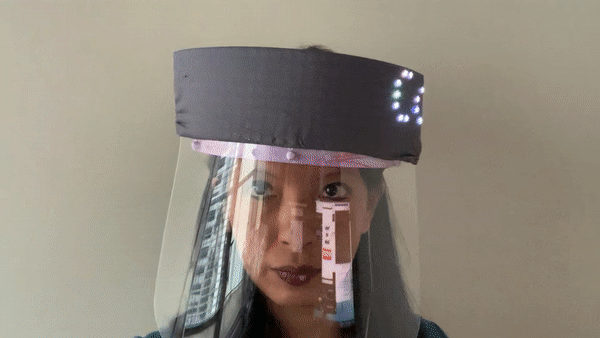
OR 32x8 Flexible NeoPixel Matrix for the face shield version - 1N4001 Diode
- Soldering Kit with heat shrink tubes
- Helping Hands for Soldering
- Wire Cutter / Wire Strippers
- Mini hot air gun or hair dryer
- Small Breadboard
- Set of jumper wires (M-to-F, M-to-M, and F-to-F)
- Cloth face mask with a translucent front layer
- Small power bank charger
- Test Lead Set with Alligator Clips
- Mini or Micro USB cable that you are willing to cut and strip
- Optional: Mask Bracket - Gently holds the mask slightly away from your mouth to aid in breathing.
- Optional: 5V Power Supply with wall-plug
Part 1: Setup Your NeoPixel Matrix
In this step, we will perform a basic wiring and run the sample code provided by Adafruit’s NeoPixel Uberguide. The NeoPixel matrix requires a separate 5 volt power source. To make this project mobile, I am using a 5V power bank charger.
1. Connect GND from your flexible NeoPixel matrix power input to the ground line of your breadboard. (M-to-M wire)
2. Connect the second GND from your NeoPixel matrix (connection next to DIN) to the ground line on your breadboard. There are actually 2 GND wires that need to be connected from your NeoPixel Matrix, one is next to the 5V red wire, and the second GND wire is next to DIN. Please connect both to GND.
3. Connect any GND pin from your Raspberry Pi to the ground line on your breadboard.
4. Connect ground from your 5V power source to the ground line of your breadboard.
5. Connect the positive terminal (power input) from your NeoPixel matrix to the diode cathode (side with the stripe)
6. Connect the positive terminal from your power source to the diode anode (side without the stripe).
7. Connect GPIO 21 to the DIN (Data In) of your NeoPixel matrix. (M-to-F wire)

In order to power the NeoPixel matrix with my 5V power bank charger, I took an old microUSB cable and cut off the microUSB end (leaving the USB) and stripped the wires to expose the red (power) and black (ground) wires.

If you are not ready to cut a USB wire, then power your NeoPixel with a traditional 5V power supply.
For the wiring in this step, I am using test leads with alligator clips to connect the stripped USB cable to the power input on the NeoPixel matrix. I plugged in the USB to the power bank charger last.

After completing your wiring connections, let’s test our matrix with the test code from Adafruit.
1. Boot your Raspberry Pi. If you don’t already have a microSD card see our article on how to set up a Raspberry Pi for the first time or how to do a headless Raspberry Pi install.
2. Open a Terminal. You can do that by pressing CTRL + T.
3. Install required dependencies.
sudo pip3 install rpi_ws281x adafruit-circuitpython-neopixel
sudo python3 -m pip install --force-reinstall adafruit-blinka
4. Clone this repository for the source code:
git clone https://github.com/carolinedunn/scrollingTextMask5. Navigate to the scrollingTextMask folder.
cd scrollingTextMask6. Run the test code fillMatrix.py
sudo python3 fillMatrix.pyIf your NeoPixel matrix lights up, red, green, blue, rainbow, Congratulations, you have a working NeoPixel matrix and can move onto the next step. Otherwise, go back and troubleshoot your connections.
Troubleshooting Tips:
If GPIO pin 21 is not working on your Raspberry Pi, you can change the GPIO output to 10, 12, or 18. Open fillMatrix.py from the scrollingTextMask folder with Geany or Thonny (right-click from file manager), and update the GPIO output. Do NOT press the Run button from Geany or Thonny. Keep in mind, if you choose to change the GPIO output in fillMatrix.py, you will need to make the same change for the other files as you progress through this tutorial.
7. Press Ctrl-C to stop the script.

At the end of this step, you should have a basic working NeoPixel matrix that fully lights up.
Part 2: Test Scrolling Text
In this section we will test the scrolling text functionality of our NeoPixel matrix.
1. If you have your Terminal open from Part 1 and are still in the scrollingTextMask directory, run testMsg.py.
sudo python3 testMsg.pyYou should see the text “Welcome to Tom’s Hardware” scroll across your matrix.
2. Press Ctrl-X to stop the python code.

Code Notes about testMsg.py
- If you changed the GPIO from 21 in fillMatrix.py, you’ll also need to make the corresponding change going forward.
- The scrolling text is set to “Welcome to Tom’s Hardware.” You will be prompted for the text to scroll in the next step.
- “matrixbrightness” can be set up to 1.0 for maximum brightness.
- “scrollSpeed” adjusts the speed of the text as displayed on the matrix. A smaller number scrolls the text faster, while a larger number displays text slower.
- “TextColor” is the RGB color of your text. By default we have the text color set to white (255, 255, 255), but you can change the color to your preference.

Customize the Text on Raspberry Pi Scrolling Face Mask:
3. Run testMsgInput.py from the same Terminal and the same directory.
sudo python3 testMsgInput.py4. The code should automatically prompt you to enter your own text. Enter hello or a phrase of your choice.

Set the Font for Raspberry Pi Scrolling-Text Mask (Optional)
You may notice that the letters (font) looks a little different on your matrix than what you see in the tutorial sample videos. The sample code uses a default font included in the Raspberry Pi OS, while the videos use the 5x7 Font. You can download the font 5.7.ttf for personal use and then install it into your Raspberry Pi.
2. Open a new Terminal and navigate to the folder containing 5x7.tff and enter:
sudo cp 5x7.ttf /usr/share/fonts/truetype3. Open testMsgInput.py with Geany
4. Comment out line 26 by adding # before “font = ImageFont.truetype("LiberationMono-Regular.ttf", 8)”
5. Uncomment line 28 to set your font to 5x7.ttf by removing #
6. Save testMsgInput.py

7. Run testMsgInput.py again
sudo python3 testMsgInput.pyEnter a word or phrase of your choice.
Flask Front-End Web Page for Raspberry Pi Scrolling-Text Mask
In this step, we will make our solution mobile by creating a convenient front end Flask website to input scrolling text for our matrix.
1. If you completed the optional step to change the font (in the previous step), please make the same change in the file app.py.
2. From your Terminal, navigate to the scrollingTextMask directory, and run app.py with the command (sudo python3 app.py).
3. LaunchChromium browser.
4. Navigate to “http://raspberrypi:5000” (assuming “raspberrypi” is your hostname) or “localhost:5000”
5. Enter a word or phrase of your choice to scroll on your matrix.
6. Test on another device.If you see your entry scroll across your matrix twice, go to another computer or your phone (on the same WiFi network) and enter “http://raspberrypi:5000” in a browser window. Once again, we are assuming that raspberrypi is your hostname.
7. Enter text of your choice. If you see your text scroll across your matrix twice again, you are ready to set this script to start on boot.
- You can adjust the number of times the entered text will scroll across the matrix by changing repeats = 2. If you change repeats = 1, then the text will only scroll once per entry to your web page. If you prefer for the text to scroll indefinitely, please use testMsgInput.py from the previous step instead, but keep in mind there is no html interface for testMsgInput.py.
- Please wait until the text has fully completed scrolling across before entering another phrase. Entering additional text before the previous phrase has completed displaying will cause errors.
- HTML code is located at /home/pi/scrollingTextMask/templates/index.html if you wish to make changes to the front end web page.

Set app.py to run on boot:
In this step, we will set up our Pi to always run our app.py code to run on boot.
1. Open a Terminal
2. Enter
sudo nano /home/pi/.bashrc3. Enter the following text at the bottom of .bashrc
sudo python3 /home/pi/scrollingTextMask/app.py4. Hit Ctrl-X to exit and Y to save.
5. Shutdown your Pi.

Part 3: Going Mobile with Raspberry Pi Scrolling-Text Mask
In this step, we make our solution truly mobile. With the Pi shutdown and completely off from the previous step, we’ll first take note of our wiring, take pictures if necessary.
1. Disassemble all wiring.
2. Solder the diode with the cathode and anode correctly between the power input of the matrix and the USB cable.

3. Cover exposed wires with heat shrink tubes. Seal heat shrink tubes with a hair dryer or heat gun.
4. Solder the ground wire from the NeoPixel to the USB cable. You may need to add a small length of wire between the ground wires to be even with the + wire. Cover exposed wires with heat shrink tubes. Seal heat shrink tubes with a hair dryer or heat gun.

When soldering is complete, your NeoPixel matrix power inputs should have a USB connection.

5. Next connect your DIN and GND to your Raspberry Pi with 2 Female-to-Male wires. Connect DIN to GPIO 21 (or if you changed your GPIO pin in a previous step). Connect GND to any GND pin on your Raspberry Pi.
6. Gently slide the NeoPixel matrix into your face mask with translucent fabric front, taking care not to disconnect any wires.
7. Power up your Pi and your NeoPixel USB. You can power both your Pi and your NeoPixel with one power bank charger if it has 2 USB outputs. A Raspberry Pi 4 can be powered with a power bank charger with a USB Type C output.
8. After your pi boots up, go to any computer or mobile device on the same WiFi network and test your setup by browsing to “http://raspberrypi:5000” and entering a word or phrase.
If the text you entered scrolls across your face mask, Congratulations! you’ve completed this project!
For a truly on-the-go solution, if you have a mobile plan and a smartphone with hotspot capabilities, you can untether yourself from your home WiFi.
1. From your smartphone, enable hotspot capabilities.

2. From your Raspberry Pi desktop, set your WiFi to your smartphone’s hotspot and enter your phone’s hotspot password.

3. From a browser on your smartphone, navigate to “http://raspberrypi:5000” and access your front end web page.
Bonus Configurations
I have included 2 additional versions of the Python files for this project for 16-pixel and 32-pixel wide configurations.
To make a 16x8 NeoPixel matrix for the Raspberry Pi Scrolling-Text mask, you will need 2 flexible 8x8 NeoPixel matrices. The second NeoPixel matrix will be powered by the first matrix and does not require a second power source.
1. Connect the DOUT of your primary NeoPixel to the DIN of your second NeoPixel matrix.
2. Line up both 8x8 NeoPixels matrices side-by-side and tape in place with electrical tape.
3. Insert the NeoPixel pair into your fabric cloth mask with a translucent top layer. Keep in mind that you will need a fabric cloth mask that is 3.1 inches tall on the ends to fit the NeoPixels.
4. Power up your Pi and your primary NeoPixel matrix.
5. Run the Python code 16-textMsg.py from your Terminal:
sudo python3 /home/pi/scrollingTextMask/16Matrix/16-testMsgInput.py6. If any changes (font, text color, scroll speed) were made to the code for the 8x8 matrix, the same changes will need to be made to the files in the 16Matrix folder.
7. Continue the setup by configuring 16-app.py as you did for the 8x8 matrix.
32x8 NeoPixel Matrix for Raspberry Pi Scrolling-Text Mask
The 32x8 flexible NeoPixel Matrix is readily available for purchase and can be connected with the same configuration as the 8x8 matrix. A 32x8 NeoPixel Matrix is too wide to fit inside a face mask, but can fit nicely above a face shield.
1. Connect your flexible 32x8 NeoPixel Matrix following the steps in Part 1.
2. Run the Python code 32-textMsg.py from your Terminal:
sudo python3 /home/pi/scrollingTextMask/32Matrix/32-testMsgInput.py3. If any changes (font, text color, scroll speed) were made to the code for the 8x8 matrix, you will need to make the same changes to the files in the 32Matrix folder.
4. Continue the setup by configuring 32-app.py as you did for the 8x8 matrix.
5. Wrap the front of the matrix with translucent fabric and hot glue into place on your face shield.
6. Power up your Pi and your primary NeoPixel matrix.
Additionally, the file 32-crown.py is available if you’d like to display a static image of a crown. Run the code:
sudo python3 /home/pi/scrollingTextMask/32Matrix/32-crown.py
Conclusion:
We hope you found this tutorial both amusing and useful. This project brings new meaning to, “It’s written all all over your face.”