Gigabyte X570 Aorus Pro Wi-Fi Review: Well-Rounded Value
Why you can trust Tom's Hardware
Software and Firmware
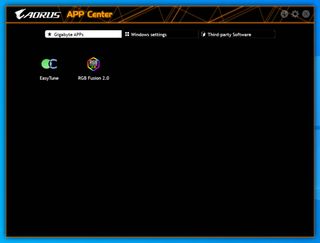
Gigabyte’s software is centered around its App Center application. This program is a one-stop shop for all of the Gigabyte applications, Windows settings, and other third party software. As you install Gigabyte applications such as Easy Tune, RGB Fusion 2.0, @Bios, On/Off Charge and others, they will be placed in the first screen of the app for ease of access. The App Center app sits in the tray until called upon and is a good way to keep all the motherboard-associate applications you use in a single display.

The first Gigabyte application we’ll dig our claws into is Easy Tune. This program is used to monitor the system, including temperatures, speed, and voltages, as well as overclocking. It is divided up into sections across the top for each function. These sections are Smart Boost, Advanced CPU OC, Advanced DDR OC, Advanced Power, and Hotkey. All the monitoring information sits on the bottom.
Inside the Smart Boost section, you can select two different options, “Default” and “OC.” The latter takes all cores and boosts them to 3.8 GHz. Oddly enough there are four total options, but the ECO and Auto Tuning sections can’t be selected. With a Ryzen 3000 CPU, I would simply use Precision Boost Overdrive (PBO) before using any of these profiles.
The Advanced CPU OC section is where overclocking from within Windows is accomplished. Inside are two sections, frequency and voltage, which deal with BCLK and CPU ratio along with major voltages necessary for overclocking. This includes CPU Vcore, VCORE SOC, CPU VDDP, DRAM voltage, and more. Once you have the options set, you can create profiles and save them for loading at a later point.
Next up is the Advanced DDR OC section. Here there isn’t much to do, with only two options being presented: Memory Frequency and XMP Setup Profile. The memory frequency is a simple dropdown which shows a memory multiplier to choose from. The XMP Profile dropdown lists any XMP profiles that are on your memory sticks.
When clicking on the Advanced power section, we’re greeted by additional power options, including current protection, PWM phase control, as well as Loadline calibration (LLC) control for the Vcore and SOC. After fiddling around a bit with the Vcore LLC, I found the turbo setting to keep the voltage close to where it was set. When left on auto, we saw around 0.05V vdroop from what was set in the BIOS to load in windows.
Overall, Easy Tune has come a long way from its origins so many generations ago. The software is clean and has plenty of options to push the limits in Windows on this board, though I would have liked the ability to control fans through here as well. The information Easy Tune presents is easy to read and the application is generally useful, in particular for those who like to tweak their system outside of the BIOS.


Gigabyte’s RGB control application is RGB Fusion 2. The application is a lightweight dashboard displaying the current RGB colors and schemes as well as letting you tweak them. Control includes the integrated RGB lighting on the board, RGB strips attached via the headers, as well as memory, coolers, RGB-lit video cards, and any other compatible RGB device. There are eight different preset patterns (Static, Pulse, Flash, Double Flash, Color Cycle, Music, Random and Game) with many able to be customized further (adjusting color, speed and brightness).
RGB Fusion 2 worked well controlling both the integrated RGBs and the GSkill Neo Memory we used for testing. Its interface is also easy to read, simple and gets the job done.

Firmware
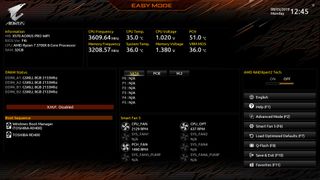
Jumping into the Gigabyte BIOS, you’re first greeted by its EZ mode, which displays useful information about the system. It sports a black background with orange accent colors, letting you know it’s part of the Aorus theme.
EZ Mode displays details about the CPU and Memory frequency and voltage, CPU/VRM/chipset temperatures, BIOS version, fan speeds, and even the boot order. There are also convenient buttons on the right to access Advanced mode, Smart Fan 5, Q-Flash and Favorites. This screen is set up well with a few options to change, such as boot device order and enabling XMP. Much more than that and you will need to access Advanced mode.

Pressing F2 solves that issue, bringing us to Advanced Mode. Here you’ll find all the options you were looking for--or at least most. From overclocking to fan speed, all other settings can all be edited from the advanced BIOS. Across the top are headings for each section. Starting from the left is Favorites, Tweaker, Settings, System Info., Boot and Save & Exit.
Starting off in Tweaker, this is where all the overclocking and system performance magic happens. You’ll have access to everything needed to push Ryzen 3000 CPUs to their limits (for whatever that may be worth on these CPUs). Options such as CPU BCLK and multiplier control, XMP profile and memory timings, voltages and VRM settings are all in one place. Each part (CPU, Memory, VRM) has its own dedicated section for dealing with the details of their functions.
The Advanced Memory sub-section has enough timing and other options to make an average user’s head pop off. Primary, secondary, and tertiary timings are all listed here among a slew of other options. Inside the VRM section we find Loadline Calibration settings, VCore current protection and PWM phase control, all of which can help with running a stable overclock.
The Settings section is where to access platform power settings, IO Ports (audio, USB, LAN, SATA, etc), RGB status/settings and an even more detailed AMD Overclocking area. Some of these options are duplicated in the Tweaker section, but here one can manually adjust the Infinity Fabric frequency and dividers, along with Gear Down mode for using odd CL values for memory. The X570 Aorus Pro Wi-Fi has a lot of overclocking options to meddle with, that’s for sure.
Also within the Settings section is PC Health and Smart Fan 5. PC Health simply lists the major voltages for the CPU and DRAM along with three PSU voltages (3.3V, 5V, 12V), while Smart Fan 5 gives access to the fan control application.
The Boot Section and Save & Exit don’t have anything we haven’t seen before and is where users can change boot behavior and drive options. The latter is where to save and load any profiles in the BIOS.


Smart Fan 5 is able to control any three- or four-pin fan or pump on each of the board’s seven headers. Within these settings, you can set up fans to respond to different temperature inputs such as the CPU, PCIe, or VRM temperatures which, is a great option to have for cooling. In addition, there is an external 2-pin header for a temperature probe that can be used as well. You can select from three different profiles or create custom curves for each fan.
Smart Fan 5 is one of the more comprehensive temperature monitoring and fan control options from all of the board partners. It offers users plenty of flexibility and options to control an entire system of fans and pumps from the BIOS.

Gigabyte’s firmware has been improving in both layout and appearance over the past couple of generations. And while it was never in bad shape, what we see now in X570 is a refined layout that’s easy to use and looks good while you’re troubleshooting or tweaking. Where you expect items to be, they are there and not hidden multiple levels down.
MORE: Best Motherboards
MORE: How To Choose A Motherboard
MORE: All Motherboard Content
Stay On the Cutting Edge: Get the Tom's Hardware Newsletter
Join the experts who read Tom's Hardware for the inside track on enthusiast PC tech news — and have for over 25 years. We'll send breaking news and in-depth reviews of CPUs, GPUs, AI, maker hardware and more straight to your inbox.

Joe Shields is a Freelance writer for Tom’s Hardware US. He reviews motherboards.
-
Giroro I'm pretty surprised to see an Editor's Choice award go to a "low to mid-range" motherboard that costs an insane $270.Reply
Is price no longer a factor for that award? I thought it was supposed to reflect that a product is a good/best value for consumers.
It's one thing to charge a little bit extra an early-adopter tax for PCIe 4.0... but over double what the boards with the previous top-tier chipset cost just for a feature that almost nobody can use right now? I mean, come on. It's not like anybody would have accepted a $100+ price hike and a cheap chipset fan for a mobo with SATA express.