Hands-On With Intel's RealSense Snapshot Camera
We evaluated the Intel RealSense SnapShot depth camera mounted on the Dell Venue 8 7000 tablet.
The Measurement Tool
The measurement tool is a compelling feature on paper. You aim your RealSense Snapshot at an object, snap a photo and use the tool to determine distances between objects, measure objects and even calculate the area of something.
However, to be blunt, you should manage your expectations of what this tool can actually do.
Dell was clear in its various guides that the measurement tool really only works under certain conditions. We were advised to be within 3-15 feet of the subject, make sure to shoot straight on (not at an angle) and ensure that there’s plenty of light. But not bright, direct sunlight. Oh, and we were to also avoid reflective or see-through surfaces, such as glass.
We were further advised to be sure that there were no smudges on the camera lenses; they can cause inaccuracies.
Dell recently pushed out an update that includes a new Dynamic Calibration tool to help ensure better accuracy in depth shots. Apparently, the Snapshot camera calibration can slip over time as you use the device, or even just during shipping. According to a Dell document, the calibration is automatic and occurs while a depth shot is being processed; if there's an issue, you'll see a pop-up notification informing you of the problem (and offering the automatic solution).
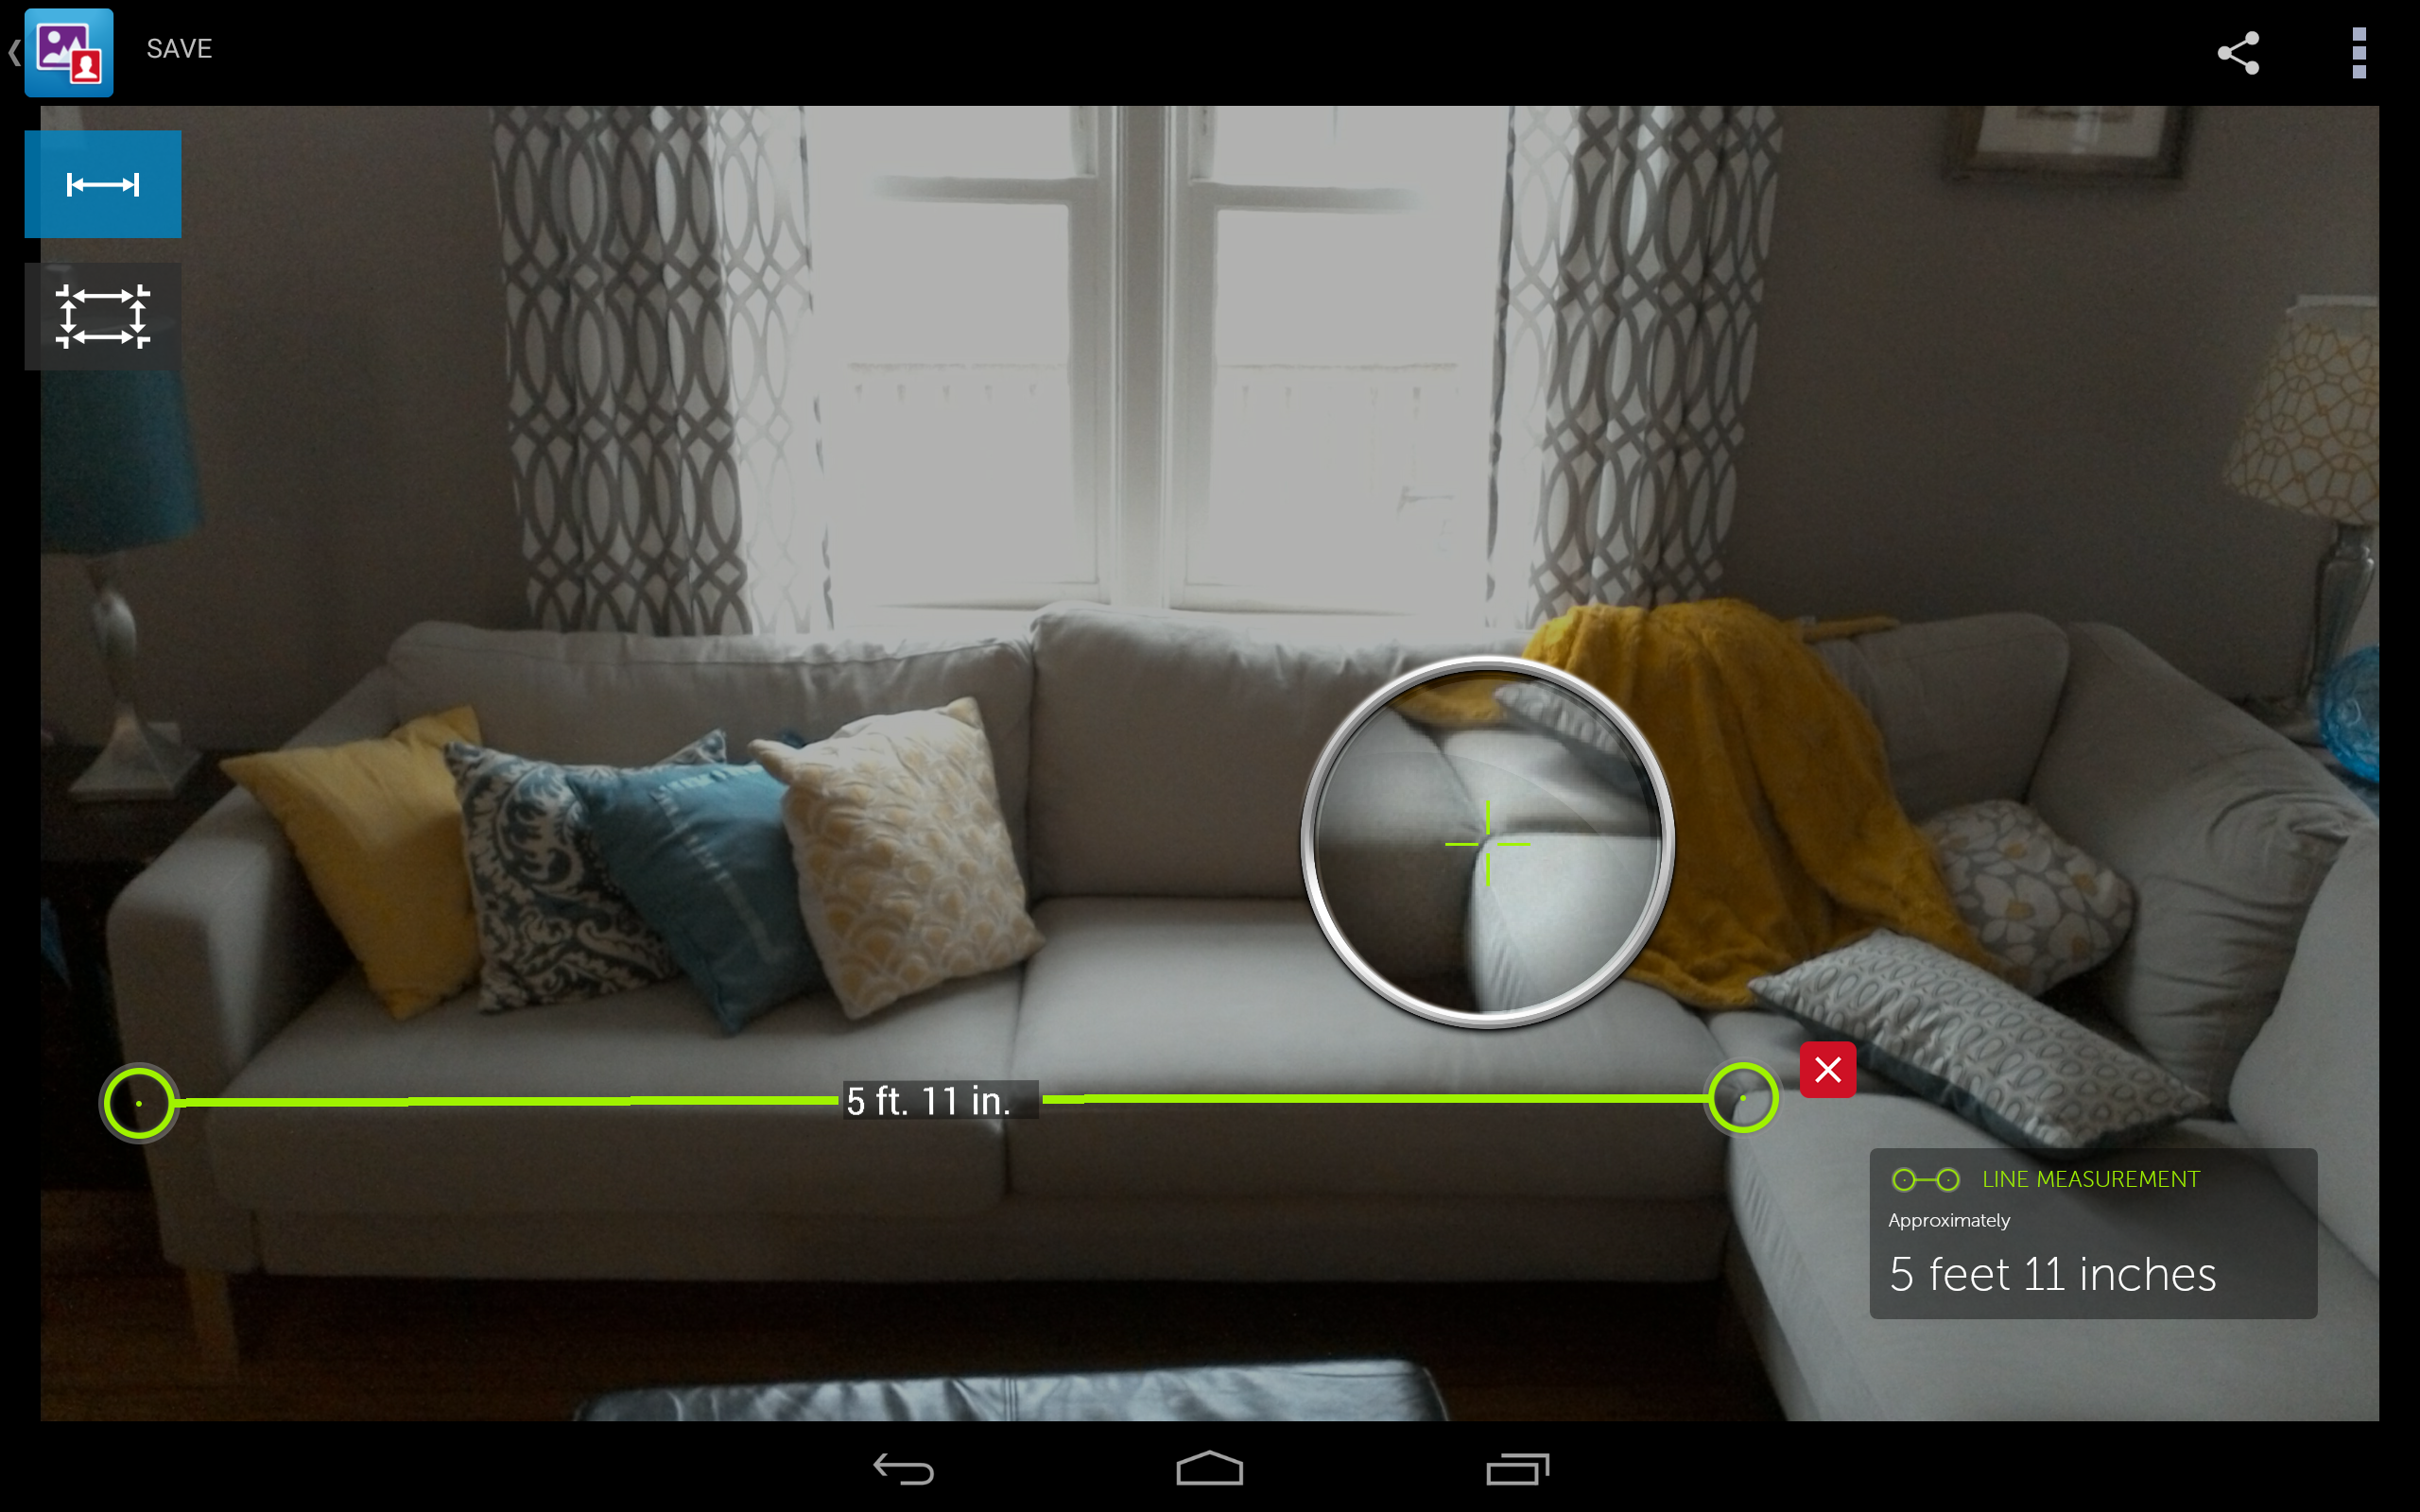
When you snap a photo, you enter the edit mode and tap the measurement tool. Simply tap two points on the image to create a measurement. You can fine-tune the measurements using a (rather nifty) feature: when you tap and hold one of the corners of your lines, you get a little magnified look at what you’re doing. It’s delicate, but it works well.
We dutifully obeyed these instructions, but our results were mixed, to say the least. We shot a variety of objects in different lighting conditions -- all more or less optimal -- and found that the tool was frequently off.
Get Tom's Hardware's best news and in-depth reviews, straight to your inbox.
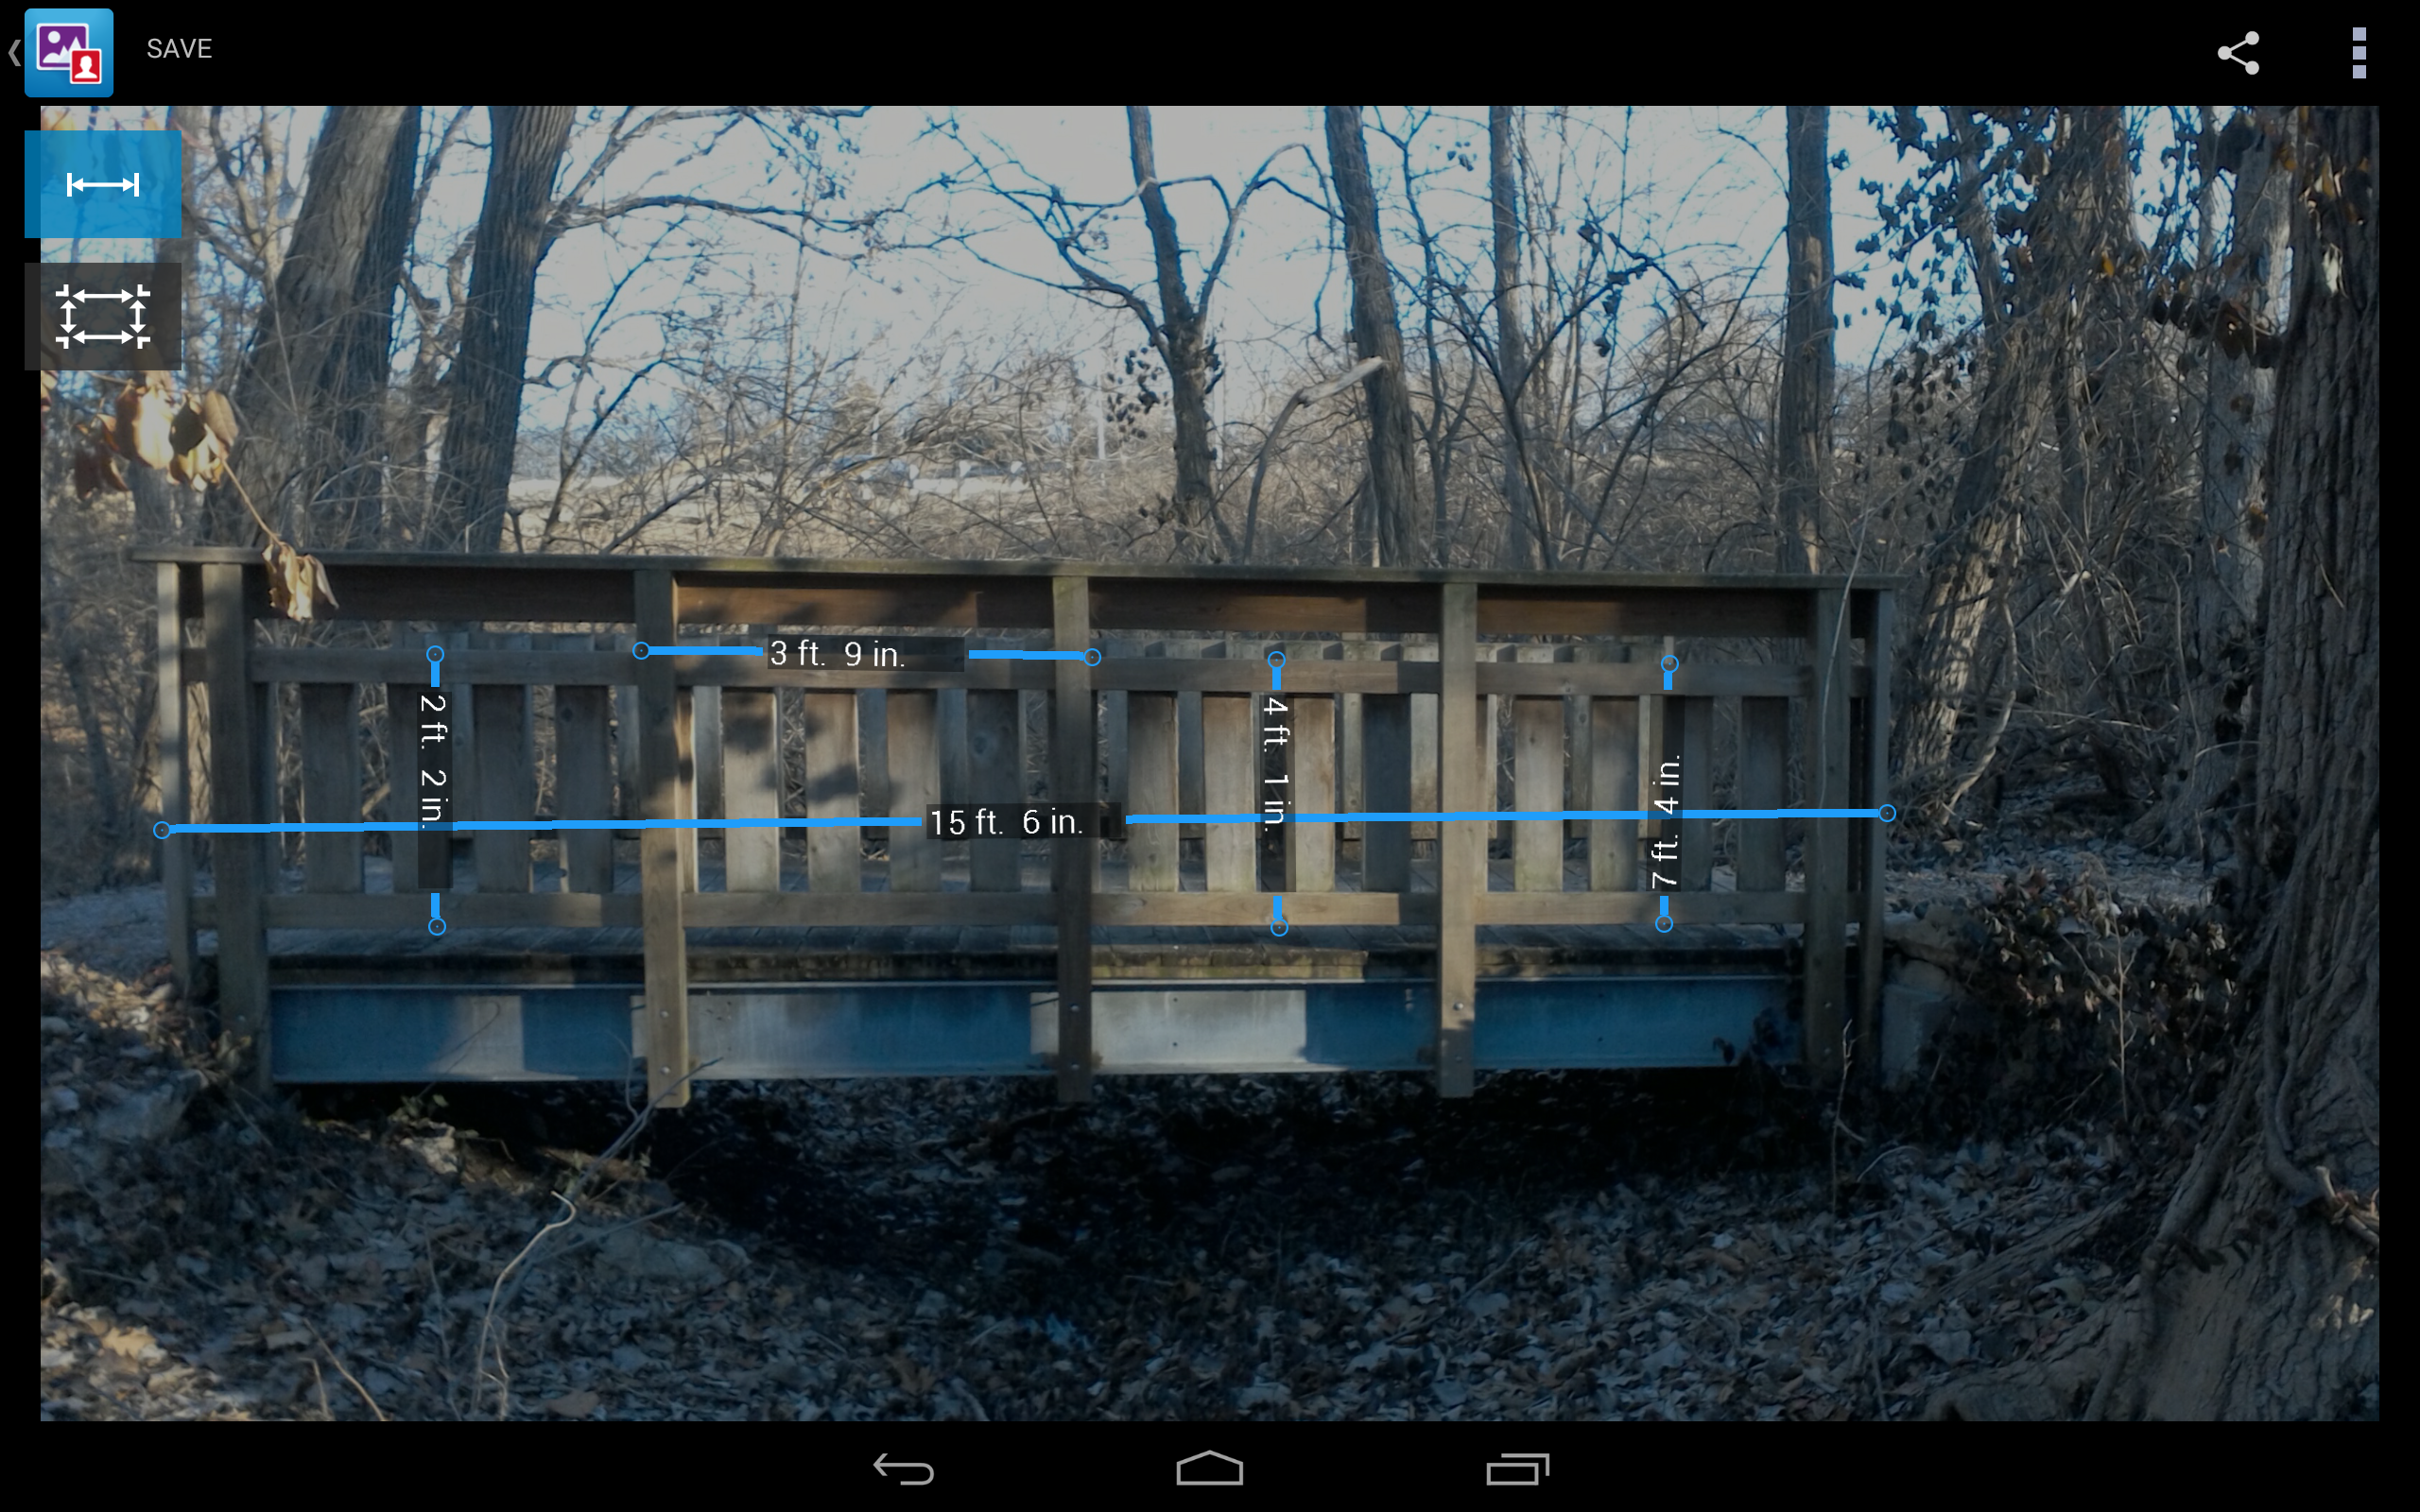
For example, note the measurements on this bridge. According to the RealSense Snapshot camera, it’s 15’6” across. That’s not completely far off; it’s actually 15’1”.
However, note the three measurements of the rails, bottom to top. The camera thinks they’re 2’2”, 4’1” or 7’4”. In reality, each of those distances is actually a hair under 2’5”. Also, the 3’9” span across the two posts is actually 3’1.75”.
We showed this parade of inaccuracy to Dell, and a representative noted that there were mitigating factors to consider. “The bridge shot has areas where the background is very similar in color to the foreground, and this is likely causing the software to calculate an incorrect depth for some of those points,” he said. He also noted that in terms of the bridge's span, a 5-inch error over that distance is still 97.5-percent accurate.
That’s fair enough, we suppose. Let’s agree that the lighting and contrast between subject and background was not optimal in the bridge image.
Here’s another example:
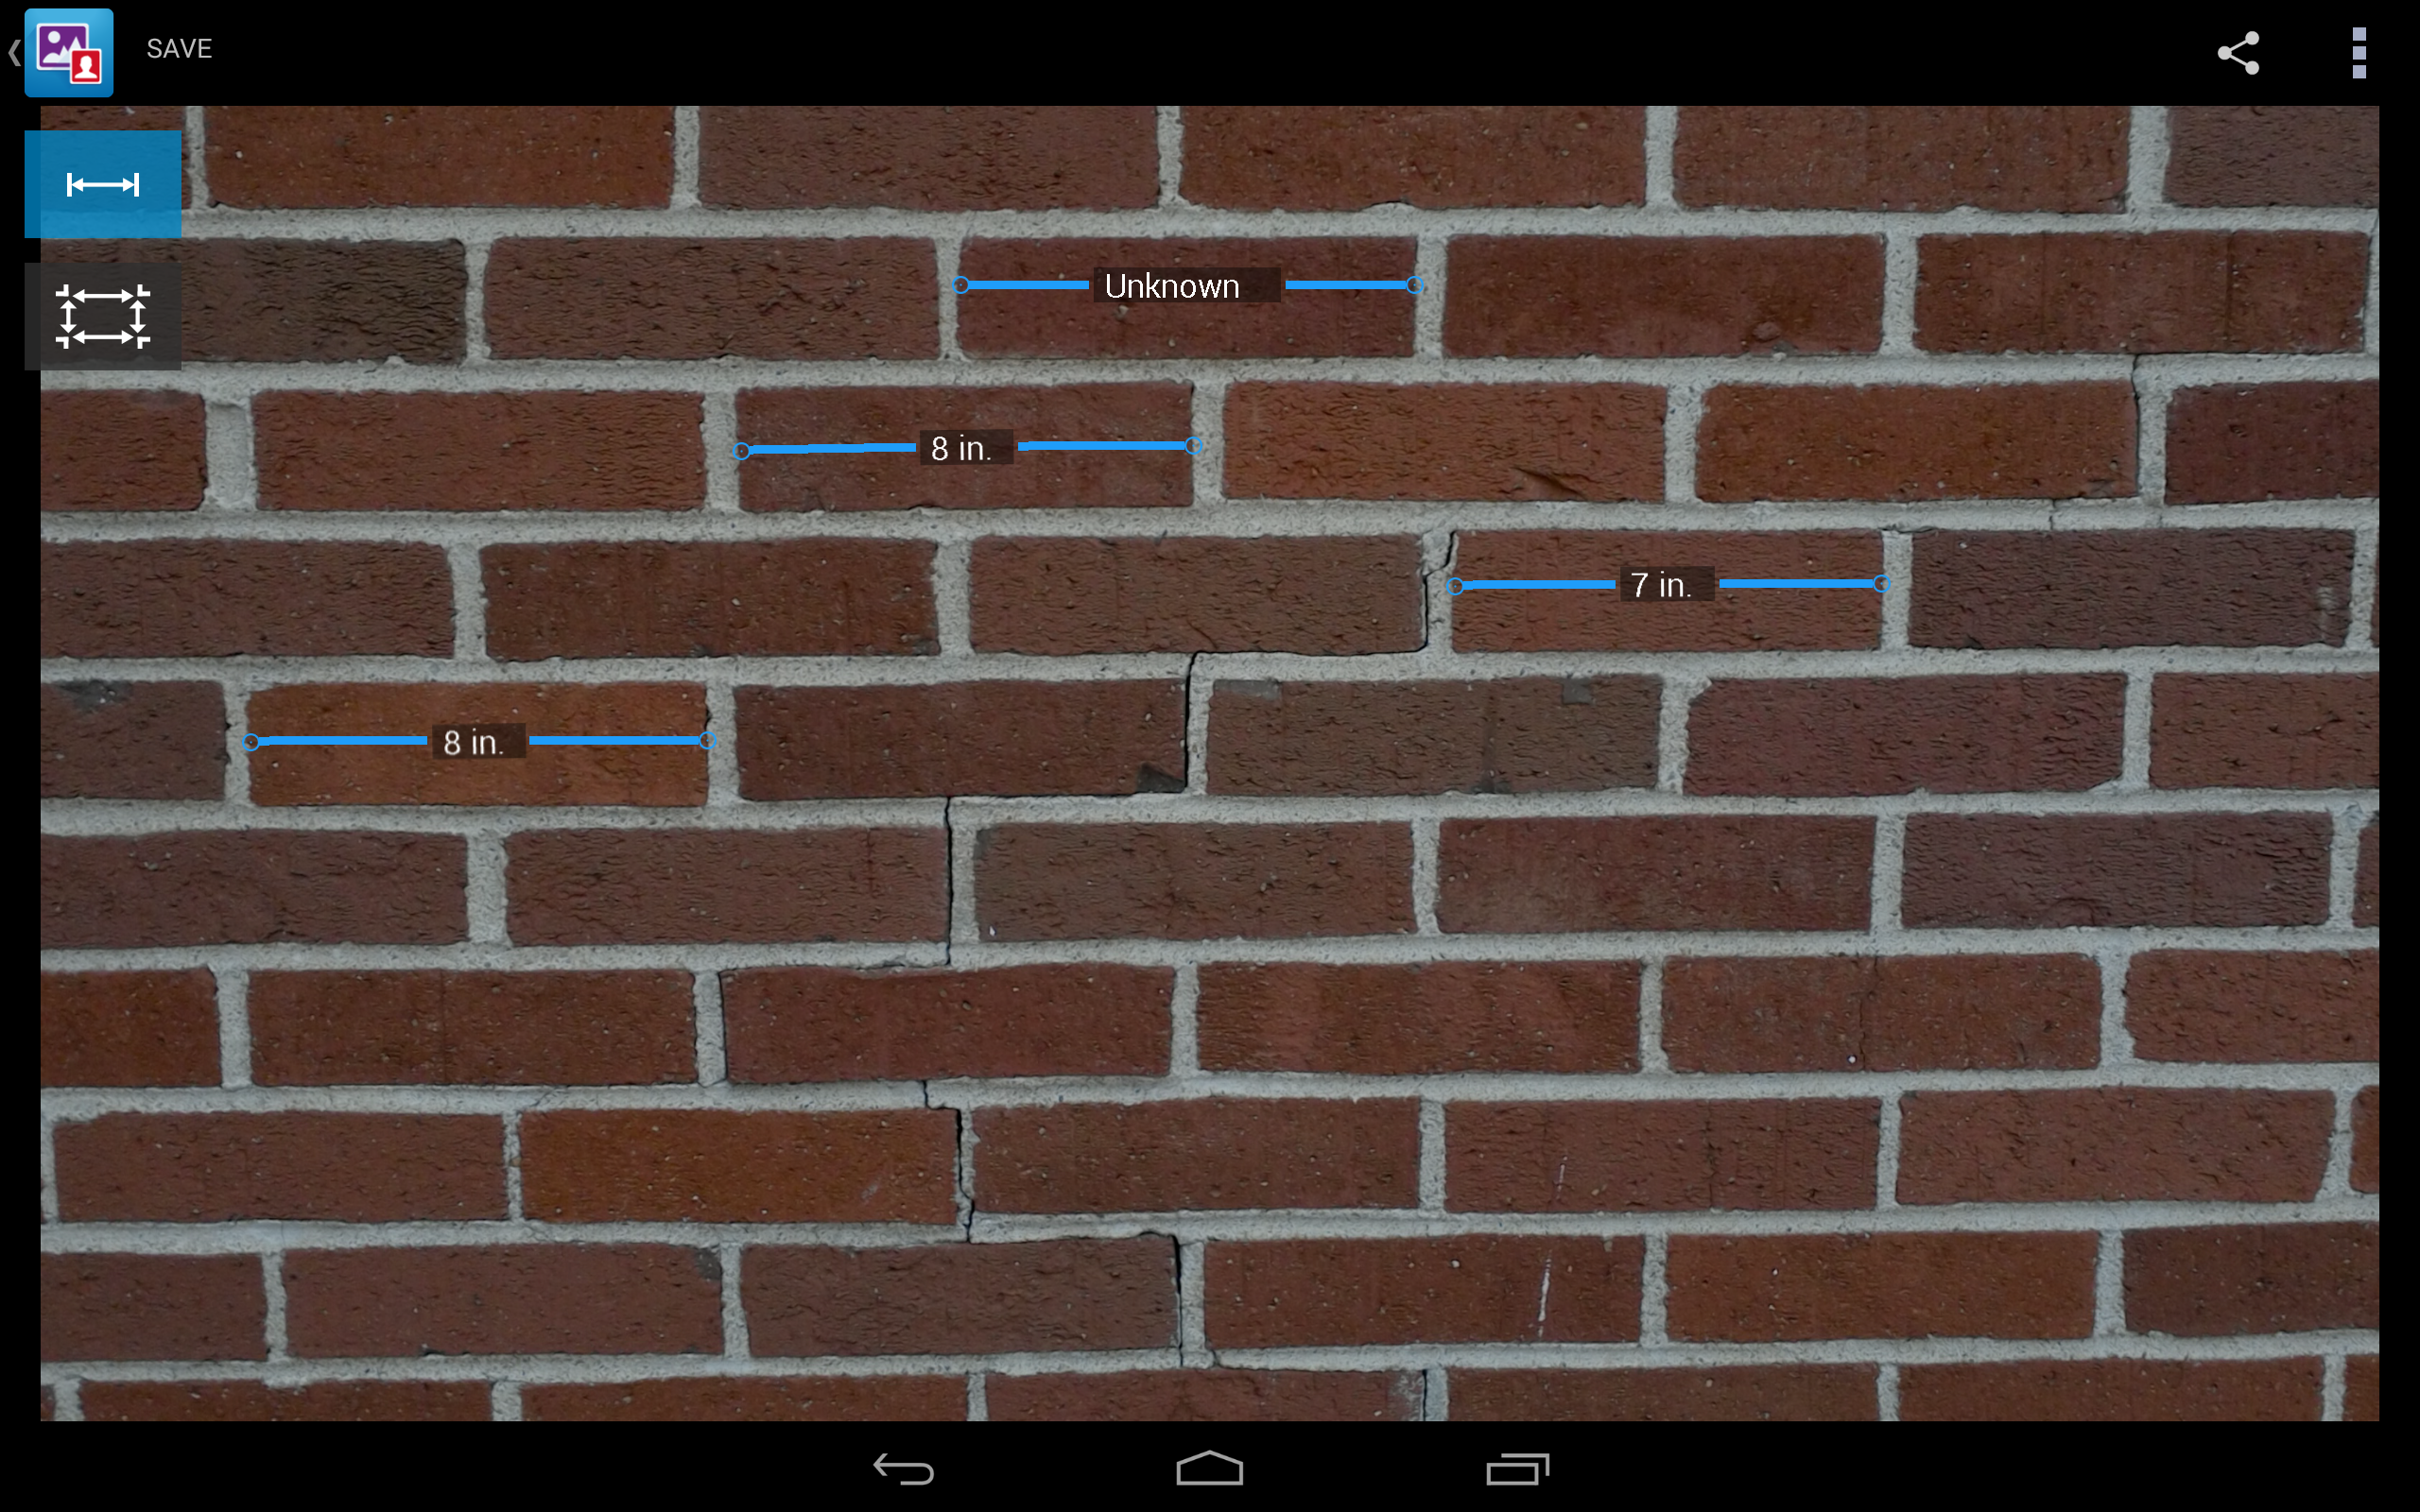
We shot these bricks in mid-afternoon light, safely away from the sun’s direct glare, but thoroughly well-lit, from just over 3 feet away. The bricks are 8.25” across. The RealSense camera guessed some of them fairly accurately at 8”, but the one is more than an inch off at 7”, and the tool was unable to even venture a guess for one of the bricks.
Could we have shot more straight-on here? Possibly, yes. But it's extremely difficult to do so without a tripod, and in real-life situations, this is about as good as you can do.
Here’s another example:
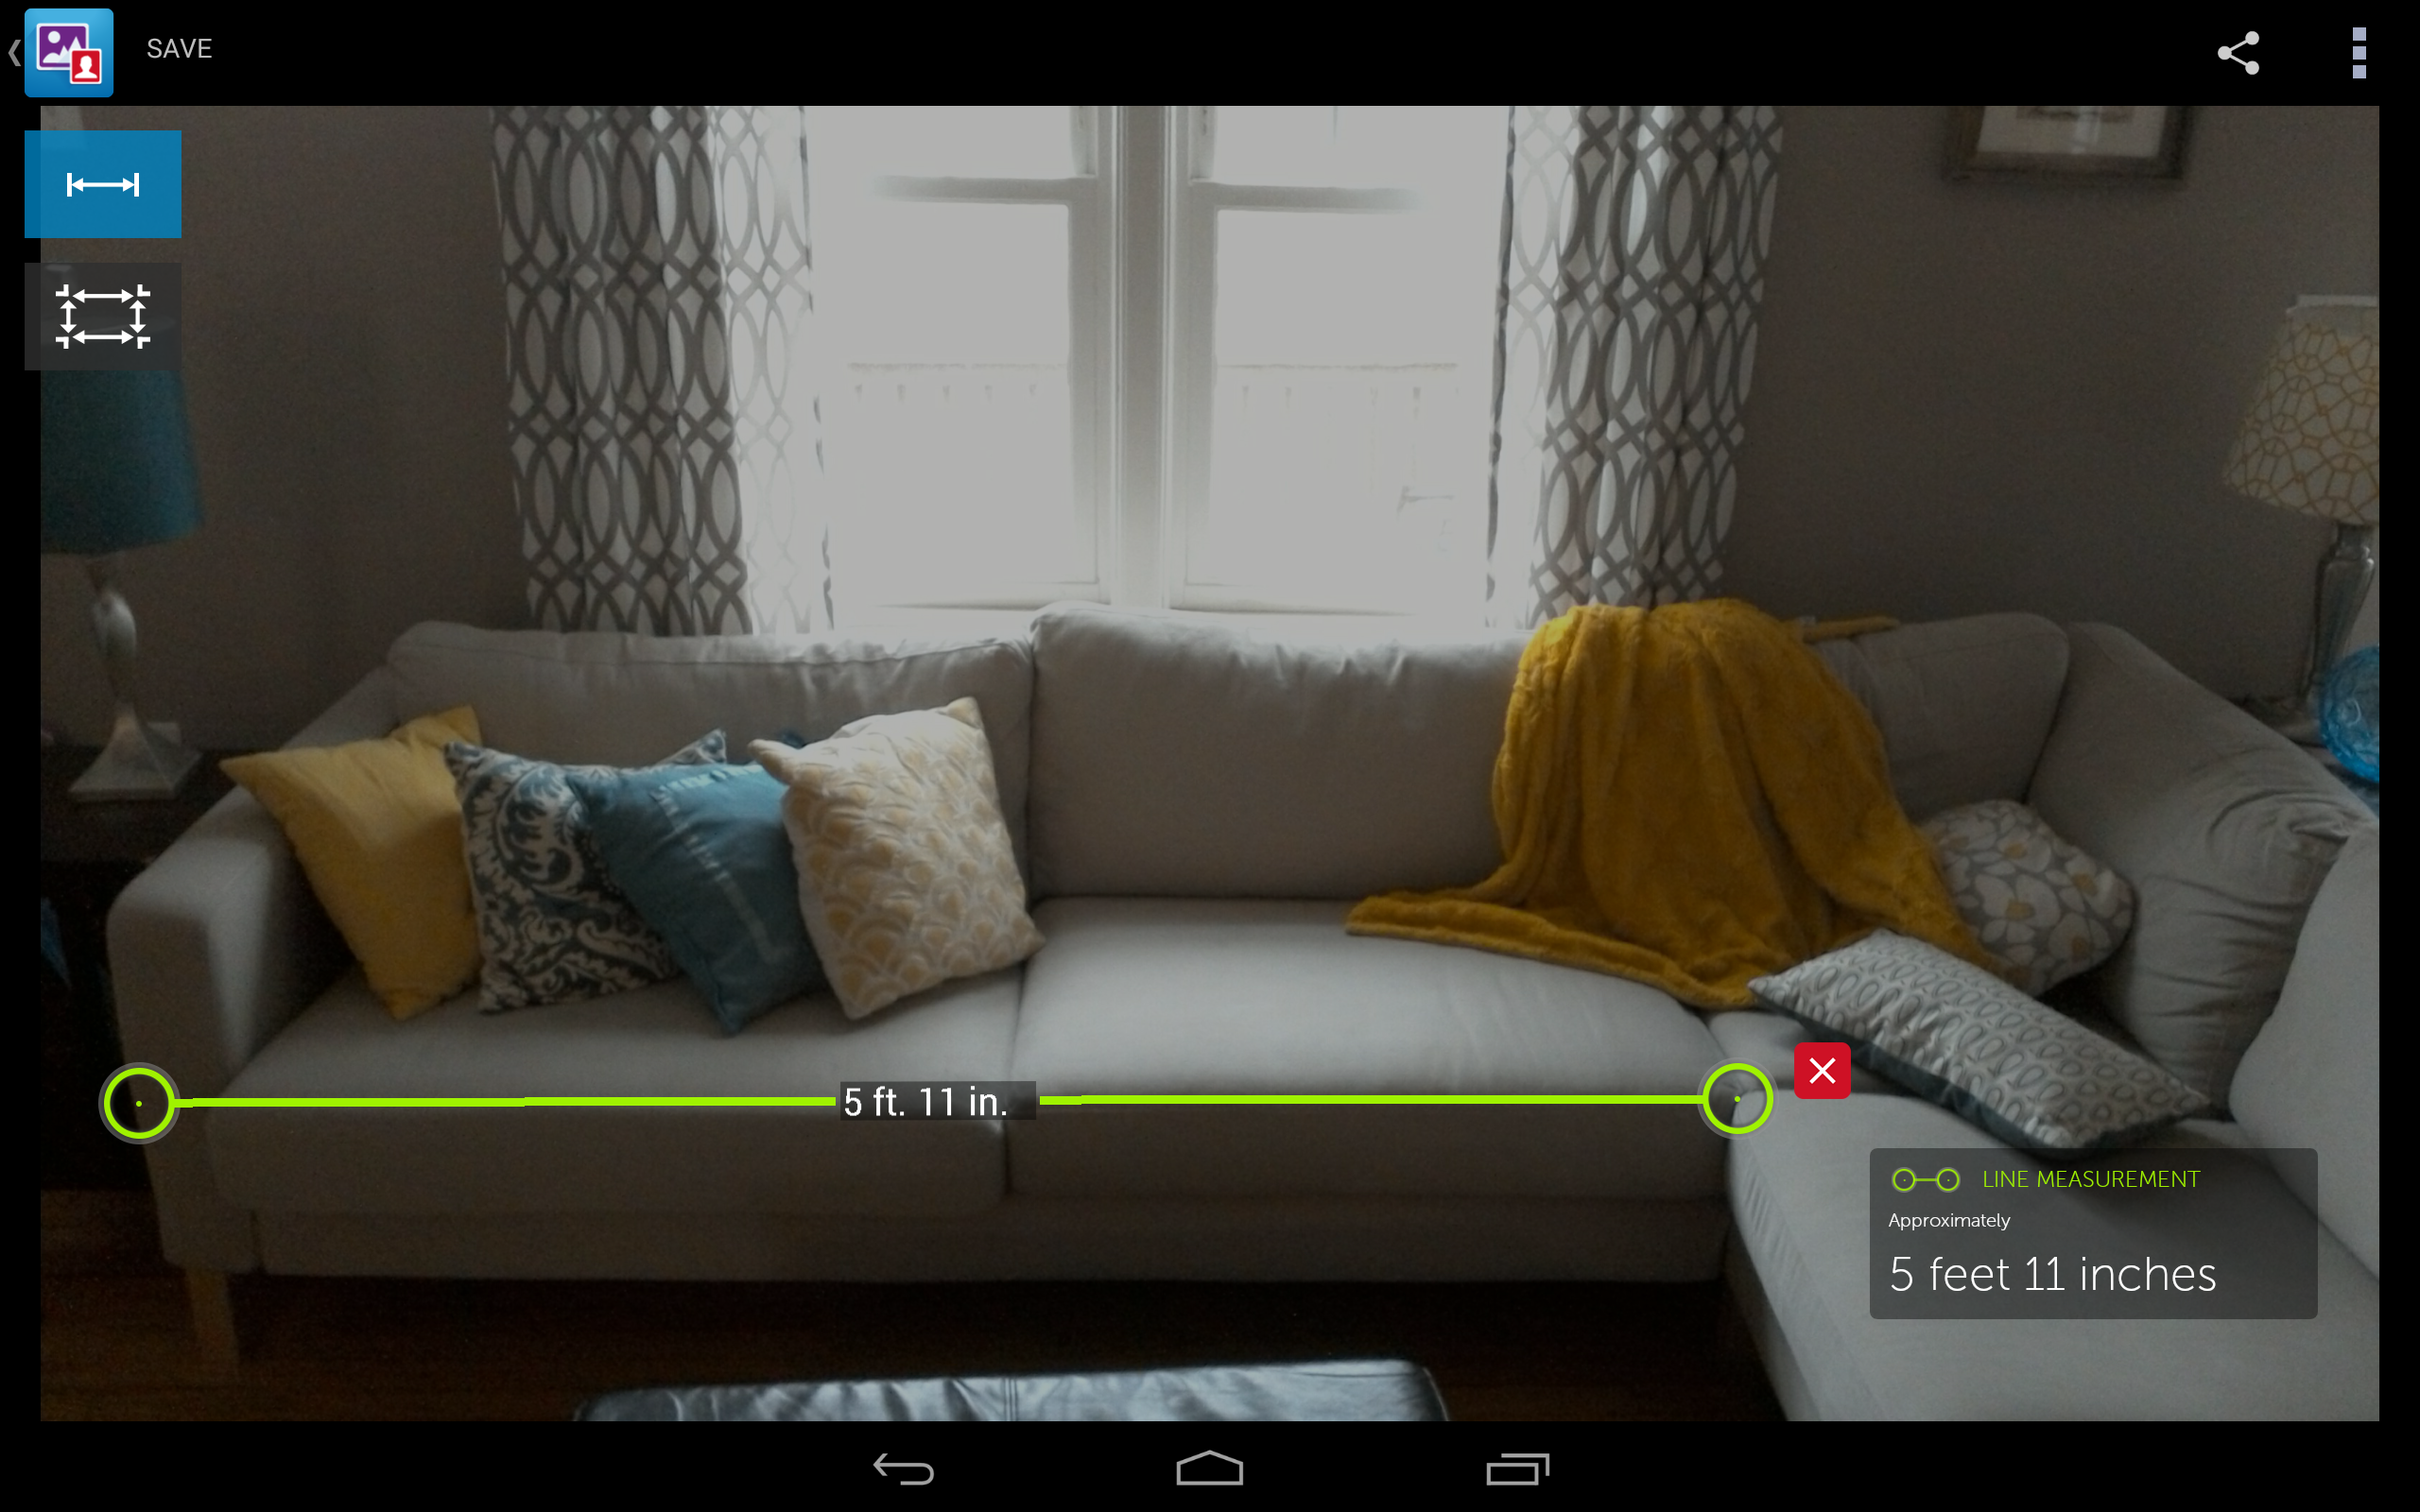
Determining couch size has been Dell’s go-to example of the measurement tool’s usefulness. You’re in a store, and you need to know if that funky divan will fit in your living room. You whip out your Dell Venue 8 7000 tablet, snap a pic and measure away.
We tried this specific use case and found that it was slightly off, too. The span of our test image is 6’2”, and the tool had it at 5’11”. That’s close -- probably close enough to determine if you can fit it in your living room -- but not precise.
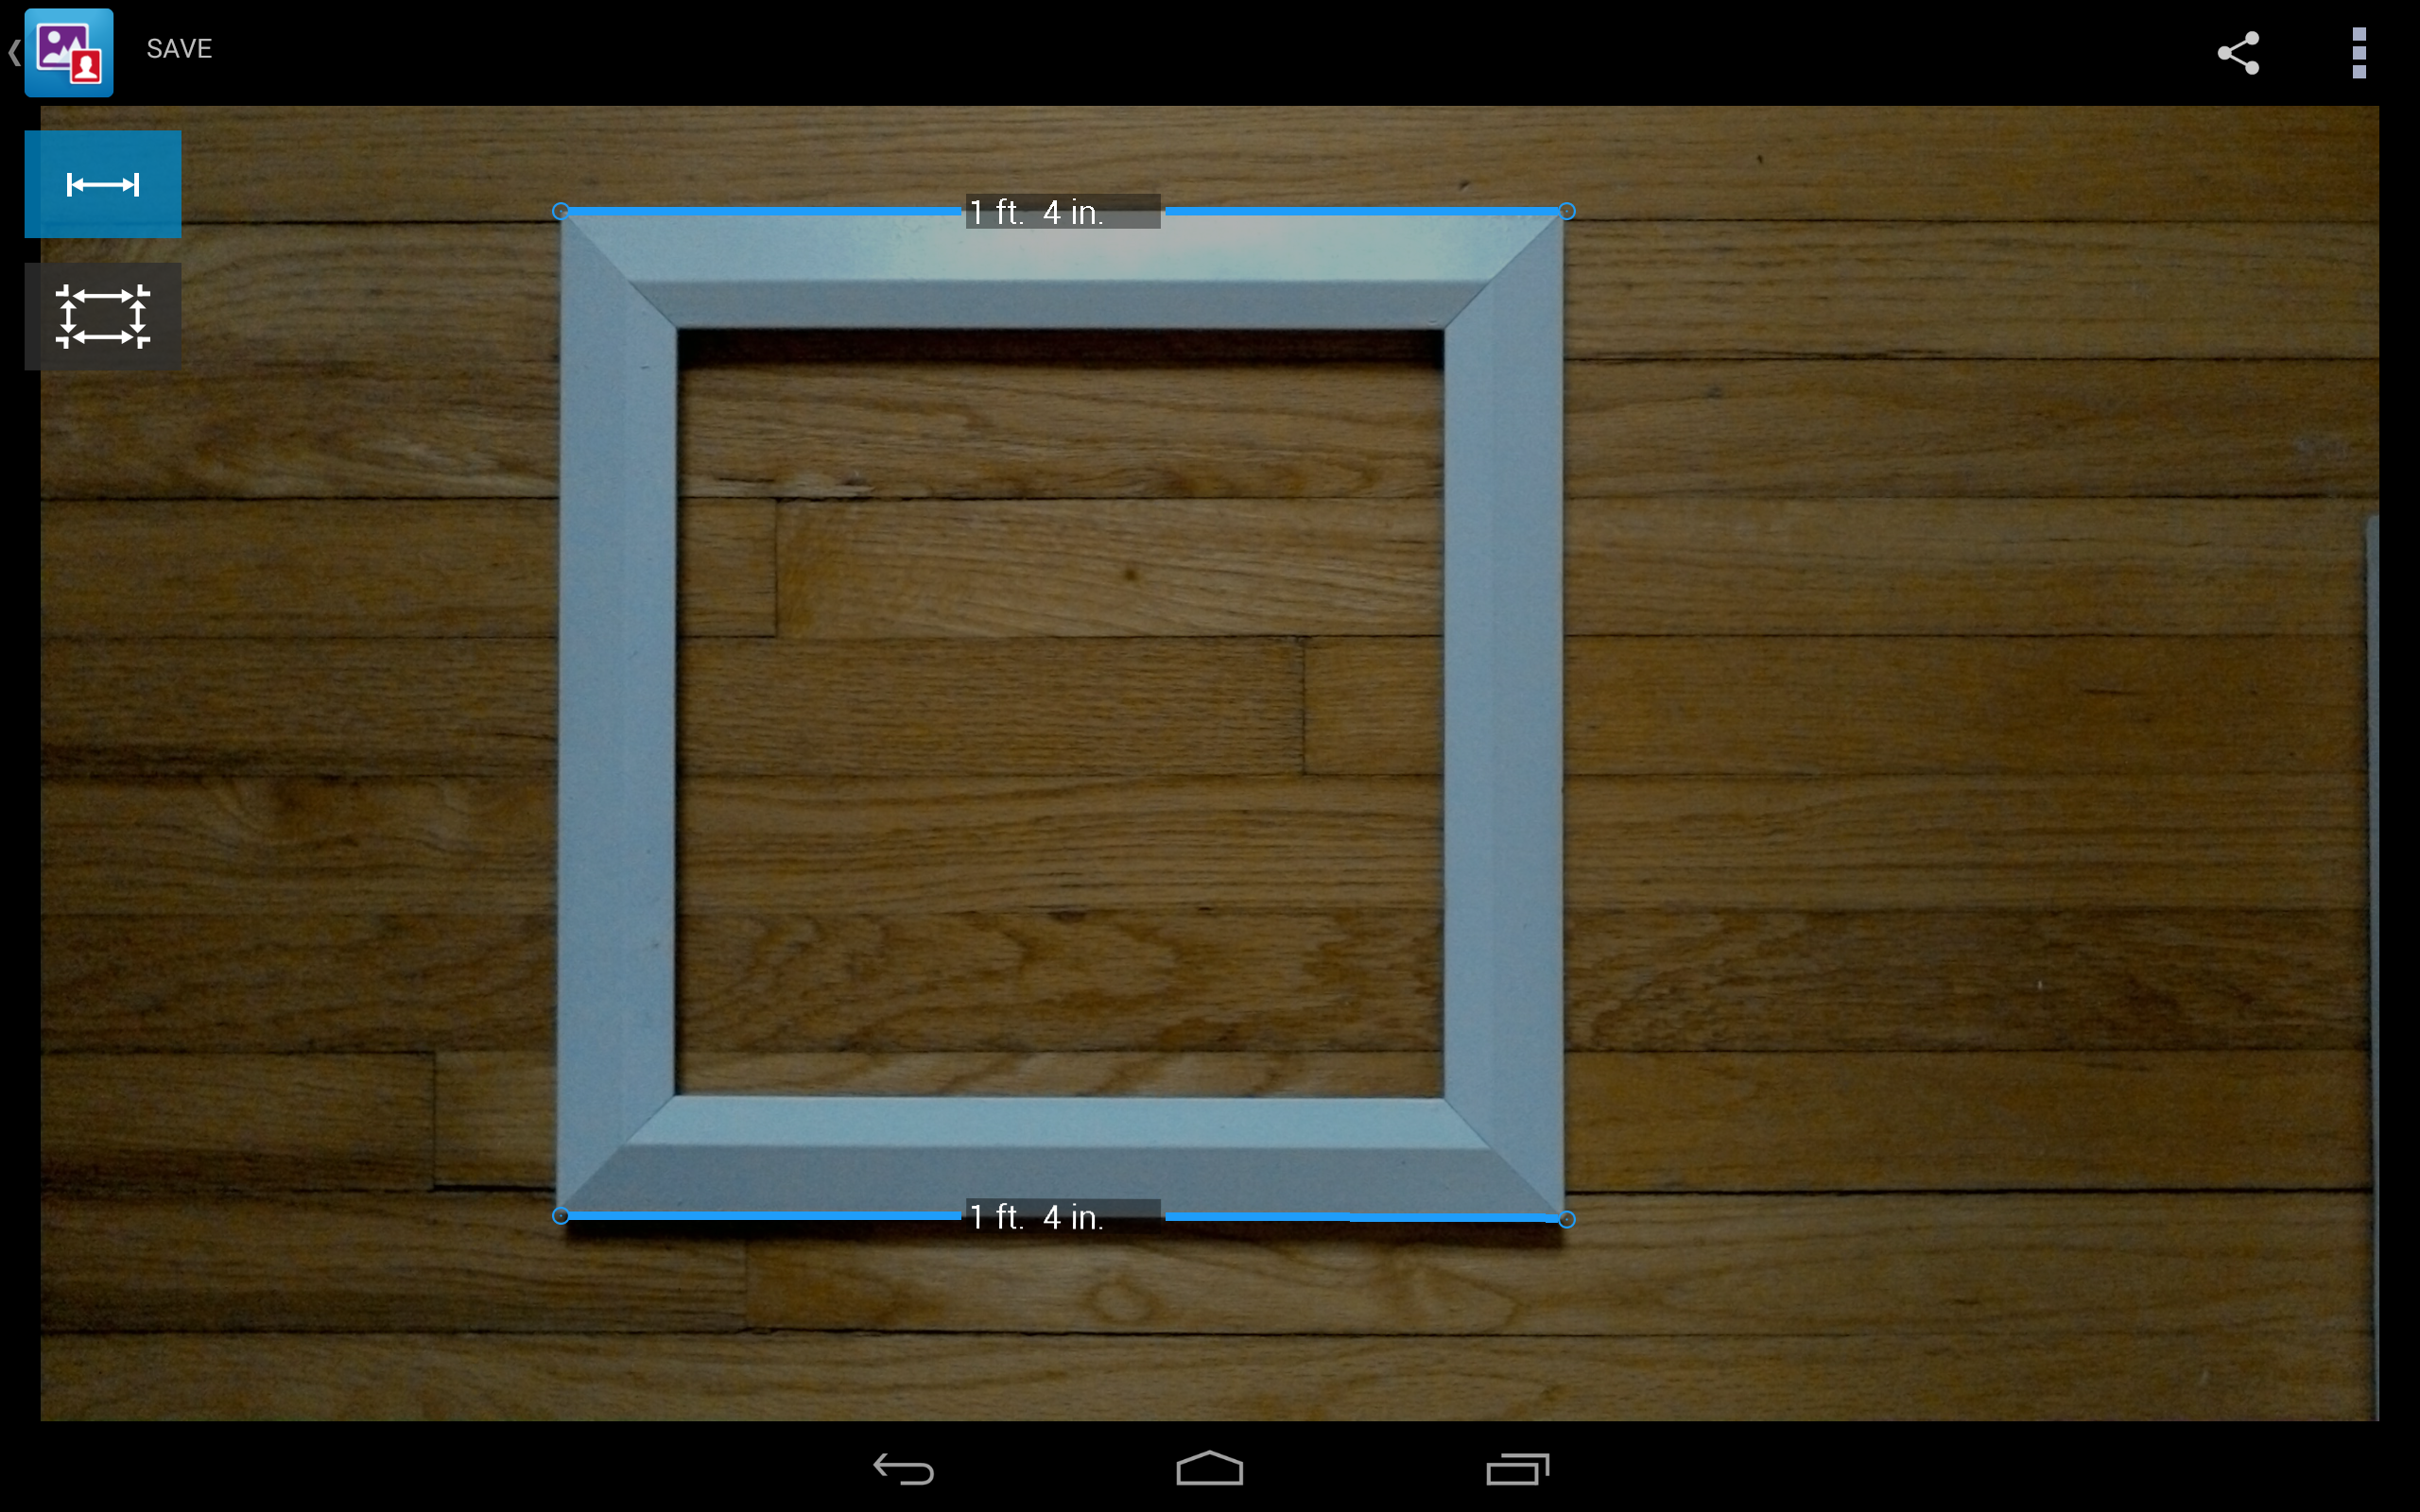
In some cases, though, the measurement tool was more accurate. Take for example this picture frame:
The sides of the frame are actually 16.25”, so the tool was accurate within a quarter-inch (it doesn’t offer measurements less than an inch, so being within an inch is as accurate as the tool can possibly be).
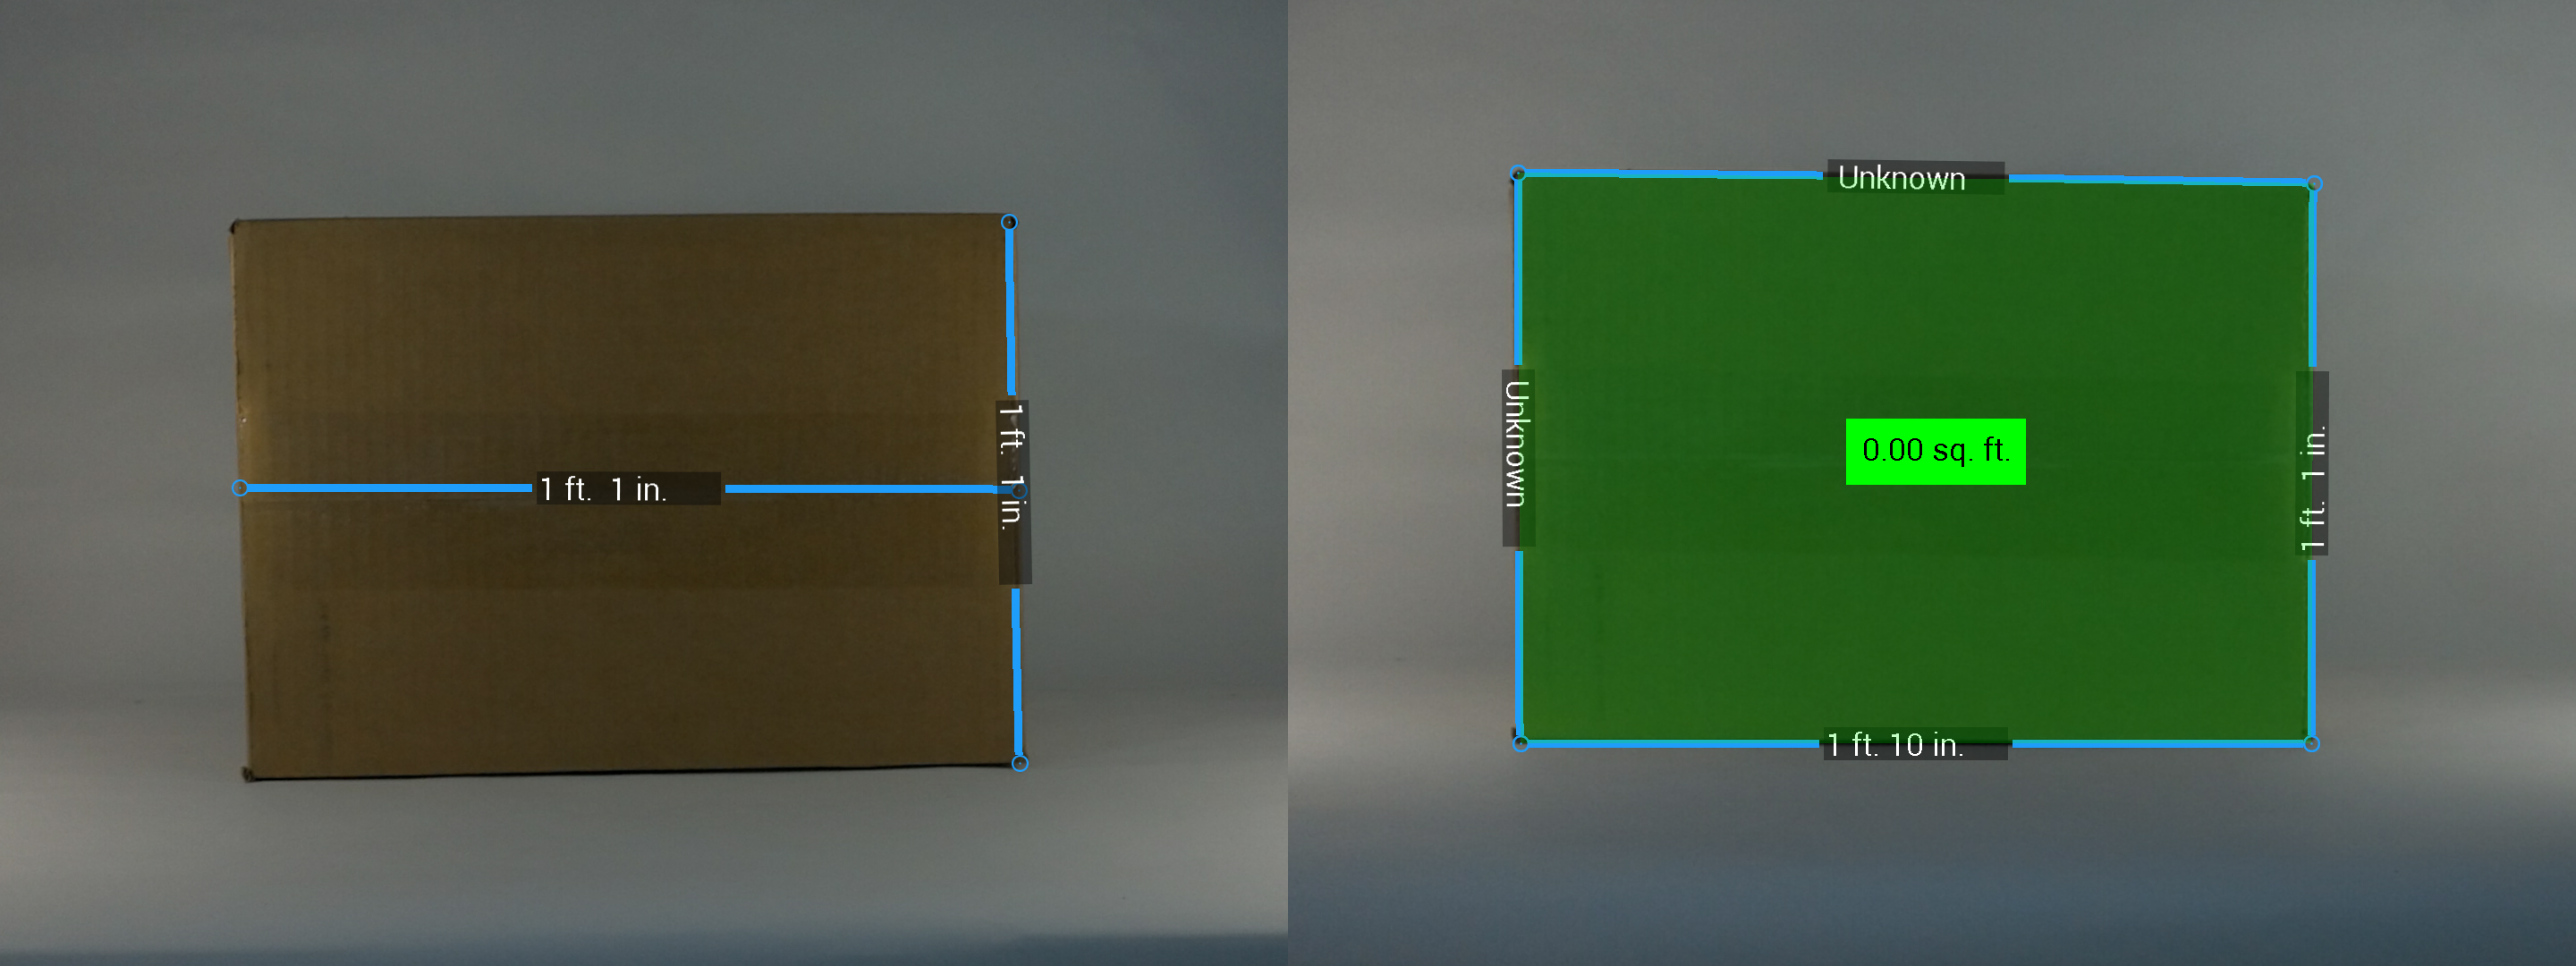
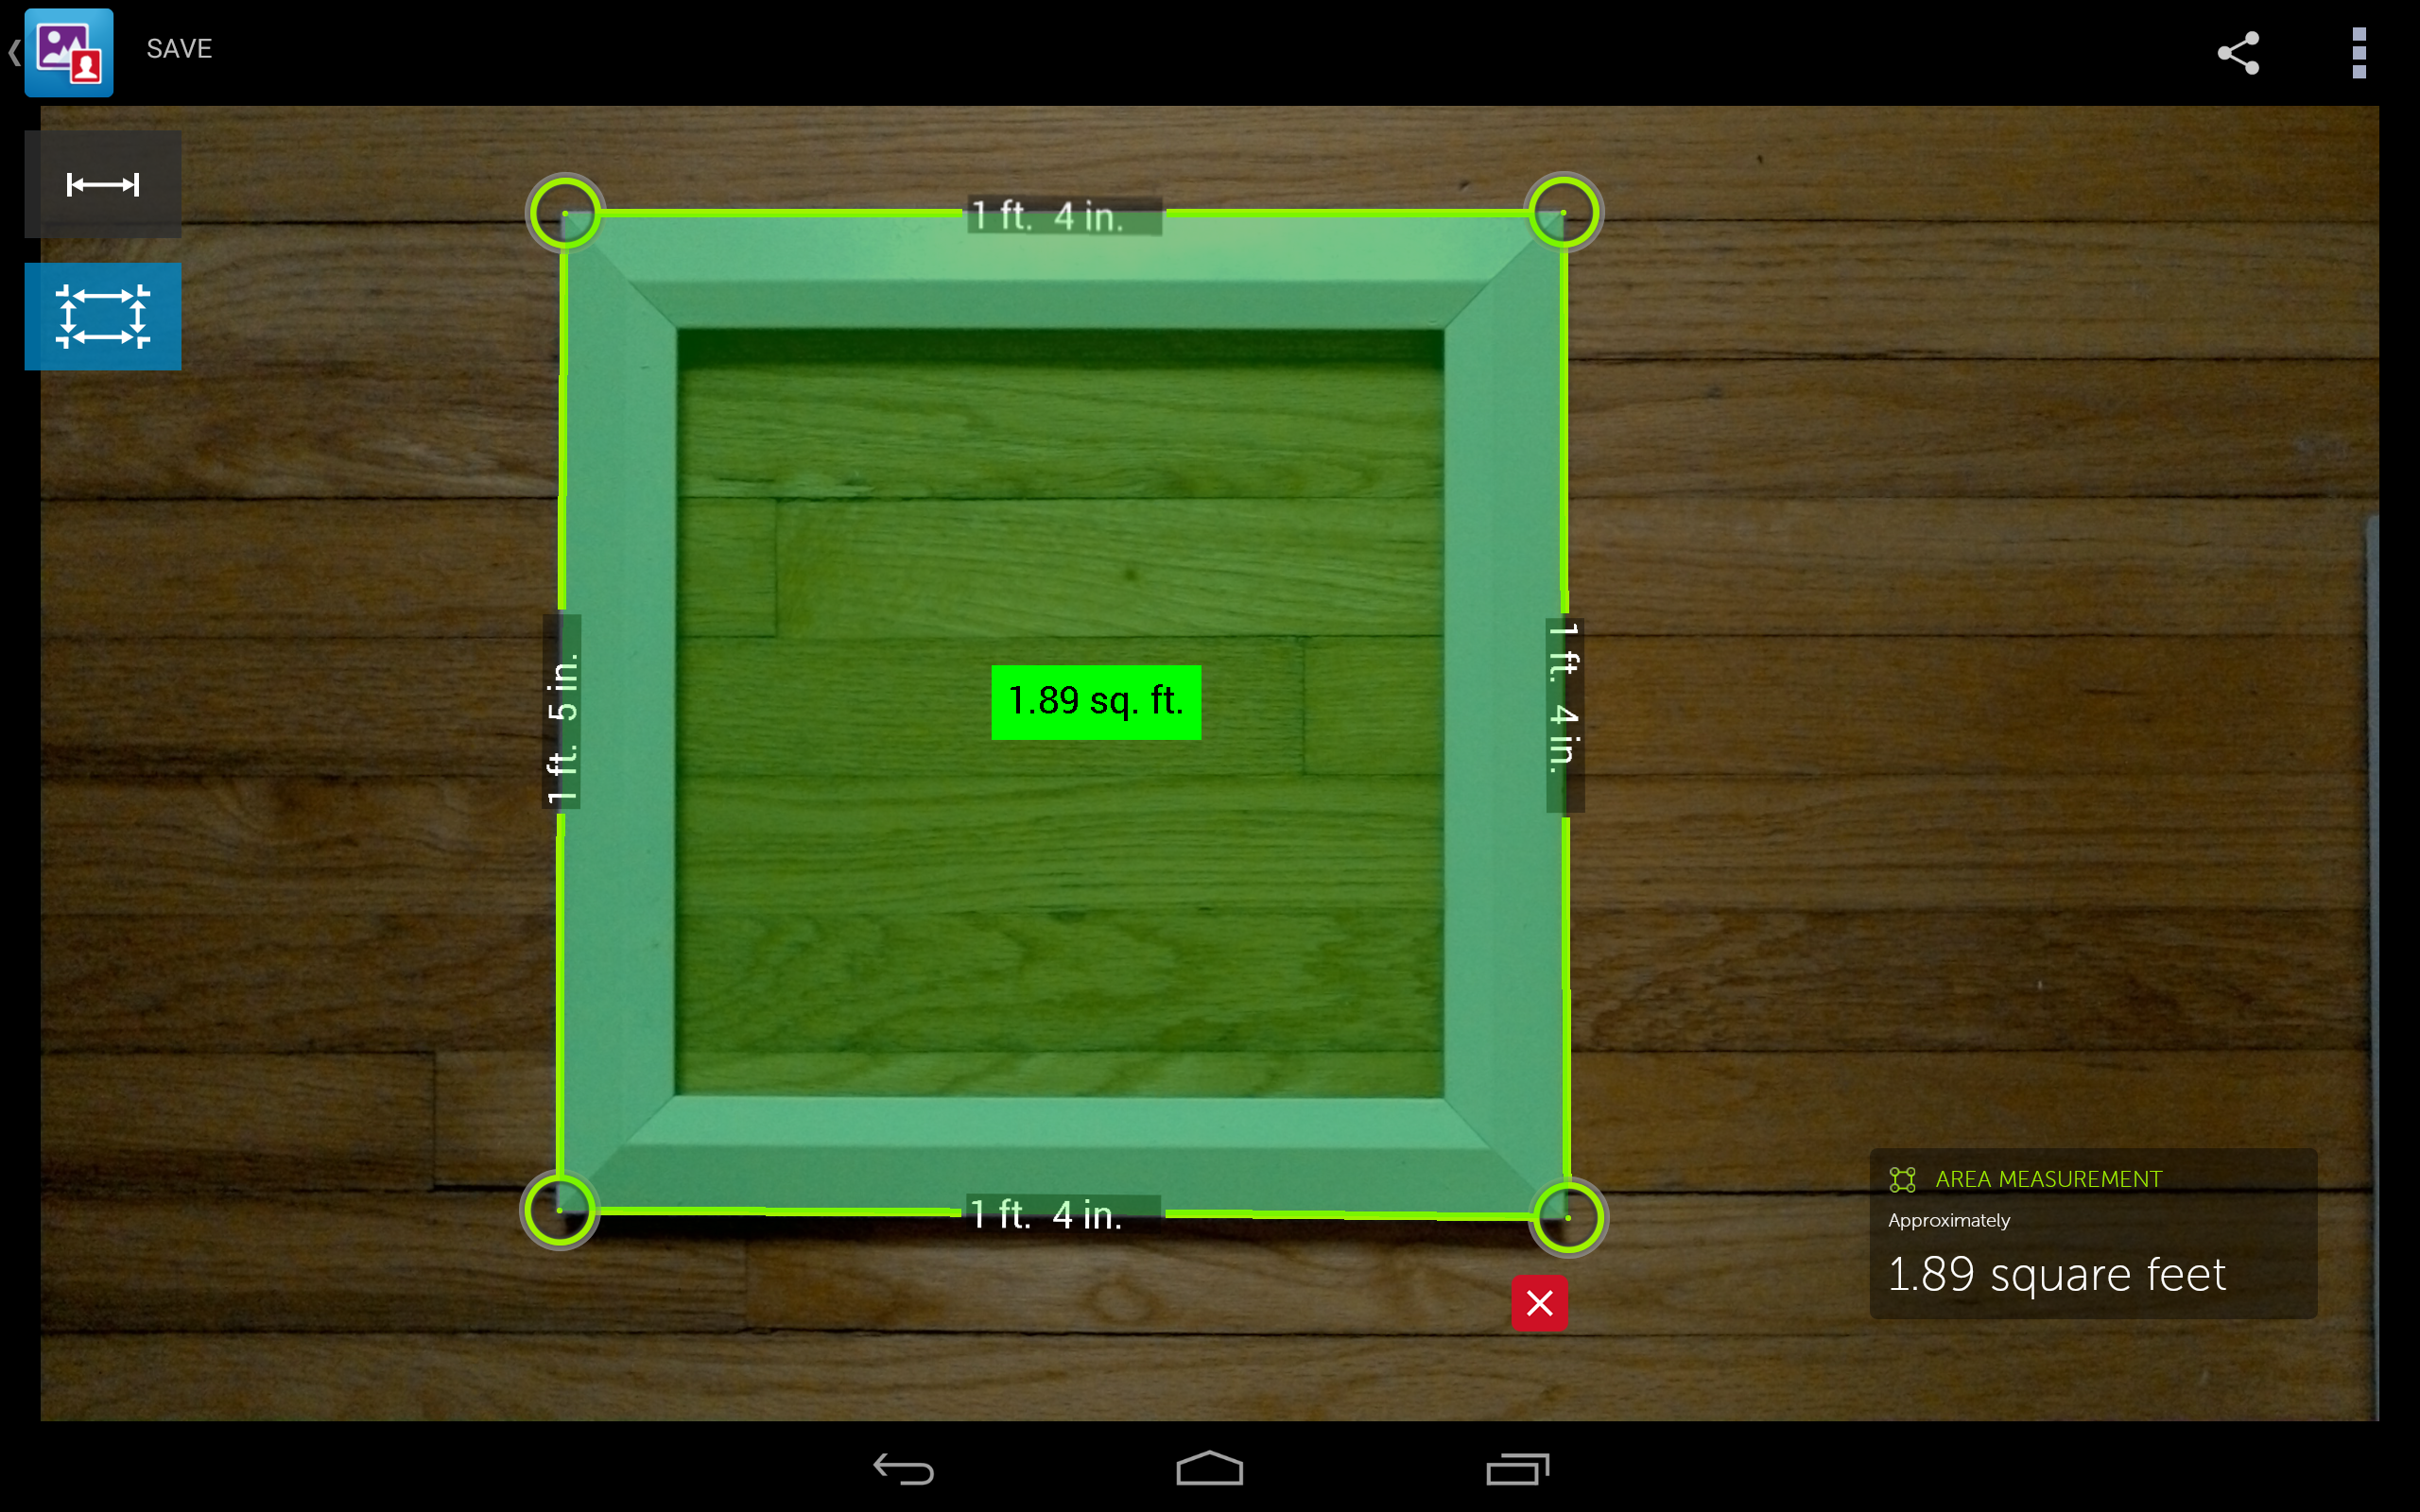
With the measurement tool, you can also check for the area of a plane. You simply tap for points, click to drag the points to exact spots, and poof, you get the area.
Or not. In this image, we shot a simple, rectangular box as close to straight on as possible. Again, we're holding a tablet and shooting without a tripod. The tool wasn’t able to measure all the sides and thus produced an “unknown” result. Oddly, the line measurement in the image on the left is actually correct.
Using that snapshot of the picture frame (above), we were able to get a reasonably accurate result, though. One of the sides registered an inch off, and therefore the area was slightly incorrect, but all things considered this particular area calculation was quite good.
We should note that we got more accurate results when shooting close to an object and measuring something small, or shooting farther away and measuring a larger distance. For instance, if you want to know the width of a brick, you should be within about 3 feet, not 15.
Current page: The Measurement Tool
Prev Page Hands-On With Intel's RealSense Snapshot Camera Next Page What Are We To Conclude?Seth Colaner previously served as News Director at Tom's Hardware. He covered technology news, focusing on keyboards, virtual reality, and wearables.
-
Eggz Looks like it could be pretty useful in the future, once all of the bugs are worked out.Reply
Lens distortion is a real problem when shooting off angle. It's like pointing a projector off-axis at a wall. When you do that, parts of the image get stretched toward one corner and others get shrunk toward the opposite corner (like below).
A similar thing happens in reverse when you take pictures. So that could be throwing off the calculations as well. I'm not sure how they could adjust for that very well. Seems like an interesting challenge. -
g-unit1111 Sounds like it could be useful, I've never had a device with a good camera. Looks like manufacturers are starting to take this kind of photography seriously.Reply -
nroslm Seems like a good sensor fora variety of things, but useless as a camera. Good photos require good glass which costs hundreds or thousands of dollars, this simpy requires to much glass to implement and even for the point and shoot crowd, I'm sure they'd be more happy with resources put into a larger sensor since these devices have no room for more/better glass.Reply -
nekromobo Countries which have not officially adopted the metric system (US, Myanmar (formerly Burma) and Liberia). Please use metric system, enuff said.Reply -
razvanc In the measurement tools defence:Reply
1. The 7 inch brick is actually smaller than the 8 inch ones (you can kind of se it with the naked eye)
2. The door is at an angle. Look down at the picture. That probably hurts the depth estimation and with it the height estimation.
I wonder, to test the reliability of the measurement couldn't you try again. You know measure twice cut one... :) -
scolaner Reply15257401 said:In the measurement tools defence:
1. The 7 inch brick is actually smaller than the 8 inch ones (you can kind of se it with the naked eye)
2. The door is at an angle. Look down at the picture. That probably hurts the depth estimation and with it the height estimation.
I wonder, to test the reliability of the measurement couldn't you try again. You know measure twice cut one... :)
You're right in your "naked eye" assessment--but a major issue, which I address in the article, is that it's nearly impossible to shoot exactly straight on with a device like this. There's no tripod mount (although I'm sure you could rig one up somehow). You're just...holding a tablet.
(Plus, if you need to measure something and have the time to set up a jerryrigged tripod, it would be easier to just use a tape measure.)
And, of course, I "tried again"...I took multiple shots of everything, lol. -
warezme I get the feeling that if this had been an Apple device the writer would have been oozing wet in his underpants and tripping with kudos even on a pre production unit despite all it's foibles.Reply -
Brian_R170 I got a 7840 last week and the software update to enable the measuring function was pushed to it the next day. I had mixed results with the accuracy. It definitely worked best on things that were flat and less than 10 feet away. The photos where I rested my hands on a table and the camera angle was within 10 degrees or so of being perpendicular to the measurement line were accurate to the nearest inch every time. I took several photos of measuring devices (a yard stick and carpenter's square) to make the analysis a lot easier. The worst measurements came when I tried to measure a coworker's height. He is 6'1" and I got values from 5'3" to 5'10". I also got "unknown" occasionally when measuring multiple objects in the same photo, but it worked when I deleted the unknown-endpoints and created them again.Reply
