Extreme Overclocking
Fill And Purge

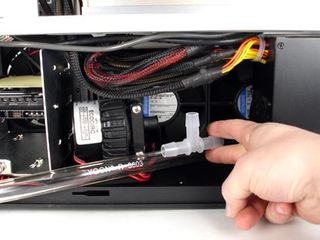
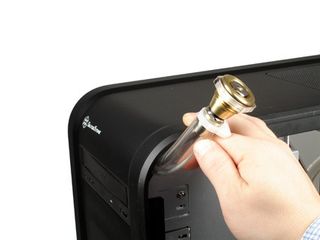
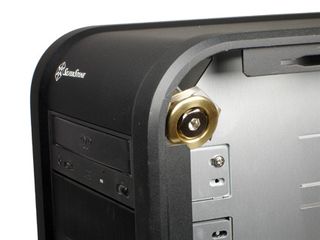
This system is designed not to have a physical reservoir. Instead of a box with extra coolant and a fill hole, we used method laid out in a Danger Den video. By using a T-fitting placed into the system facing up and attaching a long tube with a fill port, you can use the tube to act as the reservoir. What is unique about this design is that a hole can be cut into the top or side of the case to mount the fill port; this way, the case never has to be opened to fill or top off the coolant.

We used this approach but went in a slightly different direction. Since the only way you can see if the system needs more coolant is to open up the case, we decided to hide the fill port completely. We allowed for a little more tubing so it could be pulled out for better handling when filling the system. Once full, the tube slips back into the opening at the top of the case and is covered by the side panel.

Before we could start cranking up the clock speeds, we needed to purge the system of air; the pump can be damaged by a lack of lubrication and cooling, and we did not want pockets of air or tons of bubbles flowing in the system either. As we described earlier, air is less dense than water and will not conduct heat away from components as quickly. In addition, the system will not be fully pressurized if a vast amount of air is present in the coolant.
Filling and purging can take a fair amount of time. Since the pump should not be run unless there is coolant for it to move, a series of starts and stops was required, during which the air could be purged. To purge the air out you might have to tip the system or flip it upside down to make the air pockets flow out. Once finished there should be very little in the way of churning sounds coming from the pump, and you should not see many tiny bubbles in the coolant. Once you are satisfied with the fill and purge, you can take your new toy out for a spin - or in our case, for a beating.
Stay on the Cutting Edge
Join the experts who read Tom's Hardware for the inside track on enthusiast PC tech news — and have for over 25 years. We'll send breaking news and in-depth reviews of CPUs, GPUs, AI, maker hardware and more straight to your inbox.
Most Popular

