How To Use Picamera2 to Take Photos With Raspberry Pi
Capture images. video using pure Python
When Raspberry Pi OS moved from being based on Debian Buster, to Bullseye, the transition wasn’t the smoothest. For many years Raspberry Pi OS used three tools to access the official Raspberry Pi camera. The first two were raspistill / raspivid, which offered control and access to the camera via the Linux terminal.
It was a powerful and flexible means to work with the camera, both could produce video effects and stream video with no extra work. The other means was a community created project called PiCamera. Originally created by Dave Jones, Picamera grew from a community project into an essential tool. Picamera offered a purely Python means to interact with the camera, and being based on Python it also meant that we could mix the camera into our projects.
With the move to Bullseye, we saw Picamera sadly break. Raspberry Pi LTD even went as far as to offer a “legacy” version of Buster with Picamera and security updates. This was a stop-gap measure while its developers worked on Picamera2. With the September 2022 release of Raspberry Pi OS we now have a working Picamera2 module that we can use in our projects.
In this how-to we shall learn how to use Picamera2’s rather splendid API [pdf] to capture images, record video, and work with the GPIO to react to input as a means to capture an image. This how-to is compatible with all models of the official Raspberry Pi camera, including the Raspberry Pi Camera Module 3 which now comes with autofocus, HDR and a 110 degree wide angle lens.
For the projects you will need
- A Raspberry Pi (3B+, 4 or Zero 2 W are best)
- An official Raspberry Pi camera
- A mini breadboard
- A button
- 2x female to male wires
Connecting your Raspberry Pi Camera
The Raspberry Pi camera has been part of the best Raspberry Pi accessories for almost as long as the Pi has been with us. Nearly every model of Raspberry Pi has a camera (CSI) connector (the exception being the first model of Raspberry Pi Zero) and this meant that the camera rapidly became the must have accessory for your Pi. The same is still true, thanks to the official HQ camera offering much better image quality and a series of interchangeable lenses.
Connecting any official camera to the Raspberry Pi is easy to do, just follow these steps.
1. Set up a Raspberry Pi if you don't have one already. See our guide on how to set up a Raspberry Pi.
Get Tom's Hardware's best news and in-depth reviews, straight to your inbox.
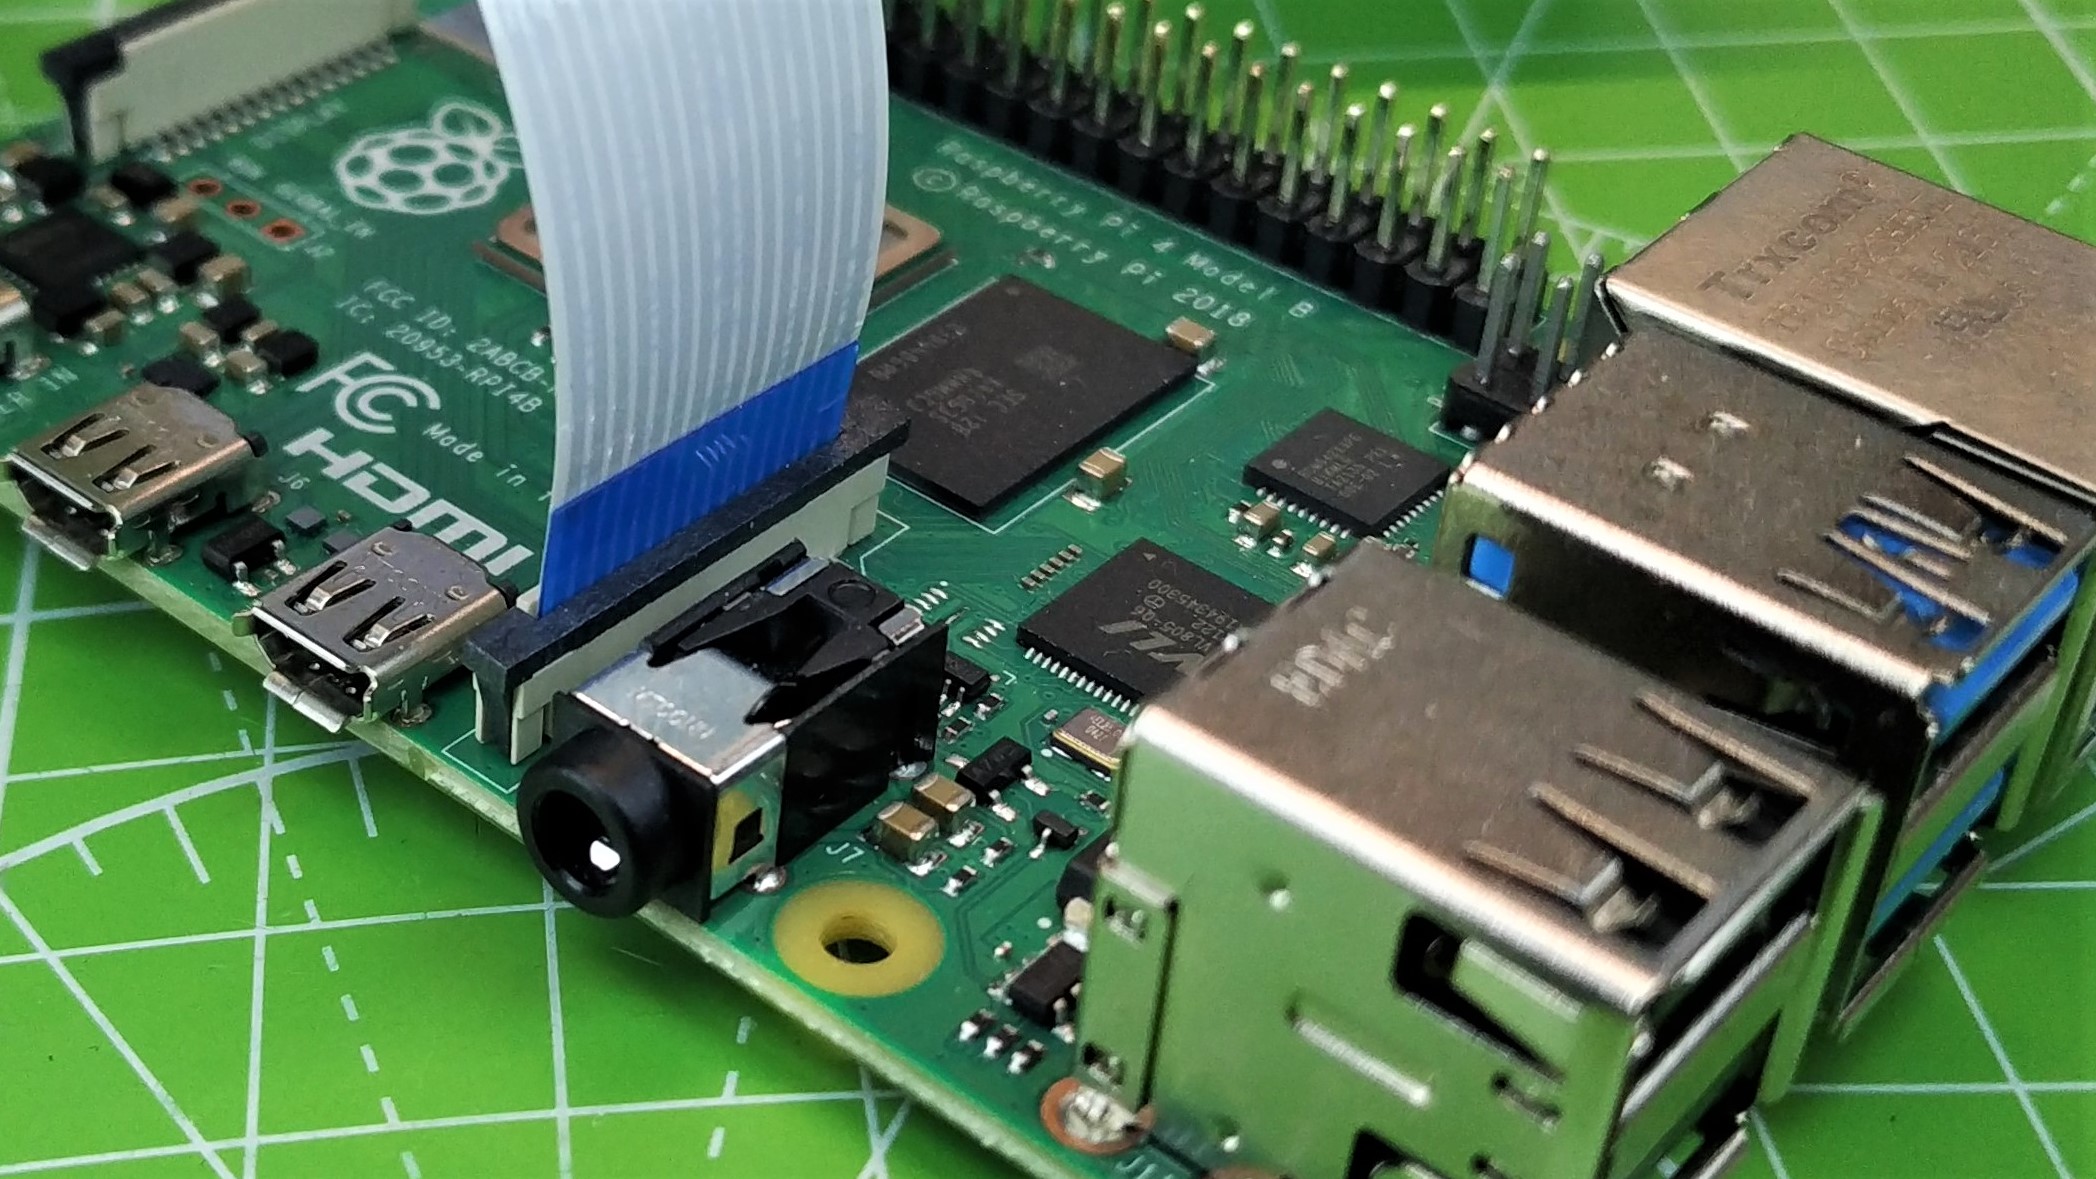
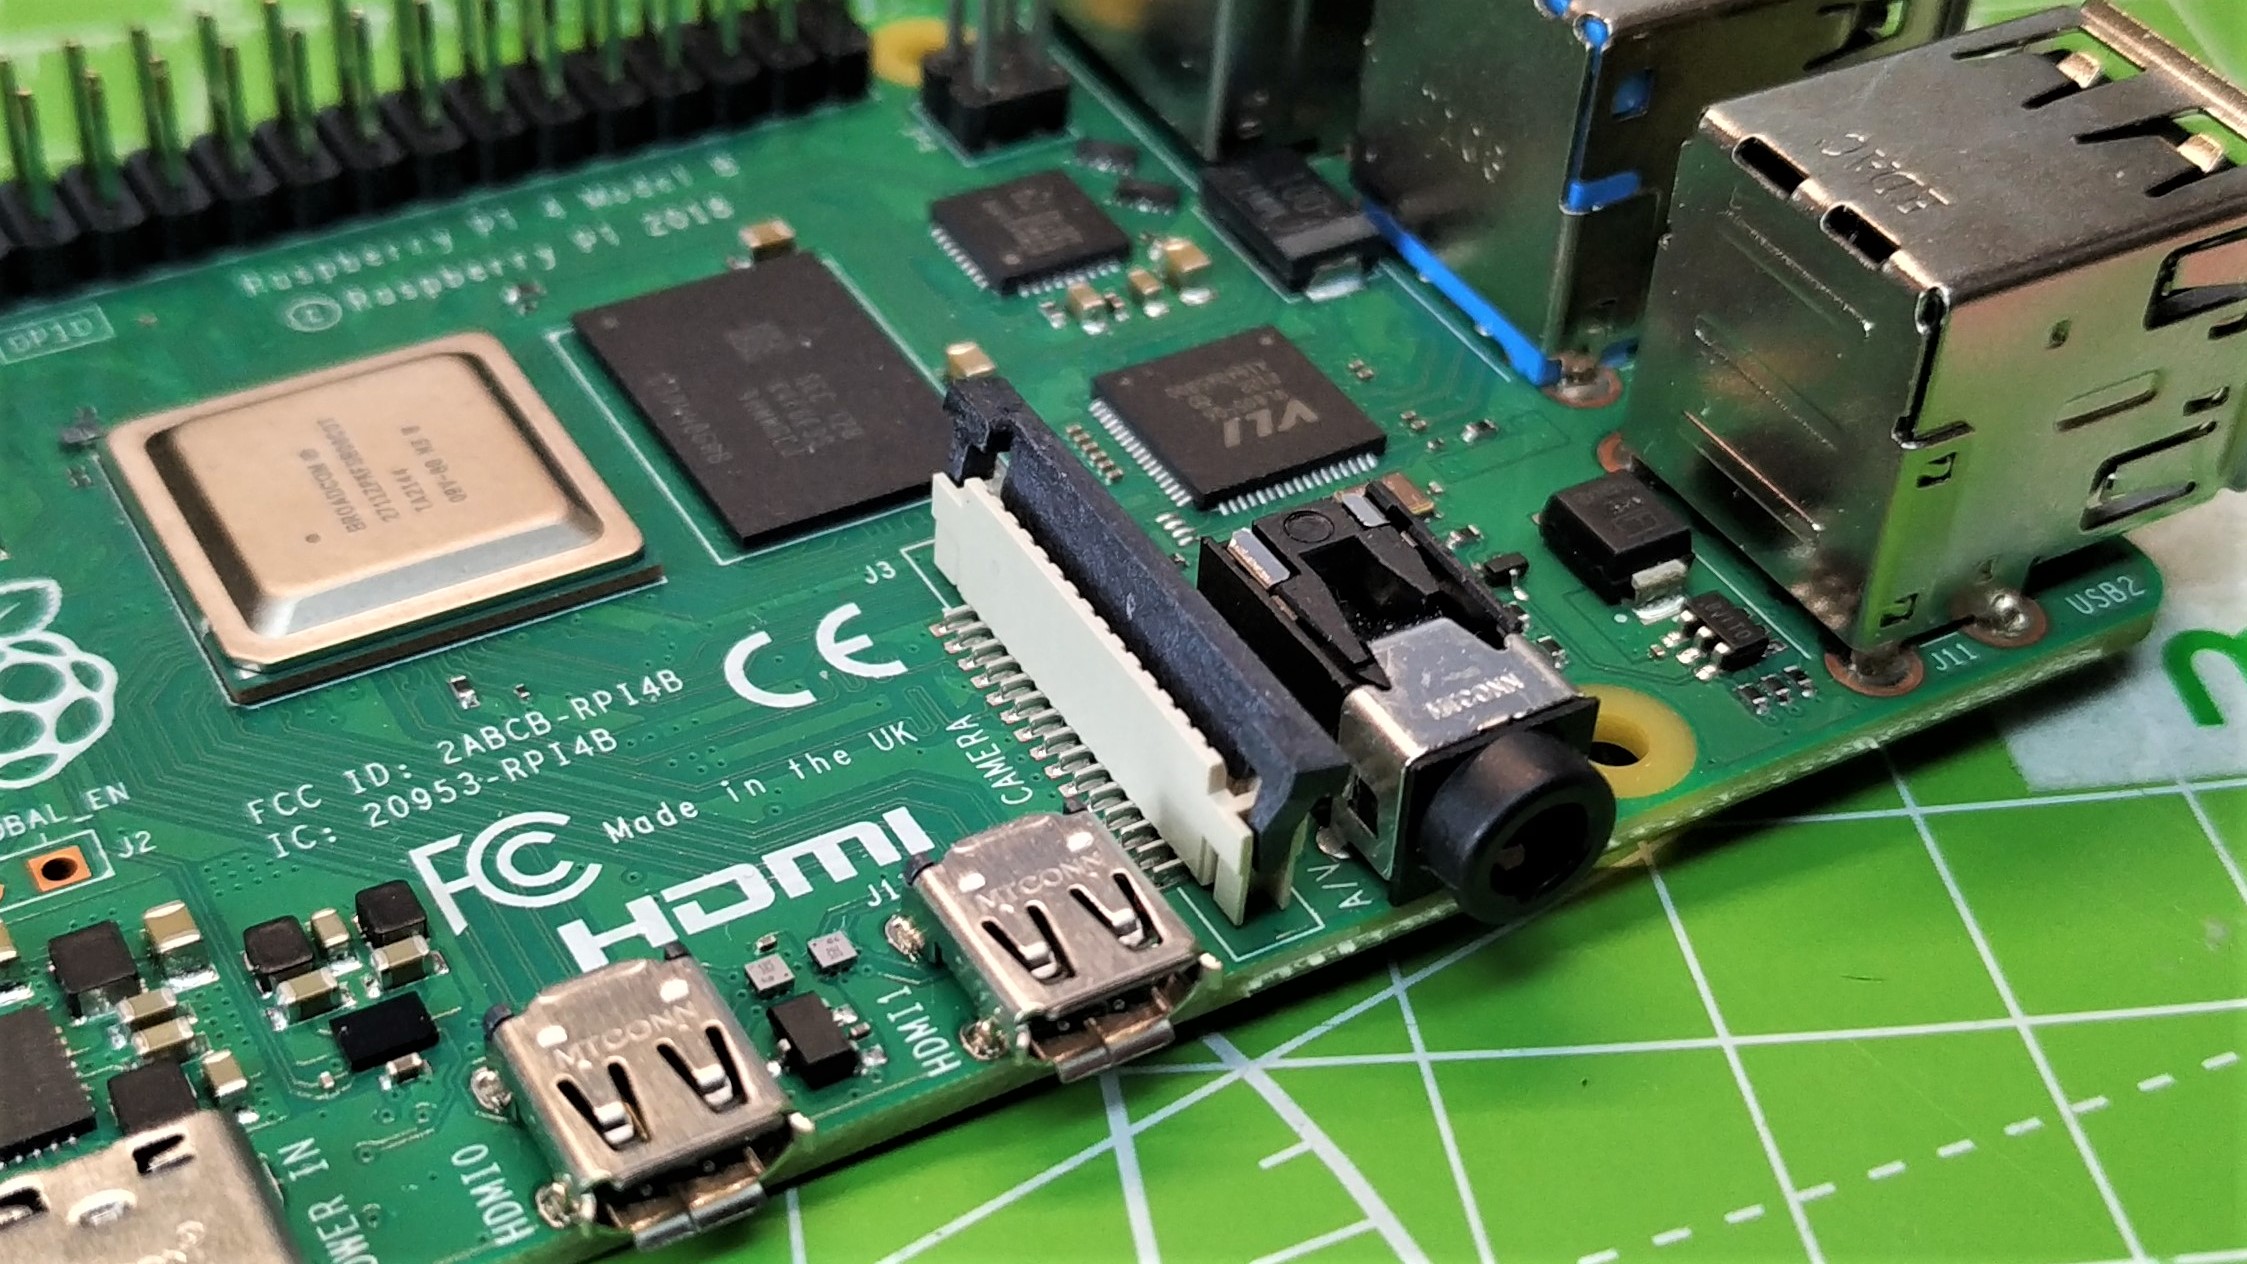
2. With the Raspberry Pi powered off, lift the tabs of the CSI port.
3. Insert the cable with the blue tab facing the USB / Ethernet port.

4. Gently slide the tabs down to lock the cable in place.
5. Secure / mount the camera so that it does not flop over and touch the Pi or its GPIO. One method is to use modelling clay / blu tack.
Installing Picamera2 software
1. Boot the Pi.
2. Open a terminal and update the installed software.
sudo apt update
sudo apt upgrade -y
3. Install the Picamera2 Python3 module. For the latest Raspberry Pi OS releases (September 2022 onwards) it comes pre-installed, but this command will also update your version to the latest release.
sudo apt install -y python3-picamera2Taking a Photograph with Picamera2
Taking a photograph with Picamera2 is the most basic task that you can perform with the module. By design, it has been created to be simple to use, but underneath the simplicity is a complex module that we can tweak to suit our needs.
In this project we shall capture an image, using a preview to frame the shot.
1. Open Thonny. You can find it in the main menu.
2. In a new file, import the Picamera2 module, along with the preview class. On a new line, import the time module. The Picamera2 module will provide us with control of the camera and time is used to control how long the preview image will remain on screen.
from picamera2 import Picamera2, Preview
import time
3. Create an object, picam2, which is used to reference the Picamera2 module and control the camera.
picam2 = Picamera2()4. Create a new object, camera_config and use it to set the still image resolution (main) to 1920 x 1080. and a “lowres” image with a size of 640 x 480. This lowres image is used as the preview image when framing a shot.
camera_config = picam2.create_still_configuration(main={"size": (1920, 1080)}, lores={"size": (640, 480)}, display="lores")5. Load the configuration.
picam2.configure(camera_config)6. Start the preview window and then start the camera.
picam2.start_preview(Preview.QTGL)
picam2.start()
7. Pause the code for two seconds.
time.sleep(2)8. Capture an image and save it as test.jpg.
picam2.capture_file("test.jpg")9. Save the code as camera-test.py and click Run to start. A preview window will appear, use this to frame your shot. If two seconds is too short a delay, change the delay to meet your needs.
10. Open the system File Manager and double click on test.jpg to view the image.
Complete Code Listing
from picamera2 import Picamera2, Preview
import time
picam2 = Picamera2()
camera_config = picam2.create_still_configuration(main={"size": (1920, 1080)}, lores={"size": (640, 480)}, display="lores")
picam2.configure(camera_config)
picam2.start_preview(Preview.QTGL)
picam2.start()
time.sleep(2)
picam2.capture_file("test.jpg")
Recording a Video with Picamera2
HD video recording is something that we now take for granted. The same is true for the Raspberry Pi thanks to numerous models of official (and unofficial) cameras. With Picamera2 we can record video at various resolutions using different encoders.
In this project we will show how to record a simple 1080P video stream, while previewing the stream in a lower resolution window.
1. Open Thonny and create a new file. You can find Thonny on the main menu.
2. Import the H264 encoder from the Picamera2 module.
from picamera2.encoders import H264Encoder3. Import the Picamera2 module, along with the preview class. Next import the time module.
from picamera2 import Picamera2, Preview
import time
4. Create an object, picam2, which is used to reference the Picamera2 module and control the camera.
picam2 = Picamera2()5. Create a new object, video_config and use it to set the still image resolution (main) to 1920 x 1080. and a “lowres” image with a size of 640 x 480. This lowres image is used as the preview image when framing a shot.
video_config = picam2.create_video_configuration(main={"size": (1920, 1080)}, lores={"size": (640, 480)}, display="lores")6. Load the configuration.
picam2.configure(video_config)7. Set the bitrate of the H264 encoder.
encoder = H264Encoder(bitrate=10000000)8. Set the output file to test.h264. This will create a file containing the video.
output = "test.h264"9. Start the preview window, then start recording using the encoder settings and saving the video to the output file.
picam2.start_preview(Preview.QTGL)
picam2.start_recording(encoder, output)
10. Use a sleep to record ten seconds of video. The previous recording command is not a blocking line of code. Using a sleep command, we keep the recording from stopping after a fraction of a second.
time.sleep(10)11. Stop the camera recording and close the preview window.
picam2.stop_recording()
picam2.stop_preview()
12. Save the code as video-test.py and click Run to start. The preview window will appear and you have ten seconds to record a video.
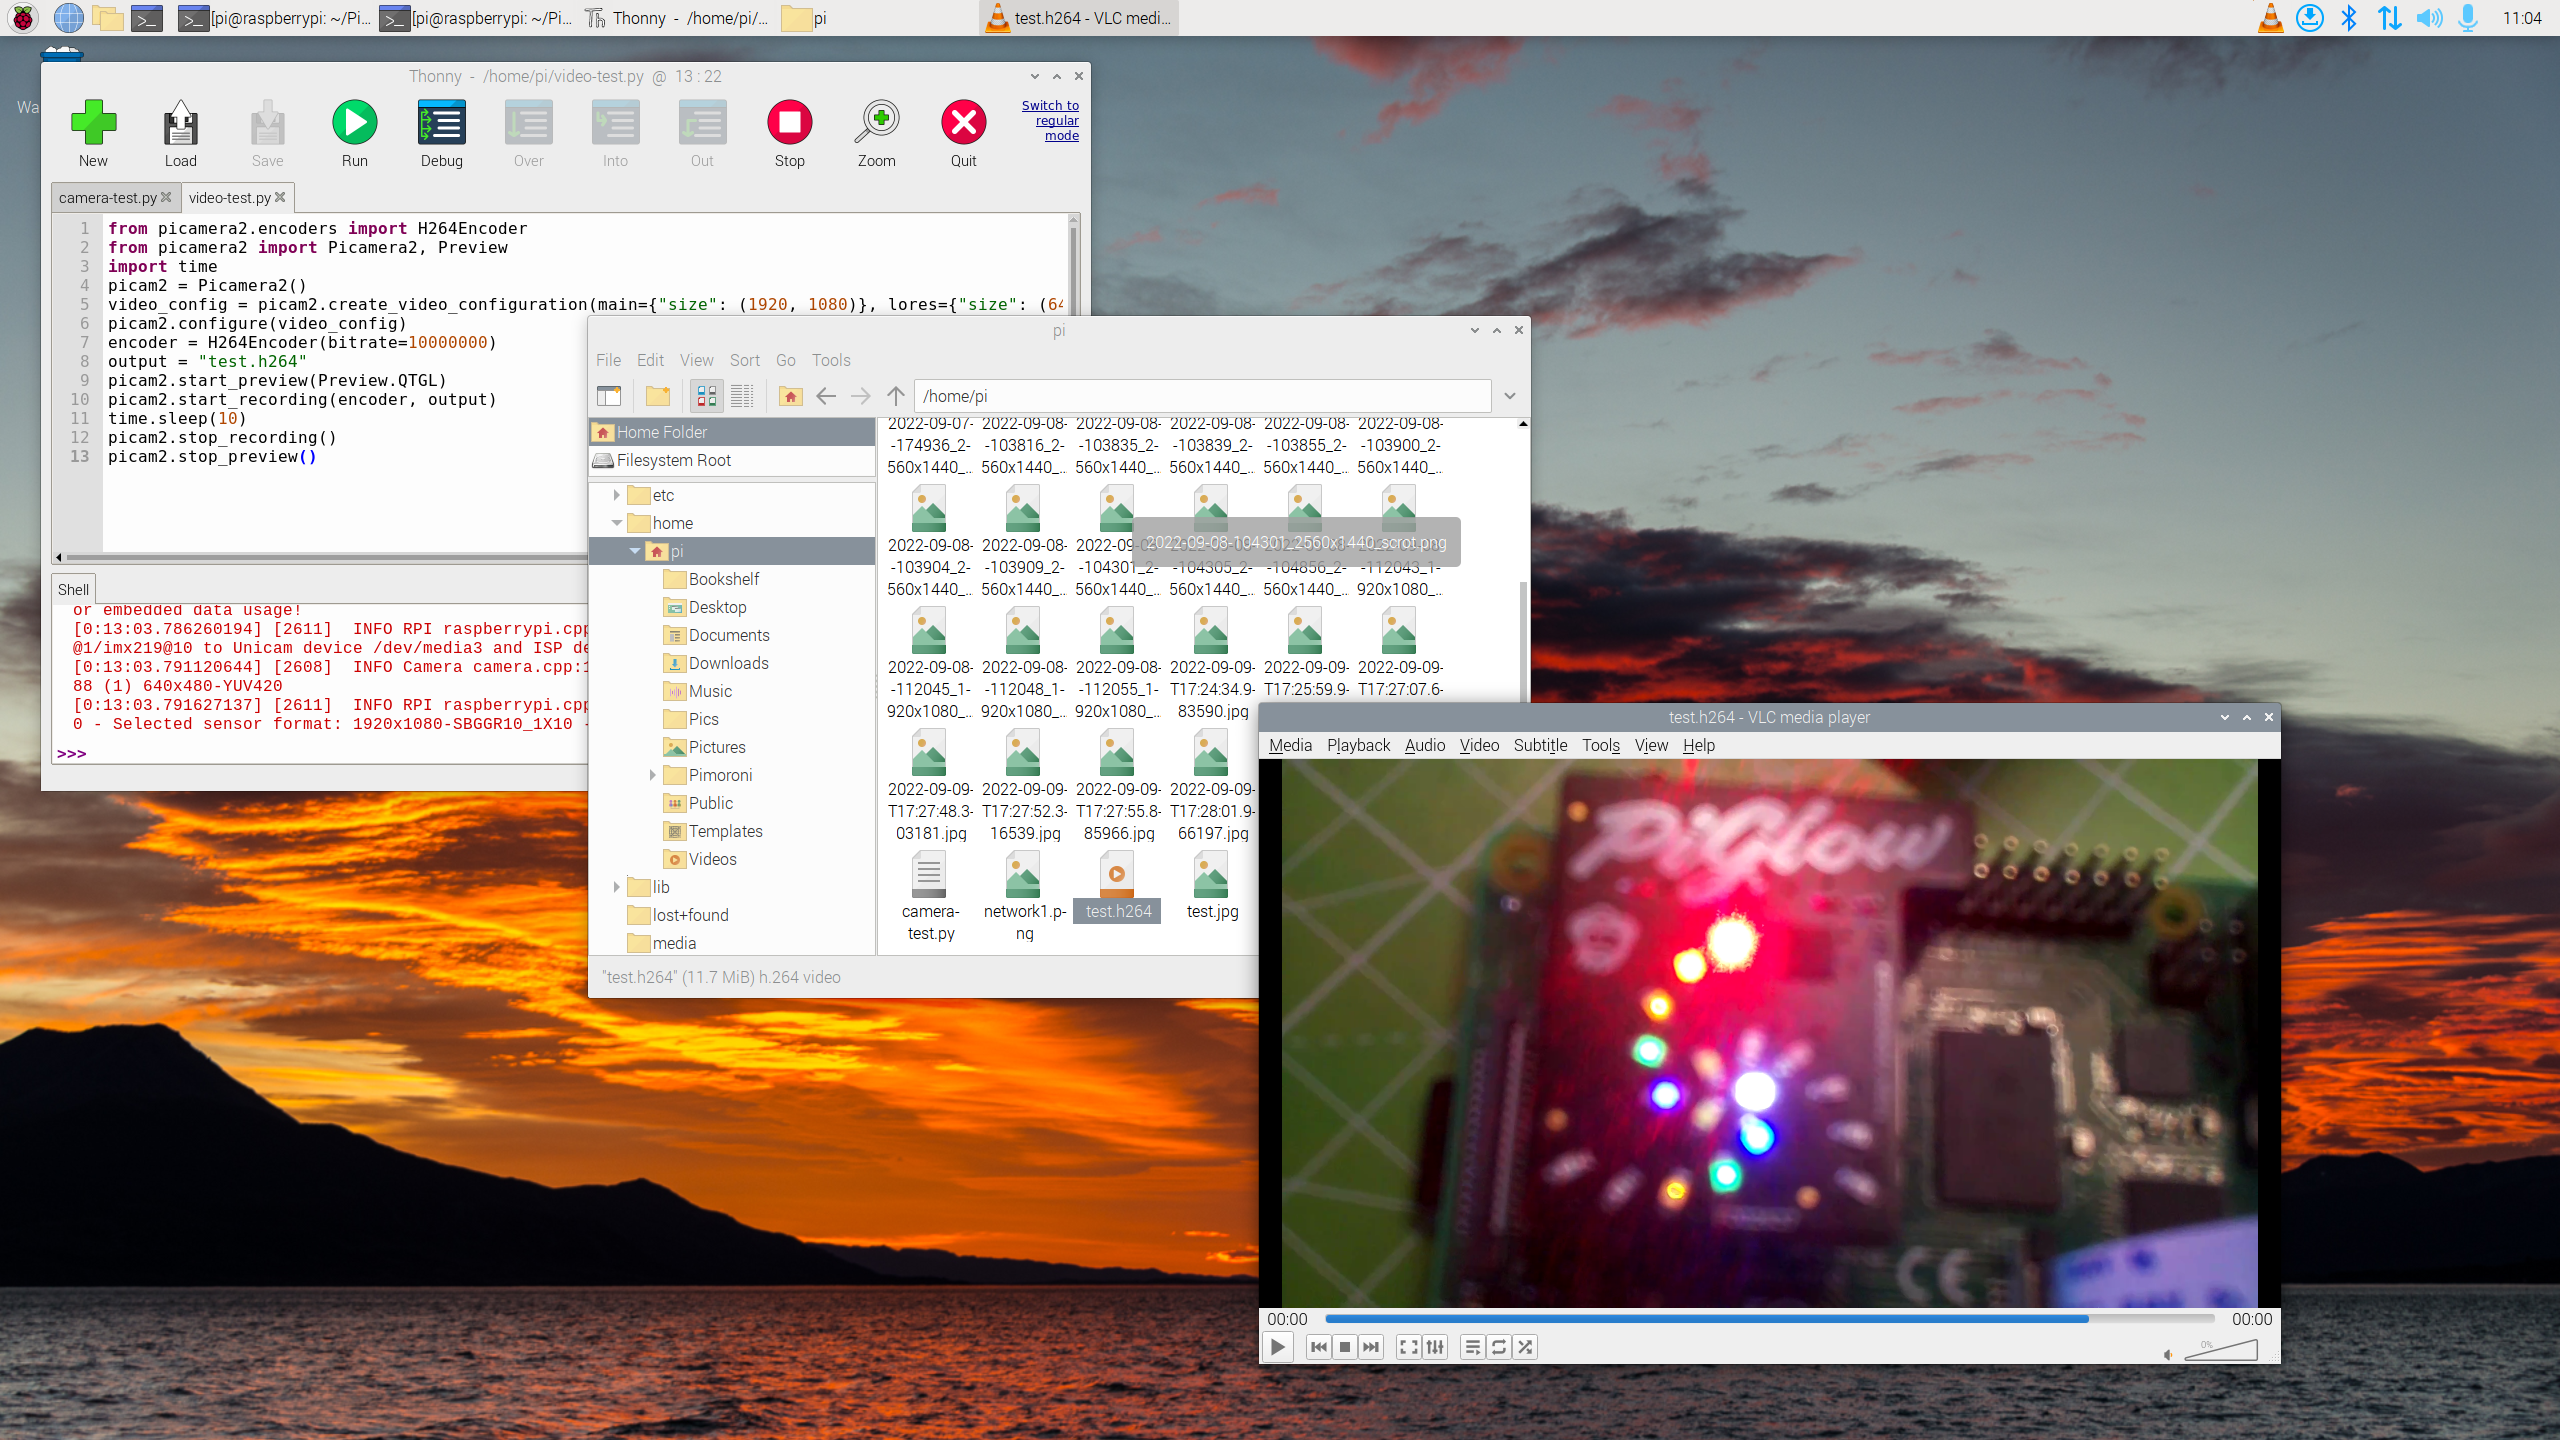
13. View the video.You can get there in the File Manager by locating test.h264. And double-clicking on the video file to play it in VLC.
Complete Code Listing
from picamera2.encoders import H264Encoder
from picamera2 import Picamera2, Preview
import time
picam2 = Picamera2()
video_config = picam2.create_video_configuration(main={"size": (1920, 1080)}, lores={"size": (640, 480)}, display="lores")
picam2.configure(video_config)
encoder = H264Encoder(bitrate=10000000)
output = "test.h264"
picam2.start_preview(Preview.QTGL)
picam2.start_recording(encoder, output)
time.sleep(10)
picam2.stop_recording()
picam2.stop_preview()
Using a Trigger to Take a Picture on Raspberry Pi
Camera triggers are a classic Raspberry Pi project. They are used to capture images / video of animals, intruders or to prank unwilling family members. A trigger can be a sensor such as a Passive Infrared (PIR) movement sensor, an ultrasonic sensor, or in our case, a simple push button.
In this project we will create a simple trigger activated camera trap. We press the button, frame the shot using the preview window, and the file then automatically saves to our Pi using the current time and date as a filename.
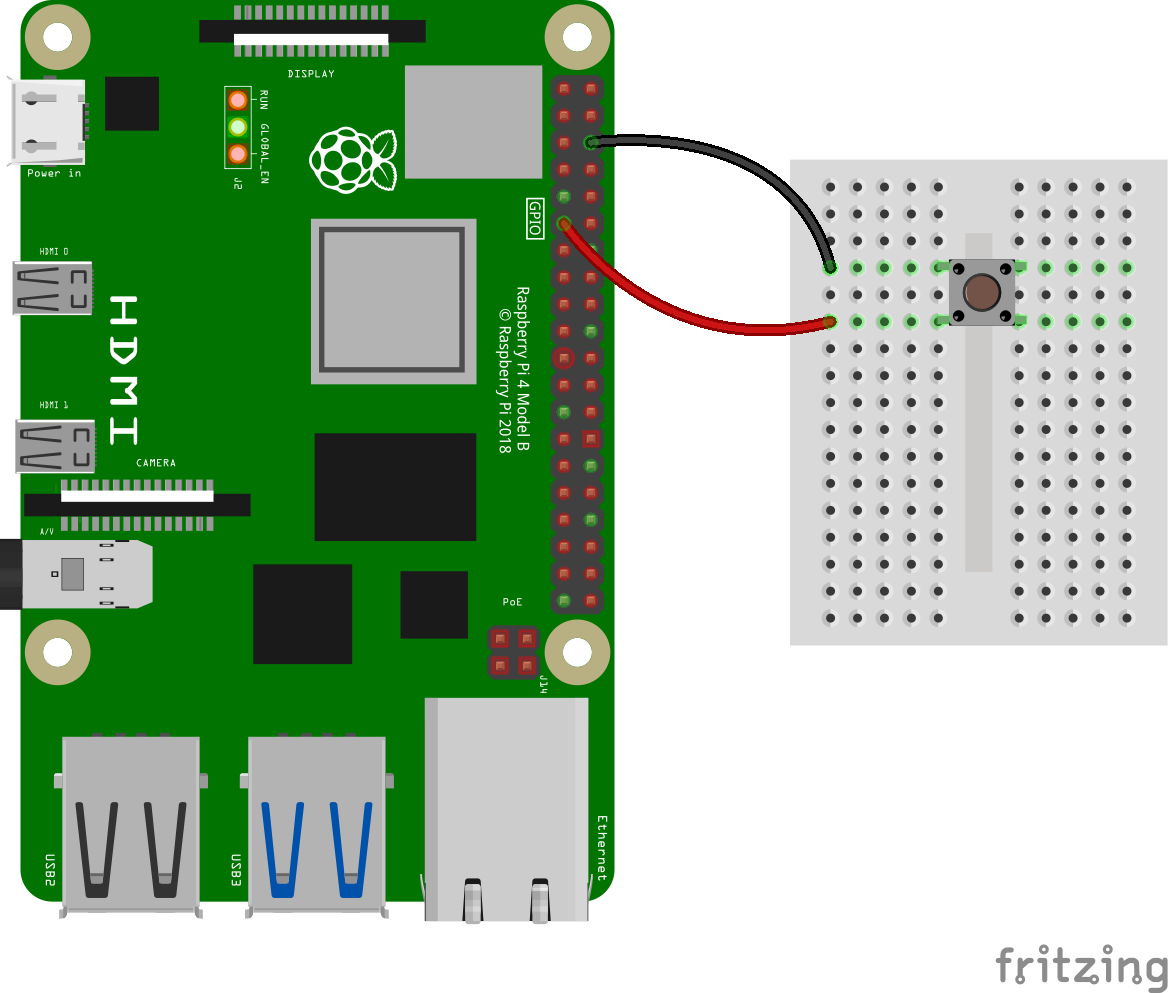
The wiring for this project is simple. The button is connected to GPIO17 and GND via a breadboard and two female to male wires.
1. Open Thonny and create a new file. You can find Thonny on the main menu.
2. Import the Picamera2 module, along with the preview class. Next import the time module.
from picamera2 import Picamera2, Preview
import time
3. Import the datetime, GPIO Zero and Signal modules. Datetime is used to generate a timestamp for our image filenames. GPIO Zero is used for a simple button interface. Signal is used to stop the Python code from exiting.
from datetime import datetime
from gpiozero import Button
from signal import pause
4. Create an object, picam2, which is used to reference the Picamera2 module and control the camera.
picam2 = Picamera2()5. Create an object, button, and use the object to store the GPIO pin to which our button is connected.
button = Button(17)6. Create a new object, camera_config and use it to set the still image resolution (main) to 1920 x 1080. and a “lowres” image with a size of 640 x 480. This lowres image is used as the preview image when framing a shot.
camera_config = picam2.create_still_configuration(main={"size": (1920, 1080)}, lores={"size": (640, 480)}, display="lores")7. Load the configuration.
picam2.configure(camera_config)8. Create a function, capture(), to store a series of commands that will be run when the trigger is pressed. Code inside of the function is automatically indented to show that it belongs to the function.
def capture():9. Start a preview window. This will enable us to frame our image.
picam2.start_preview(Preview.QTGL)10. Create an object, timestamp, and use it to store the time and date of the trigger event.
timestamp = datetime.now().isoformat()11. Start the camera, then pause for two seconds to allow time to frame the image.
   picam2.start()
   time.sleep(2)
12. Set the capture file, ultimately the image file, to use the current timestamp as the filename.
picam2.capture_file('/home/pi/%s.jpg' % timestamp)13. Finally in the function stop the preview, and stop the camera.
   picam2.stop_preview()
   picam2.stop()
14. Use GPIO Zero’s button class to react to a button press by calling our “capture” function. Finally use pause() to prevent the code from ending.
button.when_pressed = capture
pause()
15. Save the code as trigger-test.py and click Run to start the code.
16. Press the button to start the camera, and to take an image.
17. Open the system File Manager and double click on the image to view.
Complete Code Listing
from picamera2 import Picamera2, Preview
import time
from datetime import datetime
from gpiozero import Button
from signal import pause
picam2 = Picamera2()
button = Button(17)
camera_config = picam2.create_still_configuration(main={"size": (1920, 1080)}, lores={"size": (640, 480)}, display="lores")
picam2.configure(camera_config)
def capture():
    picam2.start_preview(Preview.QTGL)
    timestamp = datetime.now().isoformat()
    picam2.start()
    time.sleep(2)
    picam2.capture_file('/home/pi/%s.jpg' % timestamp)
    picam2.stop_preview()
    picam2.stop()
button.when_pressed = capture
pause()

Les Pounder is an associate editor at Tom's Hardware. He is a creative technologist and for seven years has created projects to educate and inspire minds both young and old. He has worked with the Raspberry Pi Foundation to write and deliver their teacher training program "Picademy".


