
Tom's Hardware Verdict
Solid hardware in a great form factor that has clearly been designed with a specific use case in mind.
Pros
- +
Small form factor
- +
SSD slot
- +
PoE
- +
USB C
- +
Passive Cooling
Cons
- -
Limited GPIO
Why you can trust Tom's Hardware Our expert reviewers spend hours testing and comparing products and services so you can choose the best for you. Find out more about how we test.
When you think of Raspberry Pi, you probably picture a single board computer that you use for interesting projects. But many people use Raspberry Pis in compute clusters. So why not be able to put some Pi-powered servers into a data center? The best form factor for data center computing is a blade server, a compact chassis that can easily fit next to other blade servers on a rack. The Compute Blade fulfills that purpose excellently, provided you can find a Raspberry Pi Compute module to put in it.
I’ve been keeping my eye on Ivan Kuleshov’s Compute Blade project since June 2021 as it intrigued me. Sure I’ve used many different Compute Module 4 Carrier Boards. From the official board, Seeed’s Dual Gigabit Ethernet Carrier Board, to Cytron’s Maker Board. All have their own niche to fulfill, but Kuleshov’s Compute Blade still held my interest despite a two year gestation period.
The Kickstarter is long over, having raised well over $1 million, and units will soon be making their way to eager backers. I was lucky enough to get hands on with a release candidate which closely matches the final product. For the Kickstarter, the $110 DEV Compute Blade is singularly the best version of the range and packs in plenty of server-focused features into a slender form factor. This review is based on the release candidate, and could change when it hits retail.
Compute Blade Specifications
| Raspberry Pi Compatibility | Raspberry Pi Compute Module 4 / 4 Lite |
| Storage | Micro SD. M.2 NVMe up to 22110 |
| Networking | Gigabit Ethernet (Wi-Fi on some CM4 models) |
| GPIO | 2 x UART |
| 5 x User Controllable GPIO including I2C | |
| Fan Connector (Square at rear of Blade) | |
| User button | |
| 2 x RGB LEDs | |
| Power | USB C |
| Power over Ethernet (PoE) | |
| Ports | HDMI (4K60) |
| USB A | |
| Security | TPM 2.0 |
| Hardware switchable Wi-Fi, Bluetooth and EEPROM write-protection | |
| Dimensions | 42.5 x 255 x 17.5 mm |
Setting Up Compute Blade


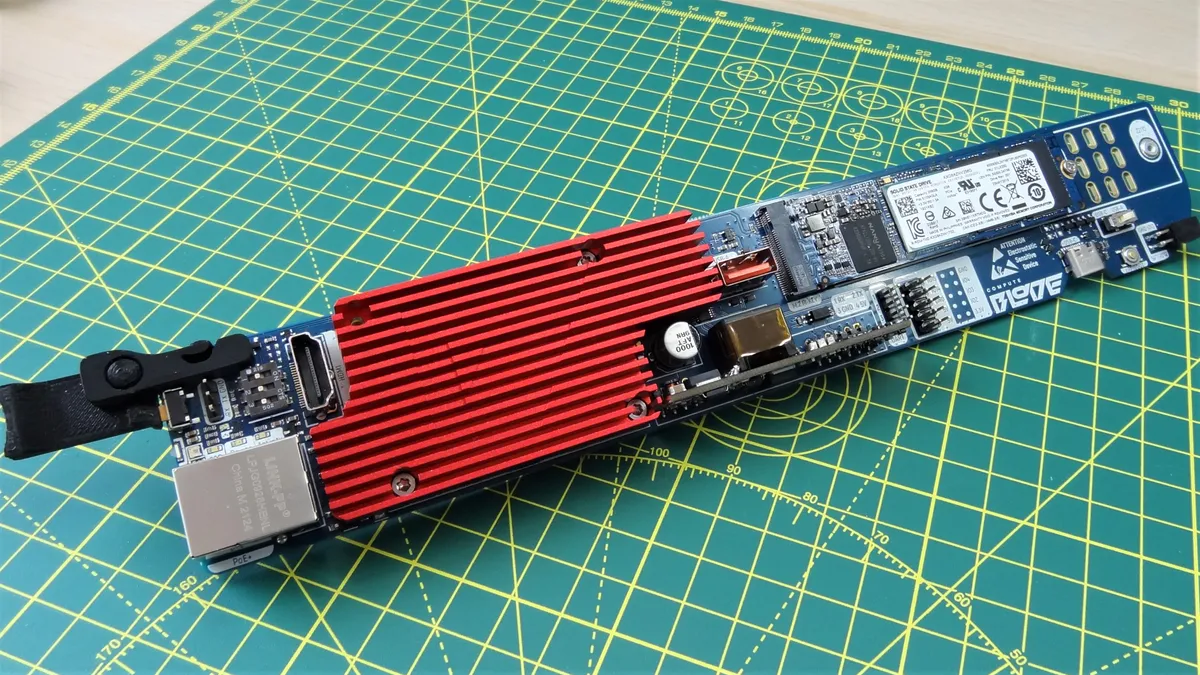
Right off the bat, this is no mere IO carrier board. Compute Blade is designed for rack mounted use, with PoE providing the power and networking for a high-density cluster of Raspberry Pi CM4 boards. The long, slender blade design lends itself beautifully to this, and clever component positioning means that we have a densely packed board full of features.
Underneath a snazzy red anodized heatsink (held in place with four Torx 8 screws) we have a connector for a Raspberry Pi Compute Module 4. This connector can be used with any Compute Module 4 variant. Our test machine was a CM4 with 4GB 32GB of eMMC and built-in Wi-Fi. We followed the rather excellent documentation to flash Raspberry Pi OS using a special tool to mount the eMMC drive.
This tool, rpiboot, is an official means from Raspberry Pi to mount the eMMC flash storage as a USB drive. It has been used with the Compute Module since its inception (I remember learning how to use it with the first Compute Module) and used with Raspberry Pi Imager, I can flash the OS in no time.
If you plan to use a Compute Module Lite, then the onboard micro SD card slot can be used to boot the OS. The onboard USB A port is not accessible on boot, but that’s not the fault of Compute Blade. This issue lies at the feet of the Compute Module itself. It is nothing that a quick config change can’t solve, and after a quick reboot I’ve got a working USB A 2.0 port.
Adding an NVMe drive, from 2230 to 22110 is easy thanks to a dedicated area near the “rear” of the blade. With the Compute Blade powered off I just needed to remove a screw, drop a test drive in and then secure it in place. From the Linux terminal I was able to prepare the drive for use, including setting the drive to mount on boot. If you need to connect your Compute Blade to a screen then the onboard HDMI port is located between the red anodized aluminum heatsink and a Gigabit Ethernet port on the “front” of the Blade.
This Ethernet port also provides PoE (Power over Ethernet) and using my Netgear GS308P, a PoE capable Switch, I was able to power and connect to my home network, all from one cable. No extra configuration was needed, just plug and play. The keen eyed amongst you will have noticed a DIP switch between HDMI and Ethernet. These switches control write protection, Wi-Fi and Bluetooth. Toggling these switches enables / disables these features, providing a level of security.
Attack of the Clones


It can’t have escaped your notice that Raspberry Pi Compute Modules are virtually unobtainable right now so can the Compute Blade be used with clone boards? The short answer is yes, but the best support comes from the Raspberry Pi Compute Module 4. I was unable to personally test this; my only CM4 alternative is a Rock 3 Compute Module, which is not electrically compatible with the CM4 pinout.
YouTuber Jeff Geerling has tested a handful of CM4 compatible boards with the Compute Blade and it seems that Pine64 SOQuartz with Plebian Linux has the best support, but even that is extremely lacking when compared to Raspberry Pi. For now, it is best to stick with the CM4, should you find one in stock.
Accessing the GPIO


While not Compute Blade’s “raison d’etre”, there is a GPIO that we can use. Just underneath the NVMe SSD slot is a 2 x 5 header which breaks out a select few pins, specifically for use with an optional RTC module. Thankfully these pins also include I2C, which means I could test a series of I2C enabled devices using Stemma QT interfaces.
I chose to test the I2C interface using CircuitPython, an easy install thanks to Adafruit. Connecting a BME688 temperature / humidity and air quality sensor was a piece of cake and within a few minutes I had data streaming across the screen. Moving to the “front” of the Blade and I spotted a push button with a neat 3D printed push mechanism. This button is connected to the GPIO and fully accessible via your favorite programming language. I ran a test using Python and can report that it works perfectly. Now I just have to work out what to do when I press the button.
Just under the button has to be the smallest WS2812s (NeoPixel) that I have ever seen. These two pixels are fully addressable and accessible via many programming languages. I chose to run my (in)famous disco light sequence and it passed the disco test. There are two UART interfaces on the board. I tested the “front” interface using a CH341A USB to Serial (TTL) and I2C adapter. A few config tweaks and I had a serial prompt running with very little effort.
What can I do with the Compute Blade?

The Compute Blade isn’t a typical Compute Module carrier board, rather its purpose is to be part of a cluster. A Compute Module 4 powered cluster would provide high density computing power, and the form factor of the Compute Blade means that we can build a high density cluster. Typical applications are edge computing, machine learning, AI and ultra small data centers. Slotting the Blades into a server rack with PoE will give a clean and simple install.
Bottom Line
You can build a Raspberry Pi based server using a Raspberry Pi 4, the Argon EON exemplifies this perfectly. But if you need high-density Raspberry Pi based computing power then there is nothing that can beat Compute Blade’s form factor. Sure we lose most of the GPIO, the CSI and DSI interfaces but the Compute Blade is designed for use in server racks so we can afford to lose these features in the name of design.
The Compute Blade is a well thought out piece of kit. It isn’t for everyone, but for those that appreciate its features, it is the pinnacle of function led design. Everything we need for data center led projects is contained in the Compute Blade.
