


Tom's Hardware Verdict
Low cost and exceptionally versatile, the Maker Pi Pico is the ideal way to start your Pico projects.
Pros
- +
+ Low cost
- +
+ Easy to use
- +
+ Lots of extra features
- +
+ Inline LEDs
- +
+ Grove connectors
Cons
- -
ESP-01 needs extra work
Why you can trust Tom's Hardware Our expert reviewers spend hours testing and comparing products and services so you can choose the best for you. Find out more about how we test.
The Raspberry Pi Pico is a fun and inexpensive way to get into coding and electronics. After buying a Pico, we need to also buy extra components to expand its scope and this can become costly and complicated. Cytron Technologies aims to simplify our learning journey and the Maker Pi Pico crams a lot of extra functions into a small package all for less than $10, including a Raspberry Pi Pico.
That isn’t a typo, embedded in the center of the Maker Pi Pico is a Raspberry Pi Pico, and the surrounding board has pre connected breakouts for every GPIO pin, many connected to extra components such as an micro SD card reader, audio output / buzzer and a series of Grove connectors, the same as those used on Seeed’s Grove Shield which enable fast and simple electronic circuit development.
The Maker Pi Pico comes preloaded with MicroPython, a good choice for those learning to code with the Pico, but we found that CircuitPython was a much better option for the Maker Pi Pico, and so do Cytron who have produced a series of tutorials based around Adafruit’s CircuitPython. The majority of this review was written using CircuitPython as the means to test the board.
Design and Use of the Maker Pi Pico


The 3.7 x 2.6 inch (94 x 68 mm) purple Maker Pi Pico PCB is a joy to behold. It has clear pin references for the GPIO and a series of header pins breaking out the pre-soldered Raspberry Pi Pico for easy use. The majority of the GPIO pins have an inline LED which illuminates when the pin is turned on.
You might be thinking: “how is this useful?” If we have built a circuit, say a blinking LED on a breadboard then there is a chance that our LED may be broken, or our wiring incorrect. The onboard LEDs of the Maker Pi Pico enable us to prove that the GPIO pin is working, and that our code is working, which means we can trace the fault to our breadboard circuit.
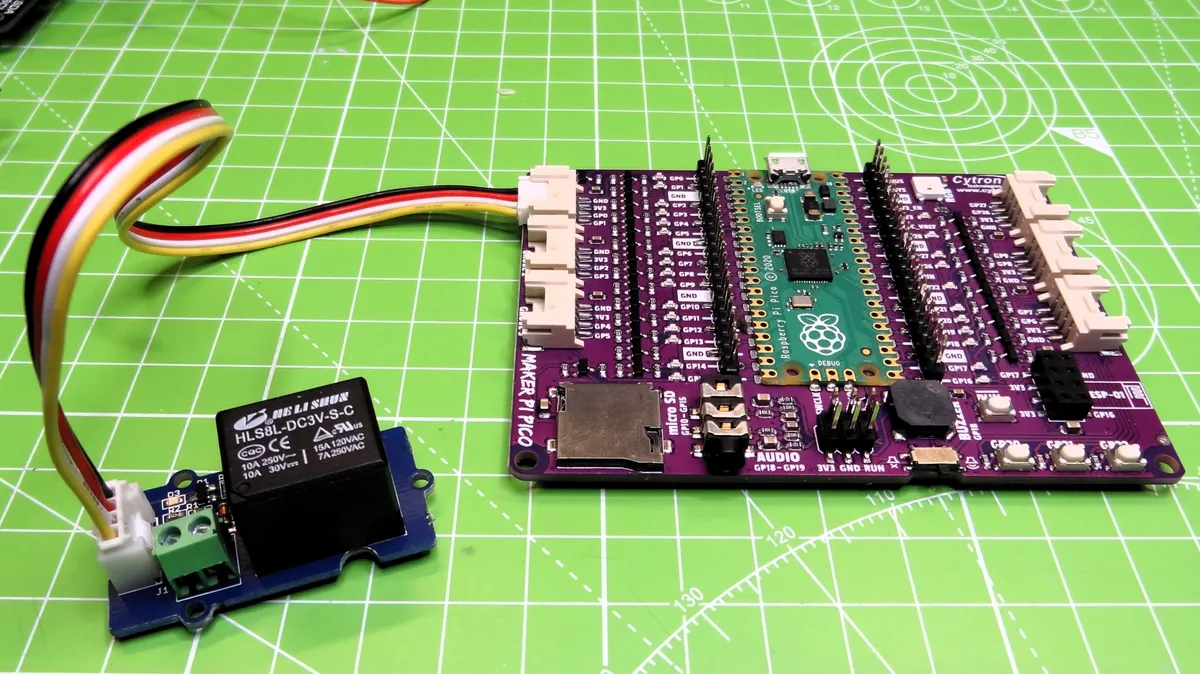
At the extreme left and right of the board are six Grove connectors, with clear GPIO pin references printed on each. We connected a relay to the first Grove connector and wrote a few lines of code to quickly open and close the relay circuit. Only Grove connector six is connected to an analog pin, two in fact. So this will limit the number of analog Grove inputs that can be used, but in our experience this is not an issue.
At the top right of the board is a single WS2812 Neopixel capable of producing many different colors by mixing the balance or red, green and blue light. Using the CircuitPython neopixel.mpy library and example code from Adafruit, we created a rainbow of colors with great ease. At the bottom of the board are a microSD card reader, 3.5mm audio jack, speaker and four buttons. The microSD card reader is connected to the SPI interface and, using the CircuitPython SD card library, we quickly managed to access a FAT formatted microSD card then read and write to and from the card. This will augment the meager 2MB of flash memory provided by the Pico and enable us to store files from experiments, for example sensor logs.
The 3.5mm audio output and onboard buzzer share the same GPIO pin (GP18) and, when the output is in use, it disables the onboard buzzer, which is trivial but useful. Audio via the output can be played using any amplified speaker and following a CircuitPython music tutorial we managed to string together a series of pleasant beeps and tones.
Unplugging the speaker, the onboard buzzer took over and made a decent job of our composition. Three of the four buttons located in the bottom right of the board are connected to GP20 to 22 and these can easily be used in your code.The fourth is linked to the Run pin and with this button we can reset the Pico, which is handy!
The final addition to the board is an eight pin header labeled ESP-01 and some of us will instantly be intrigued by this header. The ESP-01 is an ESP8266 based board that is commonly used to add Wi-Fi to boards that do not have it. The Raspberry Pi Pico fits squarely into that class and so, with glee, we attached a spare ESP-01 board and loaded up MicroPython.
Using a blog post as a starting point we managed to get the Maker Pi Pico connected to our home network, but right now that was the limit. We were unable to send or receive messages via TCP or MQTT despite numerous attempts. We took the extra step of flashing a newer firmware to the ESP-01, but alas saw the same result. This doesn’t mean that the ESP-01 interface is useless; it just means that we have to wait for the software and workflow to make this work.
Use Cases for the Maker Pi Pico


For $10 the Maker Pi Pico is an ideal way to introduce the Pico to newer users. We get the ease of use that Grove connectors provide and the extra features for audio, microSD cards and buttons. But the biggest pro for the Maker Pi Pico is the clear GPIO labelling. The Maker Pi Pico is aimed at learners and clear pin labelling will help learners to identify the correct pin for the project.
If you are a more advanced user, then the Maker Pi Pico is still a viable platform for developing projects. The audio and microSD card alone provide plenty of scope for additional musical and data logger projects, all from a $10 board. The adoption of CircuitPython as the primary coding language is a smart move from Cytron. Scott Shawcroft, project lead for CircuitPython, and Adafruit have invested time and money into this growing alternative to MicroPython and it shows in the number of tutorials and available software libraries for additional components such as sensors, screens and motor controllers.
Pimoroni’s Pico Explorer Base is the nearest alternative that we can offer for comparison. The Pico Explorer has a breakout for the GPIO, along with a speaker, IPS screen, prototyping area and two breakouts for Breakout Garden products. While we love the Pico Explorer, it retails for three times the price of the Maker Pi Pico, and it doesn’t include a Raspberry Pi Pico. It also doesn’t have the Grove connectors or the lights for each GPIO pin. Both boards have their place, but the Cytron Maker Pi Pico is a better value for beginners.
Bottom Line

The $4 cost of a Raspberry Pi Pico is 40% of the total cost of the Maker Pi Pico For the additional $6, we get plenty of extra features that really make this board a must have! The ESP-01 would be a nice thing to have working, but considering the age of that chip, and with the ESP32 offering a well supported means to add Wi-Fi, we can chalk the ESP-01 header as an interesting curio.
