This year I decided to tech-out my Christmas tree with an Alexa controlled light strip and a one-of-a-kind RGB tree topper. 2020 is the year of unexpected tech, right? In this article, I’ll build a flaming tree topper using a Raspberry Pi and an 32x8 flexible RGB LED matrix. No real fire was lit in the creation of this tutorial.
How does the Raspberry Pi RGB Flaming Tree topper work?
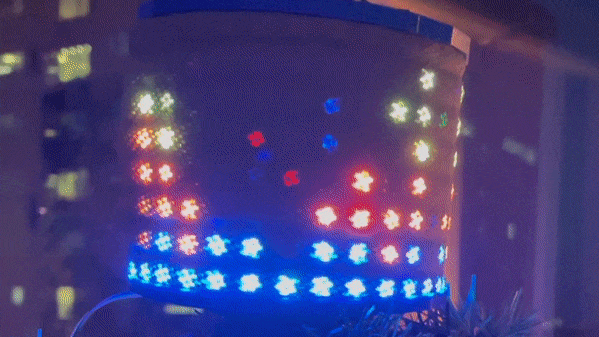
The idea is to gently bend your 32x8 flex NeoPixel matrix around the top of your tree while looping simulated flame images. I designed this 3D printed frame to hold my RGB matrix in place on top of my tree with a cut-out for the top of the tree and wire pass-through. The Raspberry Pi (via Python code), translates 10 JPG images of flames (you can substitute with your own images) into color coordinates displayed on the RGB matrix. With this project, you can loop your own images and control pause time between each image as it is displayed on your 32x8 RGB matrix.
What You’ll Need
- Raspberry Pi 3, Raspberry Pi 4, or Raspberry Pi Zero W with pre-soldered GPIO headers or you can solder them yourself.
- Power supply/Keyboard/Mouse/Monitor/HDMI Cable (for your Raspberry Pi)
- 32x8 Flexible NeoPixel RGB LED Matrix
- Set of jumper wires (M-to-F, M-to-M, and F-to-F)
- 5V Power Supply with wall-plug and barrel to screw terminal adapter.
- 1000 µF capacitor
- Optional: Scrap cloth to diffuse RGB Matrix
- 3D Printed frame for RGB Matrix
Part 1: Setup Your RGB Matrix
In this step, we will perform a basic wiring and run the sample code provided by Adafruit’s NeoPixel Uberguide. This project requires 2 power sources, one for the Raspberry Pi and a 2nd power source for the RGB Matrix. Fortunately powering the RGB matrix can be as simple as purchasing a 5V Power Supply with wall-plug, or repurposing an old USB connector. We will use 2 sets of connections from your RGB matrix: 1) Power 2) Data.
Article continues below
I am repurposing the flexible 32x8 RGB Matrix from my Scrolling Text Face Shield tutorial with soldered connections. I attached (with hot glue) a scrap piece of fabric over the matrix to help diffuse the RGB LEDs.
Data Connections
1. Connect any GND pin from your Raspberry Pi to the ground data wire on the matrix. (M-to-F wire)
2. Connect DIN from your matrix to GPIO 21 on your Raspberry Pi. (M-to-F wire)

Power Connections with a traditional 5V power adapter (Option 1)
1. Attach the barrel-to-screw terminal connector and attach wires to it.
2. Connect the positive terminal (power connection) from your RGB matrix to the positive terminal of your barrel connector.
3. Connect the negative terminal (power connection) from your RGB matrix to the negative terminal of your barrel connector.
4. Connect a 1000 µF capacitor across the terminals of the barrel connector.
Power Connections with a USB cable Hack (Option 2)
1. I did not have a 5V power adapter on hand, and decided to cut off the microUSB end of an old USB cable, and stripped the wires to expose the red (power) and black (ground) wires.
2. Connect the positive terminal (power input) from your RGB matrix to the diode cathode (side with the stripe)
3. Connect the positive terminal from your power source to the diode anode (side without the stripe).
4. Connect GND from the RGB matrix power connections to GND of your USB cable.
5. Solder connections.

Now let’s test our matrix with the test code from Adafruit.
1. Boot your Raspberry Pi. If you don’t already have a microSD card see our article on how to set up a Raspberry Pi for the first time or how to do a headless Raspberry Pi install.
2. Connect power to your RGB Matrix by plugging in your soldered USB connector to a wall adapter or power bank charger. (Or plug in your 5V wall adapter).
3. Open a Terminal. You can do that by pressing CTRL + T.
4. Install required dependencies.
sudo pip3 install rpi_ws281x adafruit-circuitpython-neopixel
sudo python3 -m pip install --force-reinstall adafruit-blinka
5. Clone my repository for the source code:
git clone https://github.com/carolinedunn/RGBTreeTopper6. Navigate to the scrollingTextMask folder.
cd RGBTreeTopper7. Run the test code fillMatrix.py
sudo python3 32-fillMatrix.py
If your NeoPixel matrix lights up, red, green, blue, rainbow, Congratulations, you have a working RGB matrix and can move onto the next step. Otherwise, go back and troubleshoot your connections.
Troubleshooting Tips: If GPIO pin 21 is not working on your Raspberry Pi, you can change the GPIO output to 10, 12, or 18. Open 32-fillMatrix.py from the scrollingTextMask folder with Geany or Thonny (right-click from file manager), and update the GPIO output. Do NOT press the Run button from Geany or Thonny. Keep in mind, if you choose to change the GPIO output in 32-fillMatrix.py, you will need to make the same change for the other files as you progress through this tutorial.
8. Press Ctrl-C to stop the script.
Part 2: Flaming RGB Assembly
With the terminal still open from the previous step, now let’s test the flaming Python code.
1. Run the tree topper / flames Python code.
sudo python3 treeTopper.py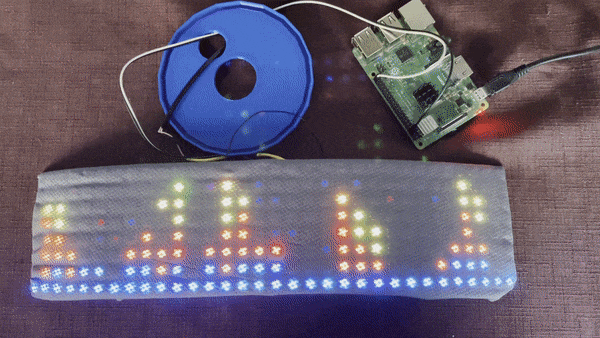
Within the code you cloned from Github, there is a ‘fire’ folder that contains 10 JPGs.

What the treeTopper.py Python code does:
- Declare the libraries we will use in the Python code. Take special note of PIL, aka Pillow Imaging Library which adds imaging processing capabilities to our Python interpreter.

- Tell the Pi where to send data to our RGB matrix by specifying the GPIO pin 21 (line 8).
- Specify the parameters of our matrix, size, brightness and the amount of time to pause between each JPG. (lines 9 - 13).
- Create an array with the data from each of the 10 JPGs in sequential order. (lines 28-32)
- Analyze every pixel in the 1st image, and translate the image to the RGB matrix. Show the image on the RGB matrix. (lines 35-41)
- Pause for 0.2 seconds and then repeat the process for the next image. (line 42)
- Loop around until the user presses Ctrl-C.
Now that we understand the code, we can substitute our own images.
1. To create your own images, create a JPG file that is 32 pixels wide and 8 pixels tall with a black background.
2. Save each file that you create as 1-10.JPG and save into a folder on your Raspberry Pi.
3. Edit the Python code, treeTopper.py with the new path to your JPG files. If you have more or fewer than 10 JPGs, adjust the while loop to fit the number of images you have created.

I used Acorn to create my images, but you can use Adobe Photoshop or any graphical editing software. GIMP is a free and open source image editor that’s available for Raspberry Pi, macOS and Windows.
Run on Boot
Once you’re happy with your RGB images, let’s set our Python code to run on boot. We’ll use the Crontab method.
1. In a Terminal, open your Crontab by entering:
crontab -eIf you haven’t set the crontab previously, you’ll see the response “no crontab for pi, Select an editor.”
2. Type ‘1’ and hit Enter.

3. This will open a new crontab file, arrow down to the bottom of your crontab file and enter -> sudo python3 /home/pi/RGBTreeTopper/treeTopper.py
@reboot sudo python3 /home/pi/RGBTreeTopper/treeTopper.py4. Press Ctrl-X, and y to save your crontab.
5. Shutdown your Pi and disconnect your assembly.
Part 3: Final Assembly
In this step, we proudly display our new flaming RGB matrix on our Christmas Tree.
1. 3D print the holder assembly. There are 2 pieces. Top piece is 1 ring and the bottom piece has 2 openings.
2. Thread the USB connector and 2 M-F wires from the RGB matrix through the smaller hole in the bottom piece.

3. Gently curl the RGB matrix into a cylinder shape and insert into the groove of the bottom piece.
4. Fit the top of the RGB matrix into the groove of the top piece.
5. Thread the top of your Christmas Tree through the center opening of the bottom piece.

6. Connect the USB power supply and the power for your Raspberry Pi.

7. Post a video of your magnificent creation on social media to show off to your friends. #FlamingRGBTreeTopper or #MyTreeTopperisLIT
And yes, I realize the shape of my tree topper resembles a roll of toilet paper. How perfectly fitting for 2020.
