The official Raspberry Pi camera comes in many forms. From the original v1.3 all the way to the latest Raspberry Pi HQ camera, all use the same software. Using the raspistill and raspivid commands we can take still images and videos right from the terminal.
More advanced uses included manually controlling the white balance, color, saturation and brightness of an image and video. We can also create a simple video streaming service with just one line of code.
Article continues belowSetting up a Raspberry Pi Camera
If you're already familiar with how to set up a Pi camera module, you can skip ahead. These steps will work for all Raspberry Pi camera modules (including third-party ones).
With the Raspberry Pi powered off.
1. Open the camera port by gently lifting the plastic lock upwards.

2. Insert the ribbon connector with the blue tab facing the USB / Ethernet ports.

3. Close the lock on the connector and give it a very gentle pull to make sure it is in place.
4. Power up your Raspberry Pi and then go to Preferences >> Raspberry Pi Configuration.

5. Click on the Enable button for the Camera found in the Interfaces tab.

6. Click Ok and reboot the Pi.
7. Open a Terminal and type the following command to take a quick picture to test the camera.
$ raspistill -o test.jpg
After five seconds has elapsed, an image will be taken and saved as test.jpg. Using the file manager check that the image is correct before moving on.
Testing a Stream
To start a stream we need to open a terminal and enter a rather long command. Ensure that your Raspberry Pi is connected to the network. For the best performance use an Ethernet cable, Wi-Fi will work, but you may see dropouts.
1. Get the hostname of your Raspberry Pi. Open a terminal and type in this command for your hostname. Make a note of the hostname. You may need to add “.local” to the end, depending on your network.
$ hostname
2. Run the streaming command. The one line command to run a video stream live from the camera is rather long, so let's go through the command before we run it.
-o is our output, in this case set to none.
-t is the length of the video clip, using zero will set this to infinite.
-w and -h are the width and height of the video, in this case 800 x 600.
-fps are the frames per second for the video stream, a lower value should minimize dropouts.
| cvlc is a pipe which takes the output from the raspivid command, our video stream and streams the video using an h264 codec via real time streaming protocol (rtsp) over our network.
Run this command in a terminal on your Raspberry Pi.
raspivid -o - -t 0 -w 800 -h 600 -fps 12 | cvlc -vvv stream:///dev/stdin --sout '#rtp{sdp=rtsp://:8080/}' :demux=h264
3. On your Windows / Mac / Linux computer install VLC and then open VLC.
4. Go to Media >> Open Network Stream, or press CTRL + N.

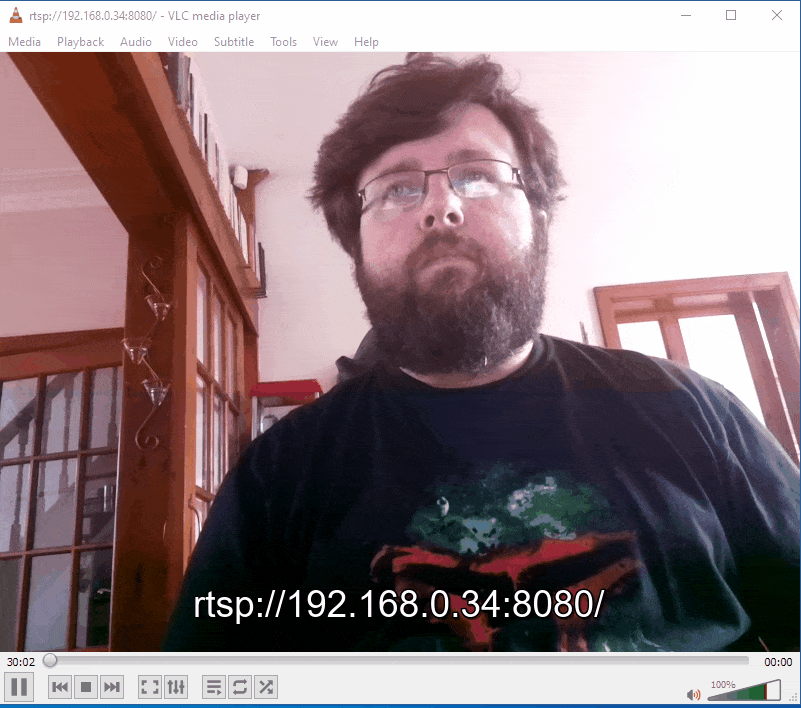
5. Enter the rtsp address and port of your Raspberry Pi. The rtsp address is your Raspberry Pi’s hostname, prefixed with rtsp://, and the port was set to 8080. Click Play to start the stream. Here is our example rtsp address.
rtsp://raspberrypi:8080/

It will take VLC a few seconds to catch up with the stream, be patient. Soon you will see video streamed from your Raspberry Pi, with a delay of around 5 to 10 seconds.
6. To record a stream, click on Playback >> Record and then specify a filename. The recording will end when the stop button is pressed.
Getting Arty: Streaming With Filters
The final part of this project is where we get creative. We will be creating a script that will first create an array (a list) of all the possible image effects. Then we create a variable to store the length of the array, before randomly choosing a number in the array that will control which effect is used when our stream goes live. We shall be writing the code on the Raspberry Pi using a GUI text editor.
1. Launch Geany (from the menu) and create a new file called random_stream.sh and remember to save often.
2. Enter the first line of code, which will tell the code where to find the Bash interpreter.
#!/bin/bash
3. Create an array to store all of the possible image effects in this project. There are 20 effects in total, and each has its own place inside the array, enabling our code to pick a specific effect based on a random number.
array[0]="none"
array[1]="negative"
array[2]="solarise"
array[3]="sketch"
array[4]="denoise"
array[5]="emboss"
array[6]="oilpant"
array[7]="hatch"
array[8]="gpen"
array[9]="pastel"
array[10]="watercolour"
array[11]="film"
array[12]="blur"
array[13]="saturation"
array[14]="colourswap"
array[15]="washedout"
array[16]="posterise"
array[17]="colourpoint"
array[18]="colourbalance"
array[19]="cartoon"
4. Create a variable called size to store the number of effects in the array. This variable will store the output of a command (via {}) which checks the length of the array.
size=${#array[@]}
5. Create another variable, index, which will store a random number between zero and the length of the array, in this case 20.
index=$(($RANDOM % $size))
6. Print the chosen filter to the terminal, then wait for one second.
echo ${array[$index]}
sleep 1
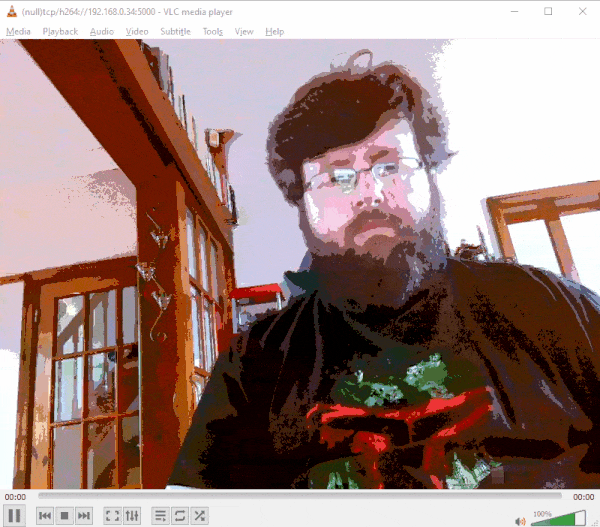
7. Use raspivid to create an infinite stream at a resolution of 800 x 600 at 15 fps. The -ifx switch will be populated by a randomly chosen effect from the array To stream live video, this time we use a standard tcp stream. It works a little faster than rstp but your stream may have artefacts. The Pi listens (-l) for connections from any local IP address.
raspivid -t 0 -w 800 -h 600 -ifx ${array[$index]} -fps 15 -l -o tcp://0.0.0.0:5000
8. Save the code to the /home/pi/ directory and exit from the editor.
9. Open a terminal and use this command to make the code executable.
$ chmod +x random_stream.sh
10. Run the code.
$ ./random_stream.sh
11. On your Windows / Mac / Linux computer open VLC.
12. Go to Media >> Open Network Stream, or press CTRL + N.
13. Enter the tcp address and port of your Raspberry Pi. The tcp address is the Raspberry Pi’s hostname, prefixed with tcp/h264://, and the port set to 5000. Click Play to start the stream. Here is our example tcp address.
tcp/h264://raspberrypi.local:5000
14. To record a stream, click on Playback >> Record and then specify a filename. The recording will end when the stop button is pressed.
15. To change effect, press CTRL + C in the Raspberry Pi terminal, then press the UP key and enter to run the command again, with hopefully a different filter.
Complete Code Listing
#!/bin/bash
array[0]="none"
array[1]="negative"
array[2]="solarise"
array[3]="sketch"
array[4]="denoise"
array[5]="emboss"
array[6]="oilpant"
array[7]="hatch"
array[8]="gpen"
array[9]="pastel"
array[10]="watercolour"
array[11]="film"
array[12]="blur"
array[13]="saturation"
array[14]="colourswap"
array[15]="washedout"
array[16]="posterise"
array[17]="colourpoint"
array[18]="colourbalance"
array[19]="cartoon"
size=${#array[@]}
index=$(($RANDOM % $size))
echo ${array[$index]}
sleep 1
raspivid -t 0 -w 800 -h 600 -ifx ${array[$index]} -fps 15 -l -o tcp://0.0.0.0:5000
