Whether you want to promote content from your own website or just keep up with the news, wearing a custom news ticker on your shirt is an eccentric, but great way to do that. Using a Raspberry Pi and a few accessories, you can make a shirt that scrolls through the RSS feed of your choice.
Naturally, we designed our device to show the latest news headlines from Tom's Hardware. But you could just as easily point the script toward any content you want on the Internet (it uses Wi-Fi to download the data). Here's how to make your own news ticker shirt.
Materials
- Raspberry Pi 3B+, 3A+ or 3B. This also might work with a Pi Zero W if you use some adapters.
- Arduino Nano (or similar)
- USB battery bank
- MicroUSB to USB Type-A cable
- MiniUSB to USB Type-A cable
- 3x Adafruit Neopixel 8x8 Panels
- Wire
- Velcro strips
Tools
- Solder
- Soldering iron
- HDMI monitor
- USB Keyboard
- 3D Printer (optional)

Wiring
The first step in making your T-shirt flashier than the Vegas strip is busting out the soldering iron! Don’t worry if your soldering skills are a bit rusty; there are only a few connections to make.

First, get your three Adafruit Neopixel 8x8 panels and line them up next to each other, face down. In the bottom left corner you’ll see three pins, labeled “DOUT,” “5V” and “GND.” Solder a wire from the DOUT pin on the right panel to the DIN pin on the middle panel. Do the same for the GND and 5V pins.

It helps to use ribbon cable for this. Things stay much neater when all three of your wires are bundled together!

Repeat this process to connect the middle panel to the left. Great! All the Neopixel panels are now chained together and ready to receive data. The last bit of soldering is connecting the panel to the Arduino.

Solder a wire from the DIN pin on the right-most panel to Digital Pin 6 on the Arduino. Then connect GND on the panel to a GND pin on the Arduino. Next, connect the 5V pin to a 5V pin on the Arduino. Now you can turn off the soldering iron.
Note: You might want to add a connector to this wire. It can be really helpful to disconnect the control board from the light panel when putting on the shirt. Plus, at one point in our testing, the wires got yanked out of the Arduino Nano. If you want to make the connection between the Neopixel panels and your Arduino Nano board easier to work with, consider adding breakout pins to the Nano and using a wire with a female connector. Standard 0.1-inch headers will work alright here. That way, if the wires do get yanked out, you can put them back in without resoldering.
How the Software Works
The first thing the Raspberry Pi does is ask an RSS feed for some information. In our case, we’re looking at titles from Tom’s Hardware articles. Once we get those, the Pi packages up the titles and sends them via the USB cable to an Arduino. After the Arduino gets the headlines, it figures out which LEDs to illuminate to spell out the letters. Then, it sends a signal to the LEDs, and you’ve got yourself a message!
In order to make all these parts work together, we need to put some code on the Raspberry Pi and Arduino. The Raspberry Pi needs to know what website to get information from, and the Arduino needs to know what to do with the information it gets over the USB cable.
Install the Code on Arduino
If you don't already have the Arduino IDE on your computer, you'll need to download, install, and open it with your Arduino board connected via USB. Then download the git repository for this project -- a zip file with all the code for both Arduino and Raspberry Pi -- and open the file scrollWhenRead.ino from the scrollWhenRead folder using the Arduino IDE. You can then transfer the scrollWhenRead.ino sketch to your Arduino board.
Installing the Code on the Raspberry Pi
Before you begin, you'll need your Pi to be running Raspbian on a card that has at least 8GB of space. After connecting to Wi-Fi on the Pi, go to the command prompt and enter the following:
git clone https://github.com/sphawes/ledTshirt.git pip3 install feedparser pip3 install pyserial
Typing python3 ledTshirt/sendText/sendText.py will run the script, which by default uses the RSS feed from Tom's Hardware. Type sudo nano ledTshirt/sendText/sendText.py to edit the script. You can change the RSS URL to a different site by editing the line that reads:
rssLink = "https://www.tomshardware.com/feeds/rss2/articles.xml"
And you can change the change the name of the site by editing the line that reads:
encoded = ("Toms Hardwaren").encode('utf-8')
Once you are happy with the code, and you've saved and exited the file, you'll want to make sure that it runs every time you start the Pi. To do that, enter the following at the commands at the prompt:
cd ~/ledTshirt sudo cp tshirt.service /etc/systemd/system/myscript.service sudo systemctl start tshirt.service
Next time you boot up your Pi, it will automatically run this script. The script will send the text to the Arduino board that, in turn, sends the words to scroll on the ticker.
You can find more details about how the code works and how to install it on this project's dedicated GitHub page.
Finishing Up
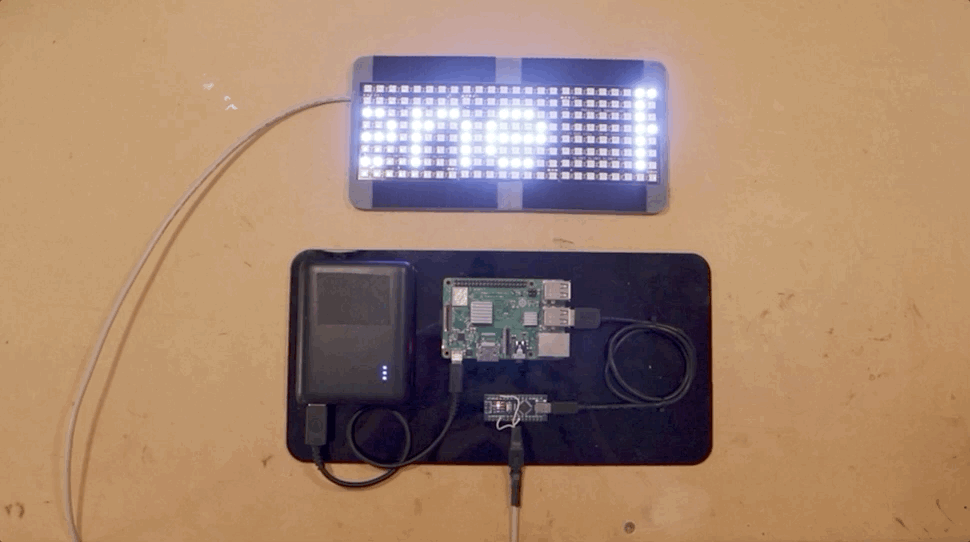
Now that you have everything wired and programmed, go ahead and give it a shot! Make sure your hotspot is turned on, then plug the Pi into the USB battery bank. After the Pi boots, you should see some great Tom’s Hardware article titles streaming across the display.
Now that you’ve got it working, it’s time to make it fit on a shirt! The most important part of this is getting the Neopixel panels to shine through the front of the shirt.
I did this with a custom 3D printed bracket, but a bit of cardboard and an X-Acto knife will do just fine. If you want to print our bracket design, you can find it on the Github page. I mounted the Neopixel panels into the bracket using a bit of VHB (“Very High Bond”) tape, which is an insanely strong foam tape that sticks way better than you think it will! Next, add a few strips of Velcro to the bracket and to the inside of the t-shirt, and you’re ready to rock.

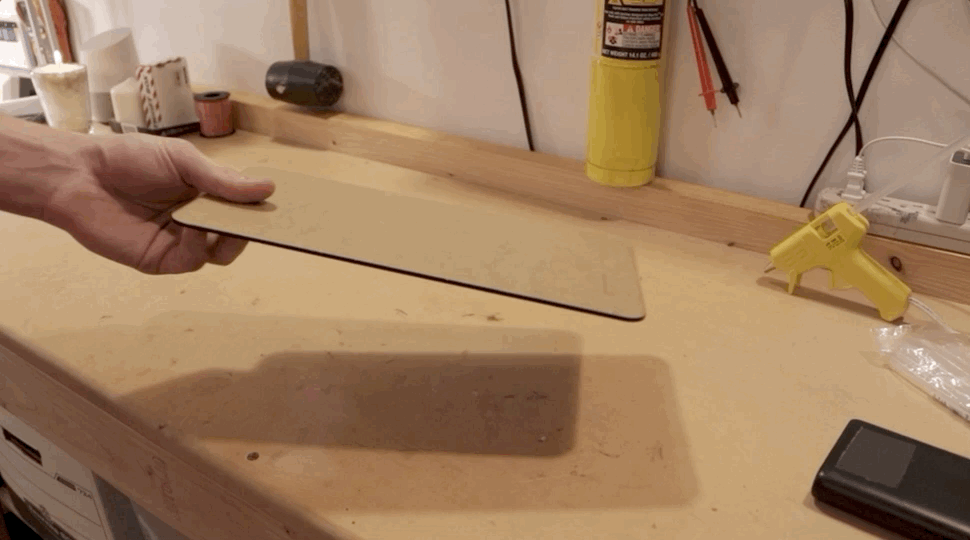
Next is mounting the Arduino, battery and Raspberry Pi. I put them all on one central “control panel” and mounted it on the back of the shirt to be displayed. I then laser cut a very simple black acrylic panel and attached all the components using VHB. A bit more Velcro and I was able to mount the panel to the back of the shirt.
Depending on how heavy your battery is, you might have a hard time keeping the board from falling off of your back. Try stitching a large mesh zipper pocket onto the shirt if you have problems getting it to stay. You could also try sticking the two boards and the battery in a backpack or fanny pack.
Done!
And there you go! A custom light-up t-shirt using a Raspberry Pi and Neopixel panels. Play around with editing the “sendText.py” script to make it show different kinds of information. Perhaps a Twitter follower counter? Maybe make it stream your resume at a job fair? Or perhaps you just want to display some goofy sayings and quotes.
We want to see what you make with it! Share your creations with us in the Tom’s Hardware forum.
Photo Credit: Tom's Hardware