How to Disable VBS and Speed Up Windows 11 or 10

Disable VBS
(Image credit: Future)

A security setting that's on by default in Windows 11 and at least some installs of Windows 10 could be slowing performance in some by as much as 15 percent. Virtualization-based security, aka VBS, allows Windows to create a secure memory enclave that's isolated from unsafe code. Another built-in feature called Hypervisor-Enforced Code Integrity (HVCI) uses the capabilities of VBS to prevent unsigned or questionable drivers and software from getting into memory. Together VBS and HVCI add a layer of protection that limits how much damage malware can do, even if it gets past your antivirus software. 

Unfortunately, VBS and HVCI have a significant performance cost, particularly when it comes to gaming. In our tests, we found that games ran as much as 15 percent slower with these settings on as with them off. This is true whether you're using an old graphics card or even a speedy RTX 4090. It used to be the case that simply upgrading from Windows 10 to 11 would not enable VBS, but lately we've seen it get turned on after updates so you should not assume that it's disabled on your system, even if you had it turned off before. 

For most users and applications, the performance deltas with VBS on and off are 5 percent or less and likely not noticeable in everyday tasks such as web browsing or editing documents. However, if you want the best possible performance and are willing to sacrifice an added layer of security, here's how you disable VBS in Windows 11 or 10.

How to Check if VBS is Enabled in Windows 11 or 10

Before you start thinking about turning off VBS, you need to find out if it's on in the first place. 

1. Open system information. The easiest way to do that is by searching for "system information" in Windows search and clicking the top result.

open system information

(Image credit: Future)

2. Scroll down to find the "Virtualization-based security" row. If it says "running," VBS is enabled. But if it says "not enabled," then you're done.

System information

(Image credit: Future)

How to Disable VBS / HVCI in Windows 11 or 10

1. Search for Core Isolation in Windows search and click the top result.

search for core isolation

(Image credit: Future)

2. Toggle Memory Integrity to off, if it was on. If it is not on, skip ahead to step 6.

toggle memory integrity to off

(Image credit: Future)

3. Reboot your PC as prompted.

reboot

(Image credit: Future)

4. Check system info again to see if virtualization-based security is listed as "not enabled." If so, you are done. If not, go to step 6 where you'll disable VBS in the registry.

check system info again

(Image credit: Future)

5. Open regedit. The easiest way is by hitting Windows + R, entering regedit in the text box and click Ok.

open regedit

(Image credit: Future)

6. Navigate to HKEY_LOCAL_MACHINE\System\CurrentControlSet\Control\DeviceGuard.

navigate to the registry key

(Image credit: Future)

7. Open EnableVirtualizationBasedSecurity and set it to 0.

Open EnableVirtualizationBasedSecurity and set it to 0

(Image credit: Future)

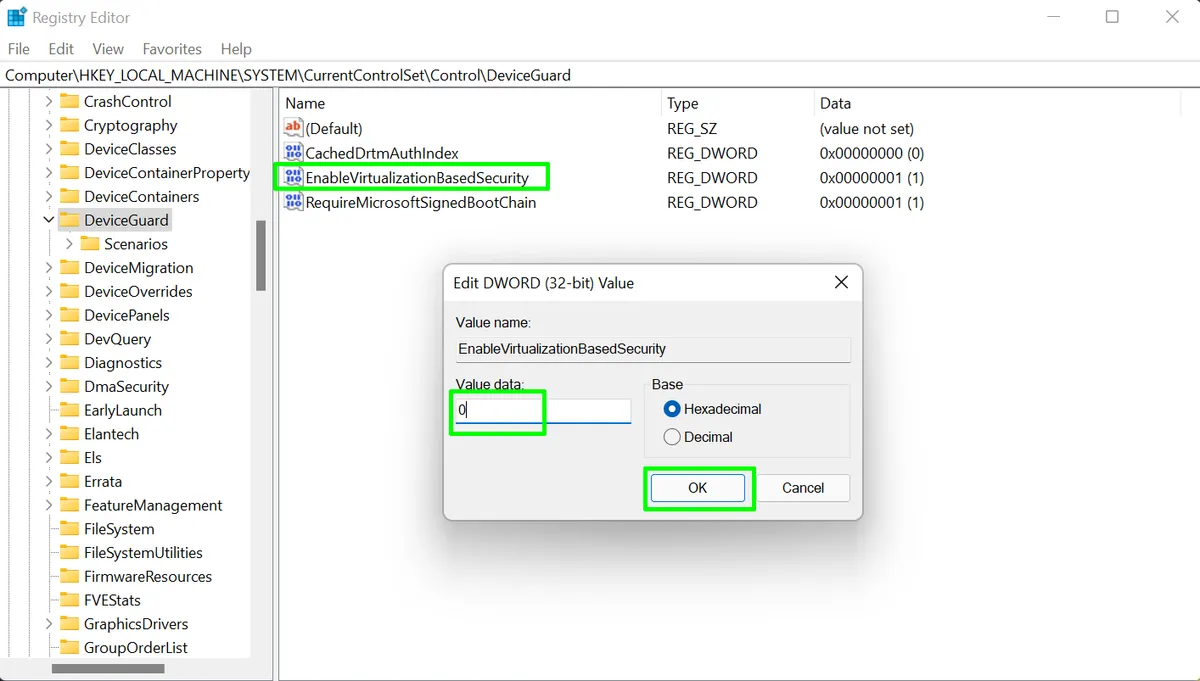
8. Close regedit and reboot your PC.

9. Check system information again to see if Virtualization Based Security is listed as  "not enabled." 

not enabled

(Image credit: Future)

If VBS is still enabled try the method of disabling it below.

How to Disable Windows VBS By Uninstalling Virtual Machine

If you still see that VBS is running, you can get rid of it by uninstalling the "Virtual Machine" feature in Windows. Note, however, that if this is the feature that's enabling VBS for you, losing it may cost you the ability to run Windows Subsystem for Linux. Here's how you do it.

1. Open Turn Windows Features on or Off by searching for it.

turn windows features on or off

(Image credit: Future)

2. Uncheck Virtual machine and click Ok.

uncheck virtual machine platform

(Image credit: Future)

3. Reboot your PC.

4. Check system information again to make sure virtualization based security is listed as "not enabled."

Avram Piltch
Avram Piltch is Tom's Hardware's editor-in-chief. When he's not playing with the latest gadgets at work or putting on VR helmets at trade shows, you'll find him rooting his phone, taking apart his PC or coding plugins. With his technical knowledge and passion for testing, Avram developed many real-world benchmarks, including our laptop battery test.
  • cvzone
    If even the registry setting does not work for you, try "bcdedit /set hypervisorlaunchtype off" in cmd as admin.

    PS: If registry settings wont help, there might be an UEFI lock active. Delete secure boot keys, restart Windows and turn off the settings, then set secure boot keys.
    Reply
  • waltc3
    I have it turned off--I wonder if just turning off SVM in the bios would accomplish the same thing...? And yes I have noticed a slight performance uplift with SVM disabled (I don't need it for anything else, atm.) I recall reading awhile back that DeviceGuard is something Microsoft has devised so that Defender and third-party AV programs can run simultaneously without tripping all over each other and generating a lot of false positives and other undesirable things. But as I'm not a big believer in running more than a single (competent) AV program simultaneously, Defender is all I need and seems to be doing a thorough job so far.
    Reply
  • stairmand
    When you install Windows 11 it askes how you would like the PC optimised. (gaming, creative etc) you would think the gaming setting would disable it automatically.
    Reply
  • rassilon007
    cvzone said:
    If even the registry setting does not work for you, try "bcdedit /set hypervisorlaunchtype off" in cmd as admin.

    Thank you for this. The options in the article did nothing, as core isolation was disabled and there was no such entry in the registry. Microsoft forced Virtualization on when I tried the Amazon App Store beta and didn't turn it off when the app was removed.
    Reply
  • RodroX
    stairmand said:
    When you install Windows 11 it askes how you would like the PC optimised. (gaming, creative etc) you would think the gaming setting would disable it automatically.

    After this step, you gave Windows the hint to know where and how should focus data collection. (y)
    Reply
  • stairmand said:
    When you install Windows 11 it askes how you would like the PC optimised. (gaming, creative etc) you would think the gaming setting would disable it automatically.
    Why would you think that? VBS is for security, and with all those games with online multiplayer, leaderboards, content sharing, etc. security is the last thing I'd expect to be compromised in a gaming machine.
    Reply
  • kerberos_20
    theres no need to tinker with registry
    you can disable virtualisation in bios or disable hyper-v in BCD, that will disable VBS just fine

    you can also disable it through group policies
    Computer Configuration\Administrative Templates\System\Device Guard\Turn On Virtualization Based Security , set it to disabled there
    Reply
  • umeng2002_2
    Yes, turning off VM extensions in your BIOS will kill this feature.
    Reply
  • Darkbreeze
    Funny, because I just check my three primary machines. One of them was a clean install of Windows 11 about six months ago, one was a clean install of Windows 10 a year ago and the other was a clean install of Windows 10 two years ago but was upgraded to Windows 11 about three months ago. None of them had this enabled. Checked my mom's 2 year Windows 10 installation and it wasn't enabled on there either. Maybe it was only the lab machine that had it enabled. LOL.
    Reply
  • ArtemS
    rassilon007 said:
    Thank you for this. The options in the article did nothing, as core isolation was disabled and there was no such entry in the registry. Microsoft forced Virtualization on when I tried the Amazon App Store beta and didn't turn it off when the app was removed.
    I second this. Also I had to reboot.
    Instantly got my average CPU usage on idle drop from like 25% to 5%.
    Reply