Hack: Run AMD Fusion Game Util on Intel CPUs
AMD recently released version 1.0 of its Fusion Gaming utility, but despite efforts to keep the software out of the hands of Intel users, the software can quickly be made compatible with all processors.
AMD released version 1.0 of its AMD Fusion for Gaming utility, which allows users a simple and fast way to prepare their Windows PCs for gaming. With the press of a button, the application can be used to automatically close down non-essential services, enhance the hard drive performance and even overclock the GPU and CPU.
Unfortunately for many, the AMD Fusion for Gaming utility is limited to only systems with an AMD processor, although that limitation is artificially imposed by AMD. The good news is, overcoming such an artificial limitation is often a trivial matter, which we will now demonstrate.
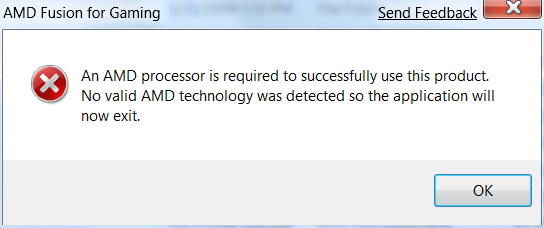
The first step required in this process is the download and installation of the AMD Fusion for Gaming v1.0 utility, located here. The application should install fine, even if the system does not have an AMD processor. Attempting to run the application though, without an AMD processor, will result in a notification stating that an AMD processor is required for the application to function.
Now, the next several steps can just be observed, but if you wish to follow along, you will need a debugging application and a system with a non-AMD processor. We used Ollydbg v1.10 for our debugging needs, which can be downloaded for free here.
Open Ollydbg, making sure it is run as an adminstrator, if required. Through Ollydbg, we will open (Menu > File > Open) the main executable of the AMD Fusion for Gaming utility that we had already installed, which has the filename "AMDFusion.exe". Becareful not to confuse this file with the installation file. This file is likely located in the following directory:
C:\Program Files\AMD\AMD Fusion for Gaming 1.0
Get Tom's Hardware's best news and in-depth reviews, straight to your inbox.
If you are not already familiar with assembly code or software debugging, the seemingly cryptic code that should now appear in Ollydbg may take some time to understand. Teaching how to read assembly code though is beyond the scope of this article, but the following steps should still be simple enough to follow even without any previous experience.
As we already know, the AMDfusion.exe application seems to check if the current system uses an AMD processor and halts the applicatoin if there is none present. What we want to do is find and modify this processor-checking portion of code in the application, so that the application either bypasses the processor-check or is tricked it into thinking that we are running an AMD processor.
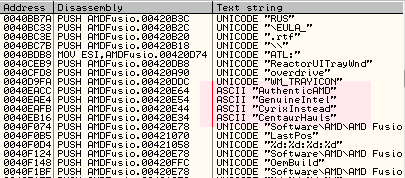
To do this, we will want to right-click the mouse in the main sub-window of Ollydbg, which should bring up a menu. From this menu, we want to select "Search for" and then "All referenced text strings". This in turn opens up another window, listing all the text strings that the AMDfusion.exe application uses. If you do not see the "Search for" menu option when you right click, you might be right-clicking in the wrong area.
On a hunch, we want to look through this list of text strings, keeping our eyes open for anything that may seem suspicious. Less than half of the way down the list, we should see the following suspicious text strings: "AuthenticAMD", "GenuineIntel", "CyrixInstead" and "CentaurHauls". These text strings are CPU identifiers and are likely used in determining what brand of processor the system is using.
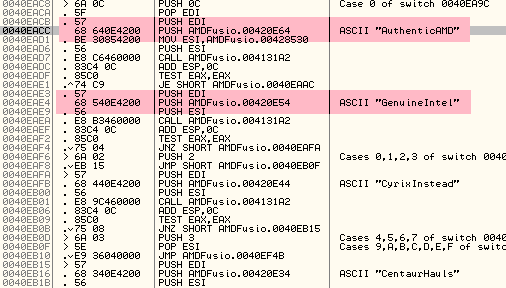
Lets find out where in the application these text strings are being used and see if we can modify the code to our favor. To do this, right click the "AuthenticAMD" text string and select from the menu, "Follow in Dissassembler". We should now see where the "AuthenticAMD" text string is being used in the actual code; apparently the "GenuineIntel" text string is used not far away from it either.
Now that we are at the portion of code that seems to be where we want to be at, lets start making some modifications. One obvious thing we can try is to just switch the lines of code that the "AuthenticAMD" and "GenuineIntel" text strings are mentioned in. For example, the two lines of code as displayed on our system are "PUSH AMDFusio.00420E64" (for AMD) and "PUSH AMDFusio.00420E54" (for Intel), so switching them around simply means modifying a single digit in each line of code- the 6 and the 5. Simply double click the code you wish to modify to edit it. When you double click on the code, the code might appear a bit different, such as "PUSH 420E54", but do not worry, just modify the single digit that needs changing.
Once we have modified the two lines of code, the debugger should now allow us to run the AMDfusion application on Intel-based systems. To test this out, in Ollydbg lets run the loaded application (Menu > Debug > Run). The AMDfusion application should run now fine on an Intel-based system!
However, the changes we have just made in the debugger to the application are temporary. The actual AMDFusion.exe file was not modifed by the debugger when we modified those lines of code and to do so requires actually altering the file itself manually. This can be accomplished by using a hex editor. Do not quit the debugger yet though if you have it open, we will still need to refer to it in just a bit. If you wish to modify the AMD Fusion for Gaming ultility to work with your Intel-based system, you will need to atleast do the follow steps.
There are several free hex editors available for download online, but the one that we will be using can be found here. Install and open the hex editor, making sure to run the hex editor as an Administrator. Open the AMDFusion.exe file from within the hex editor (Menu > File > Open). Now, from the menu, select "Search" and then "Find". We want to search for the lines of hex code that we modified in the debugger. In our case, the first line of hex code we modified was "68 64 0E 42 00", so we enter that and hit "OK".
The hex editor should quickly find the line of code that we are searching for in the AMDFusion.exe file and once it does, we will need to modify it like we did in the debugger. In this case, we need to change "68 64 0E 42 00" to "68 54 0E 42 00". We also need to find the hex code "68 54 0E 42 00" and modify it to "68 64 0E 42 00", while being careful not to confuse it with the line of code we just changed. The above embedded image highlights which bytes of code need changing.
Once we properly modify these two bytes of hex code, we will need to save the file. To be safe, I recommend saving the file as a new file name, such as "IntelFusion.exe". You will not be able to save the file as the original name if the file is in use or is currently running.
Now, you should be able to run the newly modified file from the "AMD Fusion for Gaming 1.0" folder on an Intel-based PC, without problem. We are not responsible however for any problems or issues you may encounter with this procedure, nor do we endorse the modification of the AMDFusion.exe application. It is interesting to note however that bypassing CD checks, trial limitations and product key registrations can often be achieved using a very simliar manner to what was shown here.


