Hands On: Intel's NUC 12 Extreme 'Dragon Canyon' Kit Is Compact, Powerful and Complicated
It's also expensive at $1,450 for the i9 model, without RAM, storage, an OS or a GPU.
2/25/2022 Update: We have added some performance testing below, as well as tweaked the text to clarify some setup issues that weren't clear to us during initial testing.
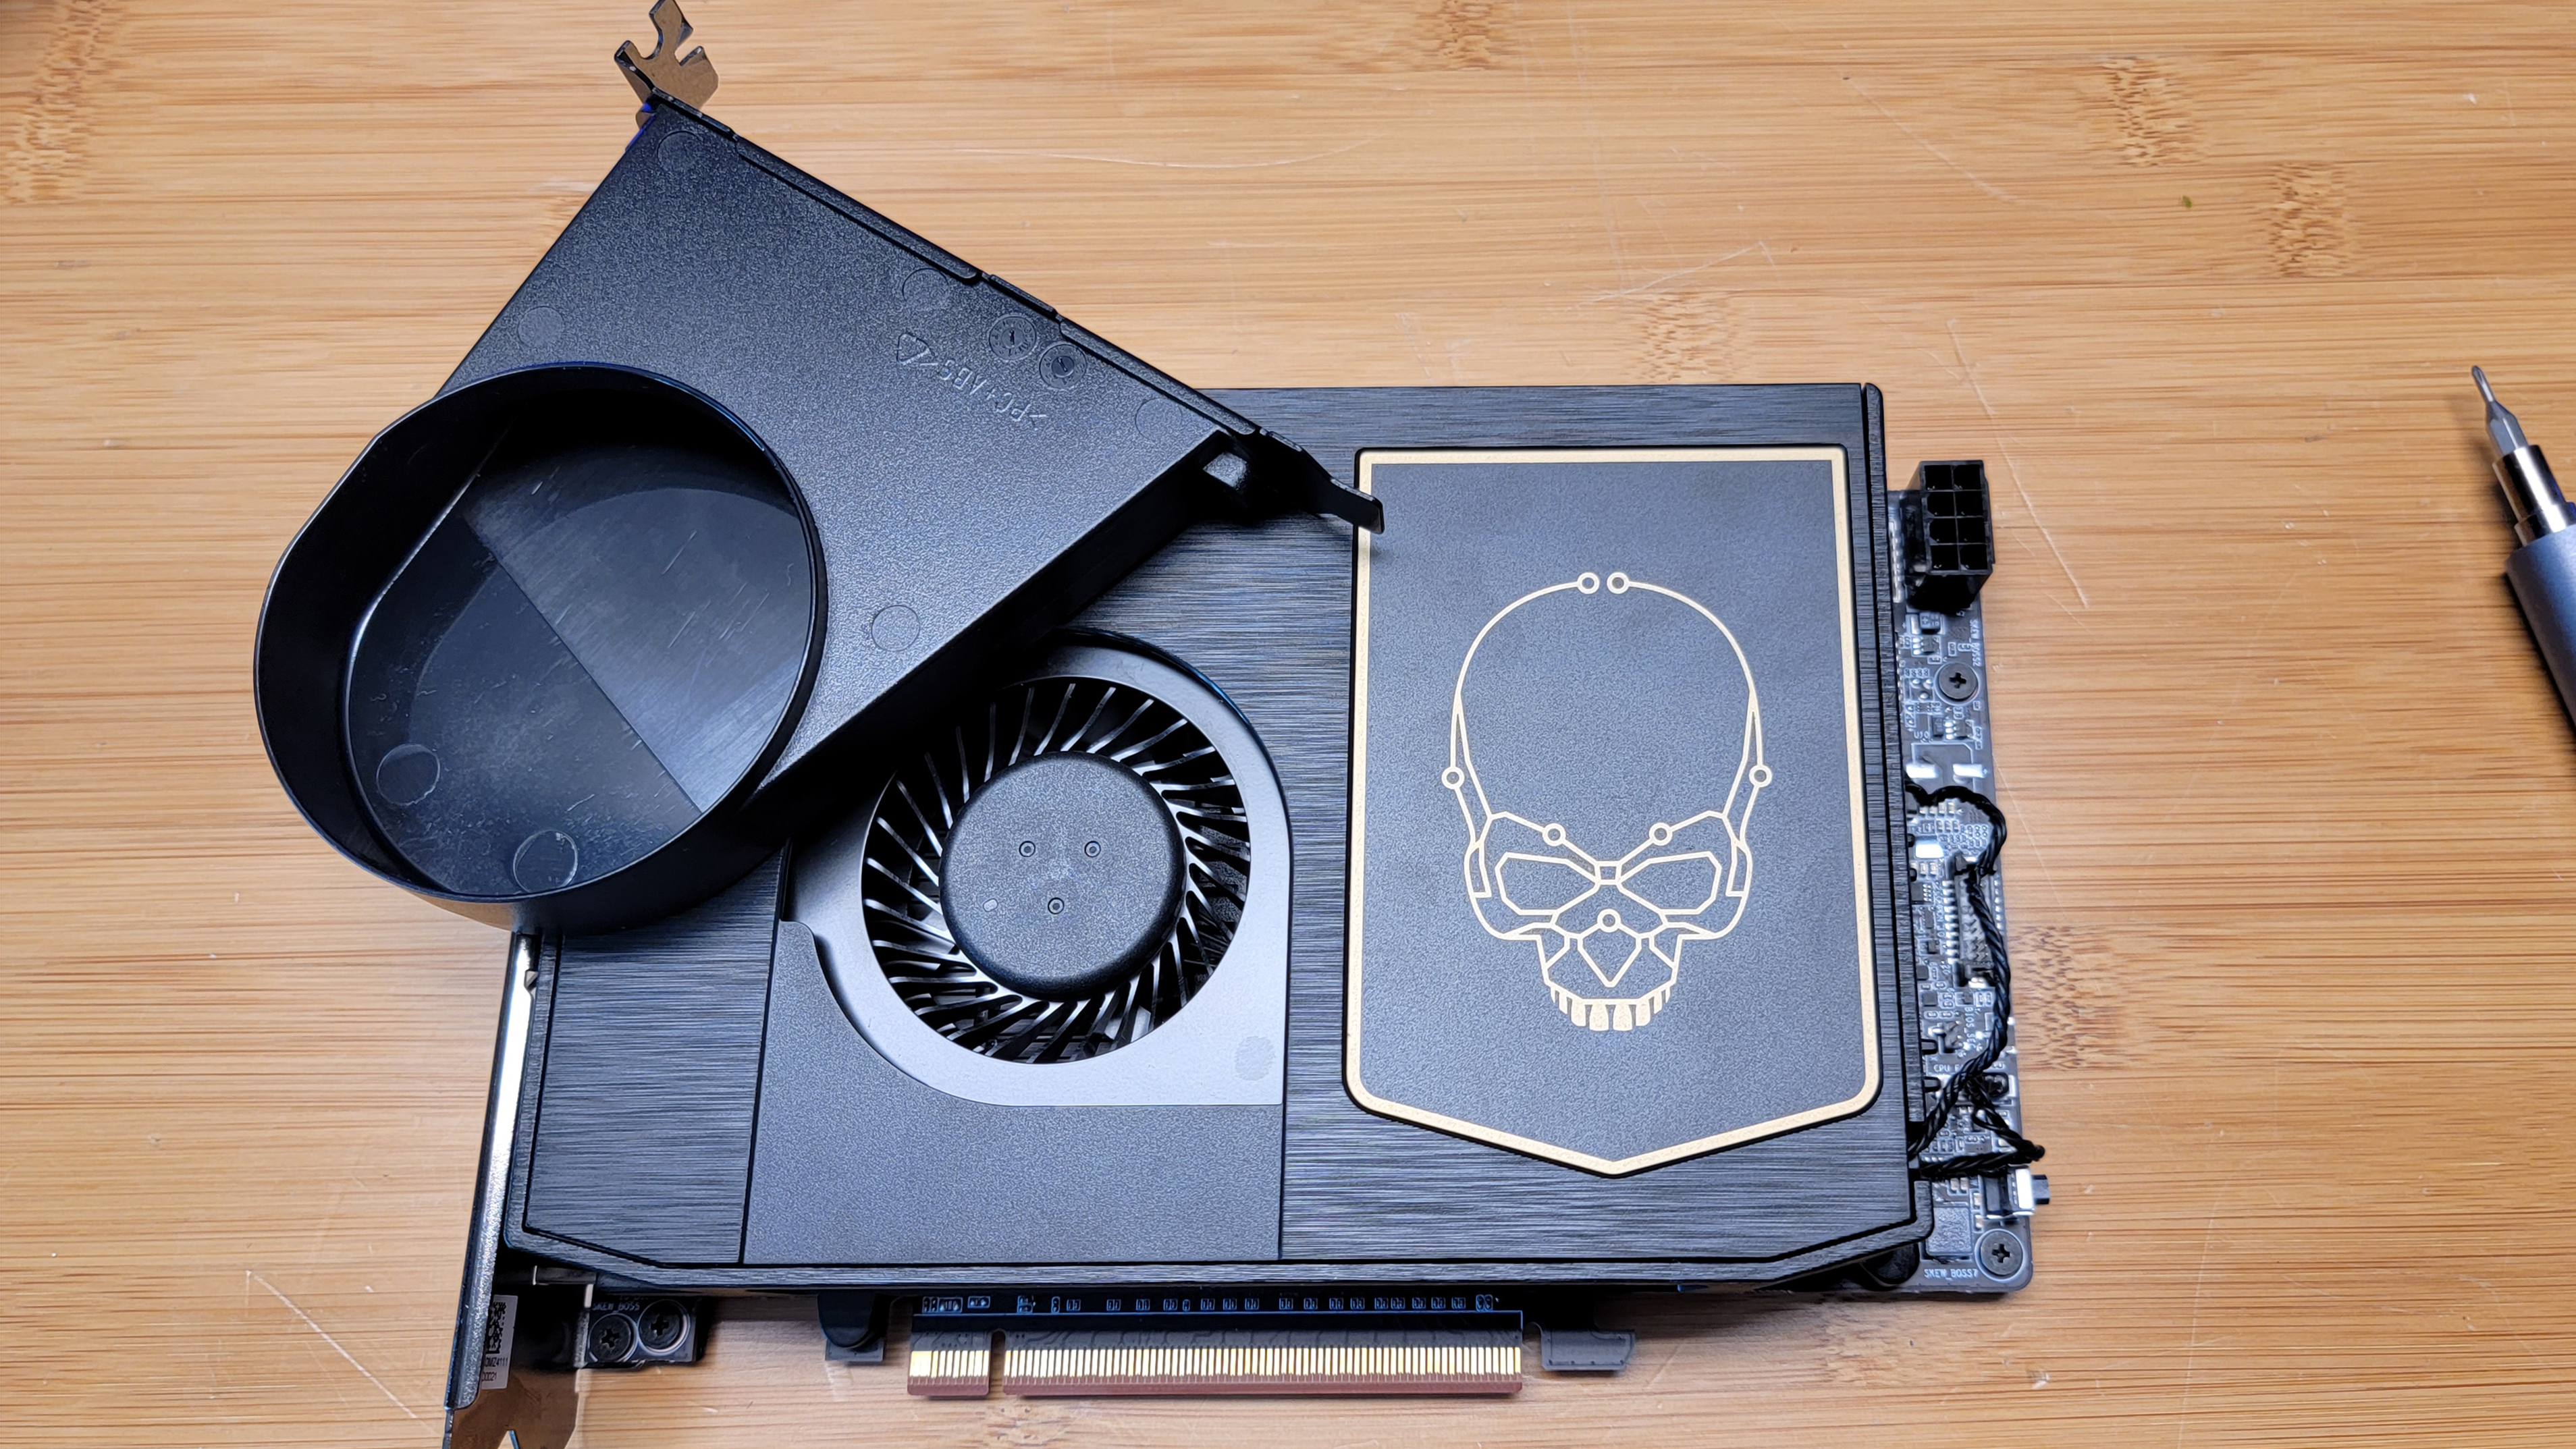
I have to give Intel some credit. When the chipmaker debuted its PCIe-card based Compute Element back in 2019, moving the CPU, RAM, storage and more off the motherboard, I was skeptical the company would stick with the form factor. Yet here we are going on four years later and the company's latest 'Eden' compute element not only packs a 12th Gen CPU, but it comes with standard socketed desktop chips this time around, in the form of a Core i7-12700 or the Core i9-12900 they sent our way, packed inside the company's complicated but impressively compact (8-liter) NUC 12 Extreme 'Dragon Canyon' kit.
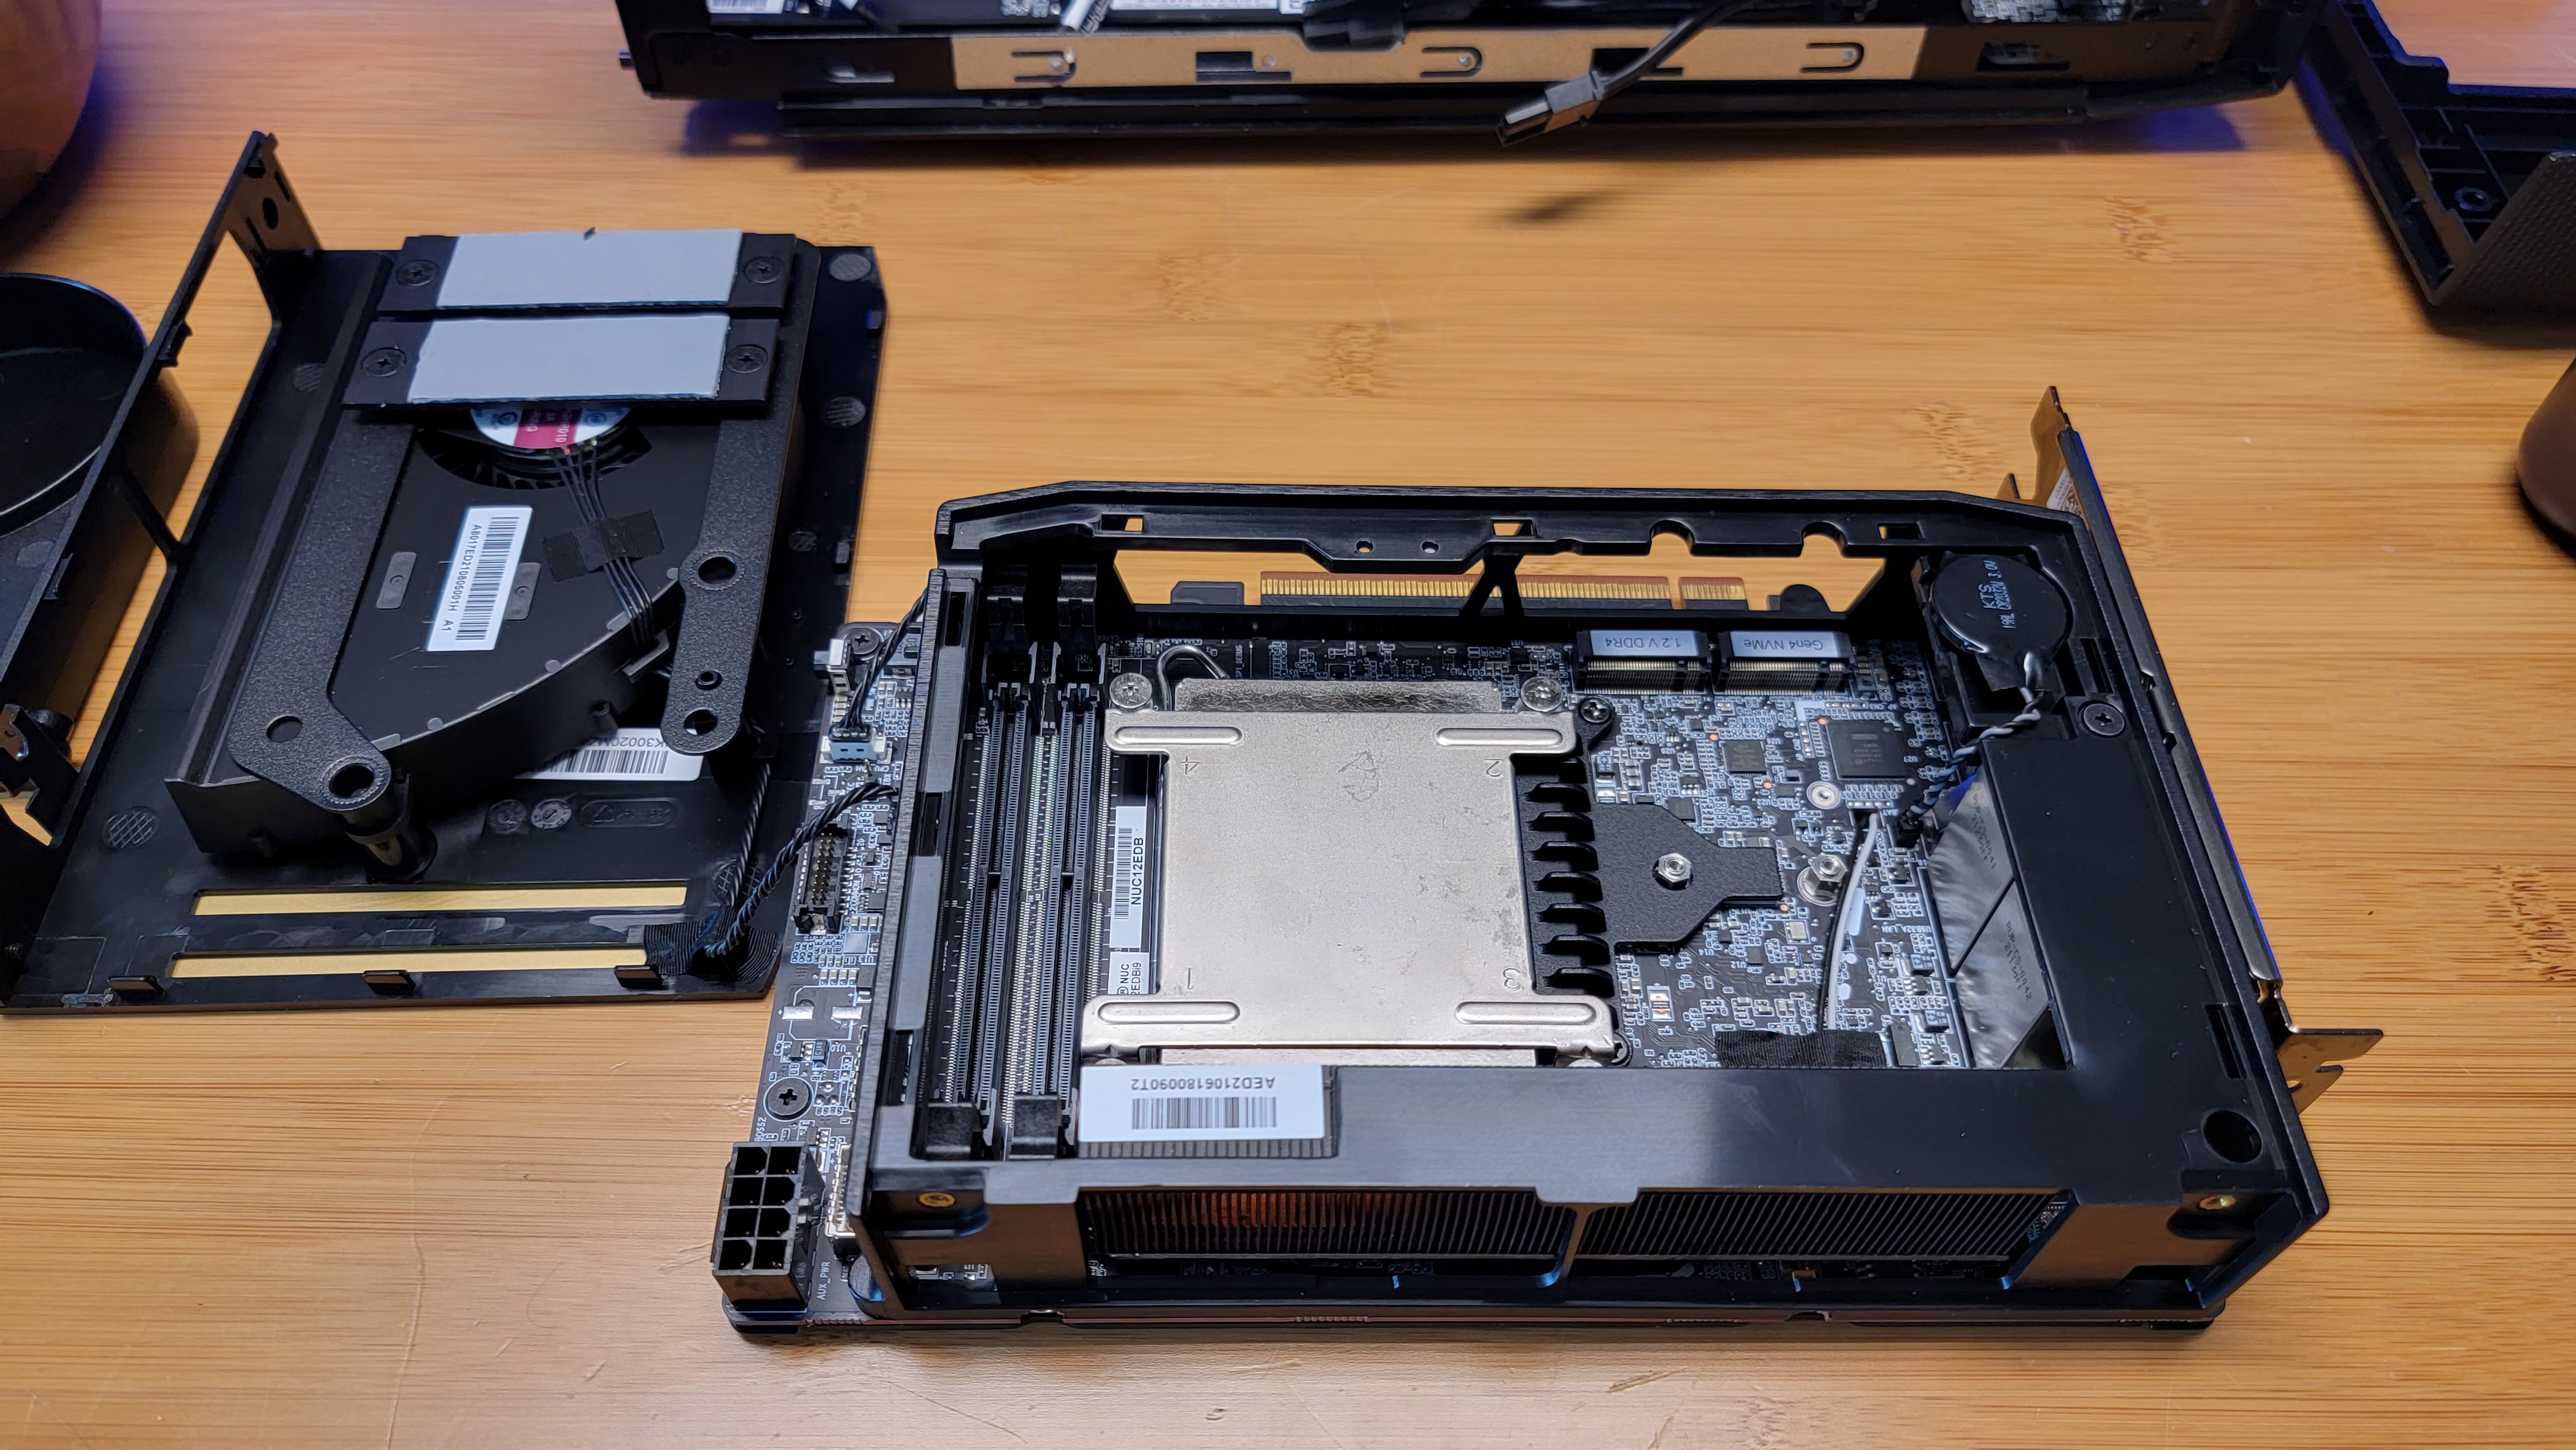
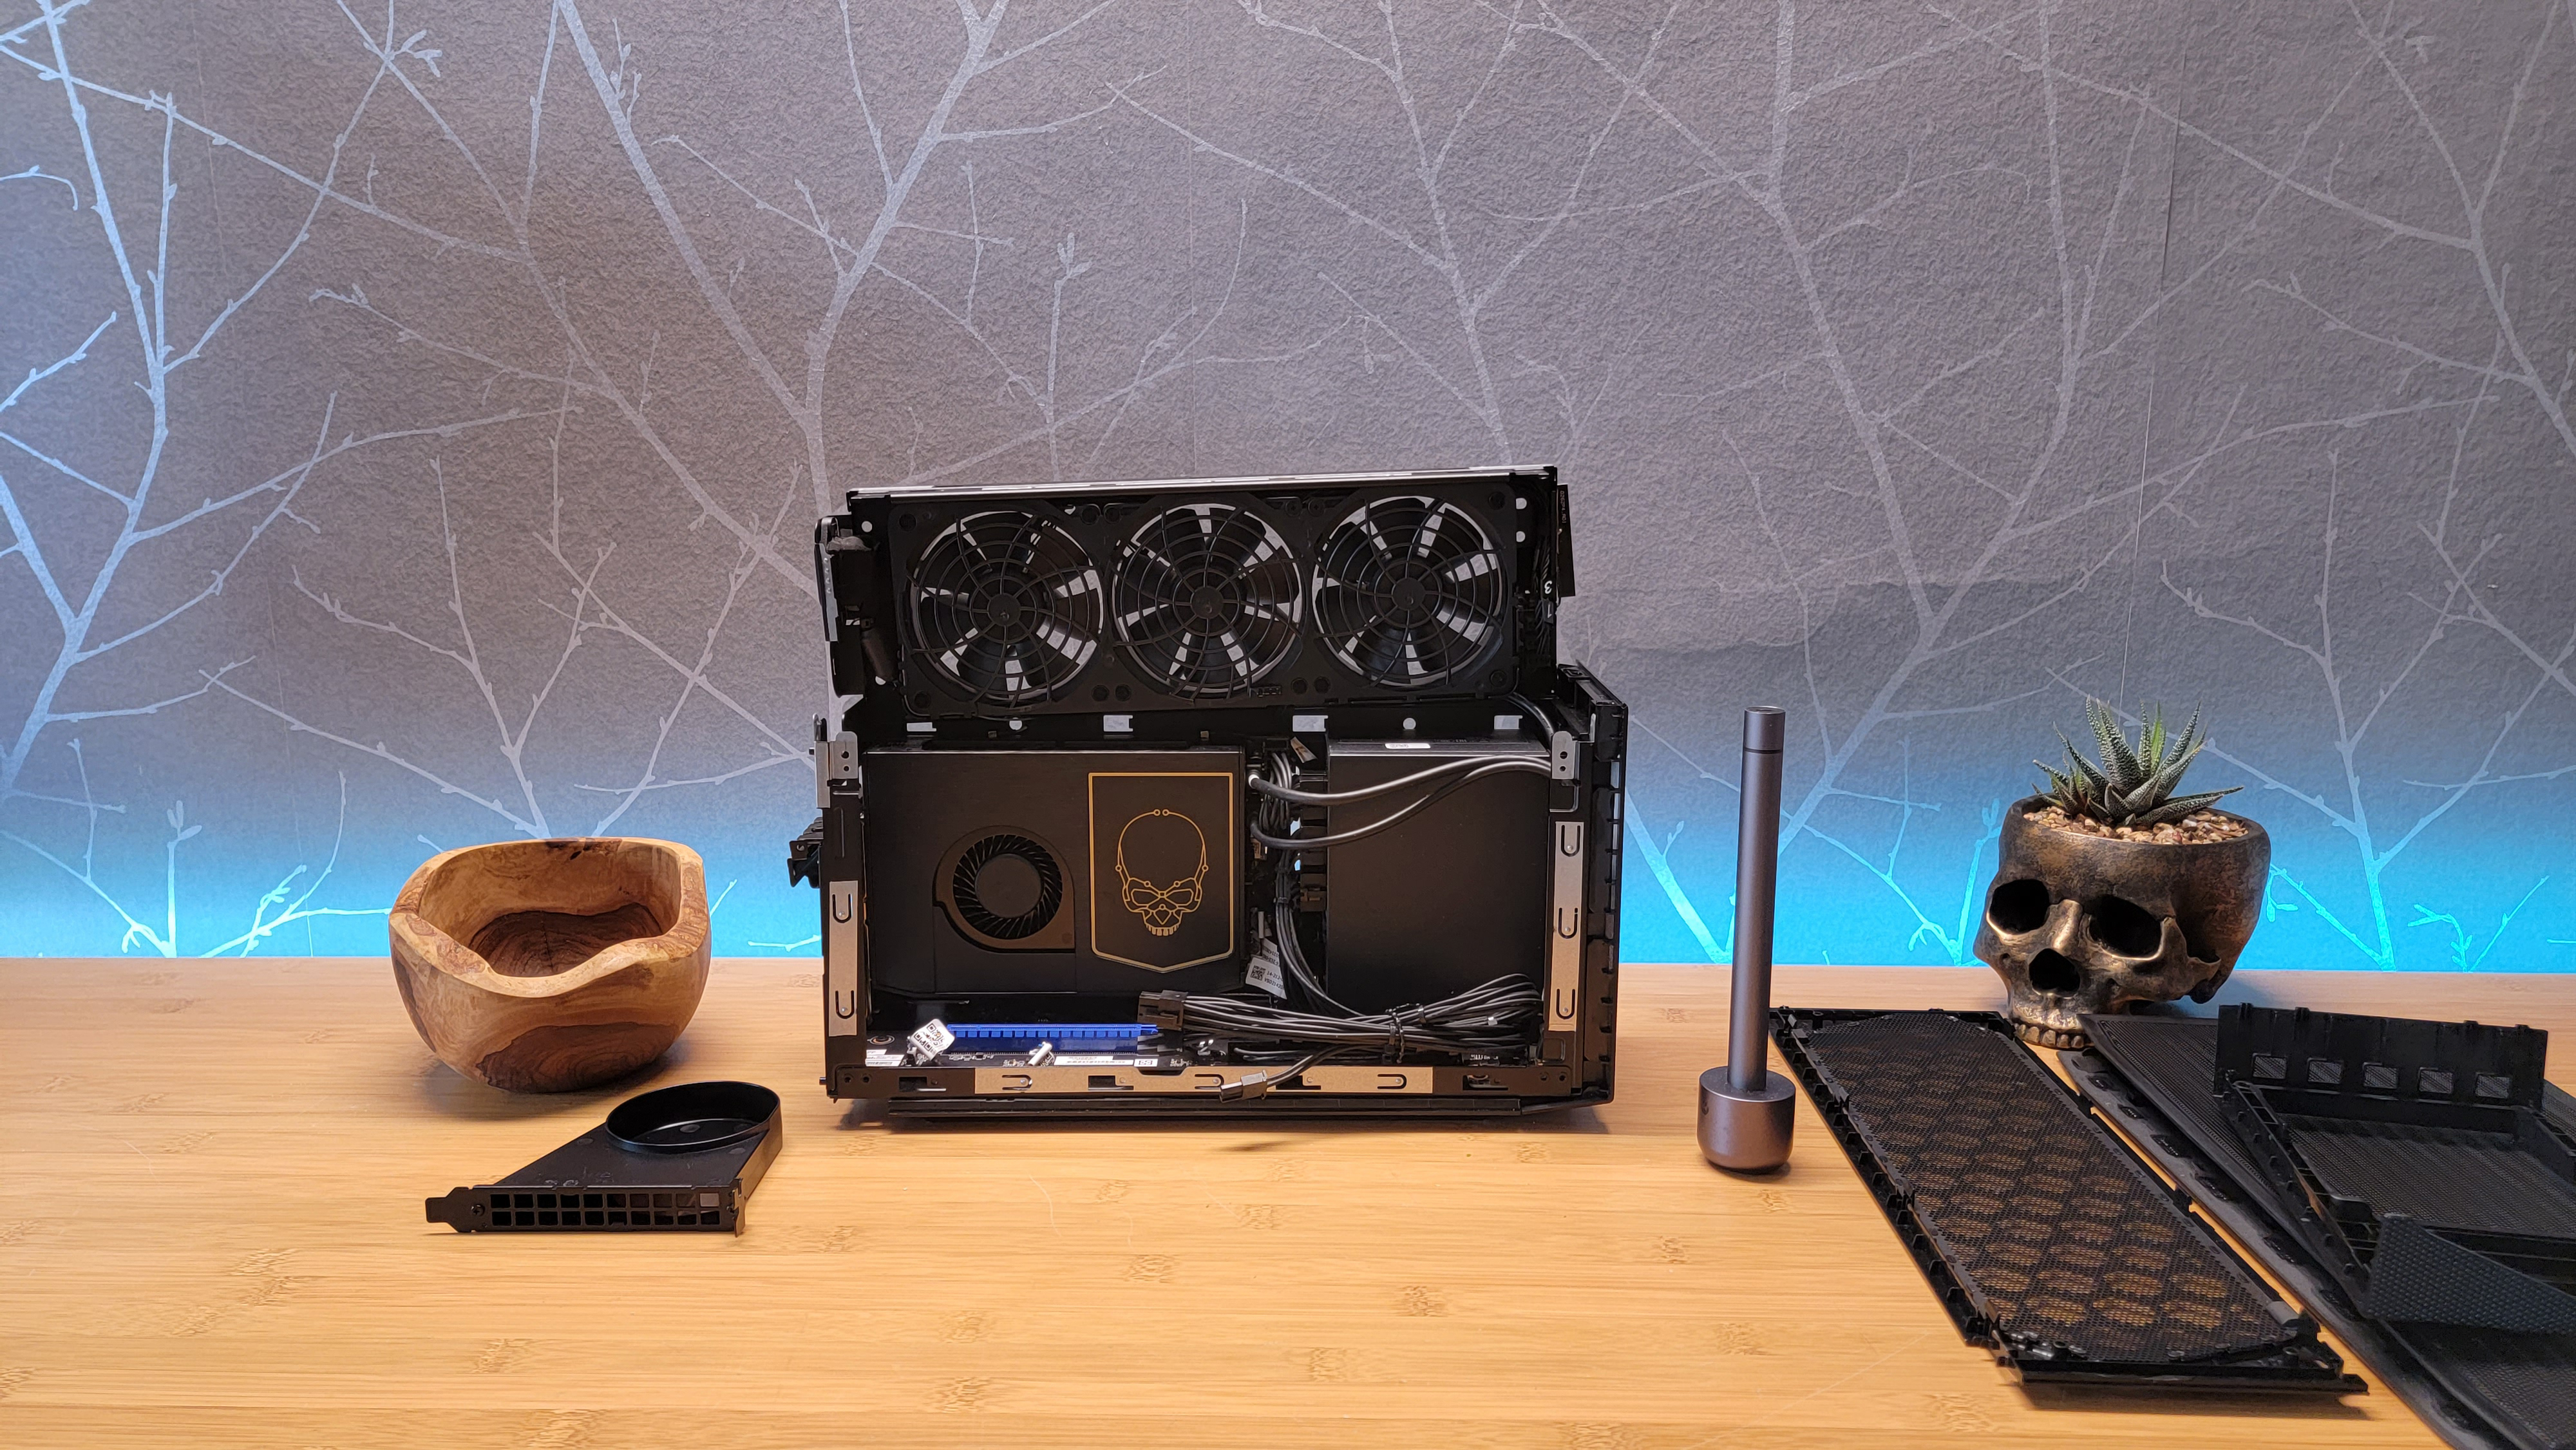
First off, let's tackle pricing. The Compute Element itself is basically a PCIe expansion board with an LGA1700 socket, CPU, and two slots for SO-DIMM (laptop) DDR4 RAM and two M.2 sockets, plus a surprising amount of ports and headers, starts at $750. But if you want one with a Core i9-12900 CPU, the price jumps to $1450. Keep in mind these prices are without RAM, storage or an OS. And if you want something to plug your Eden Element into, the full NUC 12 Extreme Kit, basically a case with a daughter board, three fans, and a 650W SFX power supply, a second PCIe slot for installing a dedicated GPU, plus the Compute Element with your choice of CPU, will sell for $1,150 for the i7 model or $1,450 for the i9 Intel sent our way. You could, however, also use this to upgrade previous gen NUC Extreme kits.
Keep in mind, just like with the card, those prices don't include storage, RAM, an OS, or a GPU. And don't expect to drop in something beefy like a 3080 Ti. The NUC 12 Extreme supports cards up to 12 inches long, but only two slots thick. Anything thicker and you aren't going to be able to put the side panel on because your blower is going to be hanging outside the chassis, which is impressively compact at about 14 x 4.75 x 7.5 inches (LWH). The dimensions are basically the same as last year's NUC 11 Extreme, although there's a USB-C port up front now and one USB-A, where the previous model had two USB-A ports. The ports on the Compute Element are also different, which we'll delve into in the next section.
Competition and Eden Compute Element
In terms of packing high-end components into a small space, the closest thing I can think of to the NUC 12 Extreme is Corsair's One i300. That system is noticeably bigger at 14.96 x 6.93 x 7.87, but it's a vertical tower, so takes up far less desk space. It also supports higher-end CPUs and GPUs, and both are liquid-cooled.
The NUC 12 Extreme, meanwhile, has three fans up top for cooling, a tiny cooler with a modest amount of fins for its CPU and the surrounding VRMs (to be fair, both CPU options are moderate 65W models), and a plastic fan duct designed to pull cool air from outside the chassis. The problem with the latter, though, is that due to the five-slot design of the chassis, the intake vent for the CPU sits right next to the rear vent for your GPU. At the very least, you probably want to avoid blower-style GPUs with this kit. Otherwise, during gaming or other GPU-heavy loads, your CPU is going to be sucking down the warm air exhausted by your graphics card. Every compact, high-power system is going to have some thermal compromises, but this, paired with the slim cooler of the CPU, seems far from ideal, especially on i9 models.
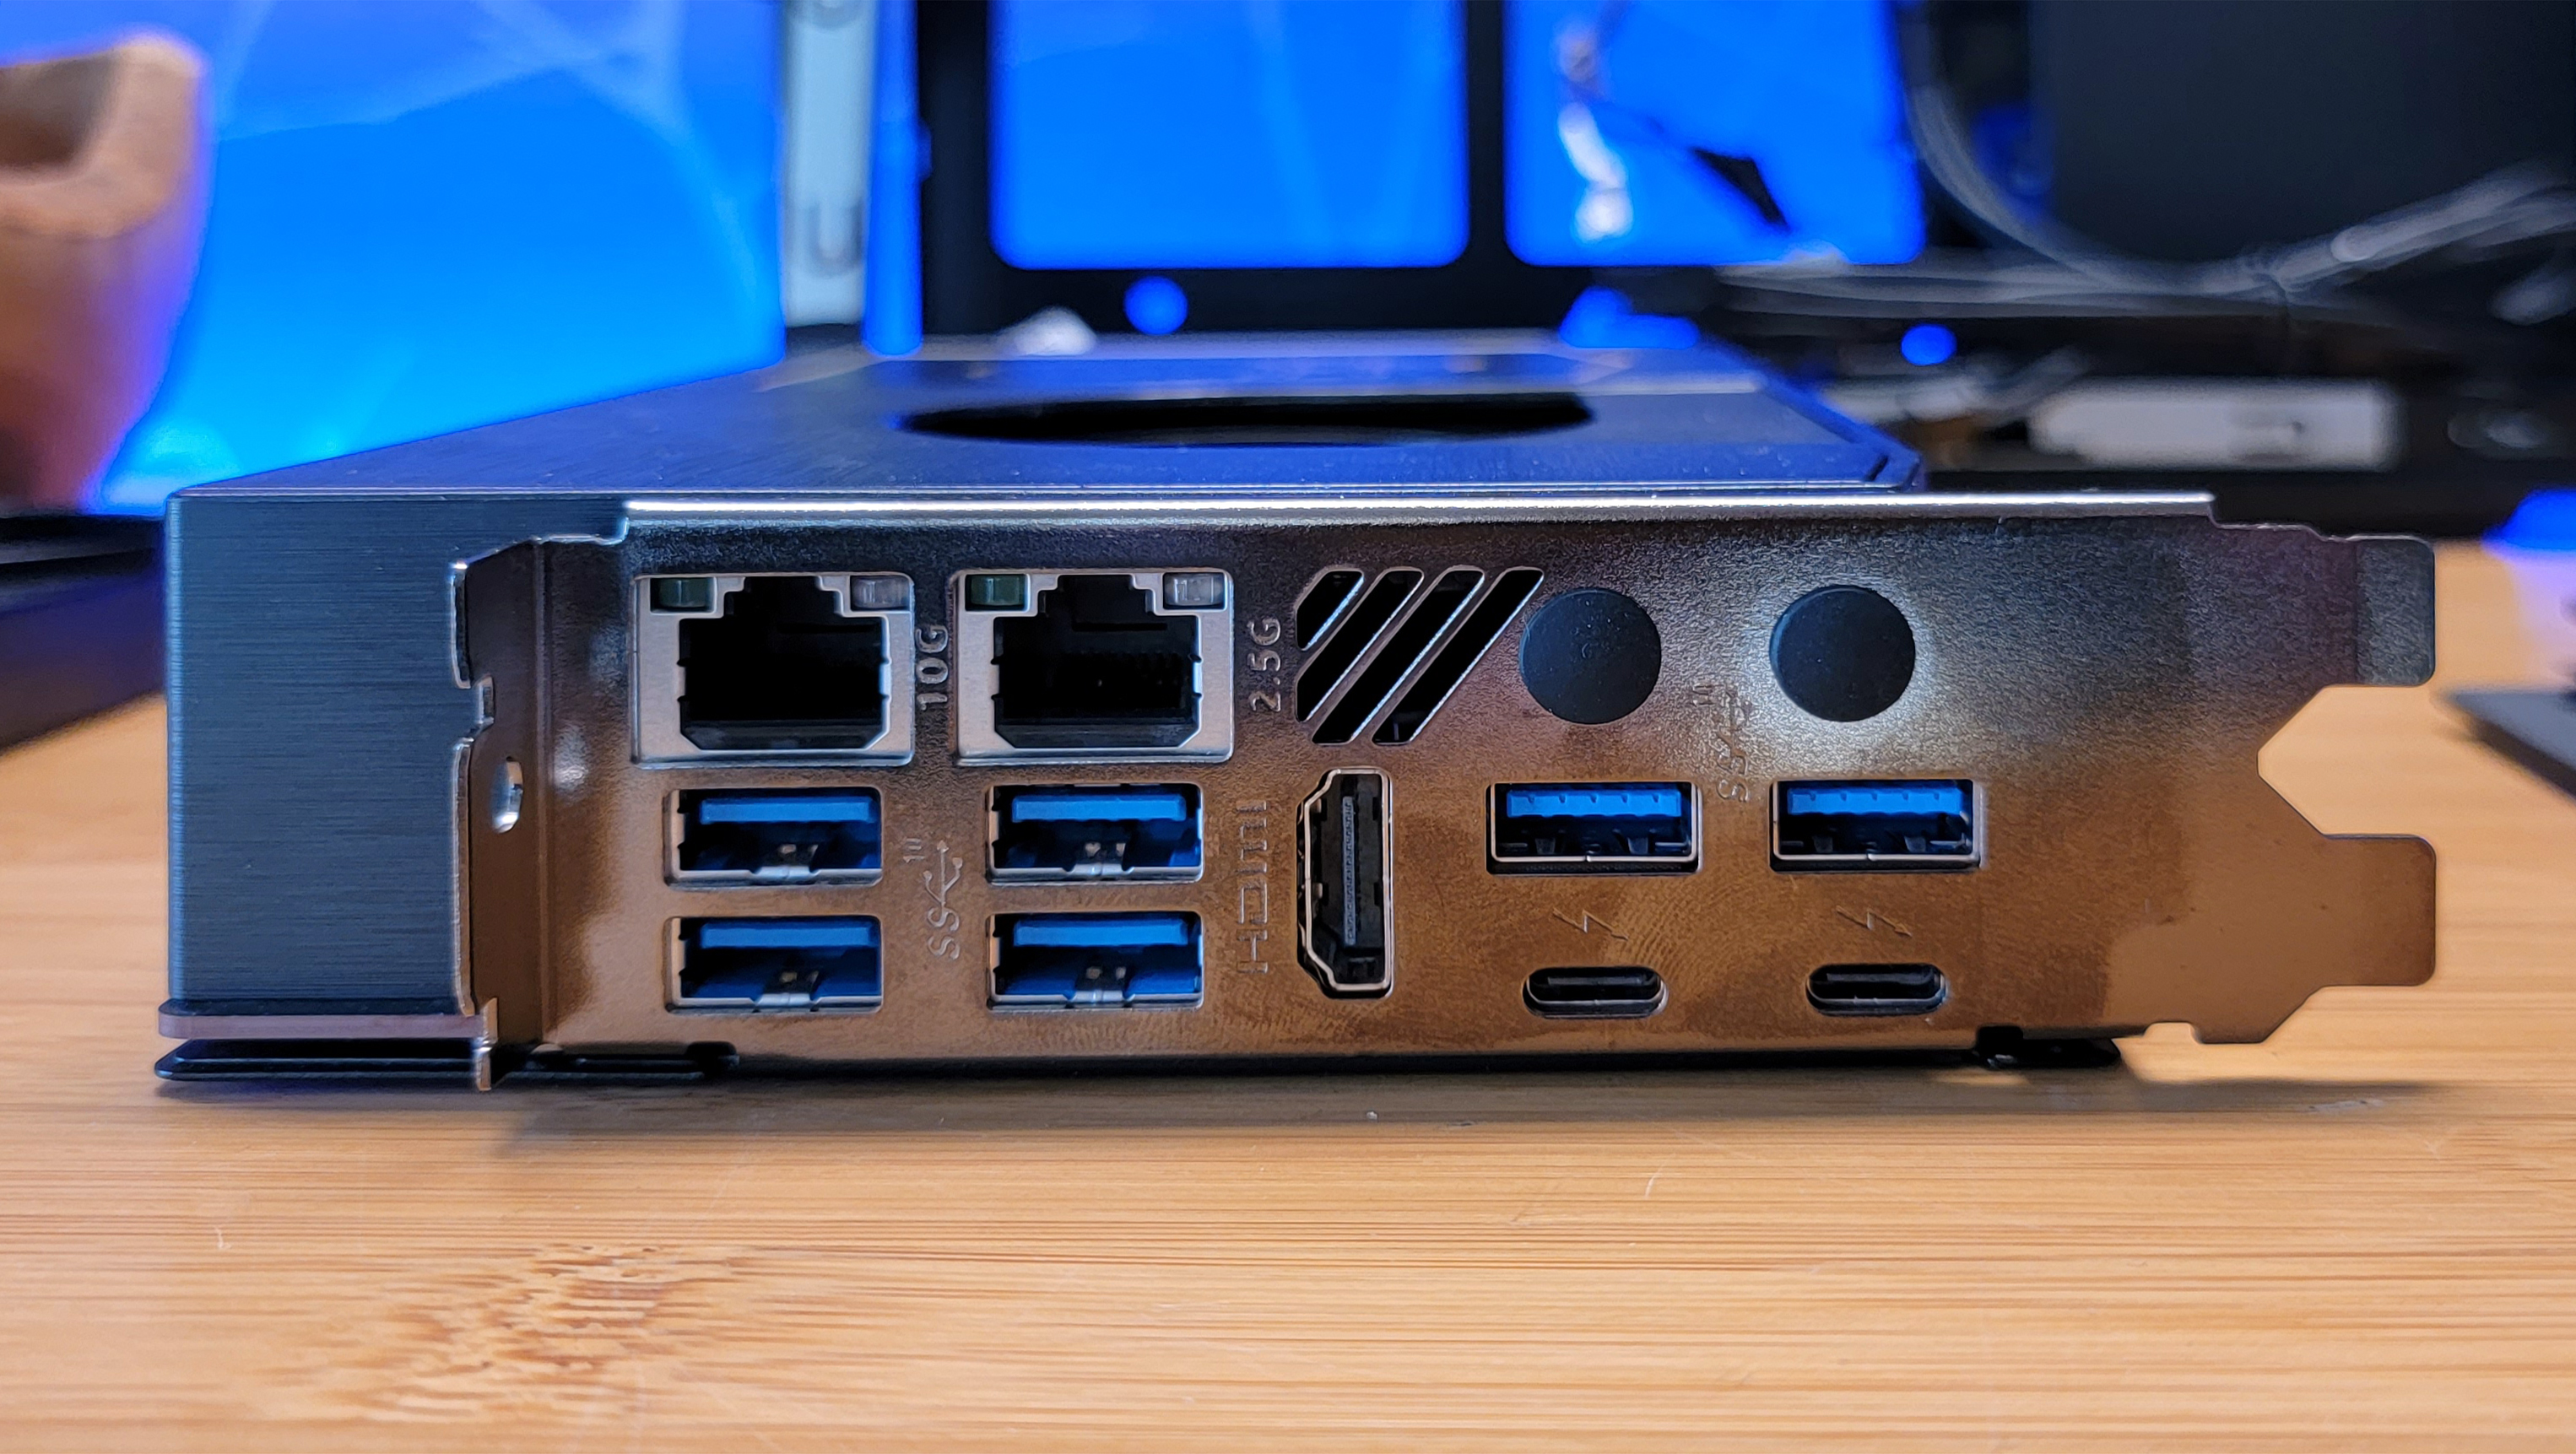
That said, the port selection on the expansion bracket of the Eden Compute Element is more packed with ports than many full-size motherbaords. You get six 10 Gbps Type-A ports, two Thunderbolt 4 ports, both 10 and 2.5 Gb Ethernet ports and a full-size HDMI port. That's a whole lot of connectivity in a small space. But it's also so packed together that it's going to be tough to use most of it at the same time, unless you're just plugging in cables.
Disassembly and Setup
With all those details out of the way, it's worth pointing out just how complicated it is to get the NUC 12 Extreme kit up and running. There is quite a bit of disassembly involved and some very tight clearances, especially if you want to take the Compute Element card out of the system, as we did.
Because the kit needs storage and RAM, both of which are installed inside the compute element, you need to first open the chassis. To begin this process you need to loosen four captive Philips head screws at the back. Then the two mesh side panels pull off from the rear section, giving you access to the interior.
To remove the Compute Element, you'll need to get access to the top. While it's not immediately clear (although parts of the metal frame near the top are labeled 'pull), the whole top portion, fans and all, flips up from the top outer edge. From there, removing another screw lets you lift up the flap locking the expansion brackets. Removing two more screws from the brackets finally sets the Compute Element free.
Note you don't expressly have to remove the element card. With the system laid on its side and top flipped up, you can loosen the two screws on the internal chassis of the card and flip it up, giving you access to the RAM and M.2 sockets. At the time of initial writing, we weren't aware of this because we didn't have access to the installation guide. Plus we wanted to remove the card to get a better look at it and take photos anyway, so our full removal and disassembly experience follows below.
Get Tom's Hardware's best news and in-depth reviews, straight to your inbox.
If you want to remove the card, you can't do it just yet, because there are still a bunch of cables that need to be unplugged. At the end of the card are the eight-pin CPU power connector, two front-panel USB connectors (there's an additional USB-C and USB-A port up front, along with an SD card slot and an audio jack), to antenna connection points for the Wi-Fi hiding up on the top edge of the card (which required pliers for me to get off), and a couple more small header plugs that you can't even see because the power supply and its plugs are in the way. This can be mitigated somewhat by removing the power supply. But doing that requires taking four screws out from the back, then unplugging the other and of one of the USB front-panel cables on the bottom of the chassis (because it blocks the removal of the PSU), and then slowly edging the power supply out of its cramped space in the front of the case. Only you can't remove it very far because the main PSU power socket cable, which is permanently attached, has about three inches of slack and routes up through the top three-fan housing to the back of the case, where you plug in your standard three-prong PSU cable.
Once you've done all that, then removed two small header cables on the Compute Element board, you can remove it. After this complex and careful disassembly, you can you start taking the Compute Element apart so you can install your storage and RAM. Although again, you don't expressly have to remove the card. You can access its inernals by loosening a couple of screws on the side of the card and flipping up the card's shroud.
The first time I removed the Compute Element, I did so without removing the PSU. And because everything was so close together, there were clearly some moments where bits were pushing up against other parts of the case. But with the Compute Element out I installed two SO-DIMMs (for a total of 64GB of RAM) and and a 512GB Patriot PCIe 3.0 SSD. I then put the whole thing back together, installed an RTX 2060 GPU (the only graphics card I had on hand that was slim enough to fit), and put the whole thing carefully back together.
Powering up the NUC 12 Extreme (or trying to)
With everything back in its place (or so I thought), and the power supply plugged in, I powered the system up –- or at least attempted to. The fans on the GPU spun up, but not the fans on the chassis, and the system didn't boot. After disassembling the NUC 12 Extreme kit again, carefully, I looked closely at the Compute Element and the rest of the internals, eventually noticing a yellow three-pin jumper, with its three pins still intact, laying at the bottom of the chassis.
After some back-and-forth with an Intel rep, they confirmed this was the "recovery jumper," which normally sits on the end of the board, near a couple of those small header cables that connect bits of the Compute Element to the front-panel portions of the case. It must have gotten snagged when I removed the Element for the first time. Clearly, this was the reason the kit wouldn't boot.
Intel NUC 12 Extreme Performance
Intel did send us a second unit of the NUC 12 Extreme, but it arrived less than 24 hours before launch. So it took us another couple days to get it set up and do some basic testing. Since the system comes without storage, RAM, an OS or a GPU, we just ran CPU tests. The 65W Core i9-12900 in our kit isn't quite as powerful as the full-wattage i9-12900K, but it's easily powerful enough to handle any 12-inch, dual-slot GPUs that will fit in the NUC chassis, as is the lesser Core i7-12700 option.
To get a sense of the NUC 12 Extreme's performance, we ran a few productivity tests and compared it to the previously mentioned Corsair One i300, a slightly larger desktop with a Core i9-12900K and an RTX 3080 Ti–and also a much higher price at $4,999 as tested, but it is a complete system, with a powerful GPU, 64GB of RAM and 2TB of SSD storage. As a more direct comparison, we also included Intel's previous-generation NUC 11 Extreme Beast Canyon kit, which uses a very similar chassis, but its Compute Element card features a non-upgradable Core i9-11900KB, as opposed to the standard socketed 12900K in the Dragon Canyon kit.
We outfitted the NUC12 Extreme Dragon Canyon with 64GB of DDR4 memory and a 512GB Patriot PCIe 3.0 SSD for testing.
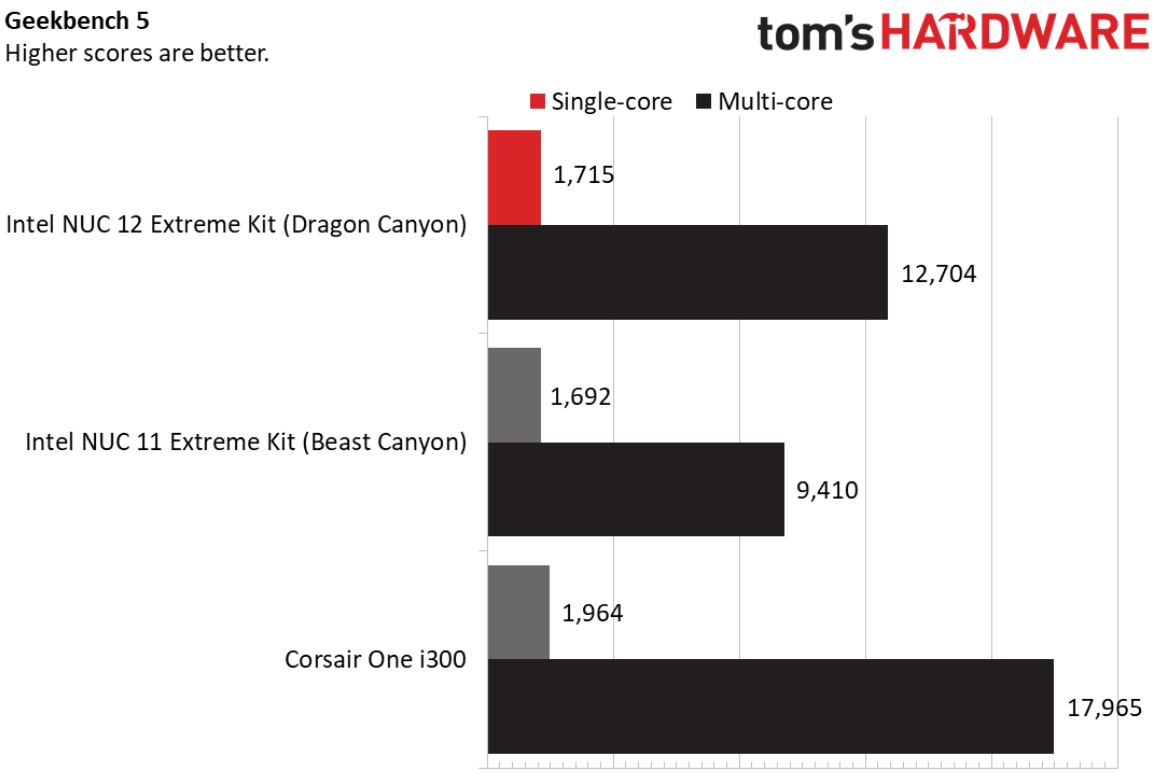
First off in Geekbench 5, the 12th Gen NUC edged past the 11th Gen model just slightly on the single-core test, but its mulit-core score of 12,704 was much higher than the 9,410 scored by the 11th Gen model on the same test. But neither 65-watt CPU could match the liquid-cooled 125W 12900K in Corsair's One i300, which scored 1,945 on single-core and 17,965 in the multi-core part of the test.
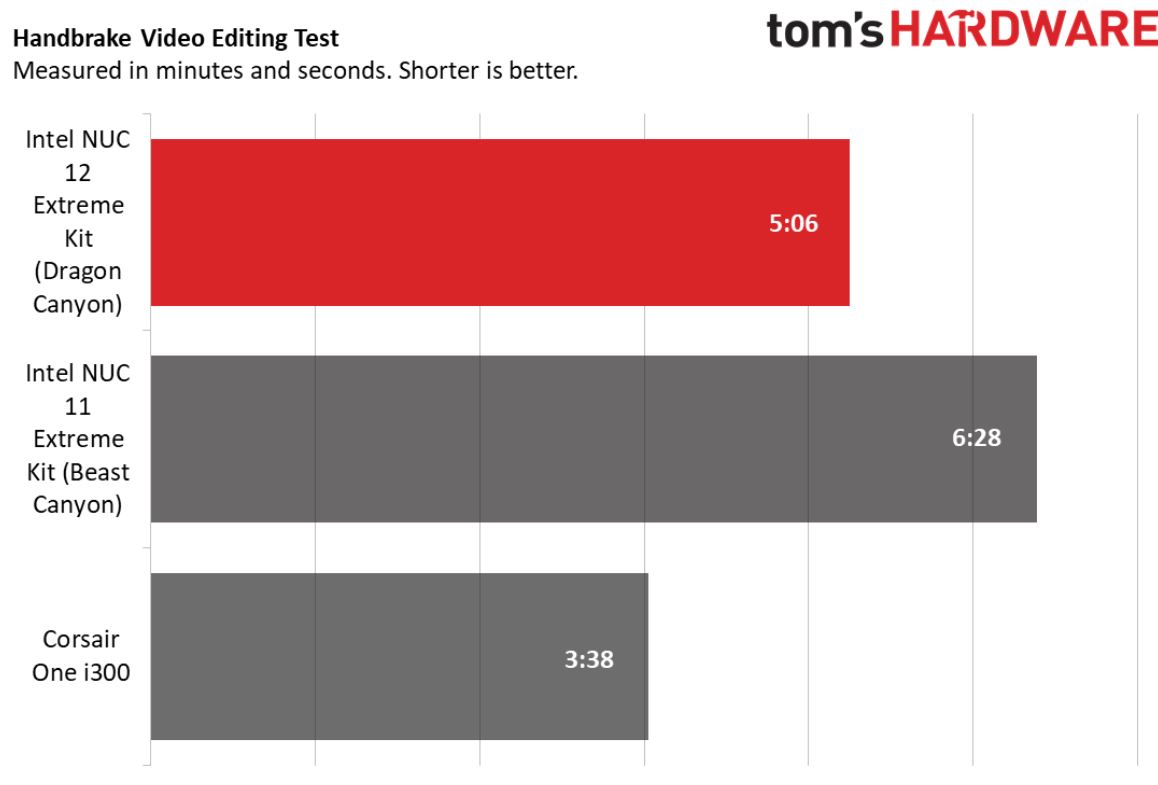
We saw a similar pattern in our Handbrake test, which taxes a CPU by transcoding a 4K video file to 1080p. On this test, the Dragon Canyon's time of 5:06 looked impressive against the previous-gen Beast Canyon model's time of 6:28. But again, the more powerful, liquid-cooled One i300 finished the same test nearly 90 seconds sooner than the NUC 12 Extreme, finishing in 3:38.
Since the storage, memory and GPU performance all depend on what components you put in the system, there's little else to test here that would apply to the NUC itself.
If you are considering the Dragon Canyon kit, know that it's very densely packed and complicated to work in. Although be sure to check out the manual for help since this is a far-from-standard PC form factor. And note that you don't actually have to remove the Compute Element card to get access to the storage and RAM slots. Still, setting it up or upgrading the system is more complicated than you probably expect. And if you ever want to remove the Compute Element from the chassis to upgrade the CPU or swap in whole new future card, expect the process to feel more like fixing a piece of old stereo equipment than upgrading a "standard" desktop.
That, plus the fact that it's so expensive ($1,450, without a GPU, storage, RAM or an OS), means that most people would be better off opting for something like Corsair's One i300 if they want a compact, powerful PC for gaming or other intense workloads. That system is also very expensive, but it has much better (liquid) cooling for both the CPU and graphics card. And while it is somewhat larger, its vertical orientation means that it will take up much less space on your desk or floor than the NUC 12 Extreme. Plus, it comes completely assembled out of the box, while the NUC requires a fair amount of fiddling in an unfamiliar form factor--unless perhaps you bought one of the last-generation Extreme NUCs.
After a rough start with the Mattel Aquarius as a child, Matt built his first PC in the late 1990s and ventured into mild PC modding in the early 2000s. He’s spent the last 15 years covering emerging technology for Smithsonian, Popular Science, and Consumer Reports, while testing components and PCs for Computer Shopper, PCMag and Digital Trends.
-
Co BIY Did removal of the jumper brick the unit ?Reply
Seems like jumpers are designed to be removed.
As complicated as it sounds it seems like they should be selling them with RAM, SSD, ect... already installed.
Then it would be like a laptop. It's possible to make changes but what percentage of consumers actually ever open the back of their laptop. (Not Tom's posters but "real" people)
