
There are times when even the best soldering irons won't speed up your soldering pace. So what if the board soldered itself? This is the goal of Carl Bugeja, and this PCB that can solder itself and then other boards!
Bugeja's approach is described using a pizza analogy: The PCB is the dough, the solder paste is the sauce, and the toppings are the circuit components. Put all of this into the oven, and you have a ̶t̶a̶s̶t̶y̶ ̶p̶i̶z̶z̶a̶ PCB ready to go!
For those not familiar with surface mount electronics, large stencils are placed over pre-fabricated PCBs. Next, a layer of solder paste (think toothpaste, not typical solder) is applied through the stencils. A pick-and-place machine is then used to drop the components onto the solder paste, and then the whole board goes into a reflow oven where the components are baked into place. If you need to make thousands of boards, then this is the way.
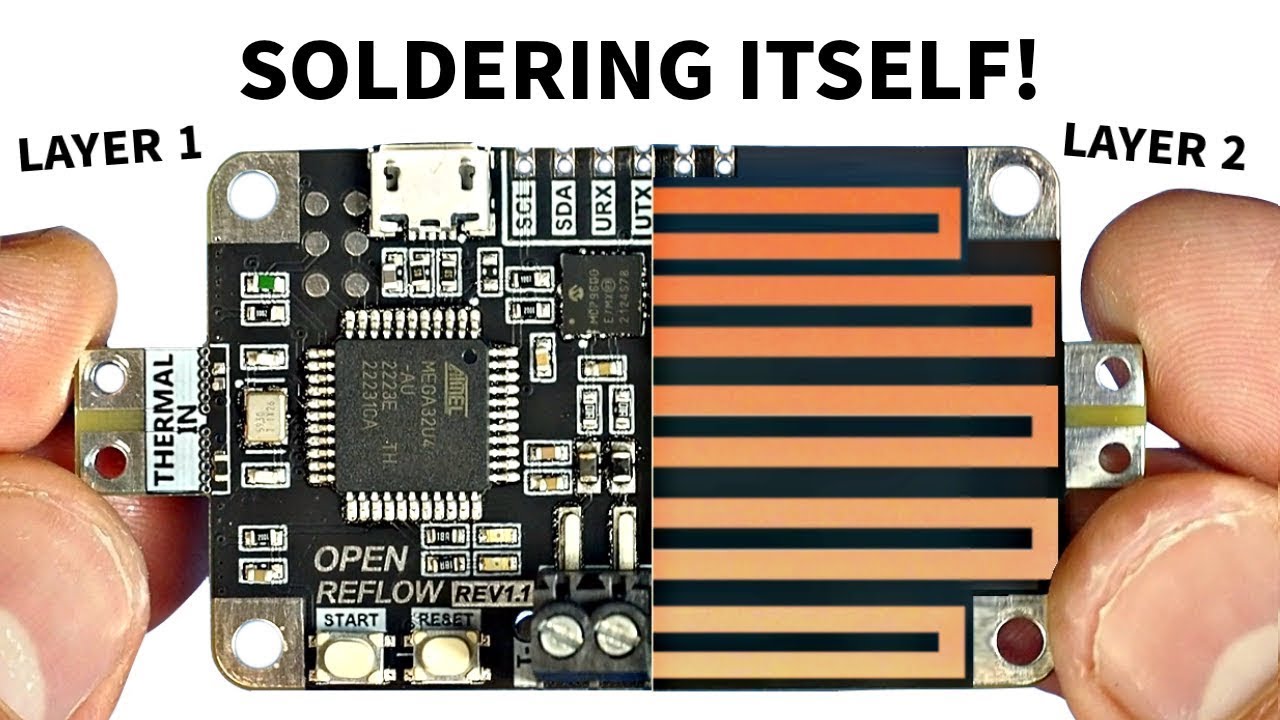
Bugeja uses one of the many layers in the PCB as a means to transmit heat. Rather than one massive copper ground plane, Bugeja has reconfigured that layer into a track that provides some resistance and heats up the board. This heat causes the solder paste to reflow and the components to be soldered into place.
Bugeja kept the resistor values low on purpose. This enabled the boards to self-solder at 165 degrees Celsius (328 degrees Fahrenheit) using just 9 Volts. The magic 165°C is the temperature needed to melt the low-temperature solder paste (Chip Quik TS391LT50 for those in the know). Bugeja chose a PCB construction that was good up to 170°C, and since this is a one-shot, five-minute solder, it offered a robust medium for the board.


The downside of the process is that this is a one-shot process, but Bugeja is prepared for this and will use this layer as a ground (GND) plane by soldering a zero ohm resistor from the track to the GND connection. An elegant solution, if we say so ourselves.
The circuit was designed using Altium Designer, and Bugeja used this as an advantage, routing the wavy self-soldering track around many vias that work between layers of the circuit. The input for the soldering power is via two extensions to the PCB. These extensions take the power around the track and can be easily broken off when the job is done. How is that possible? Using "Mouse bite vias," in other words, tiny nibbles are fabricated directly into the structure of the PCB. They can be easily broken off and sanded down, leaving little or no trace of their existence.
The first test went well. Sure it wasn't perfect, with a few soldering blobs that needed a little rework, but the board came out with no damage; all it needed was a bootloader, a few component changes, and a custom Arduino sketch to control the next part of the project.
Initially, Bugeja manually controlled the temperature by steadily increasing the voltage, but Bugeja felt that a computer could do it better! What technology could accurately self-solder another circuit using the exact temperature profile of the solder paste? Well, that would be the PCB that Bugeja had just self-soldered. Yes, the freshly created board has an Atmel MEGA32U4 (well-used in the Arduino world) and a temperature sensor (thermocouple). All the user has to do is connect their compatible board to the PCB, press a button, and a PID controller will precisely cook your ̶p̶i̶z̶z̶a̶ PCB to order.
The second version (Bugeja called this a "daughter")of the board was connected to the original (mother) using two machine screws. The thermocouple was then taped to the underside of the board. Pressing the button started the Arduino sketch to run, controlling the temperature profile to 165°C where the components settled into their final positions. The daughter board was a success, and Bugeja celebrated by creating another board, the granddaughter of the original.
Bugeja's project is an excellent approach to surface mount soldering and one that we can see catching the eye of many electronics experts keen to push the boundaries of what is possible in the subject. Right now, we either purchase expensive equipment to reflow our surface mount builds, build small projects using MHP30 hot plates, or go DIY with your own reflow toaster oven.
You can read more about Bugeja's project and download the PCB files from the GitHub repository.
