
Connecting our projects to the Internet just got a lot easier, and cheaper! The $6 Raspberry Pi Pico W, an upgrade on the original Raspberry Pi Pico, brought one great update: Wi-Fi. This upgrade, along with the $6 price, enables makers to harness the power of the RP2040 SoC for a plethora of Internet of Things applications. The Pico W also tops the list of our best RP2040 boards.
We’ve already covered how to pass data to and from a Raspberry Pi Pico W to another web service, Anvil. But what if you just want to collect some data and send it off into the world? There are many ways to do this, but the simplest has to be IFTTT.

IFTTT (If This Then That) is a web service that can take data from many different inputs (Twitter, Home Automation, Google, Facebook etc) and send it to other services.
In this project we’ll use the most basic service, webhooks, to send an HTTP POST request from a Raspberry Pi Pico W to IFTTT’s service. On IFTTT we will create an applet that will intercept the webhook, and trigger a tweet to be sent on Twitter.
For this project you will need
The Temperature Sensor Circuit

Our circuit is simple, consisting of just the Raspberry Pi Pico W and a temperature sensor. The DHT11 is a low-cost four-pin temperature sensor which is ubiquitous in the maker community. Looking from the front (the blue “cage”), we connect to the Raspberry Pi Pico W as follows:
Pin 1: (Red Wire) Connect VCC to 3V3(OUT) of the Pico W.
Pin 2: (Yellow Wire) Connect Data out to GP4 of the Pico W.
Pin 3: No connection.
Pin 4: (Black Wire) Connect GND to GND of the Pico W.
Setting Up IFTTT
IFTTT (If This, Then That) is the conduit which links our Raspberry Pi Pico W to Twitter. IFTTT is a free service that offers a myriad of ways to connect different data services together.
We are going to create an applet which reacts to a webhook (a custom URL) sending data to IFTTT. Then IFTTT will add the data into a message that will be sent to our followers on Twitter.
1. In a browser visit IFTTT and login / create an account.
2. Click on Create.

3. Click on Add. This is our trigger event. If this happens, our applet starts. In our case if a webhook is sent from the Raspberry Pi Pico W.

4. Search for webhook, and then click on the webhook icon.

5. Click on Receive a web request. This is our request, sent from the Raspberry Pi Pico W.

6. Set the Event Name to Post_Tweet and then click Create Trigger.

7. Click on Then That Add. This is the outcome of our trigger, in this case a Tweet is sent.

8. Search for Twitter and then click on the Twitter icon.

9. Select Post a Tweet.

10. Check that the correct Twitter account is selected, you may have to link your Twitter account to IFTTT. Replace the tweet text with your own custom message. Linking your Twitter account to IFTTT is an automated process, which IFTTT will trigger and ask you to confirm.

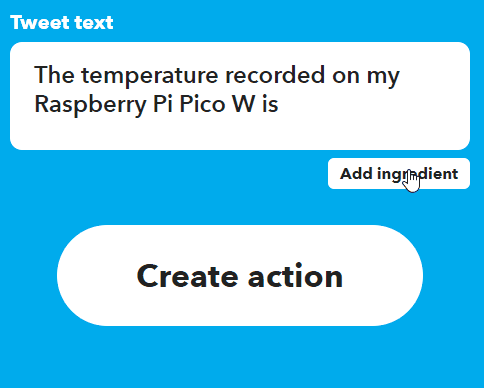
11. Click on Add ingredient and select Value 1. Then finish the remainder of the message, in this case stating that the temperature is in degrees Celsius. Click Create Action to save. Ingredients are IFTTT’s way of adding extra information to our tweet by pulling the data from our custom URL.
12. Click Continue.

13. Review the applet details, check the notifications option to on, and click Finish when ready. Notifications enable us to debug the applet, should an issue occur.

The IFTTT Applet has been created, but we don’t yet have the webhook URL. This URL is what sends the temperature data from the Raspberry Pi Pico W to our IFTTT service. The URL requires our trigger (Post_Tweet) and an API key, unlocking IFTTT access.
1.Visit this link in a new browser tab / window.
2. Copy the Make a POST or GET web request link into notepad or a text editor. Your text will show a correct API key, for security reasons we have edited the text.
https://maker.ifttt.com/trigger/{event}/json/with/key/YOUR API KEY HERE3. Remove /json and change {event} to Post_Tweet.
https://maker.ifttt.com/trigger/Post_Tweet/with/key/YOUR API KEY HEREYou now have a valid webhook URL which will link your Raspberry Pi Pico W to Twitter via IFTTT.
Setting up the Raspberry Pi Pico W
Our Raspberry Pi Pico W is acting as a data collection device. It connects to our Wi-Fi, and every hour takes a temperature reading. This is then sent to IFTTT using a custom webhook URL. IFTTT then sends the message to Twitter as per the applet we have just created.
Our goal is now to install the latest MicroPython firmware release for our Raspberry Pi Pico W, then write a few lines of MicroPython code to connect to our Wi-Fi, take a temperature reading, and then send that data to IFTTT.
1. Follow this guide to download and install the MicroPython firmware, and setup Thonny.
2. Open Thonny and create a new file.
3. Import three modules of code. Network enables the Pico W to connect to a Wi-Fi network. Urequests is a version of requests, a means to work with web data, for MicroPython. DHT refers to the DHT11 temperature sensor used in the project.
import network
import urequests
import dht
4. Import two further modules of code. From the Time module, import the sleep function, we’ll use this to add a pause to the project. From the Machine module import Pin, this enables our code to interact with the GPIO.
from time import sleep
from machine import Pin
5. Create an object, “sensor” which connects our code to the DHT11 connected via the GPIO. This object enables us to interact with the sensor connected on Pin 2, querying temperature data.
sensor = dht.DHT11(Pin(2)) 6. Create an object “wlan” and use it to connect the code to the Wi-Fi on the Raspberry Pi Pico W, then turn the Wi-Fi on.
wlan = network.WLAN(network.STA_IF)
wlan.active(True)
7. Connect your Pico W to your Wi-Fi access point using its SSID and password.
wlan.connect("SSID","PASSWORD")8. Pause for five seconds before proceeding onward. This isn’t strictly necessary as the previous Wi-Fi connection is a blocking call that will either connect or fail, then release the block. This pause is present to allow a little extra leeway.
sleep(5)9. Print the current status of the Wi-Fi connection. This will either be True for a successful connection, or False if it was unable to connect.
print(wlan.isconnected())10. Add a loop to continually run the following code. A while True loop will continuously run the code until the Pico W is turned off. Note that the code following this line is indented to show that it is part of the loop.
while True:11. Take a reading with the DHT11. We need to do this in order to get the raw data.
sensor.measure()12. Save the current temperature to an object, temperature.
temperature = sensor.temperature()13. Print the temperature to the Python Shell (REPL). This is useful to debug any issues. It should show the temperature each time the loop iterates.
print(temperature)14. Create an object, message, to store the unique webhook URL that we created earlier. At the end of the URL add ?value1= and ensure that this is contained between quotation marks “ “. Remember to add your unique IFTTT API key.
message = "https://maker.ifttt.com/trigger/Post_Tweet/with/key/YOUR IFTTT API KEY HERE?value1="15. To the same line, add the current temperature stored in the “temperature” object. Note that we need to convert the temperature from an integer / float into a string using the str() function. Your message line should now read as follows.
message = "https://maker.ifttt.com/trigger/Post_Tweet/with/key/YOUR IFTTT API KEY HERE?value1="+str(temperature)16. Post the message to Twitter using urequests.post. This essentially sends the data to IFTTT via the webhook URL, and IFTTT then sends it to Twitter.
urequests.post(message)17. Pause the code for one hour (3600 seconds) before allowing the loop to repeat. IFTTT has a rate limit of 25 tweets per day, so to have a constant feed of data we need to limit the tweets to one per hour. If you go over this limit, IFTTT disables the applet until the next day.
sleep(3600)18. Save the code to your Raspberry Pi Pico W as tweet_temp.py
Complete Code Listing
import network
import urequests
import dht
from time import sleep
from machine import Pin
sensor = dht.DHT11(Pin(2))
wlan = network.WLAN(network.STA_IF)
wlan.active(True)
wlan.connect("SSID","PASSWORD")
sleep(5)
print(wlan.isconnected())
while True:
    sensor.measure()
    temperature = sensor.temperature()
    print(temperature)
    message = "https://maker.ifttt.com/trigger/Post_Tweet/with/key/YOUR IFTTT API KEY HERE?value1="+str(temperature)
    urequests.post(message)
    sleep(3600)
Testing and Running the Code
Before we properly deploy the project we need to test that the code works.
1. Click on the Run button, located in the top left corner of Thonny.

2. Check the output. You should see True, confirming we are connected to the Wi-Fi. Then the temperature should appear.

3. Visit your Twitter account and check that the message has been posted. This should take approximately 10 - 20 seconds to appear.

4. Click on Stop to stop the running code.

With the code successfully tested, we can now set the code to automatically run when the Raspberry Pi Pico W boots.
1. Save As the code to your Raspberry Pi Pico W as main.py. MicroPython (on any device) will look for main.py when it powers up. If present, the code inside this file is autorun.
2. Unplug the micro USB lead from the Pico W, then re-insert to force a reboot.
3. Check your Twitter account for the corresponding tweet.
