How to Program Raspberry Pi Pico With the Arduino IDE
Use Arduino’s popular language and development environment with your Pico.
Wiring code for your Raspberry Pi Pico can fall into two categories. The easy way for new users is to use a version of Python such as MicroPython or CircuitPython. A more advanced way is to write code in C / C++ which is for more confident users.
There is now a third way that we can write code for our Raspberry Pi Pico, and that is via the Arduino IDE, which uses “Arduino Language,” a derivative of C++. Because Arduino has been around for so many years, there’s a ton of pre-existing “sketches” (the Arduino term for programs) and tutorials for it. If you’ve worked with Arduino boards before, you may be very familiar with this powerful IDE and language.
We’ve gone through many different setup processes and found two community created projects that streamline the installation process to just a handful of steps. The first is pico-setup-windows which is a Windows port of the official Pico setup script. The second is Arduino-Pico which adds support for the Raspberry Pi Pico to the Arduino IDE. In this tutorial we show you how to set up your Windows or Ubuntu machine to write Arduino code on your Raspberry Pi Pico
How to Program Raspberry Pi Pico in Arduino IDE for Windows
1. Download the pico-setup-windows installer. This is a fairly large download.
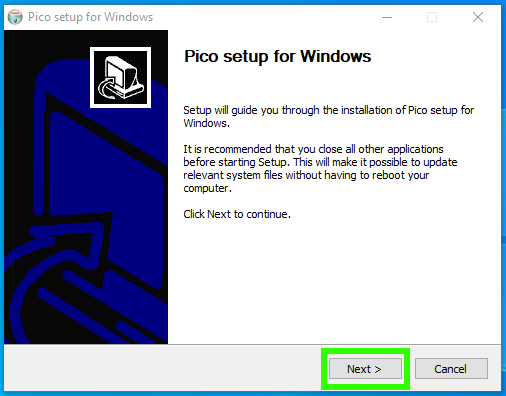
2. Launch the installer.
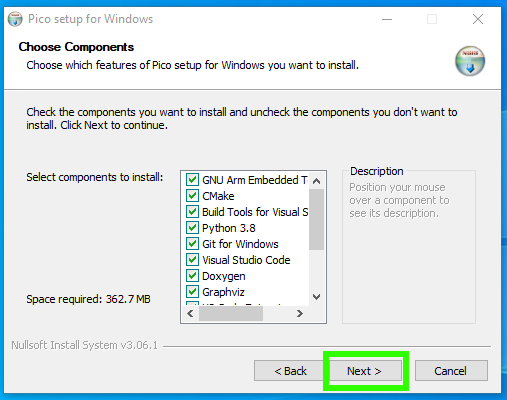
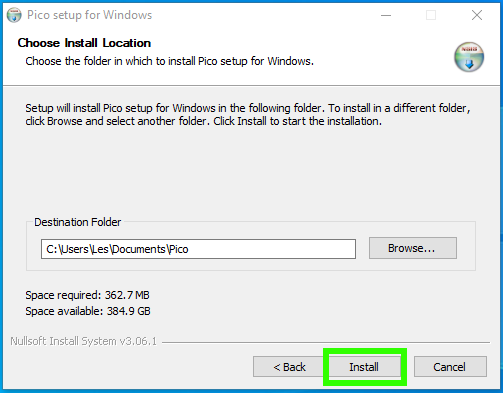
3. Ensure that all of the components are selected. This will install approximately 360MB of files and applications to your machine. Including the files necessary for building C/C++ files, Visual Studio Code, and Git version control.
4. Click Install to install all of the applications. This can take some time, and at times it may appear stuck, but be patient.
Get Tom's Hardware's best news and in-depth reviews, straight to your inbox.
5. Download the Arduino IDE and install it to your machine. We chose v 1.8.13, but the beta of v 2.0 also works.
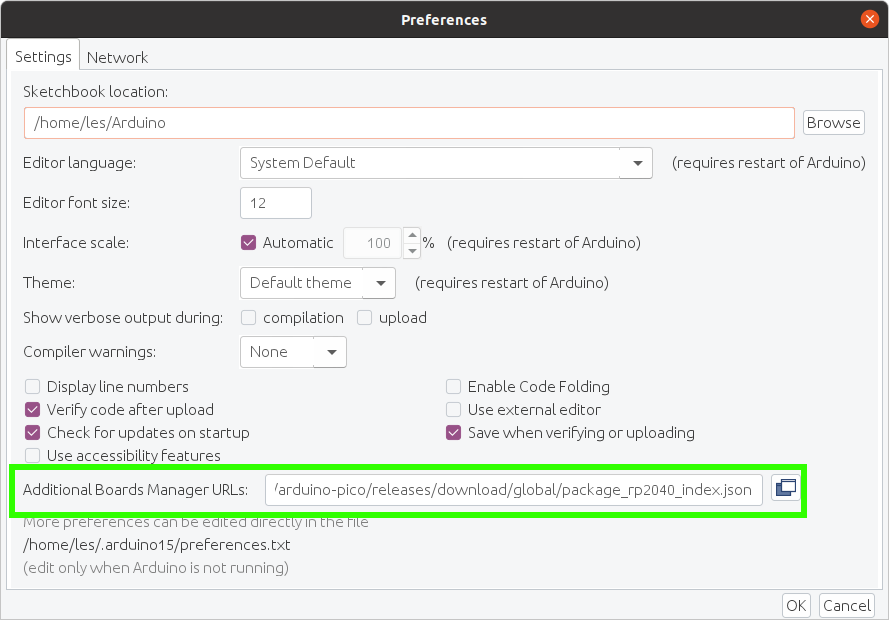
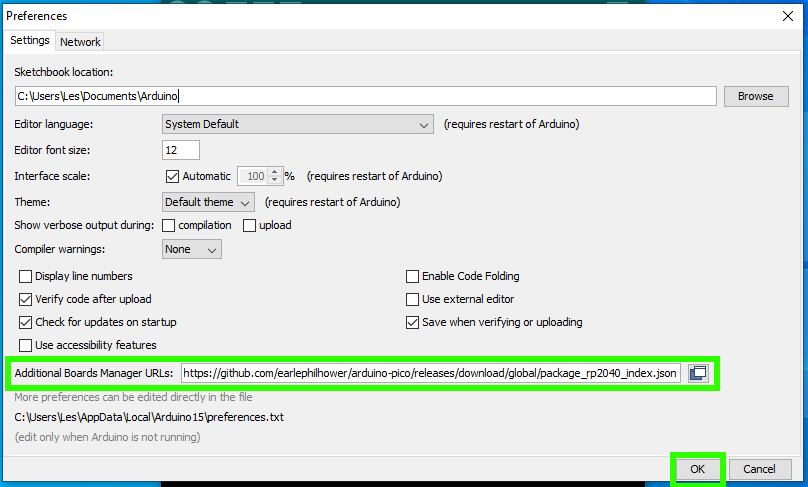
6. Open the Arduino application and navigate to File >> Preferences.
7. In the additional boards manager, add this line and click OK.
https://github.com/earlephilhower/arduino-pico/releases/download/global/package_rp2040_index.json
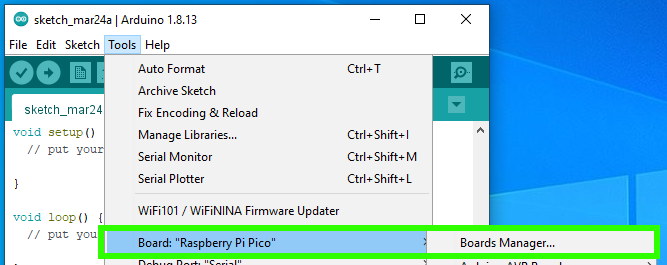
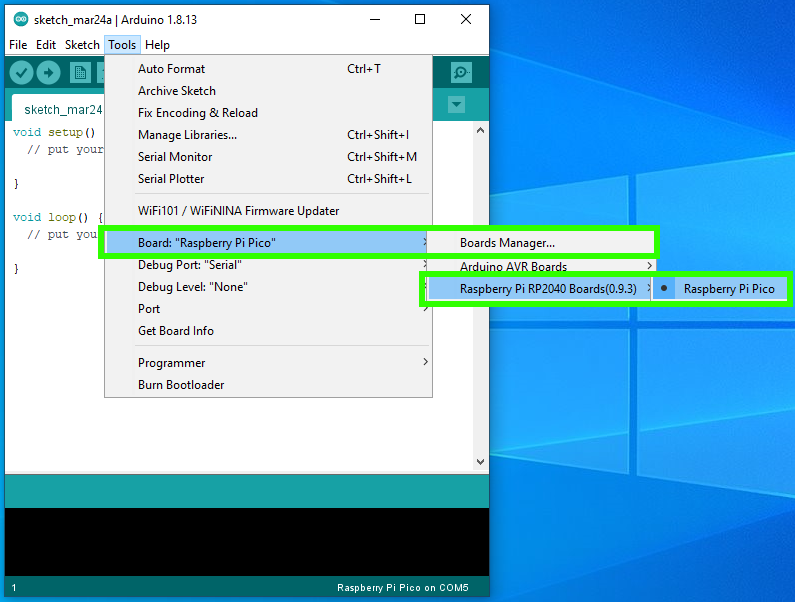
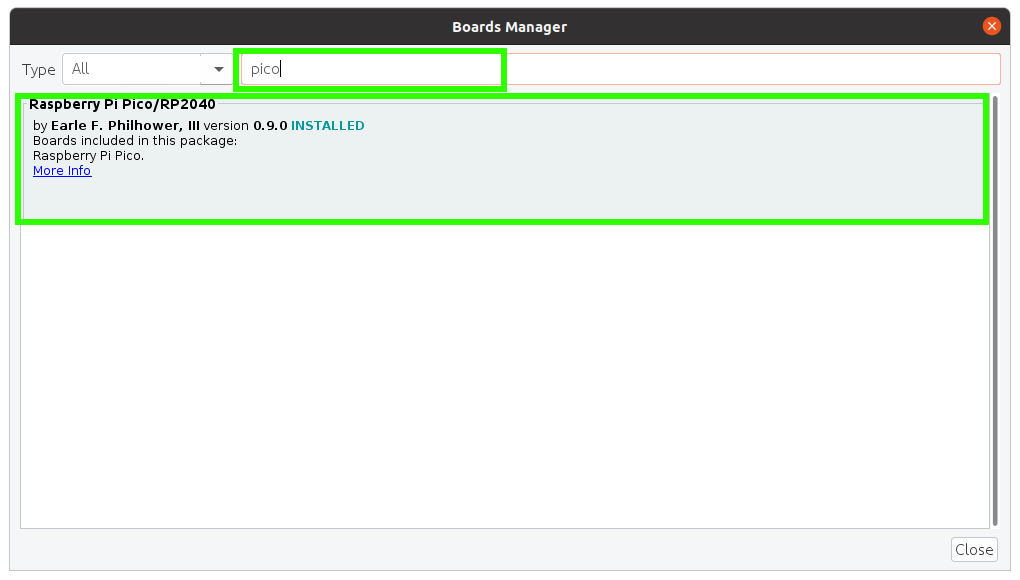
8. Go to Tools >> Board >> Boards Manager.
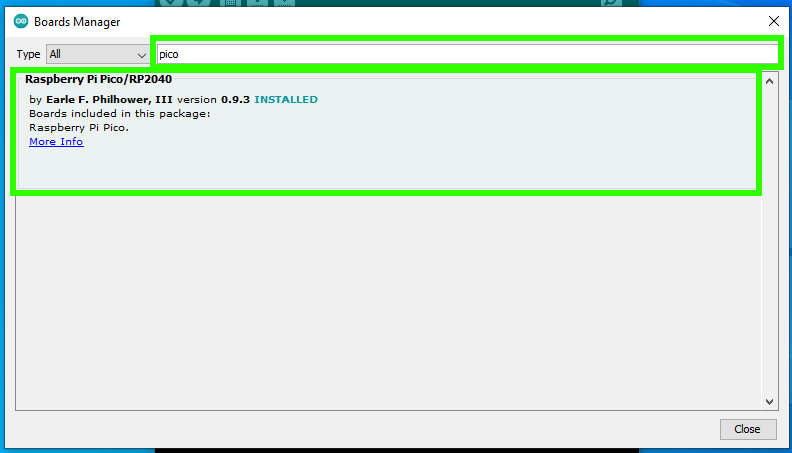
9. Type “pico” in the search box and then install the Raspberry Pi Pico / RP2040 board. This will trigger another large download, approximately 300MB in size.
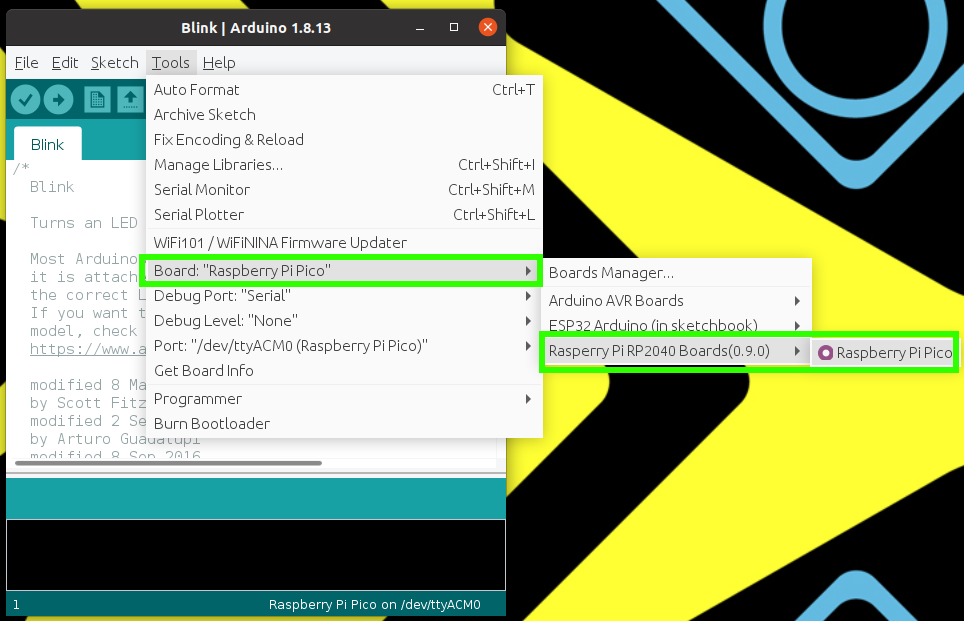
10. Go to Tools >> Board >> Raspberry Pi RP2040 Boards and select Raspberry Pi Pico.
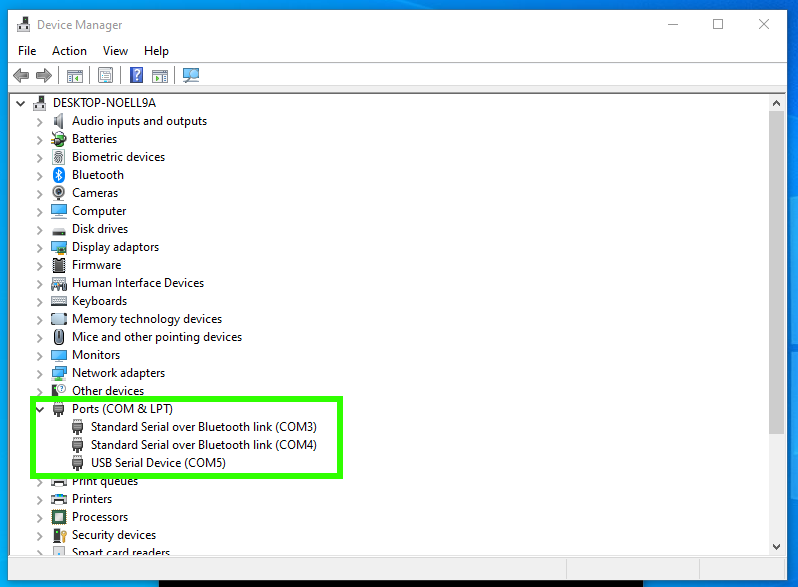
11. Connect your Raspberry Pi Pico and using Device Manager locate the COM port that it is connected to.
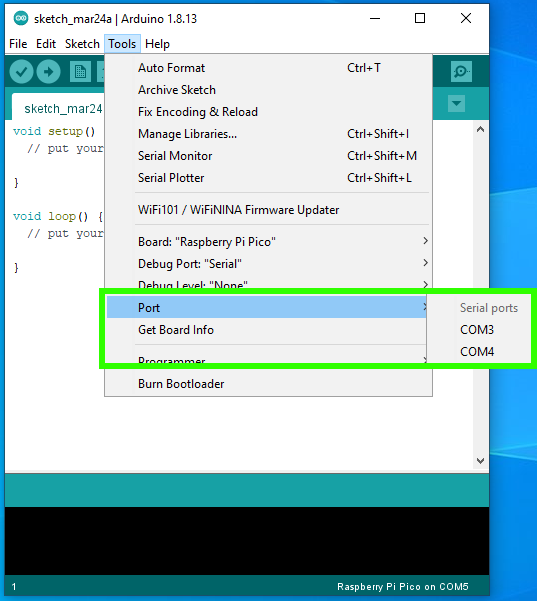
12. Under Tools >> Port, set the COM port for the Raspberry Pi Pico.
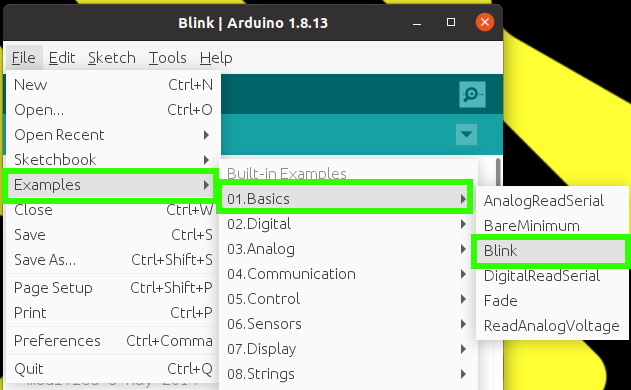
13. Open Files >> Examples >> Basics >> Blink to test that we can write code to the Arduino.
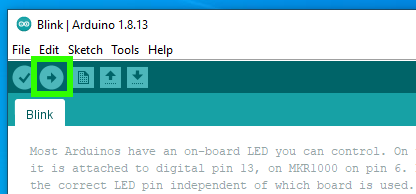
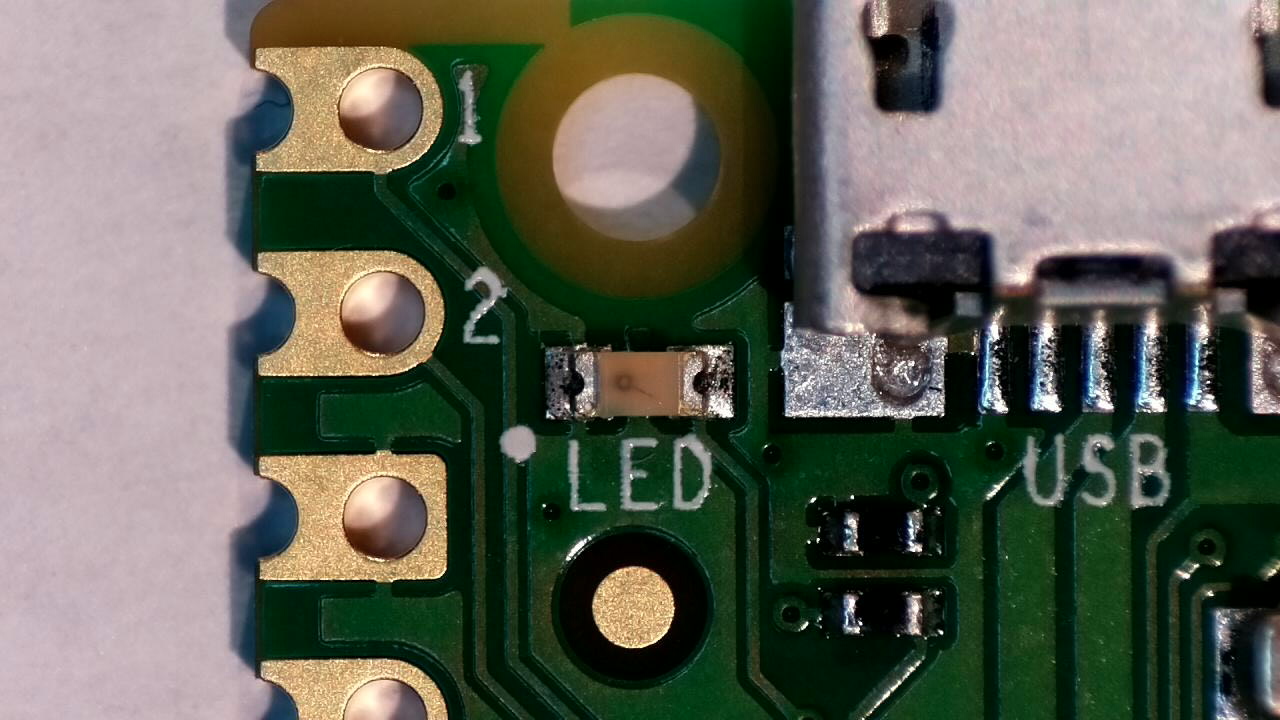
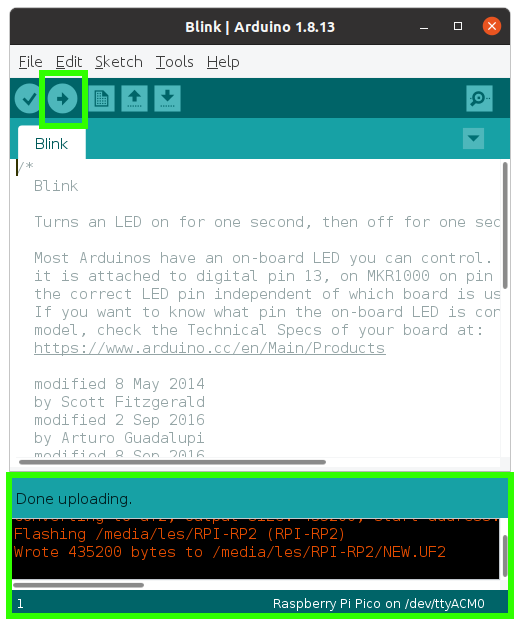
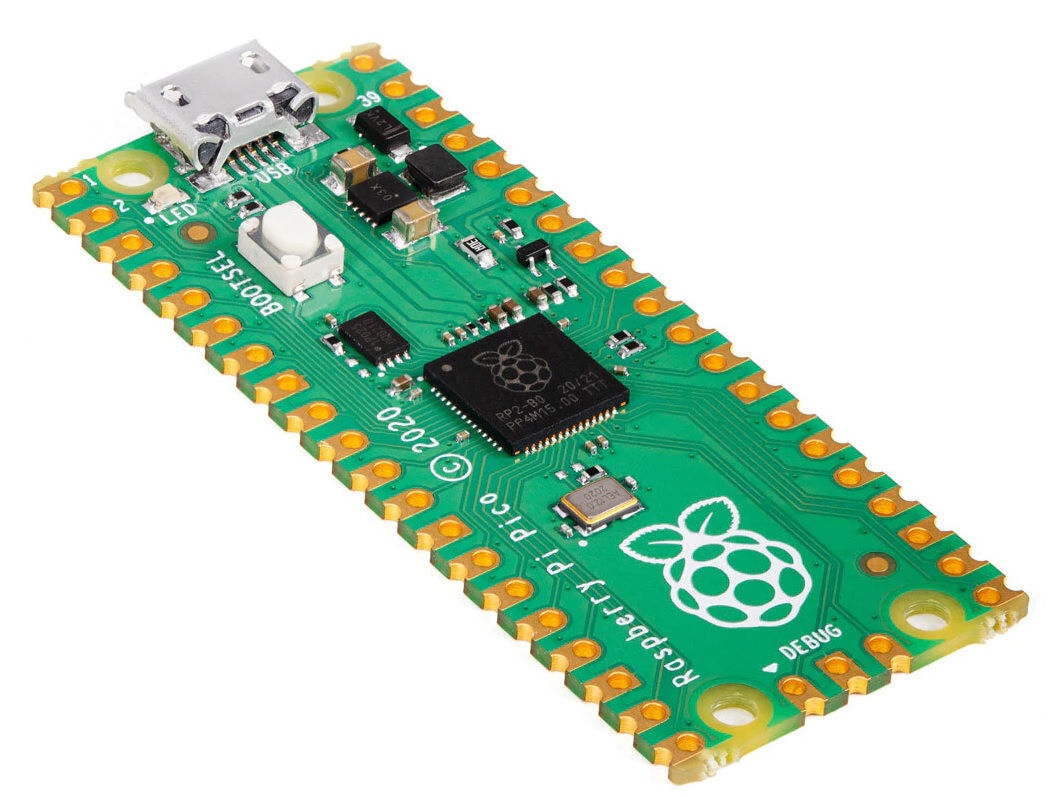
14. Click on Upload to write the code to the Raspberry Pi Pico. The default Blink sketch will flash the green LED next to the micro USB port on the Raspberry Pi Pico.
The output window will tell us when the upload is complete. Look at your Raspberry Pi Pico and you will see the green LED flashing once per second.
How to Program Raspberry Pi Pico in Arduino IDE for Linux
We used Ubuntu for this tutorial, but the same instructions should work for other Debian based distributions such as Raspberry Pi OS.
1. Open a terminal and use wget to download the official Pico setup script.
$ wget https://raw.githubusercontent.com/raspberrypi/pico-setup/master/pico_setup.sh
2. In the same terminal modify the downloaded file so that it is executable.
$ chmod +x pico_setup.sh
3. Run pico_setup.sh to start the installation process. Enter your sudo password if prompted.
$ ./pico_setup.sh
4. Download the Arduino IDE and install it to your machine. We chose v 1.8.13, but the beta of v 2.0 also works.
5. Open a terminal and add your user to the group “dialout.” This group can communicate with devices such as the Arduino. Using “$USER” will automatically use your username.
$ sudo usermod -a -G dialout “$USER”
6. Log out or reboot your computer for the changes to take effect.
7. Open the Arduino application and go to File >> Preferences.
8. In the additional boards manager add this line and click OK.
https://github.com/earlephilhower/arduino-pico/releases/download/global/package_rp2040_index.json
9. Go to Tools >> Board >> Boards Manager.
10. Type “pico” in the search box and then install the Raspberry Pi Pico / RP2040 board. This will trigger another large download, approximately 300MB in size.
11. Go to Tools >> Board >> Raspberry Pi RP2040 Boards and select Raspberry Pi Pico.
12. Connect your Raspberry Pi Pico
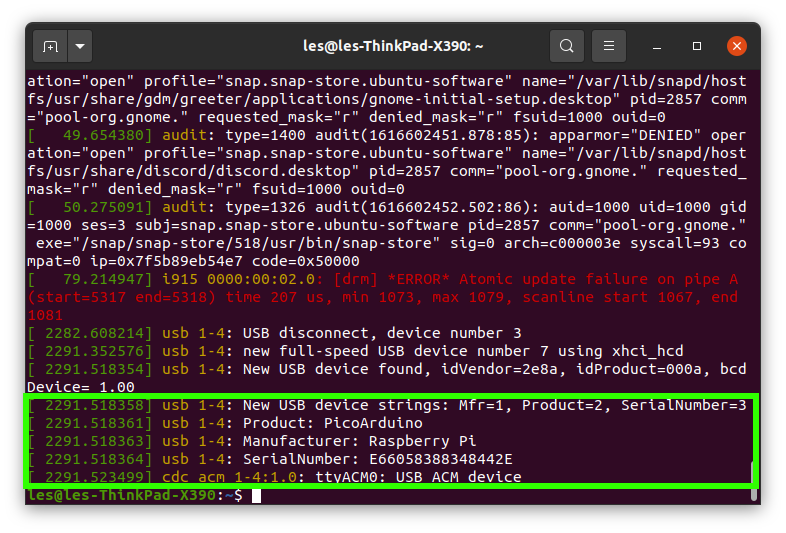
13. Run a command to locate the USB device which identifies as a Raspberry Pi Pico. In our case it was ttyACM0.
$ dmesg14. Open Files >> Examples >> Basics >> Blink to test that we can write code to the Arduino.
15. Click on Upload to write the code to the Raspberry Pi Pico. The default Blink sketch will flash the green LED next to the micro USB port on the Raspberry Pi Pico.
The output window will tell us when the upload is complete. Look at your Raspberry Pi Pico and you will see the green LED flashing once per second.
Raspberry Pi Pico Tutorials:

Les Pounder is an associate editor at Tom's Hardware. He is a creative technologist and for seven years has created projects to educate and inspire minds both young and old. He has worked with the Raspberry Pi Foundation to write and deliver their teacher training program "Picademy".
-
softeky Just a heads-up. Following installation instructions for Linux I ran into a couple of snags.Reply
(1) I'm compiling on Raspberry (Linux rpi 4.19.66-v7+ #1253 SMP Thu Aug 15 11:49:46 BST 2019 armv7l GNU/Linux). Not the most update but... "./pico_setup.sh" won't use cmake that comes with the OS. "apt-get" won't go above v3.7 which fails the script.
I backtracked and found instructions to install cmake v3.13.4 here. It took a while but that worked.
(2) returning to "./pico_setup.sh", I had to "rm -rf pico" to start over (not continuable from where it failed). Although the script tried to schedule installation of cmake v3.7 again, it was sophisticated enough to skip that (I think) as it did not fail again at the use of cmake when needed.
(3) unfortunately the C++ compilation failed here:
Building CXX object CMakeFiles/picoprobe.dir/home/pi/pico/pico-sdk/src/rp2_common/pico_standard_link/new_delete.cpp.obj
/home/pi/pico/pico-sdk/src/rp2_common/pico_standard_link/new_delete.cpp:20:55: error: expected initializer before 'noexcept'
void operator delete(void *p, __unused std::size_t n) noexcept { std::free(p); }
^
/home/pi/pico/pico-sdk/src/rp2_common/pico_standard_link/new_delete.cpp:24:33: error: expected initializer before 'noexcept'
void operator delete(void *p) noexcept { std::free(p); }
^
CMakeFiles/picoprobe.dir/build.make:585: recipe for target 'CMakeFiles/picoprobe.dir/home/pi/pico/pico-sdk/src/rp2_common/pico_standard_link/new_delete.cpp.obj' failed
make: *** Error 1
make: *** Waiting for unfinished jobs....
CMakeFiles/Makefile2:74: recipe for target 'CMakeFiles/picoprobe.dir/all' failed
make: *** Error 2
Makefile:83: recipe for target 'all' failed
make: *** Error 2I figured I should post before trying to fix the code error and getting stuck in another rabbit hole.
It's getting there - thanks for all the effort as I have a sneaky feeling the Arduino IDE guys won't be overly enthusiastic to come out with their own Raspberry Pico IDE as competition to their own pico hardware :) -
softeky Replysofteky said:Just a heads-up. Following installation instructions for Linux I ran into a couple of snags.
...
Replying to my own post (sorry). Just continuing the saga, trying to get Debian on Raspberry Pi to load the Linux package that gets the Arduino IDE to support Raspberry Pico development.
...continuing...
The source issue is the compiler keyword "noexcept", which was introduced into C++ by gcc at version11. I got as far as getting gcc++ v10.1 compiled and installed in Debian on my Raspberry Pi but it won't run since gcc++ v10.1 requires GLIBC_2.28 in "/lib/arm-linux-gnueabihf/libc.so.6", which only goes as far as GLIBC_2.27 in Debian. Fixing that would risk even booting Debian and (subsequently discovered) gcc++ v10.1 would not support "noexcept", so that was a dead end path.
Instead I checked what "noexcept" was meant to do. It's a compile time assert which should provide no features to the runtime result. Trouble is "fixing" the code by removing "noexcept" would be overwritten since the source is fetched, each time the "pico_setup.sh" script is run. "pico_setup,sh" is not reentrant, it complains at a "mkdir build" line that the directory exists. That directory is an artifact of the precious run. Even changing "mkdir build" to "mkdir -p build" fails further down as other directories exist and are not empty. I have to "rm -rf pico" between each attempt so my "fixes" don't survive (:-( ).
To get past that, I copied the source that trips up the compile:
pico/pico-sdk/src/rp2_common/pico_standard_link/new_delete.cppto the same directory as the "pico_setup.sh", "fixed" the source by commenting out both "noexcept" references:
void operator delete(void *p, __unused std::size_t n) noexcept { std::free(p); }
void operator delete(void *p) { std::free(p); }
void operator delete(void *p) noexcept { std::free(p); }
became
void operator delete(void *p, __unused std::size_t n) /* noexcept */ { std::free(p); }
void operator delete(void *p) { std::free(p); }
void operator delete(void *p) /* noexcept */ { std::free(p); }
and added a re-copy back step just before the relevant "make" in "pico_setup.sh" i.e.
cd build
cmake ../
make -j$JNUMbecame:
cd build
cmake ../
cp ${HOME}/new_delete.cpp ${HOME}/pico/pico-sdk/src/rp2_common/pico_standard_link/new_delete.cpp
make -j$JNUM
A bit of a kludge but that now compiles on Debian's gcc++ v6.3.
The saga continues... the next snag is:
Processing triggers for gnome-menus (3.13.3-9) ...
Reading package lists... Done
Building dependency tree
Reading state information... Done
E: Unable to locate package libegl-mesa0
That appears to be something to do with a video driver given as a dependency.
ONWARD! -
softeky Replysofteky said:Replying to my own post again (sorry). Still continuing the saga, trying to get Debian on Raspberry Pi v3 to load the Linux package that gets the Arduino IDE to support Raspberry Pico development.
...continuing...
Processing triggers for gnome-menus (3.13.3-9) ...
Reading package lists... Done
Building dependency tree
Reading state information... Done
E: Unable to locate package libegl-mesa0
That appears to be something to do with a video driver given as a dependency.
ONWARD!
It Works!
Last "fix" to the "pico_setup.sh" script for Raspberry Pico support to Arduino IDE hosted on a Raspberry Pi v3 (Linux rpi 4.19.66-v7+ #1253 SMP Thu Aug 15 11:49:46 BST 2019 armv7l GNU/Linux).
from:
EXTRA_VSCODE_DEPS="libx11-xcb1 libxcb-dri3-0 libdrm2 libgbm1 libegl-mesa0"
to:
# was EXTRA_VSCODE_DEPS="libx11-xcb1 libxcb-dri3-0 libdrm2 libgbm1 libegl-mesa0"
EXTRA_VSCODE_DEPS="libx11-xcb1 libxcb-dri3-0 libdrm2 libgbm1"
I have one of my sketches ported from Arduino Mega to Raspberry Pico. Phew.
TY hardworking Arduino IDE board-porting people.
--Alen -
seamusdemora This is pretty awful! It's not been maintained, and is now full of outdated information. In my case, even blink won't work - this is the error message:Reply
Sketch uses 89816 bytes (4%) of program storage space. Maximum is 2097152 bytes.
Global variables use 42824 bytes (15%) of dynamic memory, leaving 227512 bytes for local variables. Maximum is 270336 bytes.
.....................
Failed uploading: uploading error: exit status 1
You guys should delete this - it's a waste of time & a source of frustration for all who follow it. Sheesh! -
ndabas The link to the Windows installer should now be: https://github.com/raspberrypi/pico-setup-windows/releases/latest/Reply
The link in the article points to my repo (https://github.com/ndabas/pico-setup-windows), which has now been adopted by Raspberry Pi as the official installer for the Pico SDK, and development is continued over there.
