How to Send and Receive Data Using Raspberry Pi Pico W and MQTT (Updated)
$6 to build a sensor device with global reach.
Update 10/24 03:32 PT
We have updated this how to as originally we installed umqtt.simple via the upip package manager. It seems that at this time the package cannot be installed in this manner. We have updated the installation so that we use Thonny instead.
We also must advise of a MicroPython bug which prevents the Pico W from connecting to an open network.
Updated Article
MQTT ( Message Query Telemetry Transport) is one of those protocols that are taken for granted. It just works, with minimal effort, and it has been with us in various forms since 1999. MQTT is bandwidth efficient, lightweight and it can be used on devices with very little resources, including the new $6 Raspberry Pi Pico W. With just 264KB of SRAM, the Pico W relies on clever coding and lightweight protocols, and this is where MQTT comes in.
We’ve already covered how to control a Raspberry Pi Pico W via web services such as Anvil and sent live sensor data to Twitter via IFTTT. But with MQTT we can effortlessly send and receive data with a Raspberry Pi Pico W, and use it with multiple devices across the globe.
MQTT has two basic functions: publish and subscribe. Devices can publish information to MQTT via a broker, using topics to filter messages of a certain type. Subscribers are those interested in receiving the data from the publishing device. They can be another Raspberry Pi Pico W, a laptop, or a data center processing scientific data. An analogy would be YouTube, which acts as a broker for creators publishing their content, and subscribers watching.
Get Tom's Hardware's best news and in-depth reviews, straight to your inbox.
In this how-to, we will learn how to publish and subscribe to MQTT data feeds using the Raspberry Pi Pico W and a free public MQTT broker service from HiveMQ. We will publish live data from a PIR sensor, and then control an LED using messages sent to a Pico W.
For This Project, You Will Need
- A Raspberry Pi Pico W
- A PIR Sensor
- Half breadboard
- 3x Female to male jumper wires
- 1x Male to male jumper wire
- 1x LED
- 220 Ohm Resistor (Red-Red-Brown-Gold)
Our Project Circuit
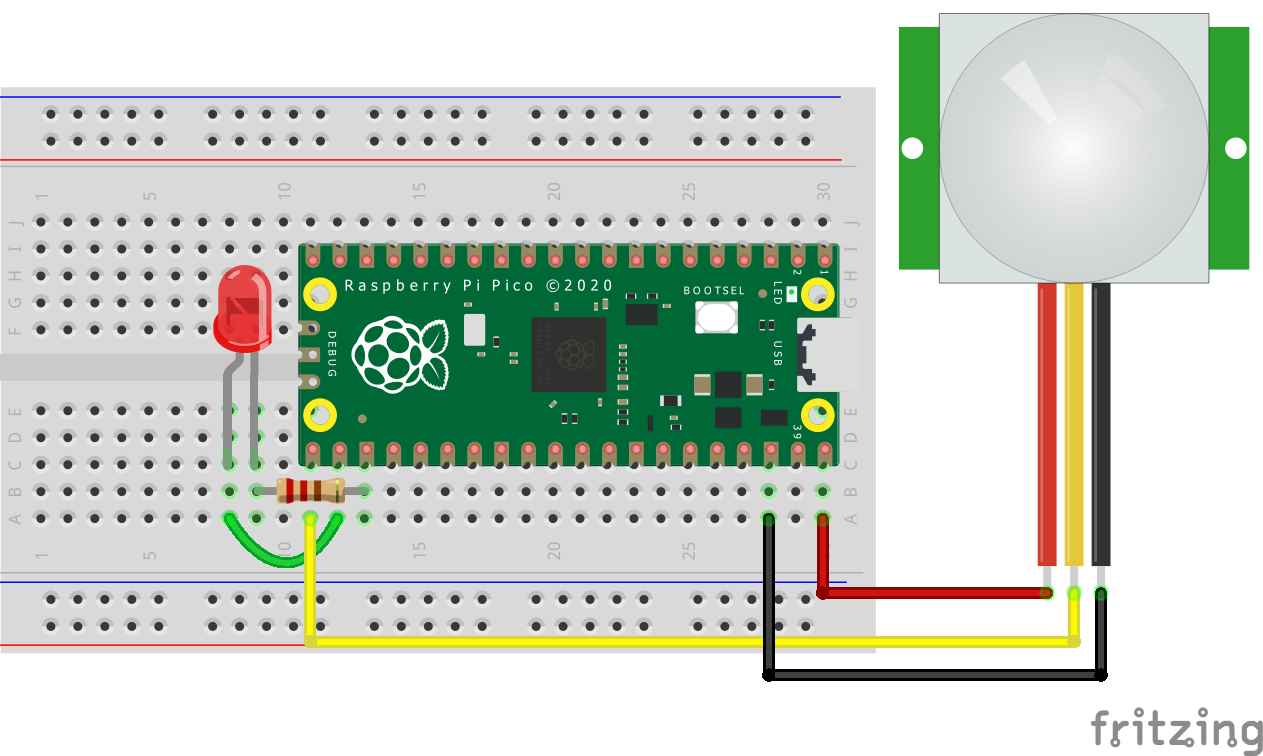
We are going to be using one circuit to demonstrate both aspects of MQTT (publish and subscribe). To demonstrate how to publish, we shall use a simple PIR sensor, connected to GPIO 16 as an input. This sensor will trigger when it detects movement, pulling an output pin low, which will trigger our code to send a message via MQTT. To demonstrate subscription, we will use an LED, connected to GPIO 17. The LED will be controlled by subscribing to an MQTT topic, where it listens for “on” and “off” messages.
Sensor Choice
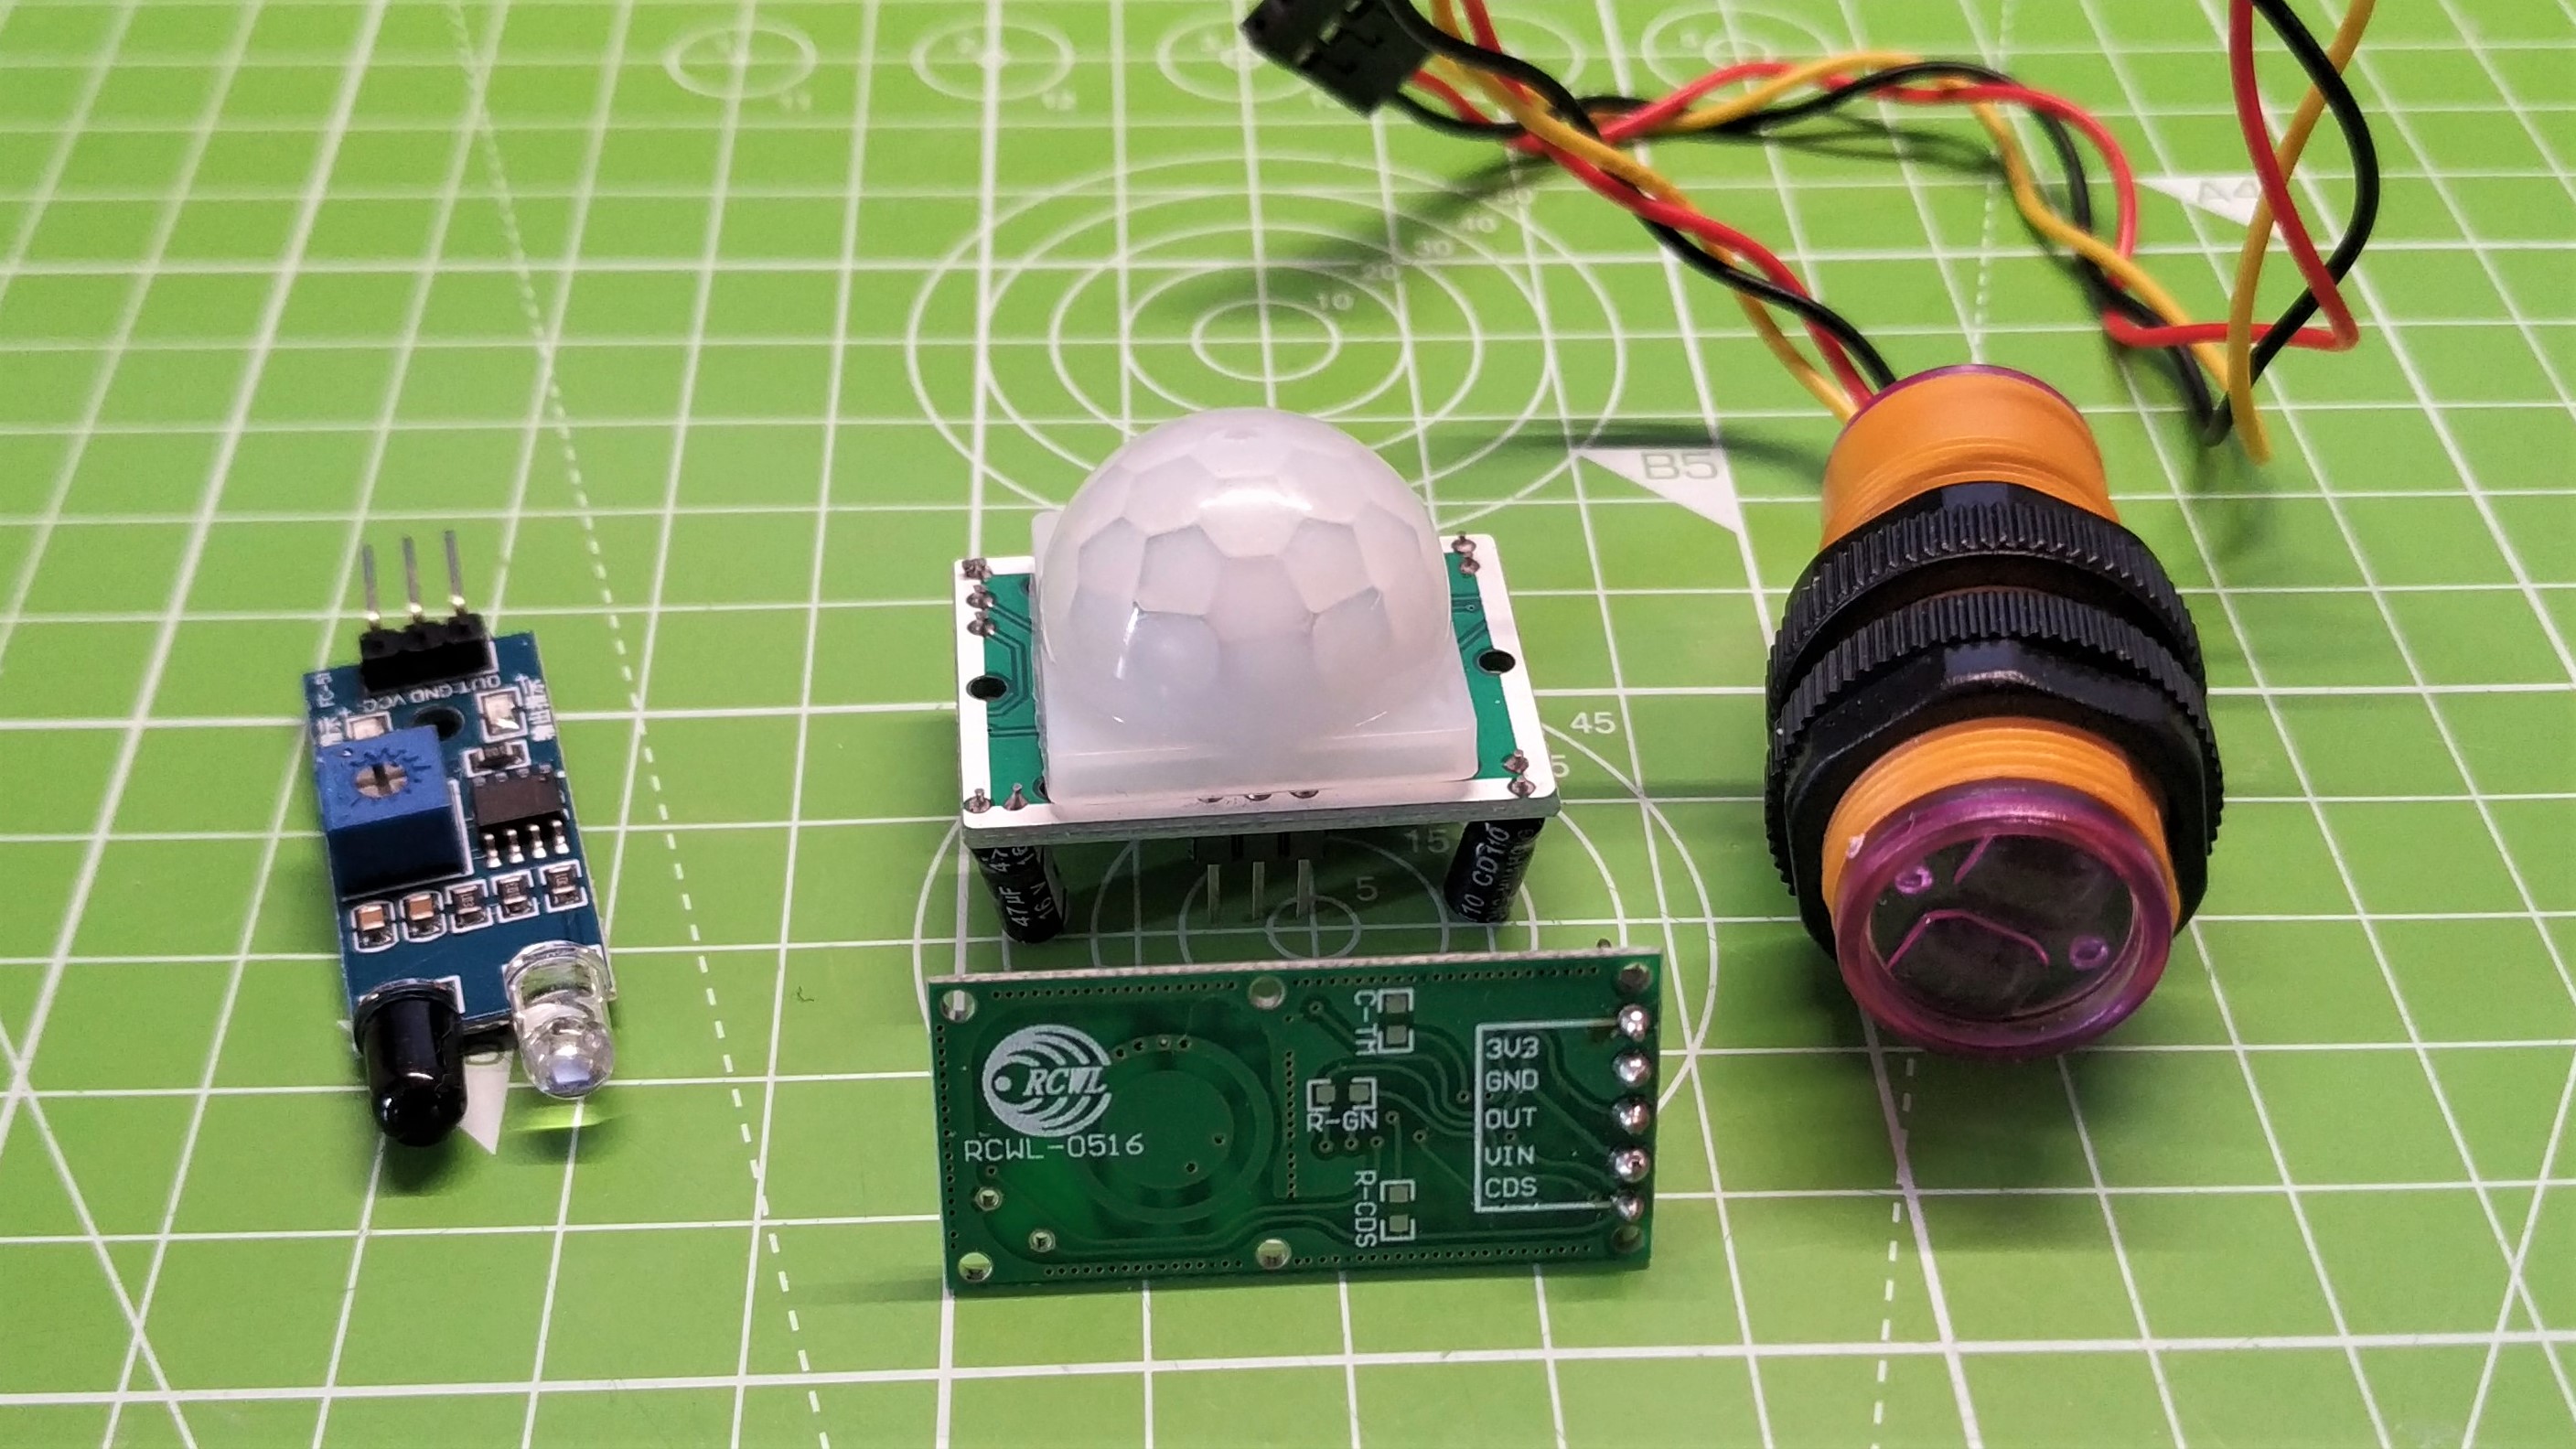
PIR (Passive Infrared) sensors are one of the most basic sensors you can use. They have two states: no motion detected (data pin pulled high), and motion detected (data pin pulled low). They also come in many different forms, with the most common being a geodesic dome attached to a square of circuit board. This version of the sensor is ideal for projects where you wish to detect movement in a large room, as the dome extends the sensor’s “field of vision.” Should this be too wide for you, a simple hack is to use a paper cup, create a hole in the bottom, and place the sensor inside so that it is pointing out of the wide end. I’ve used this hack at countless Raspberry Pi teacher training events.
Other versions of this sensor are typically called “obstacle sensors,” and they provide a short range (up to 20 centimeters) detection system, often used with robots. A five-pack of these sensors is around $10 and well worth the investment. A more expensive version, in a yellow plastic case, offers a more robust housing for the same sensor. These generally come in at $10 per sensor.
Finally, if PIR sensors aren’t your thing, you can pick up an RCWL-0516 (front sensor in the above image) doppler sensor. This sensor uses doppler radar to detect humans / moving creatures. It even works quite well through thin walls and cases. It works in the exact same logic as PIR too, so we can swap this into a project without changing our code. These sensors are approximately $8 via Amazon.
Installing MQTT Client to Raspberry Pi Pico W
Before we start the project, we first need to install the MQTT module for MicroPython. With this module, we can publish and subscribe to messages via a broker.
1. Follow this guide to download and install the MicroPython firmware, and setup Thonny.
2. Connect your Raspberry Pi Pico W to your computer.
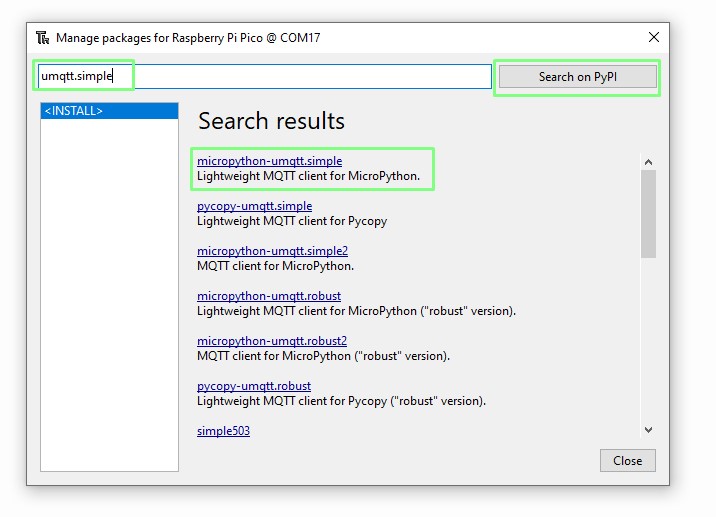
3. Open Thonny and click on Tools >> Manage Packages. Thonny has a built-in Python package manager that we can use to install extra
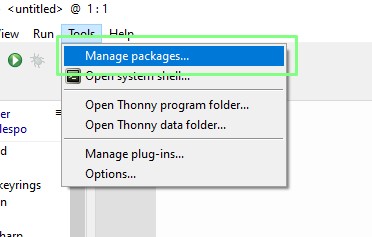
4. Search for and install umqtt.simple. This module is a simplified MQTT client for MicroPython.
Publishing Alerts to an MQTT Broker
MQTT works on a publish / subscribe model. With a broker acting between devices publishing data, and devices subscribing to feeds. Our goal will be to publish a message when the sensor is triggered. For that we need to publish a message, using a specific topic, to a broker. We will be using a public broker from Hive. To keep things simple there will be no authentication, and no personal data being transmitted.
1. Create a new file in Thonny.
2. Import four modules of Python code for Wi-Fi connectivity, controlling the pace of the code, accessing GPIO pins, and MQTT.
import network
import time
from machine import Pin
from umqtt.simple import MQTTClient
3. Create an object, wlan, which is then used to connect to your Wi-Fi access point.
wlan = network.WLAN(network.STA_IF)
wlan.active(True)
wlan.connect("Wi-Fi AP","PASSWORD")
4. Add a five second pause, then print the Wi-Fi connection status. We don’t really have to add a pause, the previous wlan.connect() command is a blocking call that will either connect or fail, then release the block. This pause is present to allow a little extra leeway.
time.sleep(5)
print(wlan.isconnected())
5. Create an object, sensor, to link our PIR sensor to GPIO 16 of the Raspberry Pi Pico W.
sensor = Pin(16, Pin.IN)6. Create four variables to store the URL for our MQTT broker, our client_id, the topic and the message. Remember we are using a public broker. Our client_id will not be used, but we need to provide one anyway. The topic is the subject that a subscriber will be listening for. The message is what they will see. Note that for topic_pub, and topic_msg the strings of text, for example ‘TomsHardware’ are preceded by b. This indicates that the strings are to be converted into bytes.
mqtt_server = 'broker.hivemq.com'
client_id = 'bigles'
topic_pub = b'TomsHardware'
topic_msg = b'Movement Detected'
7. Create a function to handle MQTT connections. Using a function we can easily call the function later in the code, without the need to repeat the contents of the function.
def mqtt_connect():8. Create an object, client, and use it to store the client_id, MQTT broker details, along with an option to keep the connection live for one hour. Code inside of a function is indented four spaces (or one tab) to indicate it is part of the function.
client = MQTTClient(client_id, mqtt_server, keepalive=3600)9. Use the client object to connect to the MQTT broker.
client.connect()10. Print a message to the python shell upon successful connection, then return the contents of the client object to the shell. This is useful for debugging.
   print('Connected to %s MQTT Broker'%(mqtt_server))
   return client
11. Create a new function, reconnect, which will pause for five seconds before resetting the Pico W. This will force the Pico W to try and reconnect.
def reconnect():
   print('Failed to connect to the MQTT Broker. Reconnecting...')
   time.sleep(5)
   machine.reset()
12. Create an exception handler which will try to connect to the MQTT broker using mqtt_connect() function.
try:
   client = mqtt_connect()
13. Add an exception so that if the code fails to connect, an error is raised, which will force the Pico W to reset using the reconnect() function.
except OSError as e:
   reconnect()
14. Create a loop to constantly check the sensor value.
while True:15. Check to see if the sensor has been triggered. PIR sensors have a natural state where its output pin is pulled high. This is a value of 1. When we trigger the sensor, the output pin is pulled low, and the value changes to 0.
if sensor.value() == 0:16. With the sensor triggered, publish a message via MQTT,using the topic and message that we created earlier. Then pause for three seconds, this gives the sensor time to reset, ready for the next event.
       client.publish(topic_pub, topic_msg)
       time.sleep(3)
17. Add an else condition which will activate if the sensor remains untriggered. Using pass enables the code to move onwards with no output.
   else:
pass
18. Save the code as mqtt-pub.py to your Raspberry Pi Pico W.
19. Click on Run (the green arrow in the toolbar) to start the code. Your Pico W will connect to your Wi-Fi access point, and then to the MQTT broker.
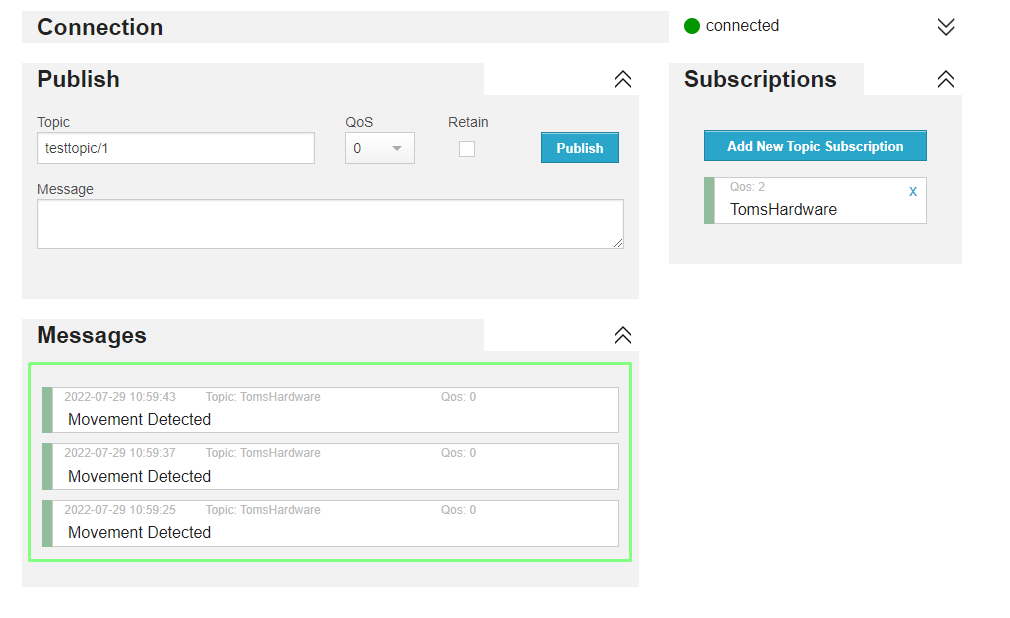
To see the output, we need to subscribe to the topic “TomsHardware.” This can be accomplished using many different methods as MQTT is cross-platform. There are MQTT clients for cell phones, as well as Python, Node-RED, JavaScript etc. We are going to keep it simple for this project and use another of HiveMQ’s services.
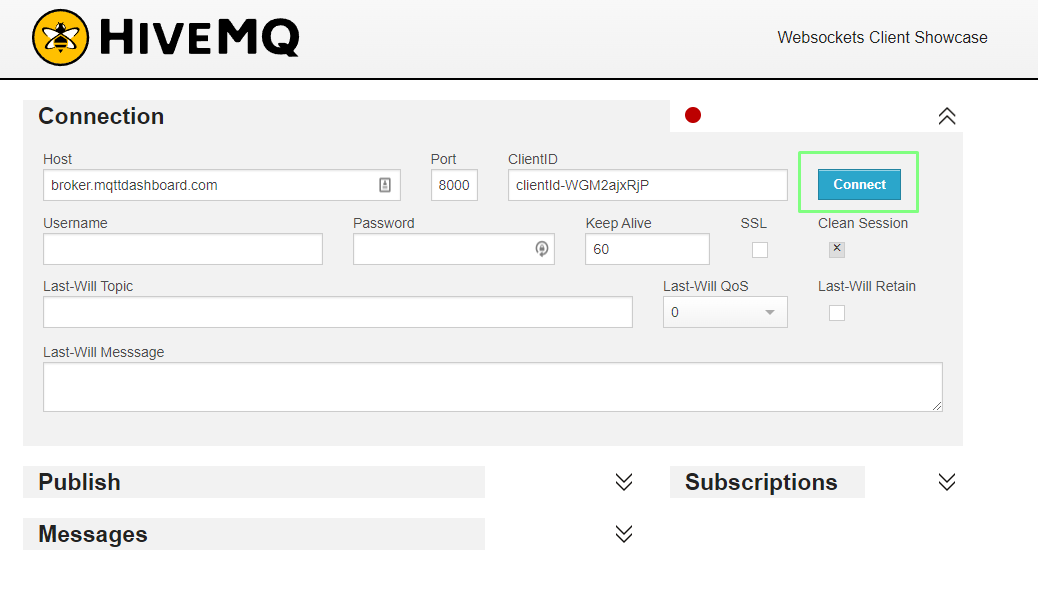
HiveMQ has a browser-based MQTT client, which we’ll use to subscribe and monitor for new messages.
1. Open HiveMQ’s MQTT client in a new browser window / tab.
2. Connect the client to the default public broker, the same as used by our Pico W.
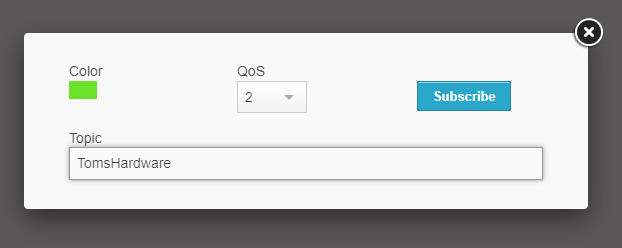
3. Click on “Add New Topic Subscription”.
4. Set the topic to TomsHardware and click subscribe. The topic is case sensitive.
5.Trigger the sensor on the Raspberry Pi Pico W to send an alert to the MQTT client.
Complete MQTT Publish Code Listing
import network
import time
from machine import Pin
from umqtt.simple import MQTTClient

wlan = network.WLAN(network.STA_IF)
wlan.active(True)
wlan.connect("Wi-Fi AP","PASSWORD")
time.sleep(5)
print(wlan.isconnected())

sensor = Pin(16, Pin.IN)

mqtt_server = 'broker.hivemq.com'
client_id = 'bigles'
topic_pub = b'TomsHardware'
topic_msg = b'Movement Detected'

def mqtt_connect():
    client = MQTTClient(client_id, mqtt_server, keepalive=3600)
    client.connect()
    print('Connected to %s MQTT Broker'%(mqtt_server))
    return client

def reconnect():
    print('Failed to connect to the MQTT Broker. Reconnecting...')
    time.sleep(5)
    machine.reset()

try:
    client = mqtt_connect()
except OSError as e:
    reconnect()
while True:
    if sensor.value() == 0:
        client.publish(topic_pub, topic_msg)
        time.sleep(3)
    else:
        pass
Subscribing to an MQTT topic on the Raspberry Pi Pico W
So far, we have successfully sent messages from a Raspberry Pi Pico W to the MQTT broker, and then subscribed using the MQTT client. This scenario was useful to get sensor data from our $6 Pico W to another device, say a powerful PC processing multiple sensor inputs.
What if we wanted a Raspberry Pi Pico W to receive a message and control and LED? For that, we would need to subscribe to the TomsHardware topic and react to certain messages. In this section we’ll do just that, issuing commands via the HiveMQ MQTT client.
1. Create a new file in Thonny.
2. Import four modules of Python code for Wi-Fi connectivity, controlling the pace of the code, accessing GPIO pins, and MQTT.
import network
import time
from machine import Pin
from umqtt.simple import MQTTClient
3. Create an object, wlan, which is then used to connect to your Wi-Fi access point.
wlan = network.WLAN(network.STA_IF)
wlan.active(True)
wlan.connect("Wi-Fi AP","PASSWORD")
4. Add a five second pause, then print the Wi-Fi connection status. We don’t really have to add a pause, the previous wlan.connect() command is a blocking call that will either connect or fail, then release the block. This pause is present to allow a little extra leeway.
time.sleep(5)
print(wlan.isconnected())
5. Create an object, LED, to store and configure the GPIO pin to which an LED has been attached as an output.
LED = Pin(17, Pin.OUT)6. Create three variables to store the URL for our MQTT broker, our client_id and the topic. Remember we are using a public broker. Our client_id will not be used, but we need to provide one anyway. The topic is the subject that a subscriber will be listening for.
mqtt_server = 'broker.hivemq.com'
client_id = 'bigles'
topic_pub = b'TomsHardware'
7. Create a function, sub_cb which will listen and react to messages on our chosen topic. This function takes two arguments, the topic and the message itself.
def sub_cb(topic, msg):8. Print an alert to the Python shell that states there is a new message on the topic. We need to decode the topic so that it is more readable.
print("New message on topic {}".format(topic.decode('utf-8')))9. Create an object, msg, and in there store the decoded MQTT message. Then print the message to the Python shell.
   msg = msg.decode('utf-8')
   print(msg)
10. Create a conditional statement to check the contents of the msg object. If the msg contains “on”, it will turn on the LED.
   if msg == "on":
       LED.on()
11. Create an else if (elif) condition that will turn the LED off if the msg object contains “off”.
   elif msg == "off":
       LED.off()
12. Create a function to handle MQTT connections. Using a function we can easily call the function later in the code, without the need to repeat the contents of the function.
def mqtt_connect():13. Create an object, client, and use it to store the client_id, MQTT broker details, along with an option to keep the connection live for one hour. Code inside of a function is indented four spaces (or one tab) to indicate it is part of the function.
client = MQTTClient(client_id, mqtt_server, keepalive=3600)14. Use the client object to connect to the MQTT broker.
client.connect()15. Print a message to the python shell upon successful connection, then return the contents of the client object to the shell. This is useful for debugging.
   print('Connected to %s MQTT Broker'%(mqtt_server))
   return client
16. Create a new function, reconnect, which will pause for five seconds before resetting the Pico W. This will force the Pico W to try and reconnect.
def reconnect():
   print('Failed to connect to the MQTT Broker. Reconnecting...')
   time.sleep(5)
   machine.reset()
17. Create an exception handler which will try to connect to the MQTT broker using mqtt_connect() function.
try:
   client = mqtt_connect()
18. Add an exception so that if the code fails to connect, an error is raised, which will force the Pico W to reset using the reconnect() function.
except OSError as e:
   reconnect()
19. Create a loop to constantly run our code.
while True:20. Subscribe to the topic, TomsHardware, using the topic_sub object. Then pause for one second.
   client.subscribe(topic_sub)
time.sleep(1)
21. Save the code to the Raspberry Pi Pico W as mqtt-sub.py and click Run to start.
To send messages we again use HiveMQ’s online client. From there we will publish messages via the TomsHardware topic, that will control the LED.
1. Open HiveMQ’s MQTT client in a new browser window / tab.
2. Connect the client to the default public broker, the same as used by our Pico W.
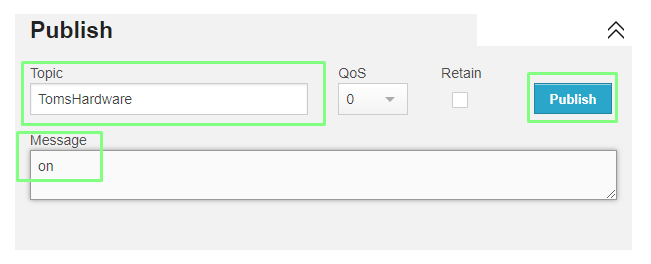
3. Set the topic to TomsHardware, and the message to on. Click publish. The LED connected to the Raspberry Pi Pico W will illuminate.
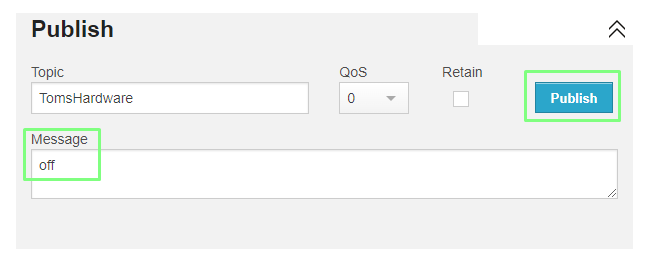
4. Change the message to off, and click Publish to turn off the LED.
Complete MQTT Subscribe Code Listing
import network
import time
from machine import Pin
from umqtt.simple import MQTTClient

wlan = network.WLAN(network.STA_IF)
wlan.active(True)
wlan.connect("NETGEAR69","Orange05")
time.sleep(5)
print(wlan.isconnected())

LED = Pin(17, Pin.OUT)

mqtt_server = 'broker.hivemq.com'
client_id = 'bigles'
topic_sub = b'TomsHardware'


def sub_cb(topic, msg):
    print("New message on topic {}".format(topic.decode('utf-8')))
    msg = msg.decode('utf-8')
    print(msg)
    if msg == "on":
        LED.on()
    elif msg == "off":
        LED.off()

def mqtt_connect():
    client = MQTTClient(client_id, mqtt_server, keepalive=60)
    client.set_callback(sub_cb)
    client.connect()
    print('Connected to %s MQTT Broker'%(mqtt_server))
    return client

def reconnect():
    print('Failed to connect to MQTT Broker. Reconnecting...')
    time.sleep(5)
    machine.reset()

try:
    client = mqtt_connect()
except OSError as e:
    reconnect()
while True:
    client.subscribe(topic_sub)
    time.sleep(1)

Les Pounder is an associate editor at Tom's Hardware. He is a creative technologist and for seven years has created projects to educate and inspire minds both young and old. He has worked with the Raspberry Pi Foundation to write and deliver their teacher training program "Picademy".
-
GKVicto For the last subscribe loop, aren't you just subscribing over and over? Don't you only want to do that once? Shouldn't you be calling client.wait_msg() instead?Reply -
FrankDelporte Hi, I'm following this guide trying to connect to HiveMQ Cloud. But to be able to do this, in MQTTClient(...) the username, password, and SSL are required. Were you able to achieve this, or did you connect to a local HiveMQ where this is not required?Reply -
rnlg Looks like you need to use mip instead of upip for package management in MicroPython now.Reply -
markjoe ReplyGKVicto said:For the last subscribe loop, aren't you just subscribing over and over? Don't you only want to do that once? Shouldn't you be calling client.wait_msg() instead?
I agree, the subscription before the loop and then wait_msg or check_msg. The only thing then is to ping the broker once in a while (if you set a keep alive interval) -
fasani Hi there,Reply
I'm facing the following problem using a Pico W with firmware v1.19.1 (2022-06-18) .uf2 (latest stable version).
Eeach time I try to install the module, I'm facing a error message (AssertionError) that seems to be related to the fact that I can't download the package.
...
AssertionError
----------------------------------------
WARNING: Retrying (Retry(total=0, connect=None, read=None, redirect=None, status=None)) after connection broken by 'ProtocolError('Connection aborted.', RemoteDisconnected('Remote end closed connection without response'))': /micropython-umqtt-simple/micropython-umqtt.simple-1.3.4.tar.gz/
----------------------------------------
Exception occurred during processing of request from ('127.0.0.1', 50406)
Traceback (most recent call last):
File "C:\Users\david\AppData\Local\Programs\Thonny\lib\socketserver.py", line 316, in _handle_request_noblock
self.process_request(request, client_address)
File "C:\Users\david\AppData\Local\Programs\Thonny\lib\socketserver.py", line 347, in process_request
self.finish_request(request, client_address)
File "C:\Users\david\AppData\Local\Programs\Thonny\lib\socketserver.py", line 360, in finish_request
self.RequestHandlerClass(request, client_address, self)
File "C:\Users\david\AppData\Local\Programs\Thonny\lib\site-packages\thonny\vendored_libs\pipkin\proxy.py", line 204, in __init__
super().__init__(request, client_address, server)
File "C:\Users\david\AppData\Local\Programs\Thonny\lib\socketserver.py", line 747, in __init__
self.handle()
File "C:\Users\david\AppData\Local\Programs\Thonny\lib\http\server.py", line 432, in handle
self.handle_one_request()
File "C:\Users\david\AppData\Local\Programs\Thonny\lib\http\server.py", line 420, in handle_one_request
method()
File "C:\Users\david\AppData\Local\Programs\Thonny\lib\site-packages\thonny\vendored_libs\pipkin\proxy.py", line 211, in do_GET
self._serve_file(*path.split("/"))
File "C:\Users\david\AppData\Local\Programs\Thonny\lib\site-packages\thonny\vendored_libs\pipkin\proxy.py", line 245, in _serve_file
tweaked_bytes = self._tweak_file(dist_name, file_name, original_bytes)
File "C:\Users\david\AppData\Local\Programs\Thonny\lib\site-packages\thonny\vendored_libs\pipkin\proxy.py", line 312, in _tweak_file
assert normalize_dist_name(wrapper_dir).startswith(normalize_dist_name(dist_name))
AssertionError
----------------------------------------
ERROR: Could not install packages due to an OSError: HTTPConnectionPool(host='127.0.0.1', port=36628): Max retries exceeded with url: /micropython-umqtt-simple/micropython-umqtt.simple-1.3.4.tar.gz/ (Caused by ProtocolError('Connection aborted.', RemoteDisconnected('Remote end closed connection without response')))
Error Command '' returned non-zero exit status 1.
I've tried to install related packages (simple2, robust, robust2) but I'm still facing the same problem...
Does anybody has an idea on how to deal with this problem ?
Regards,
David -
markjoe Replyfasani said:Hi there,
I'm facing the following problem using a Pico W with firmware v1.19.1 (2022-06-18) .uf2 (latest stable version).
Eeach time I try to install the module, I'm facing a error message (AssertionError) that seems to be related to the fact that I can't download the package.
...
AssertionError
----------------------------------------
WARNING: Retrying (Retry(total=0, connect=None, read=None, redirect=None, status=None)) after connection broken by 'ProtocolError('Connection aborted.', RemoteDisconnected('Remote end closed connection without response'))': /micropython-umqtt-simple/micropython-umqtt.simple-1.3.4.tar.gz/
----------------------------------------
Exception occurred during processing of request from ('127.0.0.1', 50406)
Traceback (most recent call last):
File "C:\Users\david\AppData\Local\Programs\Thonny\lib\socketserver.py", line 316, in _handle_request_noblock
self.process_request(request, client_address)
File "C:\Users\david\AppData\Local\Programs\Thonny\lib\socketserver.py", line 347, in process_request
self.finish_request(request, client_address)
File "C:\Users\david\AppData\Local\Programs\Thonny\lib\socketserver.py", line 360, in finish_request
self.RequestHandlerClass(request, client_address, self)
File "C:\Users\david\AppData\Local\Programs\Thonny\lib\site-packages\thonny\vendored_libs\pipkin\proxy.py", line 204, in __init__
super().__init__(request, client_address, server)
File "C:\Users\david\AppData\Local\Programs\Thonny\lib\socketserver.py", line 747, in __init__
self.handle()
File "C:\Users\david\AppData\Local\Programs\Thonny\lib\http\server.py", line 432, in handle
self.handle_one_request()
File "C:\Users\david\AppData\Local\Programs\Thonny\lib\http\server.py", line 420, in handle_one_request
method()
File "C:\Users\david\AppData\Local\Programs\Thonny\lib\site-packages\thonny\vendored_libs\pipkin\proxy.py", line 211, in do_GET
self._serve_file(*path.split("/"))
File "C:\Users\david\AppData\Local\Programs\Thonny\lib\site-packages\thonny\vendored_libs\pipkin\proxy.py", line 245, in _serve_file
tweaked_bytes = self._tweak_file(dist_name, file_name, original_bytes)
File "C:\Users\david\AppData\Local\Programs\Thonny\lib\site-packages\thonny\vendored_libs\pipkin\proxy.py", line 312, in _tweak_file
assert normalize_dist_name(wrapper_dir).startswith(normalize_dist_name(dist_name))
AssertionError
----------------------------------------
ERROR: Could not install packages due to an OSError: HTTPConnectionPool(host='127.0.0.1', port=36628): Max retries exceeded with url: /micropython-umqtt-simple/micropython-umqtt.simple-1.3.4.tar.gz/ (Caused by ProtocolError('Connection aborted.', RemoteDisconnected('Remote end closed connection without response')))
Error Command '' returned non-zero exit status 1.
I've tried to install related packages (simple2, robust, robust2) but I'm still facing the same problem...
Does anybody has an idea on how to deal with this problem ?
Regards,
David
umqtt.simple is literally one file. Download and save on the pico and you are good to go. -
KenzW I tried to install umqtt.simple with an ubuntu laptop and with a raspberry pi 4, for use with Thonny.Reply
Both attempts failed for different reasons.
The following steps worked for me:
Visit https://pypi.org/project/micropython-umqtt.simple/#filesDownload micropython-umqtt.simple-1.3.4.tar.gz
Extract simple.py from micropython-umqtt.simple-1.3.4/umqtt in the tar.gz file
Copy simple.py to your Thonny project, and save it to your pico w board
Use the following import in your mqtt-pub.py and mqtt-sub.py files: from simple import MQTTClientI hope this might be useful to other readers. -
FrankDelporte I also got it working and described it here:Reply
https://webtechie.be/post/2022-12-07-sending-sensor-data-from-raspberry-pi-pico-w-to-hivemq-cloud/
