Tom's Hardware Verdict
Priced around $139, the Maxsun Terminator H770 YTX D5 Wi-Fi is a uniquely shaped board with cable connections on the rear. It comes handsomely equipped for the price, but chassis options are limited, and the out-of-box performance could have been better.
Pros
- +
Connectors on the rear for clean cable management
- +
Four M.2 sockets (plus a SAS connection)
- +
Three Type-C ports (two via headers)
Cons
- -
YTX form factor and rear connections limit chassis options
- -
Default PL limits performance out of the box
- -
VRMs run warm at 200W
Why you can trust Tom's Hardware
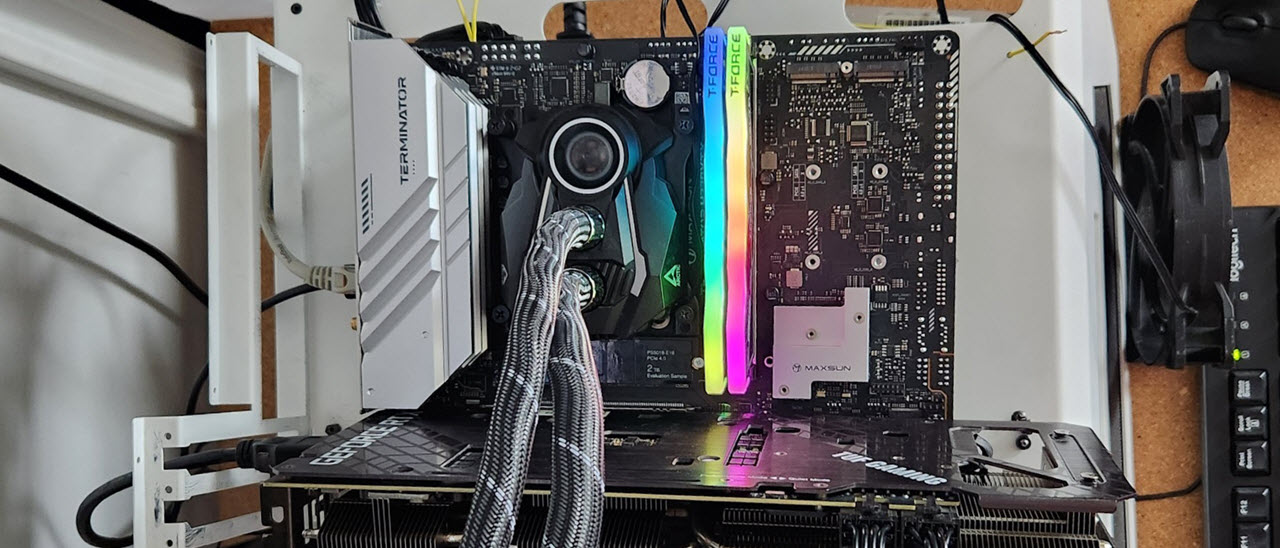
We’re used to testing E-ATX, ATX, Micro ATX and Mini ITX motherboards here at Tom’s Hardware. But today we've got something different on the test bench: The Maxsun Terminator H770 YTX D5 Wi-Fi, which conforms to a new horizontal YTX form factor. The YTX form factor measures 9.6 x 6.8 inches (245 x 175mm) and is based on the Mini-ITX form factor, but with additional room for storage and other parts of the chipset.
[Editor’s Note:Think of it as wide ITX. Given that WTX was already used , and that YTX and wide TX (or wide ITX) sound almost the same when you say them out loud, there’s a decent chance YTX was actually chosen to mean wide ITX. Perhaps we’ll get a chance to settle that for sure later this year at Computex in Taiwan when we talk to motherboard vendors.]
Aside from its form factor, another unique feature of this board is that the majority of the connectors reside on the back of the board. It’s a feature Maingear, who owns the patent in the US, calls MG-RC. MSI calls its rear-connector boards (in more standard form factors) Project Zero. And Asus, who is also making graphics cards with the power connectors at the back, calls it BTF.
Whatever it’s called and whomever makes the boards, this configuration makes for a clean look on the front, though it limits chassis compatibility. That said, the small Terminator H770 YTX D5 Wi-Fi packs a punch! You get support for flagship-class processors (12th-14th gen), several storage options including a Slim-SAS SFF-8654 4i port, fast networking with integrated Wi-Fi 6, dual USB Type-C outputs (one with Displayport), and more. You’re getting almost all of what larger boards offer, but in around half the space.
Performance on this YTX board was slower than the rest in many tests. While the default power limits are a bit higher (200/253W), it quickly drops to the 200W PL1 limit, putting a glass ceiling on tests that run longer than several seconds. Increasing that time or the power limit quickly brings things back to par with the other boards, however. Residing on the H770 chipset, you can only overclock the memory. But it is possible to configure the power limits and make CPU multiplier adjustments up to the turbo ratios.
Below, we’ll dig into the details of the board and see how it performed across all of the tests against a few other new Z790 motherboards. The Terminator won’t make our best motherboard list, but it is certainly worth a look if you want all of your connectors on the back of the board. Before we get into those details, we’ll start by listing the specifications, from the Maxsun website.
Specifications: Maxsun Terminator H770 YTX
| Socket | LGA1700 |
| Chipset | H770 |
| Form Factor | YTX (Horizontal) |
| Voltage Regulator | 10 Phase (8x 50A MOSFETs for Vcore) |
| Video Ports | (1) DisplayPort (v1.4) |
| Row 5 - Cell 0 | (1) HDMI (v2.0) |
| USB Ports | (1) USB 3.2 Gen 2x2 Type-C (20 Gbps) |
| Row 7 - Cell 0 | (2) USB 3.2 Gen 1 (5 Gbps) |
| Row 8 - Cell 0 | (6) USB 2.0 (480 Mbps) |
| Network Jacks | (1) 2.5 GbE |
| Audio Jacks | (3) Analog |
| Legacy Ports/Jacks | ✗ |
| Other Ports/Jack | ✗ |
| PCIe x16 | (1) v5.0 x16 |
| PCIe x8 | ✗ |
| PCIe x4 | ✗ |
| PCIe x1 | ✗ |
| CrossFire/SLI | ✗ |
| DIMM Slots | (2) DDR5 8000+(OC), 96GB Capacity |
| M.2 Sockets | (1) PCIe 4.0 x4 (64 Gbps) / PCIe (up to 80mm) |
| Row 20 - Cell 0 | (2) PCIe 4.0 x4 (64 Gbps) / PCIe (up to 110mm) |
| Row 21 - Cell 0 | (1) PCIe 4.0 x4 (64 Gbps) / PCIe + SATA (up to 80mm) |
| SATA Ports | (4) SATA3 6 Gbps (Supports RAID 0/1/5/10) |
| Row 23 - Cell 0 | (1) Slim SAS (SFF-8654 4i) |
| USB Headers | (2) USB v3.2 Gen 2, Type-C (20 Gbps) w/DisplayPort |
| Row 25 - Cell 0 | (1) USB v3.2 Gen 1 (5 Gbps) |
| Row 26 - Cell 0 | (1) USB v2.0 (480 Mbps) |
| Fan/Pump Headers | (4) 4-Pin |
| RGB Headers | (2) aRGB (3-pin) |
| Row 29 - Cell 0 | (1) RGB (4-pin) |
| Diagnostics Panel | ✗ |
| Internal Button/Switch | ✗ |
| SATA Controllers | ✗ |
| Ethernet Controller(s) | (1) Realtek RTL8125BG (2.5 GbE) |
| Wi-Fi / Bluetooth | Wi-Fi 6 AX101 (1x1, 80 MHz, BT 5.2) |
| USB Controllers | ✗ |
| HD Audio Codec | Realtek ALC897 |
| DDL/DTS | ✗ / ✗ |
| Warranty | 3 Years |
Inside the Box of the Maxsun Terminator H770 YTX D5 Wi-Fi
Inside the rectangular box are a couple of accessories to help get your PC up and running without an extra trip to the store. You get SATA cables, a Wi-Fi antenna, and some screws to mount M.2 drives. You’ll need to download the drivers to the board from the Maxsun website. It’s an anemic accessory stack, but you do get the basics here.
Design of the H770 YTX D5
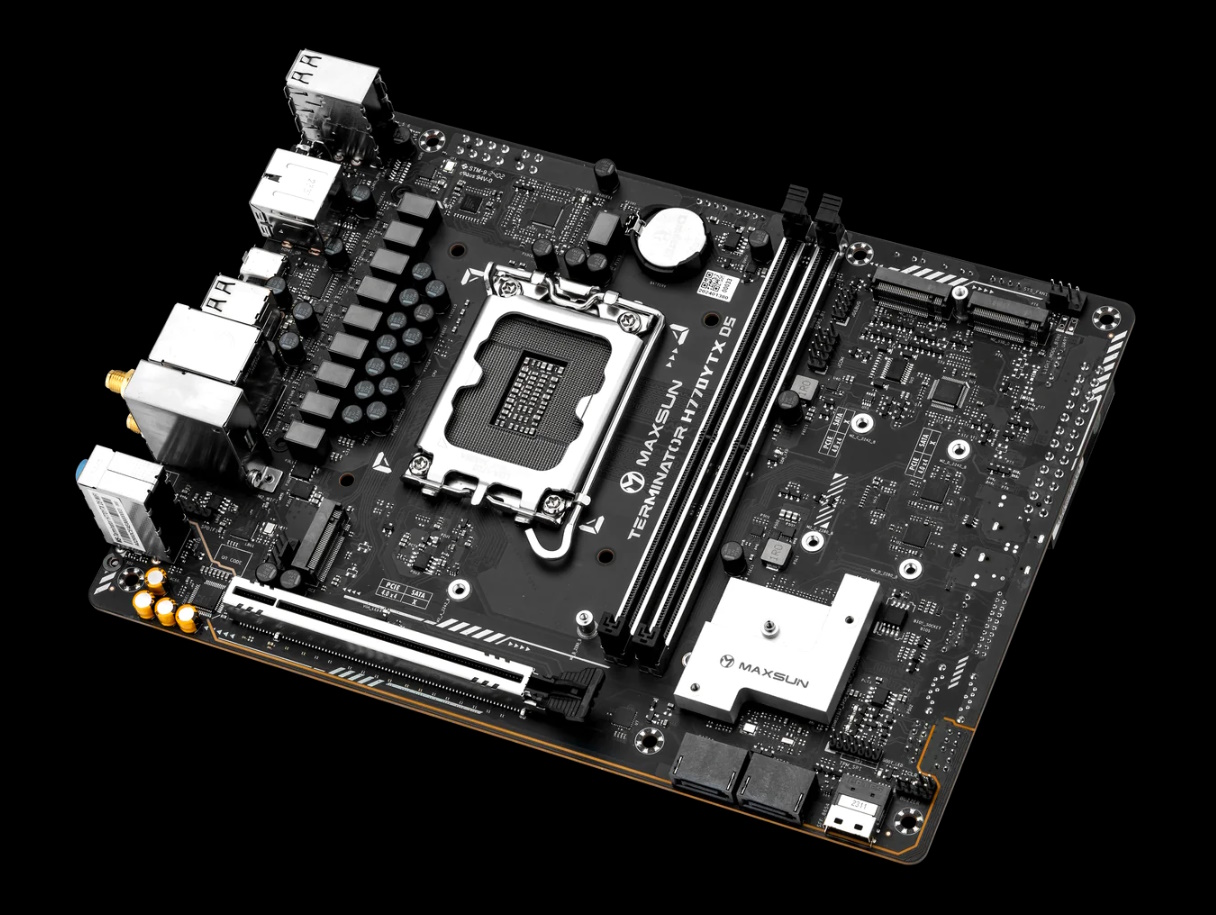
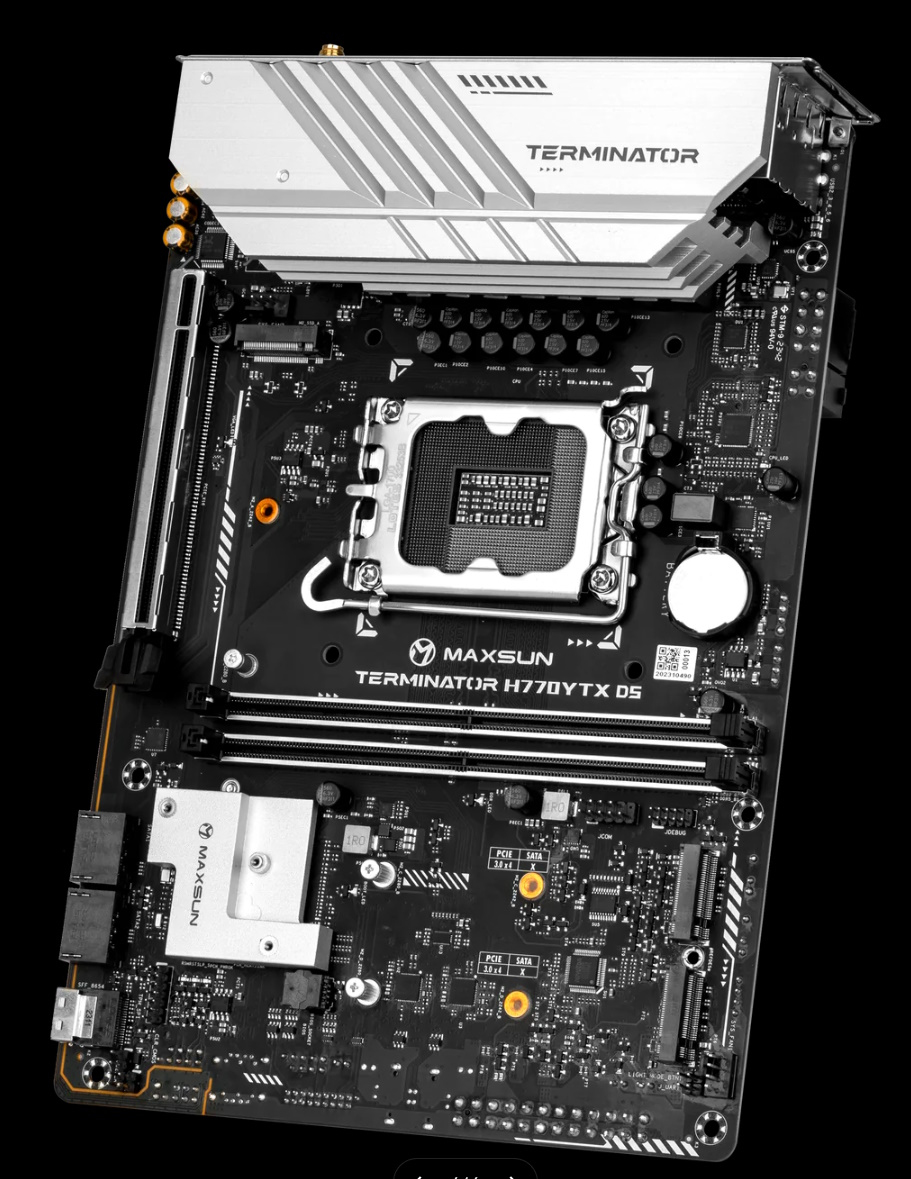
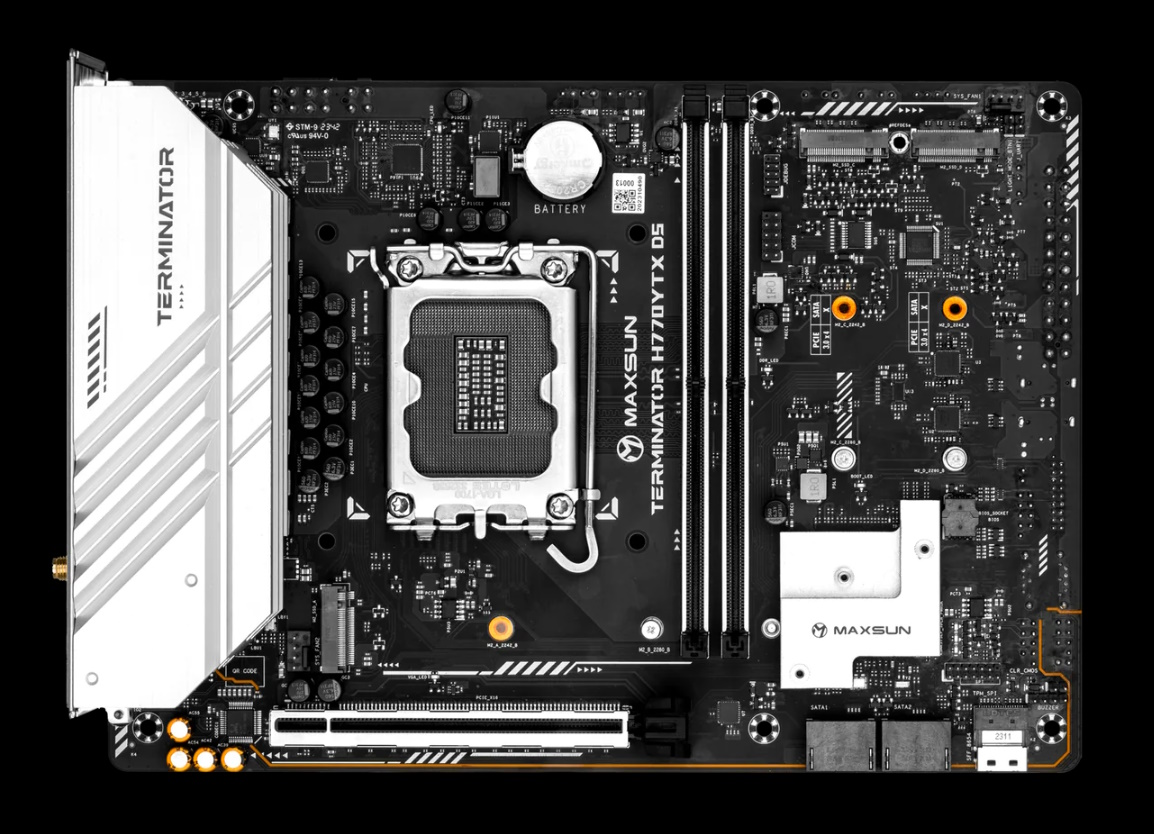
Outside of the rectangular shape and horizontal YTX form factor, the stand-out feature of this board is the lack of connectors on the front side. While you still see M.2 sockets and SATA ports, all of the other connections, including power, fans, front panel, and more, reside on the rear of the board. The positives are a clean look, but there are drawbacks, like a lack of chassis that support the board, and complicated cable routing on the back.
Get Tom's Hardware's best news and in-depth reviews, straight to your inbox.
Besides that, the H770 YTX D5 Wi-Fi sports a black multilayer PCB with grey heatsinks covering the VRMs and the chipset on the right. If you want to add RGB lighting, you can do so with the integrated RGB headers (2x 3-pin ARGB and one 4-pin RGB), as the board doesn’t come with integrated lighting. Control over any attached lighting is handled through MaxsunSYNC application. Overall, while its design won’t garner attention on its own, the lack of connectors and resulting clean internal build will definitely turn some heads.
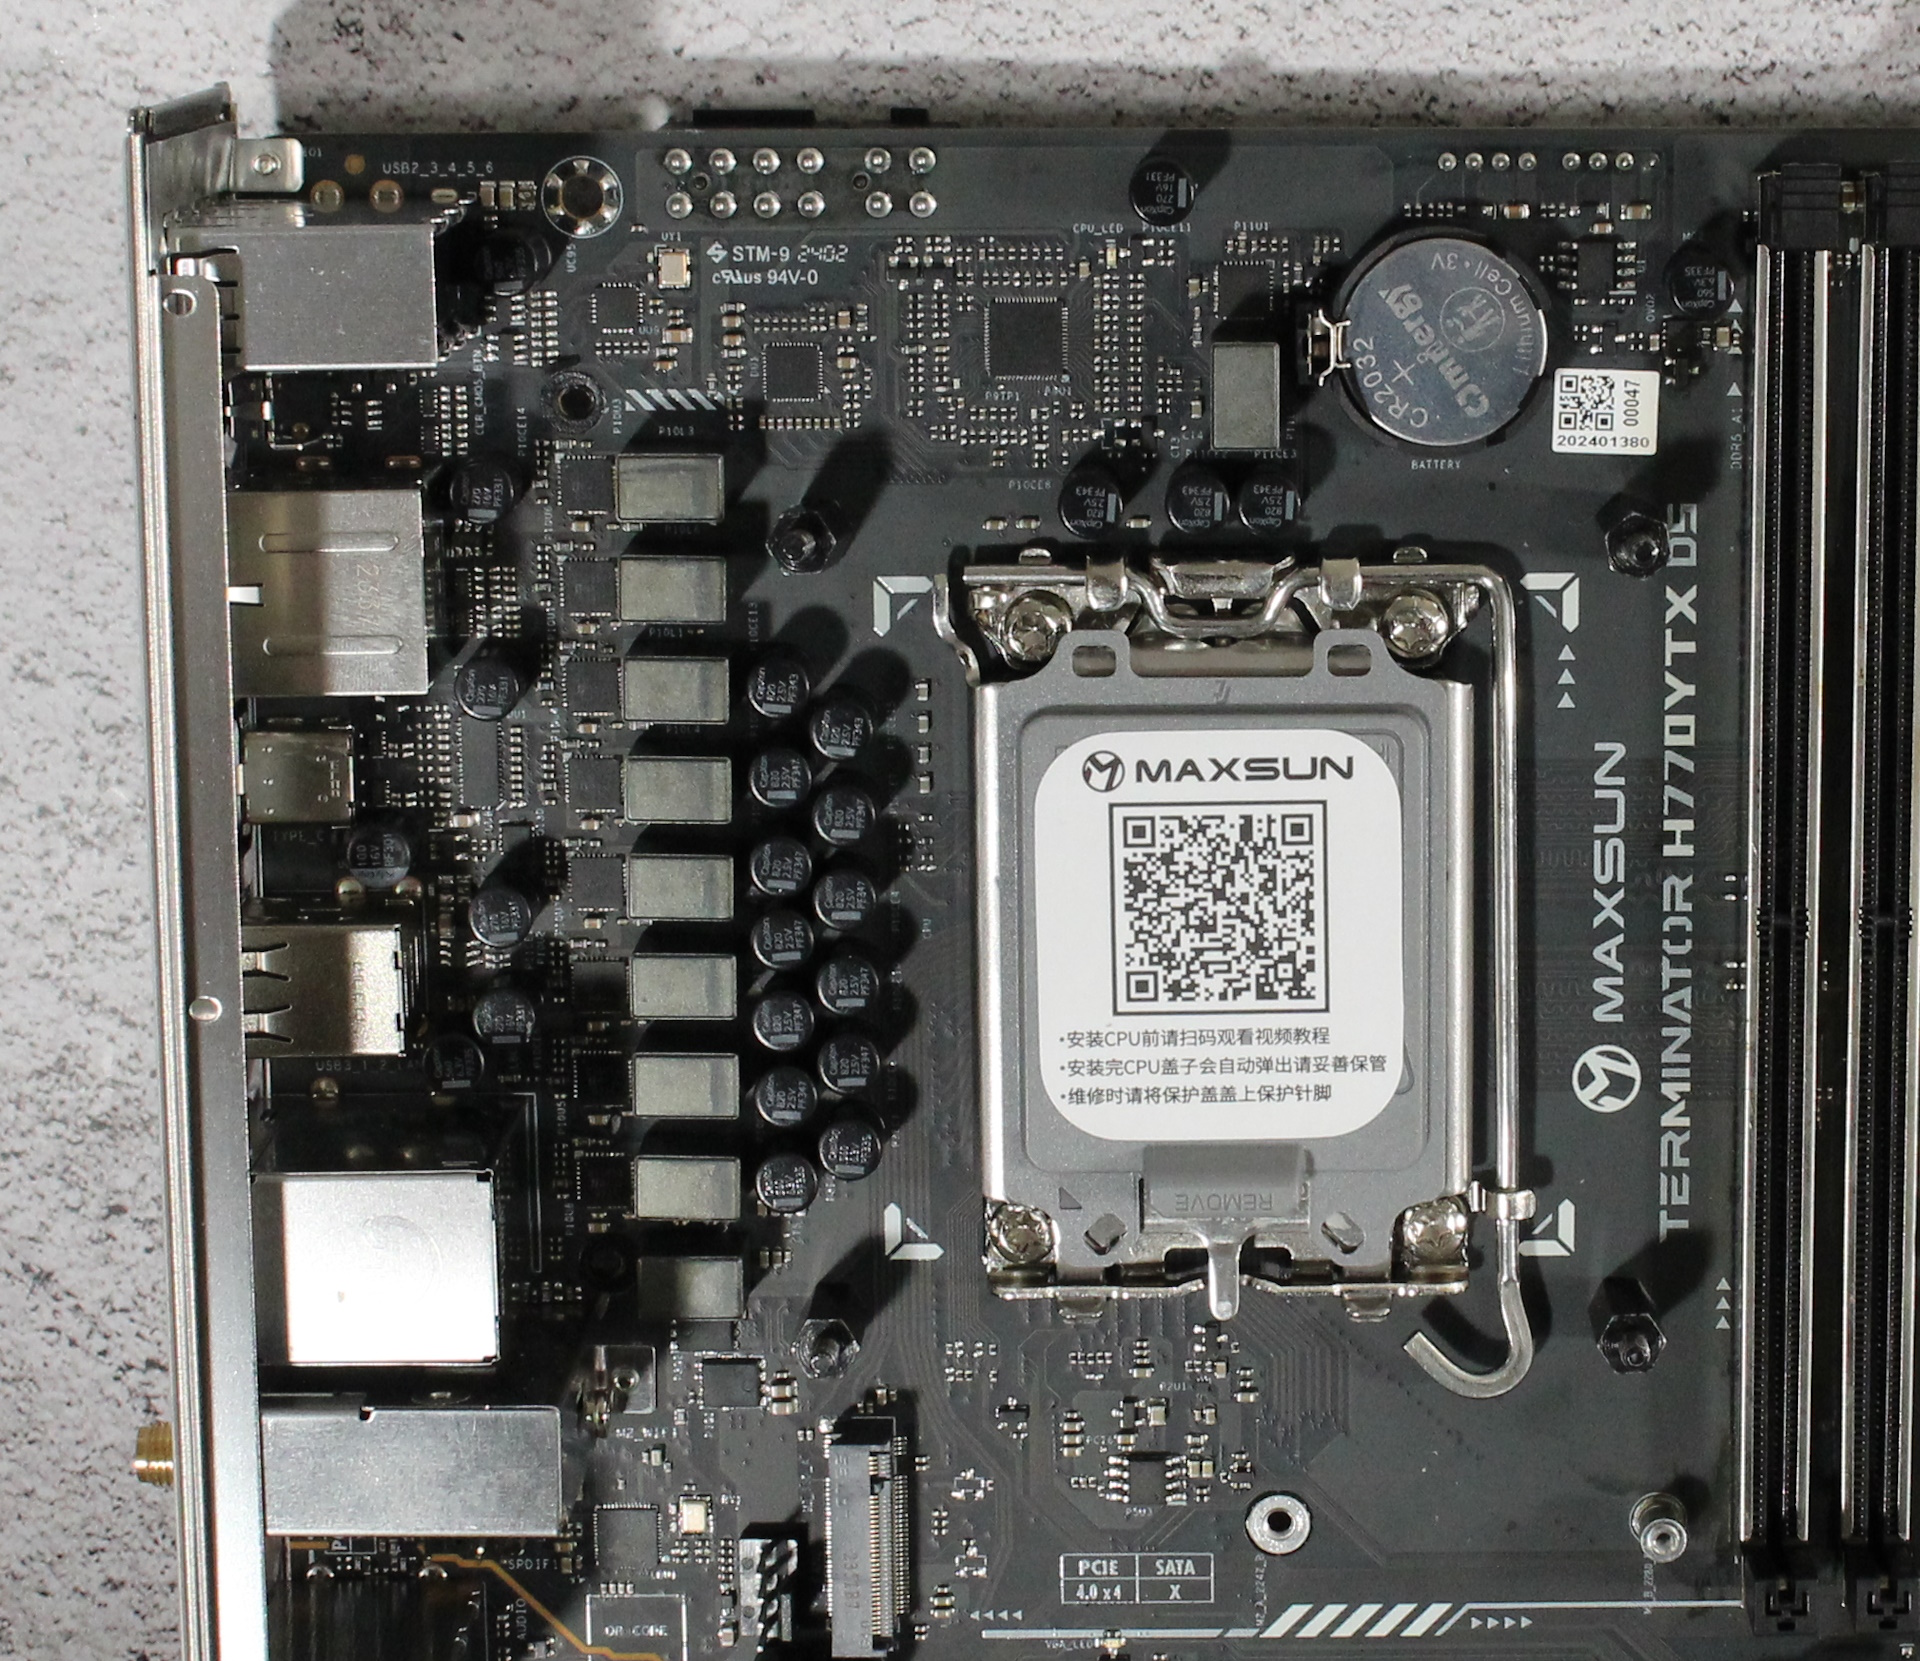
The tour of our YTX board takes the same trail as Mini-ITX, but for now, we’ll stick to the front. Starting in the upper left corner, usually, we’d see the EPS connections, but they are on the rear. On the left is the VRM heatsink that reaches out and covers the unsightly rear IO bits. The heatsink is big and has plenty of surface area to be effective. On top we see the Terminator branding in black.
Continuing right, past the socket area, we next run into the two reinforced DRAM slots with a single locking mechanism at the top. Maxsun lists support of up to 96GB of RAM with speed up to a smoking-fast (but hopefully not actually smoking) DDR5-8000. Our DDR5-7200 kit worked without issue. However, we had trouble stabilizing the DDR5-8000 kit on their QVL. The IMC on our 14900K may not be up to the task. The board booted at those speeds but couldn’t handle our stress test.
To the right of the DRAM slots, we spy two (of four) M.2 sockets. All M.2 sockets run up to PCIe 4.0 x4 (64 Gbps) speeds and support PCIe drives. None of the M.2 sockets come with a heatsink. If your workflows need extended use out of M.2 drives, you’ll want a heatsink to maximize performance and prevent throttling.
Next, we spy a 4-pin fan header, one of two on the front board (two more are on the rear). Each header supports PWM and DC-controlled devices. Maxasun doesn’t list the output in the specs, but confirmed that each header supports up to 1A/12W. I’d like to see at least one header with 2A/24W output, as you can breach that first value easily and cause permanent damage to your board.
On the bottom of the board, in the right corner, is the slim-SAS (SFF-8654 4i) connector. This is a connector more commonly found in servers and workstations. It seems like a curious feature on modern consumer motherboards, considering how common SATA and M.2-based storage is, but if you need one, it’s there. To the left are two (of four) SATA connectors, oriented horizontally to promote cable management. Maxsun does not list RAID modes for any storage medium.
Continuing left along the bottom edge, we see a reinforced full-length PCIe slot. This slot connects through the CPU and runs up to PCIe 5.0 x16 speeds. It also can bifurcate and split the lanes, but we’re not quite sure why (perhaps for the SAS storage?), and neither the web page nor the manual lists the reason. Above this is a third M.2 socket and another 4-pin fan header.
Hiding in plain sight in the bottom left corner is the audio section. Here, we spy the entry-level Realtek ALC897 codec and a few dedicated audio caps in yellow. It isn’t the best sound solution, but many users still find it acceptable.
Since we made our way back around, it’s time to talk about the VRMs. Power delivery is listed as 8+1+1 with eight phases dedicated to Vcore. Power travels from the EPS connector(s) on the rear to the Richtek RT3628AE controller chip, then onto
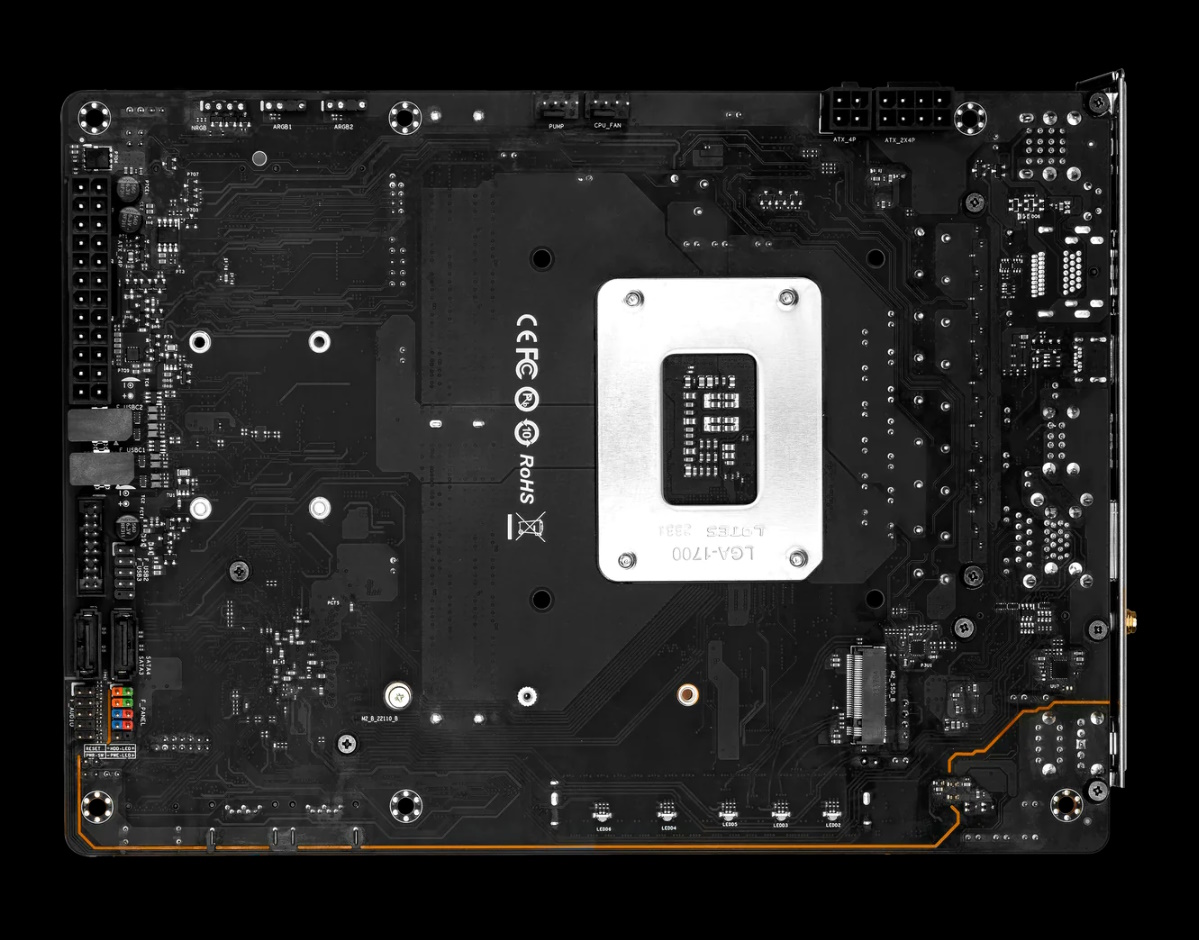
As expected, we found most of the headers and connectors on the back of the board. Along one edge is the lion’s share. Here, you see the 24-pin ATX connector to power the board, front panel USB 3.2 Gen 1 (5 Gbps), and USB 2.0 headers. The two black connections between them are the front panel USB Type-C headers. Both run up to 10 Gbps and support Displayport v1.4 video output and 15W charging. Below are two vertically oriented SATA ports and front panel audio and front panel connectivity headers.
Along the top edge are two 4-pin fan headers and the EPS connectors, an 8-pin (required) and 4-pin (optional). The last item on the board's rear is the fourth M.2 socket. The main difference here is this socket handles up to 110mm modules, while everything on the front supports 80mm modules.
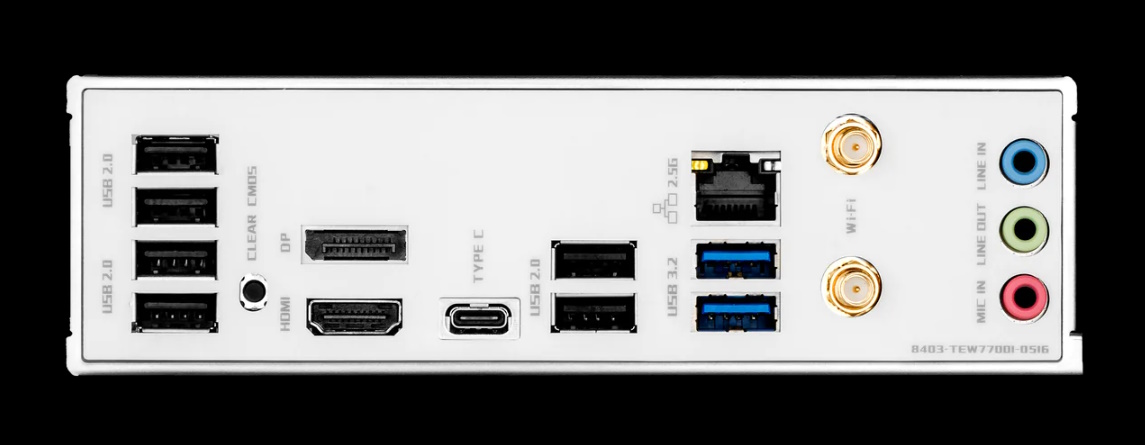
Like most boards we cover these days, the rear IO plate on the H770 comes attached already. It sports a white background with grey writing and is generally easy to read. Nine total USB ports (6x USB 2.0, 2x 5 Gbps, and one 20 Gbps Type-C) are spread across the space. There’s a clear CMOS button to reset the BIOS easily. HDMI and Displayport outputs cover the video (along with the front USB Type-C ports), the Realtek 2.5GbE network port, Wi-Fi 6 antenna connections, and a 3-plug analog audio stack.
MORE: Best Motherboards
MORE: How To Choose A Motherboard
MORE: All Motherboard Content

Joe Shields is a staff writer at Tom’s Hardware. He reviews motherboards and PC components.
-
frogr a Typo - something got truncated "Reply
Power travels from the EPS connector(s) on the rear to the Richtek RT3628AE controller chip, then onto ???"
" -
BillyBuerger I still really like that idea of a wider motherboard where things like M.2 drives sit out front there instead of between the CPU, GPU and other expansion slots. Room for more of them and they're not in the middle of all those hot components.Reply
I go back and forth on the rear connectors. It does look nice but there are drawbacks. I feel like more edge connectors would be better. As long as the case has openings along the edges of the board they are barely visible and have fewer compatibility issues. -
vanadiel007 I prefer to see all my connectors, because this way I can easily spot any loose connector rather than waiting until it causes a fire.Reply
That is just my opinion. -
peachpuff Reply
Your case is on your table at eye level?vanadiel007 said:I prefer to see all my connectors, because this way I can easily spot any loose connector rather than waiting until it causes a fire.
That is just my opinion.
Which loose connector will cause a fire? Sata? The dreaded hd led one? -
vanadiel007 Replypeachpuff said:Your case is on your table at eye level?
Which loose connector will cause a fire? Sata? The dreaded hd led one?
It sits next to me at elbow level, with clear glass side panels.
Has RGB power cables. I enjoy looking at it and set all the RGB colors and patterns with RGB software.
It's why I have it setup like that, and it also allows me to see all main power cables just in case one would wiggle loose from my dog jumping up and down on the floor. -
Amdlova Reply
It's virtually impossible to catch fire( this only happens with Nvidia) and first you will feel will be the smell of something burn.vanadiel007 said:I prefer to see all my connectors, because this way I can easily spot any loose connector rather than waiting until it causes a fire.
That is just my opinion. -
The Historical Fidelity Please spell and grammar check your articles before release. There are 3 errors in just the first paragraph. Where are the editors???Reply -
peachpuff Reply
What kind of a dog do you have?vanadiel007 said:It sits next to me at elbow level, with clear glass side panels.
Has RGB power cables. I enjoy looking at it and set all the RGB colors and patterns with RGB software.
It's why I have it setup like that, and it also allows me to see all main power cables just in case one would wiggle loose from my dog jumping up and down on the floor. -
vanadiel007 Replypeachpuff said:What kind of a dog do you have?
I have 3, but the largest of them is 180 pounds. I call him the little guy.
