APC BGE90M-CA UPS Tear-Down
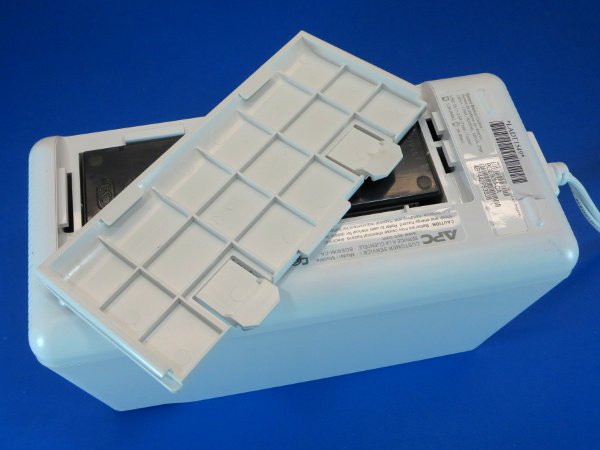
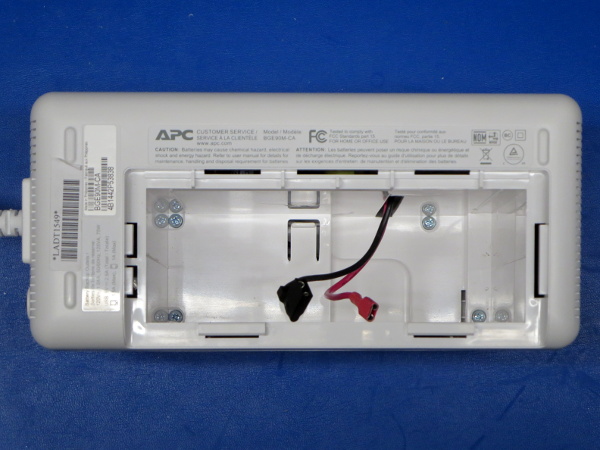
Battery Door
It's time to get started on the dissection. Our first step is removing the battery door so I can pull out the battery itself. Chunky tabs? Checked. Chunky slides? Checked. Reasonably chunky reinforcement ribs? Checked. Consider this yet another door able to withstand substantial shipping abuse.
Battery Inside
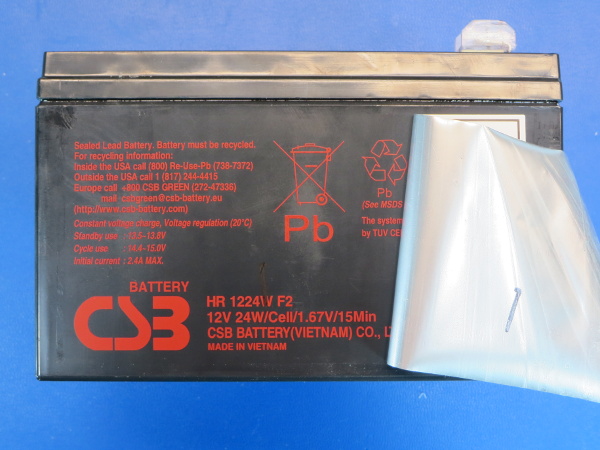
What do we find inside the battery compartment, hidden behind another one of those metallic APC stickers? A CSB Battery HR1224W Absorbed Glass Mat (AGM) lead-acid battery with its key specifications for a high-discharge application printed directly on it. This battery can provide 24W per cell (144W total) for a 15-minute discharge. How much is 144W/15 min stretched to 90 minutes? A little over 24W of sustainable power draw, which sounds about right for the 20W output power stated on the packaging.
Just in case you missed it, the squiggles of approval strike again: you can see the stain on the back of the label and a vertical strike through the ‘W’ in “HR 1224W” on the battery.
Mystery Gray Goo And Date
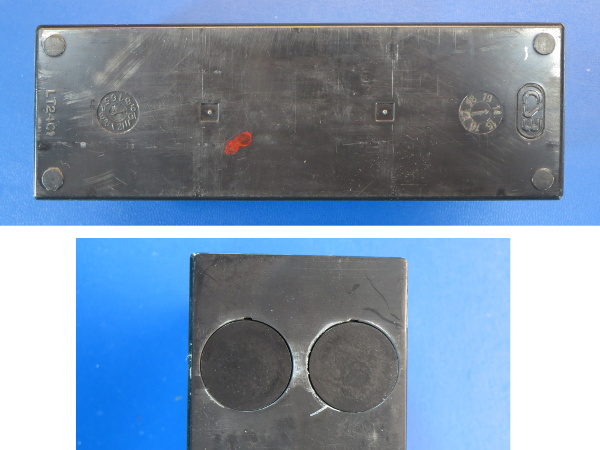
As I suspected, the battery is quite a few months older than the UPS itself: the month dial on the left points to 3 (March), making it seven months older than the UPS’ ATE slip date. By the time this battery got through my door, it was already two years and three months old.
The bottom part of the picture shows the caps on the battery's last two cells. They are the only ones with this whitish residue all around. Did someone splash lead acid between the cells during flooding and forget to clean it after installing the caps? How many months passed between manufacturing and activation/flooding?
Both batteries measured a healthy 12.7V before I connected them, which at least tells me that they did get some degree of maintenance charging between whenever they were flooded and my order.
Battery Comparison
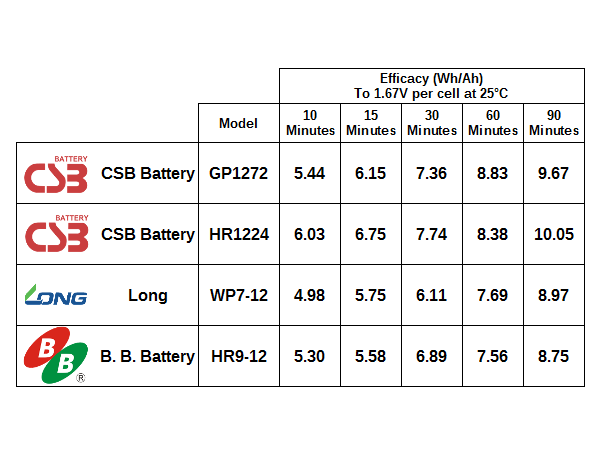
How does the HR1224 fare compared to other batteries? Much approximation went into putting this table together thanks to various manufacturers skipping different discharge rates. I also had to approximate the HR’s 20h rating based on physical dimensions to answer that question. It is 20% thinner than the GP1272 (51mm vs. 65mm) with all other measurements being equal, so I filed it in as 6Ah. An over-estimation here translates into under-estimations in the table, meaning that actual performance should be better. From the look of it, CSB improved its batteries’ performance by about 10%, pulling 10-20% ahead of the two other power sources represented here.
Get Tom's Hardware's best news and in-depth reviews, straight to your inbox.
Yuasa could have won this battle, but its NXP’s specifications only go to 20 minutes. I also had to end the table at 90 minutes since that is how far the HR1224’s specifications go.
Hunting For Screws
Breaking in is as easy as it gets. Only four screws hold the whole thing together, and all four of them are at the bottom of the battery bay. Once they are out, the cover comes right off.
I took this opportunity to take some quick measurements, hoping to answer why the battery was rattling around so much. It appears that APC’s measurements were one millimeter off in every direction. It could have molded some leaf springs (beefier than the puny one you can see at the bottom of the battery bay) to pick up that slack. On the plus side, the battery shouldn’t get stuck inside as it swells with age.
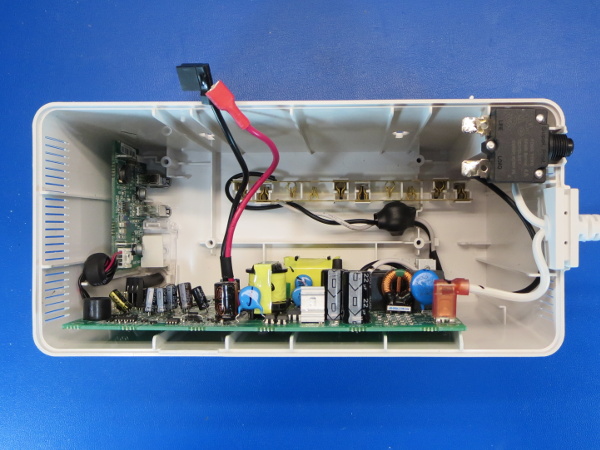
Insight
Little space goes to waste here: the USB supply board sits between the battery bay and left side just above the ventilation slots, the main board occupies most of the bottom side with an inch to spare on the right side, and then you have the cord and breaker as the right side’s only citizens. Of course, we can also see the back of the outlet strips that get wedged between the battery bay and front face when the unit is assembled.
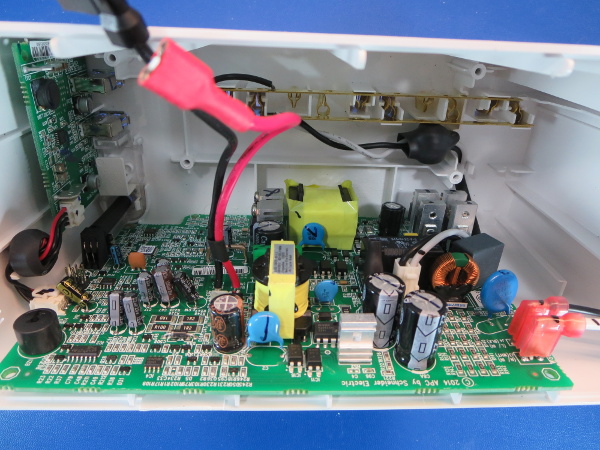
Connectors. Connectors Everywhere!
One of the last things I expected to see in such an inexpensive unit was connectors. But we're treated to spade connectors for the power cord, a two-pin connector for the AC output, and four-pin connectors at both ends of the cable between the main board and USB power board (which is driven by the main board’s 12V rail instead of AC, as was the case in the LX1500).
From this angle, it looks like we have one surprisingly busy box. Have you guessed what the BGE90M and the old BX1000 have in common yet? Look at the six tiny heat sinks surrounding that second transformer in the rear.
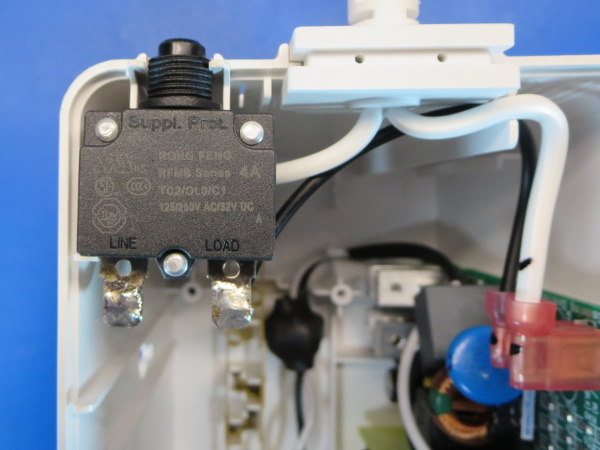
Gauge-Appropriate
Instead of having a breaker rated a few amperes higher than the cord it is attached to, we have a 4A breaker on an 8A cord. Soldering on the breaker’s tabs is a little blobular, but as long as the solder wets them and wicks into the wires, a little too much solder is better than too little.
Hollowed Out
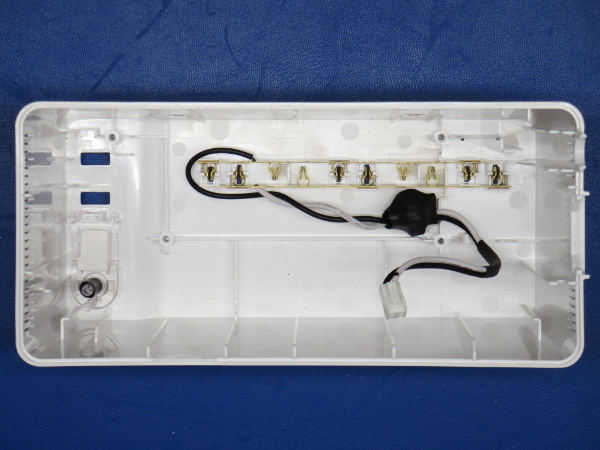
With the power cord, USB power supply, and main board taken out, the last remaining bits left inside are the two outlet contact strips with their attached power leads and in-line common-mode choke. As you can see, the metal strips actually have five outlet positions stamped into them. APC and most other manufacturers reuse the same strip designs and simply omit holes on their enclosures to vary outlet count. Pull gently on the strips from both ends and they come out with minimal effort.
To keep the button’s light pipe in the bottom-left lined up with the main board’s LED, APC put a small piece of unshrunk heat-shrink tubing on its stem to act as an alignment guide.
That’s How It’s Done
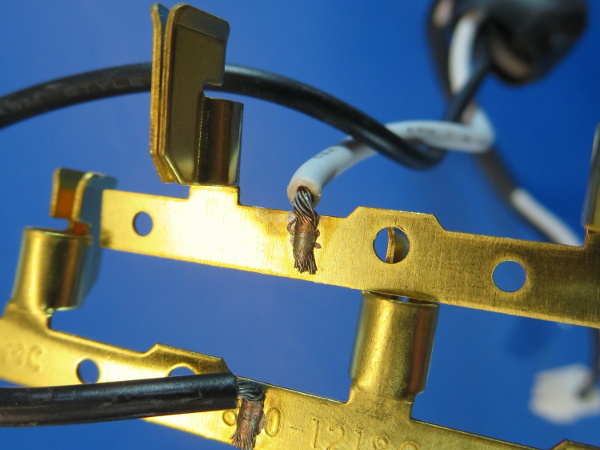
As usual with mid-range power products, we get “pinchy” live and neutral contacts. Apart from one rogue strand on the neutral wire, these spot-welds are perfectly executed. Just enough current was applied for just long enough with just enough pressure to fuse the strands into one solid mass and affix them to the brass strips.
MORE: CyberPower CP1000PFCLCD Tear-Down
MORE: APC BE550G Tear-Down
MORE: Tripp-Lite SMART1000LCD Tear-Down
-
gamebrigada For 30 bucks I'm not super concerned about the capacitors. The soldering job is decent and not done by a shmuck, and the board is nicely designed and doesn't look like it was designed by a 5 year old. Low quality capacitors scare me less than a potential fire.Reply -
nukemaster Another good read.Reply
Thanks.
I looked at this(something from the same family at least) for a cordless phone backup/router/ect, but slightly larger units did not cost much more. I did not see these for 30 dollars in my area. -
Daniel Sauvageau Reply
You're welcome!18333740 said:Another good read.
Thanks.
$30 was a clearance sale price. These units were manufactured in 2014, someone must have discovered pallets worth of these in the back of a warehouse somewhere and wanted to get rid of stale stock. At $30, these were almost worth getting just to scavenge the battery. The regular retail price is $47. While I was proofreading Chris' edits, I noticed the Newegg(.com) banner advertising a BGE90 for $80. I don't see stuff being so much cheaper in Canada than the USA very often. At such a large price discrepancy, it is almost worth it for US residents to order these units from Canada even before accounting for the exchange rate.18333740 said:I looked at this(something from the same family at least) for a cordless phone backup/router/ect, but slightly larger units did not cost much more. I did not see these for 30 dollars in my area.
New 600-650VA variants of this unit (BE600M1 and BN650M1) were launched last month (June 2016) and are only a few centimeters longer. They do cost $90-100 CAN though and at that price, it may make more sense on my side of the border to buy a pair of BGE90Ms and split the load.
BTW, there was an 8h long power outage at my mother's place due to trees shorting power lines out during a severe thunderstorm last week. The BE550G held out for about 2h30, twice as long as I was expecting it to based on its packaging's runtime chart. I'm glad it held up so much longer than planned since my mother waited until about 1h30 into the outage before calling me. The battery should have been dead by then based on the chart. Apparently, I hadn't made it clear enough the first time around before I set her up with VoIP to save her $40/month on phone bills that one key disadvantage of a VoIP setup is that dead UPS battery = no internet = no phone so if she waits to call, she may no longer be able to do so by the time she decides to. Maybe I should replace the 550 with a Frankenstein BGE90 connected to an external 12AH battery, should last over 10 hours. If voip.ms has a feature to send an email or call a number when an account fails to register for more than 15 minutes, I need to set that up. -
razor512 Why aren't they giving these devices li-ion batteries? The whole thing is lower drain, thus no super high end battery is needed to handle a very high current.Reply -
Daniel Sauvageau Reply
Lead-acid batteries are cheaper and can safely tolerate a whole lot more abuse than lithium cells do.18334228 said:Why aren't they giving these devices li-ion batteries?
-
alextheblue Reply18333740 said:BTW, there was an 8h long power outage at my mother's place due to trees shorting power lines out during a severe thunderstorm last week. The BE550G held out for about 2h30, twice as long as I was expecting it to based on its packaging's runtime chart. I'm glad it held up so much longer than planned since my mother waited until about 1h30 into the outage before calling me. The battery should have been dead by then based on the chart. Apparently, I hadn't made it clear enough the first time around before I set her up with VoIP to save her $40/month on phone bills that one key disadvantage of a VoIP setup is that dead UPS battery = no internet = no phone so if she waits to call, she may no longer be able to do so by the time she decides to. Maybe I should replace the 550 with a Frankenstein BGE90 connected to an external 12AH battery, should last over 10 hours. If voip.ms has a feature to send an email or call a number when an account fails to register for more than 15 minutes, I need to set that up.
It would be so much more efficient to be able to use a DC UPS though. Maybe get a 12V DC UPS and a couple of DC-DC adapters? :P -
Daniel Sauvageau Reply
I have entertained that idea a few times. The biggest hassle is getting the correct barrel connectors for everything you might want to connect to such an UPS and make sure you don't get leads mixed up between voltages and devices if you have devices that cannot tolerate 14V on their power input: if you have multiple 5x1.6mm barrel connector leads split between 5V devices and 12V devices, it would be quite easy to accidentally use the wrong lead on a 5V device and blow it up. I suspect this is the main reason why proper DC UPSes aren't widely available despite enabling much higher overall efficiency.18339557 said:It would be so much more efficient to be able to use a DC UPS though. Maybe get a 12V DC UPS and a couple of DC-DC adapters? :P
In principle, all you'd need to put one together for 30W worth of loads is a 3A 13V power supply to act as a float charger for the SLA battery with all the 12V loads connected to the battery and 5V USB adapters with sufficient output current for all the 5V stuff. -
alidan Reply18334174 said:
You're welcome!18333740 said:Another good read.
Thanks.
$30 was a clearance sale price. These units were manufactured in 2014, someone must have discovered pallets worth of these in the back of a warehouse somewhere and wanted to get rid of stale stock. At $30, these were almost worth getting just to scavenge the battery. The regular retail price is $47. While I was proofreading Chris' edits, I noticed the Newegg(.com) banner advertising a BGE90 for $80. I don't see stuff being so much cheaper in Canada than the USA very often. At such a large price discrepancy, it is almost worth it for US residents to order these units from Canada even before accounting for the exchange rate.18333740 said:I looked at this(something from the same family at least) for a cordless phone backup/router/ect, but slightly larger units did not cost much more. I did not see these for 30 dollars in my area.
New 600-650VA variants of this unit (BE600M1 and BN650M1) were launched last month (June 2016) and are only a few centimeters longer. They do cost $90-100 CAN though and at that price, it may make more sense on my side of the border to buy a pair of BGE90Ms and split the load.
BTW, there was an 8h long power outage at my mother's place due to trees shorting power lines out during a severe thunderstorm last week. The BE550G held out for about 2h30, twice as long as I was expecting it to based on its packaging's runtime chart. I'm glad it held up so much longer than planned since my mother waited until about 1h30 into the outage before calling me. The battery should have been dead by then based on the chart. Apparently, I hadn't made it clear enough the first time around before I set her up with VoIP to save her $40/month on phone bills that one key disadvantage of a VoIP setup is that dead UPS battery = no internet = no phone so if she waits to call, she may no longer be able to do so by the time she decides to. Maybe I should replace the 550 with a Frankenstein BGE90 connected to an external 12AH battery, should last over 10 hours. If voip.ms has a feature to send an email or call a number when an account fails to register for more than 15 minutes, I need to set that up.
have a costco where i live, they have 810 watt upses there for 100$ forget the brand name but remember them being good. if this costs 80 and the 810 costs 100, may as well get the significantly better one. -
Daniel Sauvageau Reply
If your objective is very long runtime, getting a massively higher VA rating UPS may not necessarily do you any good: in a traditional transformer-based inverter (every UPS I have shown here so far other than the BGE90 and BX1000), a larger transformer core means higher magnetizing current and other related losses which bleed off battery power. When I measured the CP1000AVRLCD, BX1000 and BGE90's no-load battery current draw, I got ~25W for the CP, ~7W for the BX1000 and ~2.5W for the BGE.18349342 said:have a costco where i live, they have 810 watt upses there for 100$ forget the brand name but remember them being good. if this costs 80 and the 810 costs 100, may as well get the significantly better one.
If your 810W UPS uses a traditional transformer-based inverter like the 1000AVRLCD does, it will need a battery about twice the size of the BGE90's to beat it at endurance on 10-15W loads due to wasting more power walking its large transformer core through its hysteresis loop than actually powering the loads.
Sometimes, less is more. The typical use-case for the BGE90 should be one of those cases when compared against UPSes using traditional inverters. -
alextheblue Reply18342170 said:
I have entertained that idea a few times. The biggest hassle is getting the correct barrel connectors for everything you might want to connect to such an UPS and make sure you don't get leads mixed up between voltages and devices if you have devices that cannot tolerate 14V on their power input: if you have multiple 5x1.6mm barrel connector leads split between 5V devices and 12V devices, it would be quite easy to accidentally use the wrong lead on a 5V device and blow it up. I suspect this is the main reason why proper DC UPSes aren't widely available despite enabling much higher overall efficiency.18339557 said:It would be so much more efficient to be able to use a DC UPS though. Maybe get a 12V DC UPS and a couple of DC-DC adapters? :P
In principle, all you'd need to put one together for 30W worth of loads is a 3A 13V power supply to act as a float charger for the SLA battery with all the 12V loads connected to the battery and 5V USB adapters with sufficient output current for all the 5V stuff.
Change the connectors on the units in question or glue them in and cut the cord, adding a second connector (something akin to a breakaway connector on an Xbox 360) that's different and incompatible for each device :P
Really I think that all small widgets and whatsits should just go USB Type C. :D Then it would be not only viable, but really easy. Heck at that point you'd basically be building a really high-class USB power bank.
