Tom's Hardware Verdict
At $329.99, the Gigabyte Z690 Aorus Pro is a mid-range class motherboard that covers all the bases. There are ample storage options, including four M.2 sockets, updated audio, and a new appearance. If you don’t need integrated RGBs and Wi-Fi 6E, the Z690 Aorus Pro is a solid base to build your system around.
Pros
- +
13 USB ports
- +
90A VRMs
- +
Four M.2 sockets
- +
Reasonable price
Cons
- -
Contrasting grey heatsinks
- -
No Wi-Fi 6E (only 6)
- -
Lacks integrated RGB
Why you can trust Tom's Hardware
We’ve tested a couple high-end boards for Intel’s brand-new Alder Lake platform so far. But now we get to dive deep into the first mid-range Z690 board, Gigabyte’s Z690 Aorus Pro. Priced at $329.99, it’s one of the less expensive offerings in the Z690 universe (although there are boards priced as low as $200), but it still has a long feature list enthusiasts should love. There are a whopping 13 total USB ports, 2.5 GbE and integrated Wi-Fi 6 for fast networking, four M.2 sockets, a premium Realtek audio codec, overbuilt VRMs, and an updated appearance. The new look may be polarizing, with its grey-on-black heatsinks, but overall we like what the Aorus Pro delivers as a package very much.
Since this is our first Gigabyte Z690 review, we’ll briefly cover the product stack. The Gigabyte website has a mind-blowing 25 models listed, across the Aorus, Aero, Gaming X, and UD families. The Aorus line has 15 boards, from the halo product Aorus Extreme Waterforce (and non-watercooled Extreme), Tachyon (overclocking centric), Master, Ultra, Elite, and Pro boards. There’s even a Mini ITX board, the Z690I Ultra.
The Aero line consists of three boards (Aero D, Aero G, and Aero D DDR4) that sport a different design aesthetic (white) with hardware geared towards content creators. The Gaming X family has two boards (one DDR5, the other DDR4). Finally, the UD series makes up the budget end of things with five SKUs, including DDR4 options.
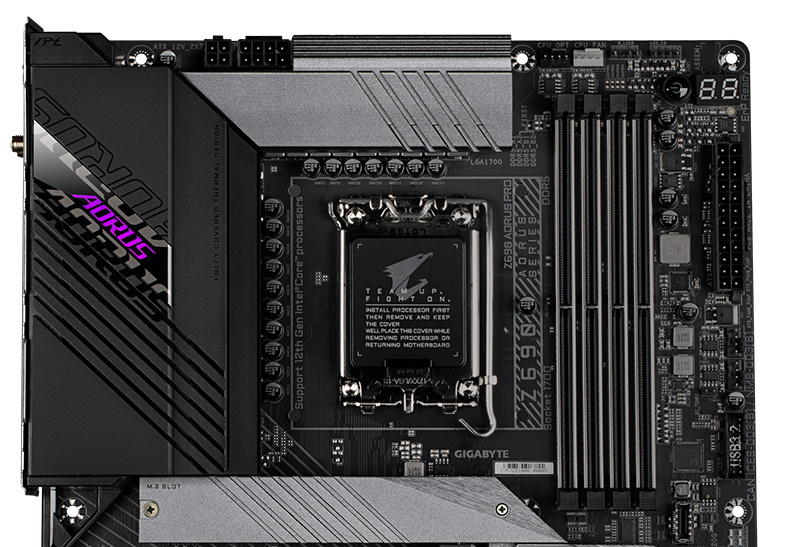
On the design front, the Z690 Aorus Pro changed things up, going with less coverage on the shrouds and heatsinks due to PCIe slot placement. The M.2, chipset and top VRM heatsink are all grey, providing a rather stark contrast against the black PCB and other heatsinks. Personally, I prefer the old style that covers more of the board and uses grey more sparingly (like the Z690 Aorus Master). That said, this is still a good-looking board and makes a great focal point for your Z690 build, though the lack of RGB lighting elements may be a turnoff for some.
Looks aside, the Z690 Aorus Pro performed well, mixing in with the other two Z690 DDR5 boards we’ve tested so far. The board led a few benchmarks, including Handbrake (x264), Cinebench R23, POV-Ray, and did a clean sweep in the Procyon Office tests and Photo Editing. RAM bandwidth and latency were spot on with the other results and so were our gaming tests.
Power use was also in the middle of the Z690 boards tested so far. Overall, the Z690 Aourus Pro is a complete package that isn’t too hard on your wallet (by current motherboard standards). Read on for additional information on features, overclocking, and takeaways from our time with the board. Before we do that, here’s a complete list of the Z690 Aorus Pro’s specifications, direct from Gigabyte.
Specifications - Gigabyte Z690 Aorus Pro
| Socket | LGA1700 |
| Chipset | Z690 |
| Form Factor | ATX |
| Voltage Regulator | 19 Phase (16+1+2, 90A MOSFETs for Vcore) |
| Video Ports | DisplayPort (v1.2) |
| USB Ports | (1) USB 3.2 Gen 2x2 Type-C (20 Gbps) |
| (4) USB 3.2 Gen 2 (10 Gbps) | |
| (4) USB 3.2 Gen 1 (5 Gbps) | |
| (4) USB 2.0 (480 Mbps) | |
| Network Jacks | (1) 2.5 GbE |
| Audio Jacks | (2) Analog + SPDIF |
| Legacy Ports/Jacks | ✗ |
| Other Ports/Jacks | ✗ |
| PCIe x16 | (2) v5.0 (x16, x8/x8) |
| (2) v3.0 (x4) | |
| PCIe x8 | ✗ |
| PCIe x4 | ✗ |
| PCIe x1 | ✗ |
| CrossFire/SLI | AMD Quad-GPU CrossFire and 2-Way AMD Crossfire |
| DIMM slots | (4) DDR5 6200+(OC), 128GB Capacity |
| M.2 slots | (3) PCIe 4.0 x4 (64 Gbps) / PCIe (up to 80mm) |
| (1) PCIe 4.0 x4 (64 Gbps) / PCIe + SATA (up to 110mm) Supports RAID 0/1/5/10 | |
| U.2 Ports | ✗ |
| SATA Ports | (6) SATA3 6 Gbps (Supports RAID0/1/5/10) |
| USB Headers | (1) USB v3.2 Gen 2x2, Type-C (20 Gbps) |
| (1) USB v3.2 Gen 1 (5 Gbps) | |
| (2) USB v2.0 (480 Mbps) | |
| Fan/Pump Headers | (8) 4-Pin (CPU, Water CPU, System Fans) |
| RGB Headers | (2) aRGB (3-pin) |
| (2) RGB (4-pin) | |
| Diagnostics Panel | 2-character debug LED, Post Status Checker (4 LEDs) |
| Internal Button/Switch | Power and Reset buttons, BIOS Flashback button |
| SATA Controllers | X |
| Ethernet Controller(s) | (1) Intel I225-V (2.5 Gbps) |
| Wi-Fi / Bluetooth | Intel AX200 Wi-Fi 6E (2x2 ax, MU-MIMO, 2.4/5/6 GHz, 160 MHz, BT 5.2) |
| USB Controllers | GL3590 |
| HD Audio Codec | Realtek ALC4080 |
| DDL/DTS Connect | ✗ / ✗ |
| Warranty | 3 Years |
Inside the Aorus Pro’s box are several accessories, including SATA cables, a Wi-Fi antenna, and screws. We didn’t find a disk/USB stick with drivers, but that could be a review sample omission. Worst case scenario, you’d have to download the drivers from the website, but that’s a good idea anyway, to make sure you have the most up-to-date software. Although the accessory list is a bit sparse, most of what you need to get started is here. Below is a complete list of the included extras.
Get Tom's Hardware's best news and in-depth reviews, straight to your inbox.
- User’s Manual
- Installation Guide
- (4) M.2 screws
- (4) SATA cables
- (2) Temperature sensors
- RGB extension
- Microphone
- Wi-Fi antenna
- G-connector
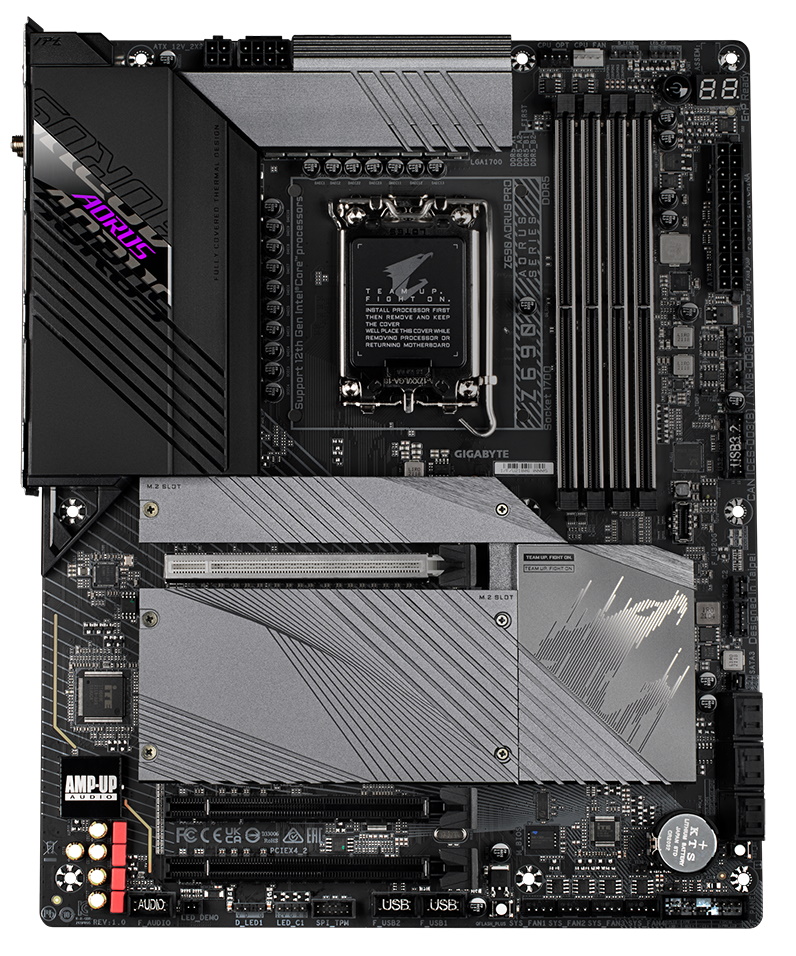
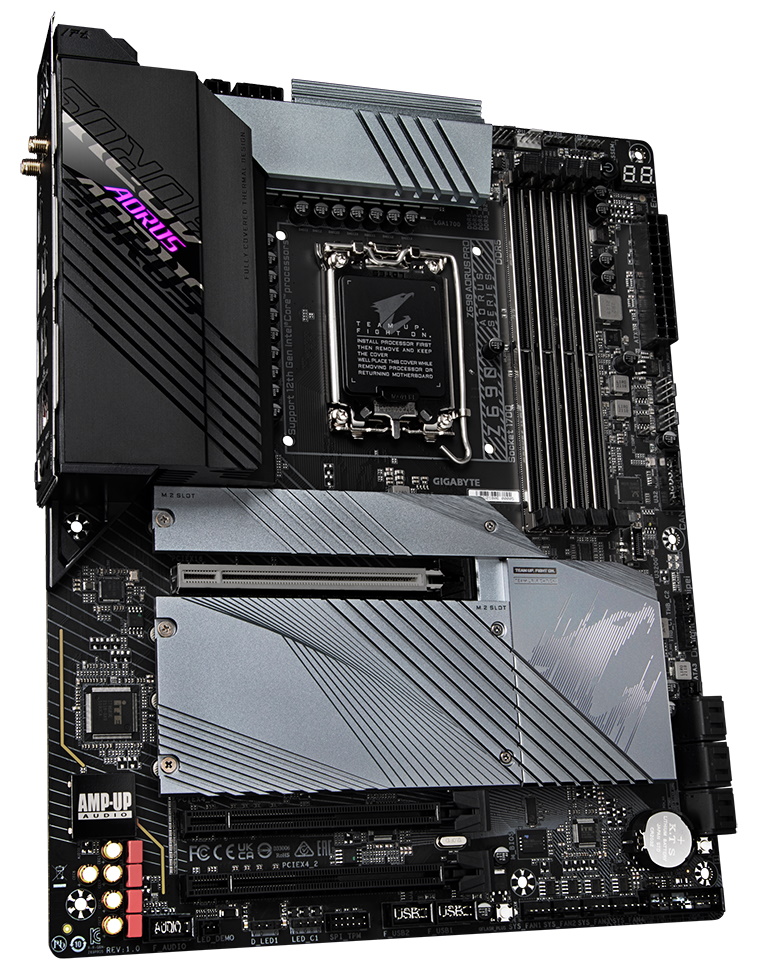
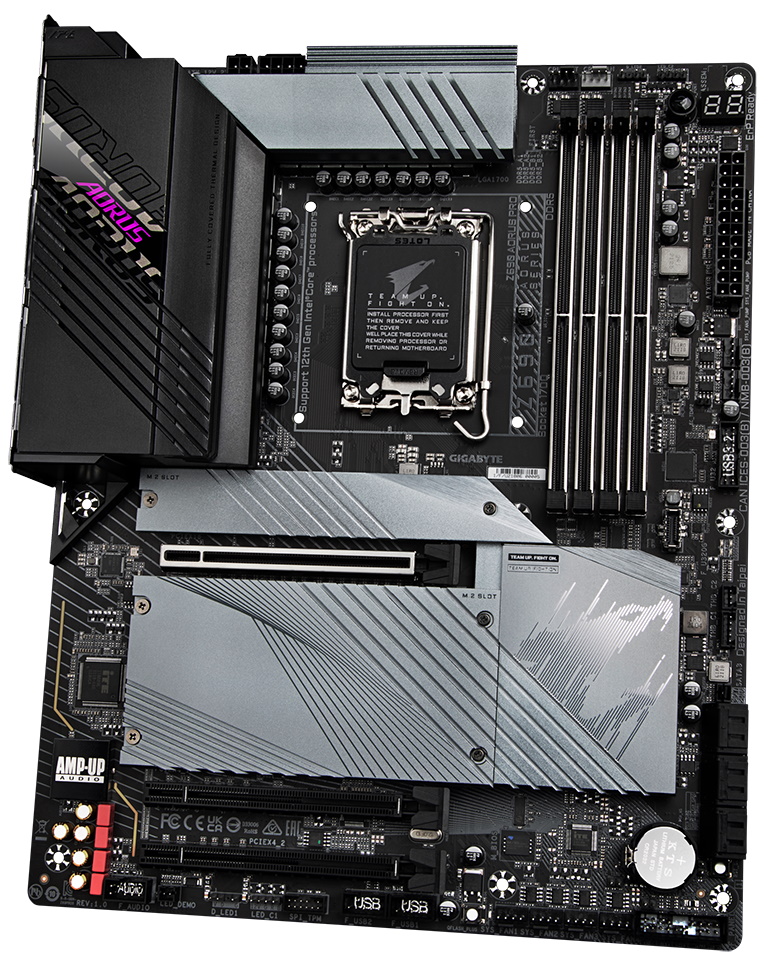
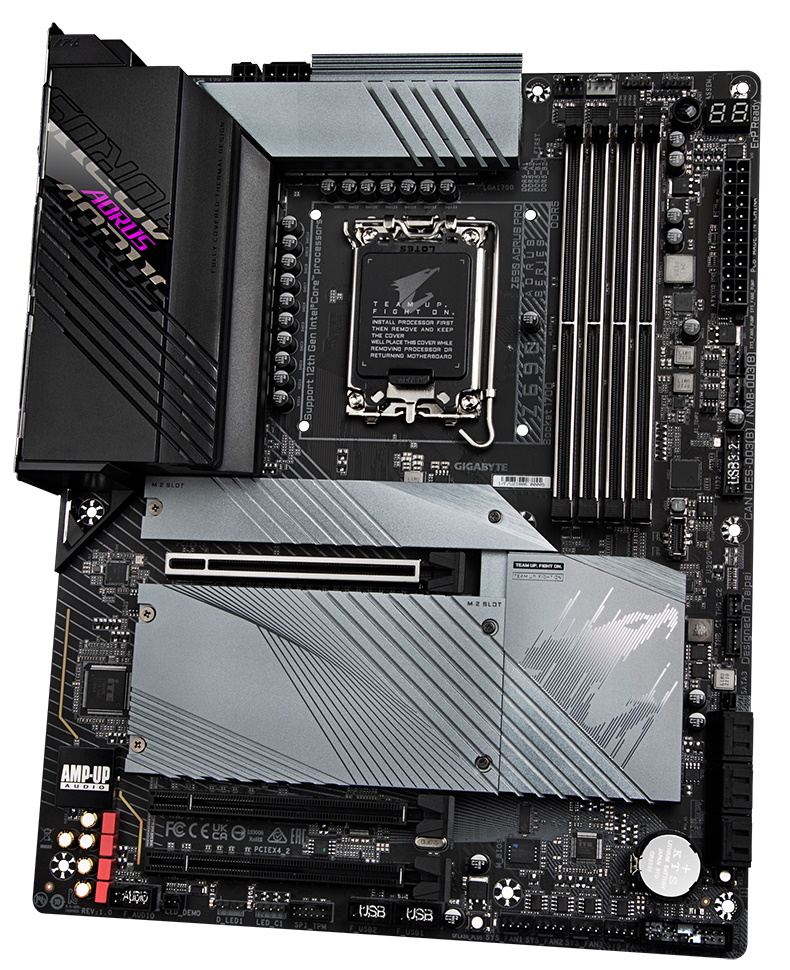
Taking a closer look at the Aorus Pro, we see a matte-black PCB, along with some grey lines stenciled on the board matching the heatsinks and shrouds. The VRM heatsink sports the Aorus branding, while the chipset has an Aorus Eagle on with a mirror finish. The black-and-grey board uses reinforcement on the primary PCIe slot and all four DRAM slots to mitigate EMI and and extra support for heavy graphics cards.
Overall, I like the design, but the contrasting grey heatsinks are polarizing. Looks are subjective, but I would like to see more black instead. There’s less heatsink coverage here generally, due to the PCIe slot design and how close the chipset-fed slots are, but that does expose more of the motherboard. On the RGB front, you’ll have to add lights yourself. The board does not include any, much like the MSI MEG Z690 Unify we recently reviewed.
As we focus on the top half of the board, we’ll cover the VRM heatsinks and all of the headers and buttons in the area. The largest feature in this area, the VRM heatsink, consists of two separate chunks of aluminum, with the left VRM bank reaching out over the IO area for that extra bit of mass and cooling. Grooves are cut out in the heatsinks to increase surface area and improve thermal transfer.
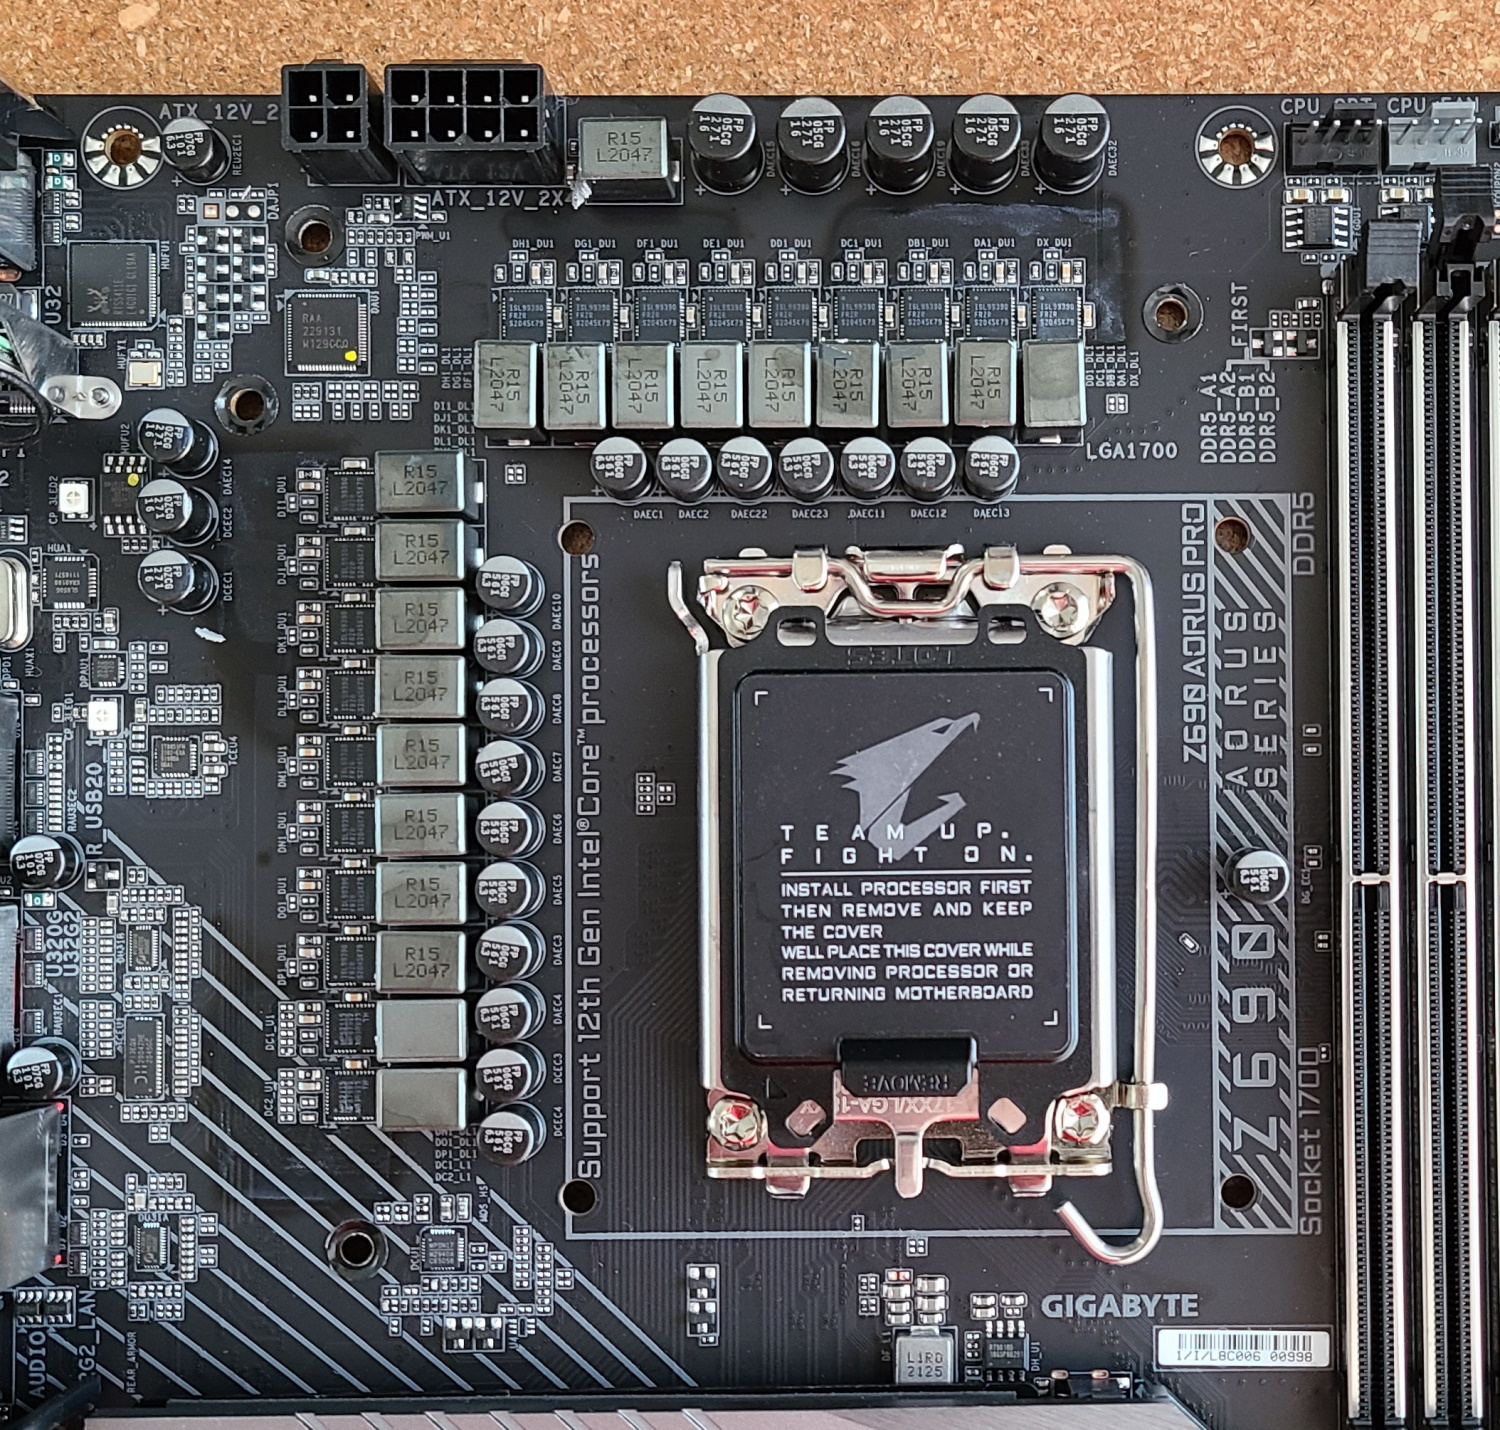
The CPU receives power from a combination of 8-pin and 4-pin EPS connectors found on the top edge above the heatsinks. Like most boards, the 8-pin is required, while the 4-pin is optional. I prefer to plug both in, if only to satisfy my OCD. The socket area has a bunch of capacitors around the socket, along with some stenciled writing that displays the brand and model.
To the right of the socket are four reinforced DRAM slots capable of handling up to 128GB of DDR5 RAM. Gigabyte lists support up to DDR5 6200(OC), but your mileage may vary depending on the type of kit used. This is one of the lower speeds listed of the boards we’ve seen so far, but still has plenty of headroom over the base spec of DDR5 4800. Gigabyte didn’t have the information in the manual to share the maximum speeds for more sticks and/or ranks, but it is less than the DDR5 6200 listed. The board did though run our GSkill Trident Z5 2x16GB DDR5 5600 kit without issue.
Just above the DRAM slots, we run into the first set of fan and RGB headers. Starting with the fans, there’s a total of eight 4-pin headers scattered around the board. Gigabyte’s manual doesn’t mention the default mode (PWM or DC) for these headers, but you can switch them through the BIOS. Each 4-pin fan/pump header supports 2A/24W, which should be plenty to power your cooling directly from the motherboard.
To the right of the fan headers are two RGB headers, one 3-pin ARGB and one 4-pin RGB header. The other two headers, one of each type again, sit on the bottom edge of the board. Since the motherboard doesn’t provide its own RGB lighting, you’ll have to use the onboard headers or a third-party solution. If they’re attached to the board, the RGB Fusion software in the App Center controls them.
Finally, on the right edge of the board, we run into the 2-character debug display, a 24-pin ATX connector to power the board, two more 4-pin fan headers, a 2-pin temperature header, a front panel USB 3.2 Gen1 header and a front-panel USB 3.2 Gen2x2 Type-C header. With more and more cases adding USB 3.2 Gen2x2 Type-C ports, having a full-speed header on the board is a welcome sight.
Also found in this area is the four-LED debug feature. These four LEDs correspond with steps in POST: CPU, VRAM, VGA, and BOOT. If there’s a problem in one of these areas during the POST process, the LED where the problem occurred stays lit. This is useful to quickly locate the problem, while the 2-character debug LED gives you more detail through the codes it displays.
The Z690 Aorus Pro comes with a 19-phase VRM, with 16 phases dedicated to Vcore (1x VccGT and 2x VccAUX). Power is sent through the RPS connectors to a Renesas RAA229131 controller, then on to 90A Intersil ISL99390 Smart Power Stages (SPS). Some simple math tells us there’s 1,440A available to the CPU, which is plenty for stock and overclocked operation. You’ll run into cooling limits before the VRM trips you up.
As we move to the bottom half of the board, we see a mostly exposed audio section, PCIe slots, and hidden below the heatsinks and shrouds, four M.2 sockets. Starting with the audio on the left, underneath the faraday cage with the Amp-Up Audio branding is the Realtek ALC4080 codec. This isn’t the flagship chip, but is the latest generation codec, and most users will be satisfied with what it has to offer.
In the middle of the board, we’ll start with the PCIe slots. The primary full-length slot (white) runs at PCIe 5.0 x16 speeds and uses Gigabyte’s Ultra Durable SMD PCIe 5.0 Armor for additional support and EMI protection. The bottom two full-length slots are connected through the chipset and run up to PCIe 3.0 x4 speeds.
Sitting around the PCIe slots are four M.2 sockets. Above the primary PCIe slot, the top socket (M2A_CPU) supports PCIe 4.0 x4 drives up to 110mm. The second slot down, M2C_SB, connects via the chipset and runs both SATA and PCIe 4.0 x4 modules up to 110mm. Lastly, the bottom two sockets (M2P_SB/M2Q_SB) connect via the chipset and support up to 110mm drives and PCIe 4.0 x4 speeds. I’d like to see Gigabyte implement the new screwless M.2 latches here, as we’ve seen on some Asus and MSI boards.
Moving to the right edge on the bottom half of the board, we run into a pair of Thunderbolt headers for use with a Gigabyte add-in card. Just below that are six SATA ports. If you’re looking to RAID your SATA or M.2 drives, they both support RAID0/1/5/10 modes. Since the new chipset has more bandwidth and lane flexibility, sharing between SATA ports and PCIe slots isn’t necessary with this configuration. Last but not least, just below the SATA ports, is a white button used to reset the system. I’m not sure why the company located it here and not next to the power button up top, though.
Across the bottom are several headers, including USB ports and RGB. The Aorus Pro also has temperature sensor headers to control your cooling system better. Here’s the complete list, from left to right:
- Front panel audio
- RGB demo header
- 3-pin ARGB header
- 4-pin RGB header
- TPM header
- (2) USB 2.0 headers
- QFlash+ button
- (4) 4-PIN Sys Fan headers
- 2-pin temperature header
- Front panel header
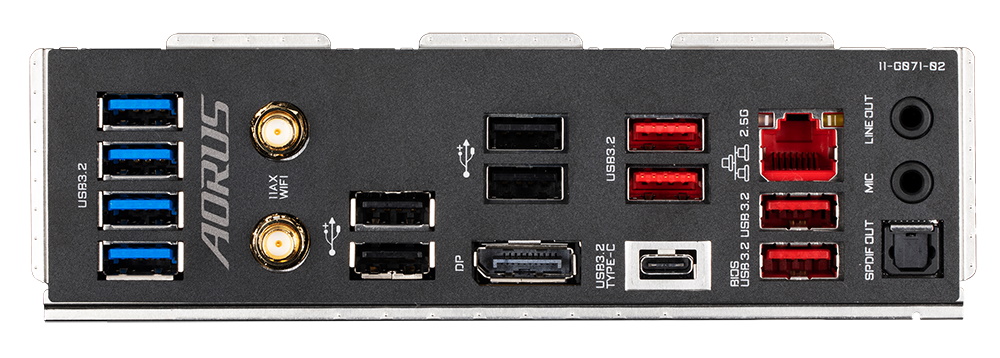
Shifting focus to the critical rear IO area, one of the first things you’ll notice outside of the pre-installed IO plate are the 13 USB ports. From fastest to slowest, there’s a USB 3.2 Gen2x2 (20 Gbps) Type-C port, four USB 3.2 Gen2 (10 Gbps) ports, four USB 3.2 Gen1 (5 Gbps) ports, and finally, four USB 2.0 (480 Mbps) ports. In short, I’d be shocked if there weren’t enough back here for almost anyone building a mainstream platform. There are also connections for the Wi-Fi 6 antenna, DisplayPort for video, the Intel 2.5 GbE port, and a simple 2-plug plus SPDIF audio stack. Everything you’d expect to see is here.
MORE: Best Motherboards
MORE: How To Choose A Motherboard
MORE: All Motherboard Content

Joe Shields is a staff writer at Tom’s Hardware. He reviews motherboards and PC components.
-
wifiburger this model also supports DDR4, I wish the review also included DDR4Reply
Some are saying DDR4 overclocking is really bad on Gigabyte Z690 boards. -
-Fran- The rambling that matters: 4Uux-qGheBkView: https://www.youtube.com/watch?v=4Uux-qGheBkReply
Also, a "mid range" $330 motherboard... What a crazy time, geez.
Regards. -
BILL1957 Reply
They are making a ddr4 version of the PRO board but it is not the same board the ddr5 is on. As of now all mb's on the market are ddr specifi EITHER DDR4 OR DDR5 and the memory standard must be chosen at the time you purchase your mb.wifiburger said:this model also supports DDR4, I wish the review also included DDR4
Some are saying DDR4 overclocking is really bad on Gigabyte Z690 boards. -
Udyr Reply
My thoughts exactly. I would have added this as an "against": "Expensive for a mid range"Yuka said:Also, a "mid range" $330 motherboard... What a crazy time, geez. -
BILL1957 Reply
Most good mid range boards have been floating around the $300 mark for a while.Udyr said:My thoughts exactly. I would have added this as an "against": "Expensive for a mid range"
You do have to remember these boards are all premium z690 chipset boards.
The cheaper lesser chipset boards will not release until q1 2022.
These boards seem to be up about 40-50 dollars over previous boards.
Whether that is because of the new tech or for months we have been hearing about copper prices and raw material prices going up by double digit increases and so has the cost of shipping so these price increases may partly be because of that as well.
I bought one of these boards and it is equivalent to the boards I usually buy for my builds and still in roughly the same $300 give or take price range as well. -
Udyr Reply
I understand, but in previous generations all these "premium" so called "mid range" were $150-200 and high end were $200+, with enthusiast level boards going for $350+BILL1957 said:Most good mid range boards have been floating around the $300 mark for a while.
You do have to remember these boards are all premium z690 chipset boards.
The cheaper lesser chipset boards will not release until q1 2022.
These boards seem to be up about 40-50 dollars over previous boards.
Whether that is because of the new tech or for months we have been hearing about copper prices and raw material prices going up by double digit increases and so has the cost of shipping so these price increases may partly be because of that as well.
I bought one of these boards and it is equivalent to the boards I usually buy for my builds and still in roughly the same $300 give or take price range as well. -
BILL1957 Reply
I paid $300 in the fall of 2020 for my ROG strix -e z490 mb for my 10 series build and that board and this board are pretty comparable .Udyr said:I understand, but in previous generations all these "premium" so called "mid range" were $150-200 and high end were $200+, with enthusiast level boards going for $350+
So I am going to have to disagree with you on the mid range prices.
The top end extreme boards continue to go up way above what used to be considered a top end board pricing but what I consider to be mid level is still mostly in the same ball park of a $300 price point. -
Udyr Reply
2020 was yesterday and prices were already on the rise. I'm talking about pre-pandemic/crazy high prices.BILL1957 said:I paid $300 in the fall of 2020 for my ROG strix -e z490 mb for my 10 series build and that board and this board are pretty comparable .
So I am going to have to disagree with you on the mid range prices.
The top end extreme boards continue to go up way above what used to be considered a top end board pricing but what I consider to be mid level is still mostly in the same ball park of a $300 price point.
You don't have to agree with me. The price history is out there, and I'm sure that's what @Yuka referred to as well. -
-Fran- Reply
It is only the generation after PCIe3 that is priced ridiculously high from top to bottom due to needing more layers on the motherboard PCB.BILL1957 said:I paid $300 in the fall of 2020 for my ROG strix -e z490 mb for my 10 series build and that board and this board are pretty comparable .
So I am going to have to disagree with you on the mid range prices.
The top end extreme boards continue to go up way above what used to be considered a top end board pricing but what I consider to be mid level is still mostly in the same ball park of a $300 price point.
My Asus Crosshair VII Hero WiFi (X470) was ~$300 (maybe a tad more) and that was top dog with Zen2 launch days. The same board for X570 jumped almost $100, but still under $400 in most places. So, at least on the AMD side, prices are not as bonkers as Intel's. The only 2 exceptions from the X570 chipset are the "Godlike" and EVGA motherboards, which are niche IMO.
EDIT: I went to double check my memory and there's one version from Asus which is $700+, so there's 3 exceptions XD
Regards.
