How To Calibrate Your HDTV
You've already seen our instructional guides for calibrating computer monitors. In today's story, we help get you started dialing your HDTV as well. From beginner to expert, we have you covered with a handful of different approaches.
Advanced Calibration Techniques
For many HDTV owners, the Spears & Munsil disc or SpyderHD package will produce excellent results. Picture quality can be greatly improved with a few simple adjustments, and unless you want that final one percent of performance, it’s not necessary to spend thousands of dollars on software and gear.
If, however, you are after the last little bit of potential, we’d like to give you a brief look at some advanced calibration techniques. This will be more of an overview than a block of instruction. Employing these methods requires both instruments and experience. But if you want to take your HDTV calibration to the highest level, it’s a road you have to travel either with an investment of time and cash or the hiring of a professional calibrator.
Two- And Ten-Point Grayscale Adjustments & Gamma
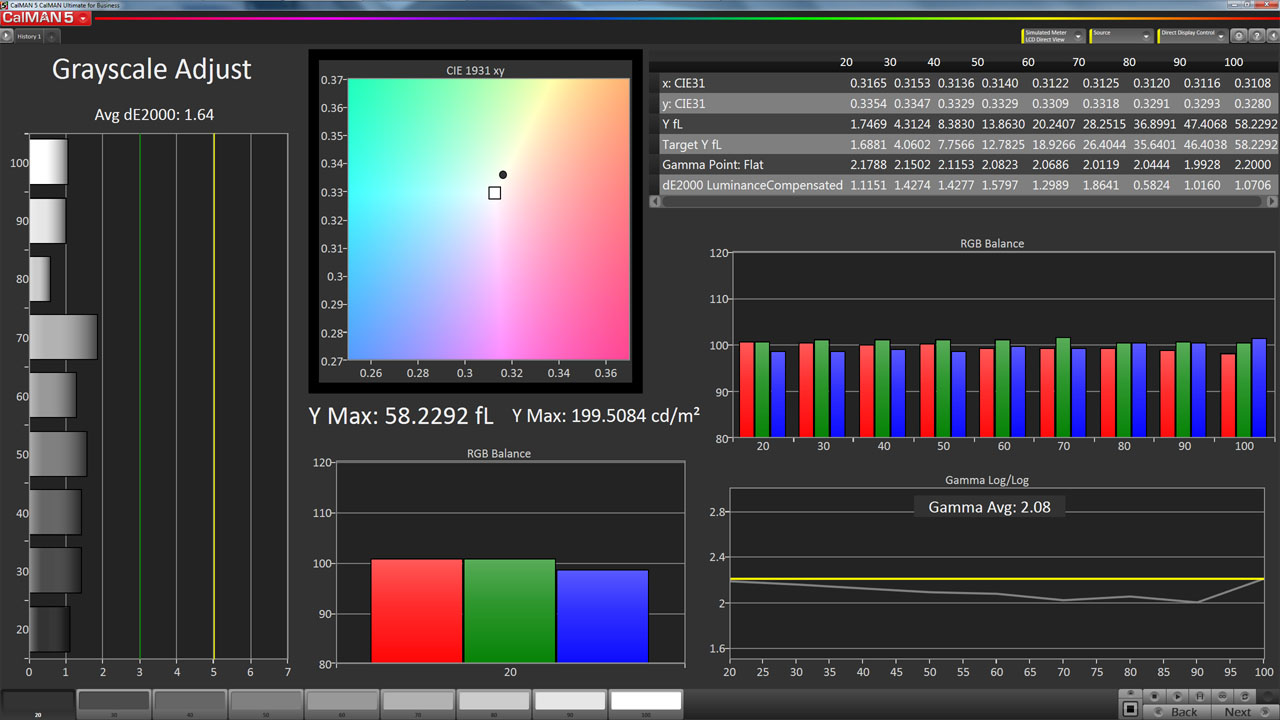
Most HDTVs have a two-point grayscale or white balance feature. That means you can change the RGB values’ high and low ranges separately. We use 30- and 80-percent brightness patterns to accomplish this. Here’s the custom CalMAN screen we like to use. To see all the detail, click on the photo to enlarge it.
On the left are the Delta E errors for brightness levels 20 to 100. The large square is a bulls-eye chart. All we have to do is tweak the RGB sliders until the dot falls within the center square. At the bottom-center is a large RGB Balance chart. It also helps dial in the correct levels when making changes. The upper-right shows the raw data: x & y coordinates plus gamma, brightness, and error values. Below that is another RGB level chart showing all the brightness steps. Finally, there's a gamma tracking chart at the bottom-right.
When we use a two-point white balance control, we adjust the high range (gain) using an 80-percent brightness pattern and the low range (bias or cut) with a 30-percent one. After a little back and forth, most HDTVs return an average error of less than one Delta E.
If some steps show a greater error, and there’s a 10-point white balance control available, we adjust each level starting from 100 percent and working our way downward.
During all of this, we closely monitor the gamma tracking. It’s usually pretty consistent once the right preset is chosen, but it can change on some displays. Once we’re satisfied with grayscale and gamma tracking, we move on the CMS.
Get Tom's Hardware's best news and in-depth reviews, straight to your inbox.
Color Management Systems
We’ve talked about these in a few display reviews and in our previous calibration feature articles. They’re not common on computer monitors but some HDTVs and many projectors include them. Our upfront advice is to leave them alone unless you know what you’re doing. You can easily destroy the color balance of a display by misusing it. And in many cases, the controls don’t work properly, leading to even more confusion.
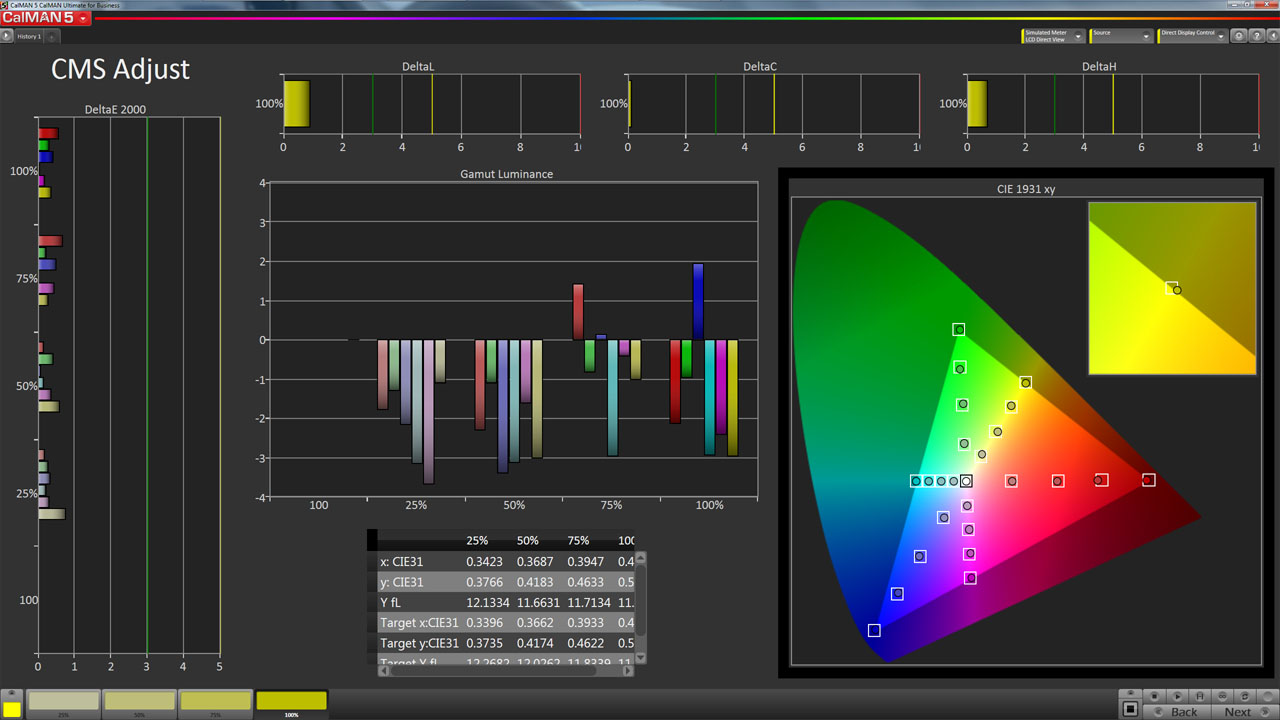
Here’s how we adjust a CMS. Click on the photo to enlarge it.
The first thing to note are the extra saturation levels shown in the CIE chart. We don’t just look at 100 percent (the triangle’s perimeter); we also measure 25-, 50-, and 75-percent saturations to be sure that any adjustments we make don’t negatively impact those color levels. We also watch the luminance chart carefully. It’s usually impossible to get all the luminance values correct, so we have to settle for the best balance as we make changes.
In our observation, luminance accuracy makes the greatest difference in picture quality. And even if a CMS’ saturation controls don’t work (often the case), the luminance sliders usually do. Adjusting them properly can improve your HDTV's picture even when saturation and hue are a little off.
Along the top of the screen are error levels for saturation (Delta C), hue (Delta H), and luminance (Delta L). We monitor them for each color we adjust and try to get all three errors as low as possible.
Current page: Advanced Calibration Techniques
Prev Page SpyderHD Walkthrough, Part 2 Next Page Now Go Forth And Calibrate!
Christian Eberle is a Contributing Editor for Tom's Hardware US. He's a veteran reviewer of A/V equipment, specializing in monitors. Christian began his obsession with tech when he built his first PC in 1991, a 286 running DOS 3.0 at a blazing 12MHz. In 2006, he undertook training from the Imaging Science Foundation in video calibration and testing and thus started a passion for precise imaging that persists to this day. He is also a professional musician with a degree from the New England Conservatory as a classical bassoonist which he used to good effect as a performer with the West Point Army Band from 1987 to 2013. He enjoys watching movies and listening to high-end audio in his custom-built home theater and can be seen riding trails near his home on a race-ready ICE VTX recumbent trike. Christian enjoys the endless summer in Florida where he lives with his wife and Chihuahua and plays with orchestras around the state.
-
vmem Thanks for the detailed and great write up. it is inspiriting as alwaysReply
Though honestly, for the "average" consumer, I find it hard to justify spending $350 to calibrate a $500 or so monitor set up and maybe a $800-1200 TV. I feel this is the type of thing you have to really get into (and end up doing it for free for your friends and family) -
rdc85 Well I'm using the pic for calibrating the monitor right now :D...Reply
looks like my brightness and contrast slights off -
crisan_tiberiu the question is: why arent the producers calibrate the TVs right out of the factory? why? is it so hard to make a preset for the TVs? 99% of the TVs that come out of a factory will have the same "crappy" default settings. And sorry, i wont spend 350$ to calibrate my TV ^^ no wayReply -
shahrooz well the first time I saw a calibrate your something's screen article was a year ago. Back then I found out "one does not simply calibrate the screen of something"Reply -
The_Icon This is something I have been wanting for a long time now. Is there any good free tool to calibrate both the HDTV and my monitor? The TV is connected to my PC as well.Reply -
vmem Reply14324342 said:the question is: why arent the producers calibrate the TVs right out of the factory? why? is it so hard to make a preset for the TVs? 99% of the TVs that come out of a factory will have the same "crappy" default settings. And sorry, i wont spend 350$ to calibrate my TV ^^ no way
They do calibrate the TVs (any manufacturer worth their salt anyway). the problem is two fold: first all TVs / monitors are relatively low margin because the market is highly competitive. unless you're paying a premium for "professional" monitors such as the Dell ultrasharp series, most panels will be calibrated the 'easy' way to some factory pre-set that is considered "good enough".
the second thing is that everyone's lighting conditions are different. maybe your room is brighter than mine and you like having the traditional type of bulbs that have a yellow / orange hue and I use white light bulbs. these things have a huge impact on how your TV looks, so at the end of the day the consumer will always need to do some calibration if you want perfect color reproduction.

