Homegrown Mod Manifesto: How To Build A UV PC
So Many Choices, So Much Fun: Selecting The Parts, Continued
We then looked at the case for possible location and placement of our lighting. We opted for a dual UV lighting approach. We selected a 4" UV light to be hidden in the channel between the power supply and the back of the CD-ROM drive, and a 12" UV light to be placed in the bottom of the case. We felt that this would provide more than enough light. Naturally, we had all of the cabling sleeved, as well, with green UV sleeves and black shrink tubing on the ends. Next, we chose a dual inverter with a single switch to be mounted in the front of one of the drive bezels on the front of the case, so that one switch would control both lights. Once we had selected this configuration, we discovered that we could have used a lighted switch to indicate whether the switch was in "off" or "on" mode. Not to worry; that might be a nice addition the next time.

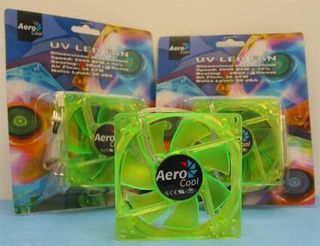
Of course, we wanted to replace all of the fans with ones that were both UV-reactive and lighted. This was difficult because not very many companies offer both types. Our friends at Aerocool, however, offer the green frame/green blade lighted UV reactive fans with LEDs inside. These fans fit the bill.
One of the most attractive features of the Kingwin KT-424-WM-BK case is that we could place two lighted fans in the front of the case just behind the front bezel grill. The only problem was that it was difficult to find fans that were both UV reactive and lighted. We wanted to stick with our green UV theme so we wanted fans that were green UV reactive, as well. We found just what we were looking for from the team at Aerocool (www.aerocool.us ). Aerocool offers the AeroFan UV in a green blade/green frame configuration. Best of all, in addition to being UV reactive, they have the LEDs inside them to make them light up. We opted for three of these, two in the front and one in the back. We opted to sleeve the connecting wires for the fan that was going to be in the rear of the case with green UV reactive sleeves and some black shrink tubing to match the other sleeving that was already covering the other parts in the case.
Now that we have selected all of the parts to build our UV PC, let's start to put our system together to see how it looks. Was all of our pre-planning worth it, did we make the right parts selection? The only way they we will know it is to build it.
Stay On the Cutting Edge: Get the Tom's Hardware Newsletter
Join the experts who read Tom's Hardware for the inside track on enthusiast PC tech news — and have for over 25 years. We'll send breaking news and in-depth reviews of CPUs, GPUs, AI, maker hardware and more straight to your inbox.
Current page: So Many Choices, So Much Fun: Selecting The Parts, Continued
Prev Page So Many Choices, So Much Fun: Selecting The Parts, Continued Next Page Planning & Preparation Make The Job Go FasterMost Popular


