How to Access Linux Ext4 partitions in Windows using WSL (great for reading Raspberry Pi microSD cards)
Use this method to read Raspberry Pi microSD cards in Windows.

If you use Linux and Windows in your life, you'll notice one huge point of frustration: Windows can't read Linux partitions, which are typically in ext4 or ext3 file format. If you connect an external drive or microSD card that has a partition which is formatted in ext4 to your Windows PC, the OS won't assign a drive letter to that partition or show you the files and folders.
The lack of ext4 / ext3 support is a particularly big problem for Raspberry Pi fans. When you install Raspberry Pi OS on a microSD card or external SSD to use as your boot disk, the drive has two partitions: a small boot partition that's FAT32 and therefore visible in windows and a larger partition that's ext4 and contains all the data and apps.
So let's say were setting up a retro gaming console on your Pi and wanted to copy a whole bunch of ROMS onto the ext4 partition. Or perhaps you are using a Raspberry Pi to power a web server or a media server and you want to copy all your files to the card from your Windows PC. You need a way to access Linux ext4 partitions from within Windows.
Unfortunately, neither Windows 11 nor 10 comes with a built-in way to access Linux partitions. There are some pricey or outdated third-party utilities for accessing ext4, but the best way is to use WSL (Windows Subsystem for Linux) , Microsoft's free Linux virtual machine. Once you have a WSL VM set up for this task, you can use it to mount USB devices such as microSD card readers, SSD enclosures and Flash Drives and those drives then appear in WIndows Explorer so you can treat them like any other drive.
Surprisingly, the process of setting up ext4 drive mounting for the first time is pretty intense. By default, WSL does not support mounting drives with Linux partitions so you need to go through a process of installing a free utility that runs in PowerShell, grabbing a bunch of packages in your Linux VM (usually Ubuntu) and compiling a custom version of the WSL Linux kernel that has USB Mass Storage drivers enabled. I learned all of the steps in this process by following along with this great tutorial video from AgileDevArt (huge h/t to him).
Below, I'll show you how to set up WSL so you can mount external drives and access Linux partitions from within Windows 11 or 10. It's not difficult, but it does take a few steps.
What You Need: Accessing Linux Partitions in Windows
- WSL2 (Windows Subsystem for Linux) Installed (how to install WSL2)
- Ubuntu or some other Linux flavor installed under WSL2, available here.
- PowerShell 7 or higher. You can get it here.
- microSD card with USB card reader or USB Flash drive with ext4 partition
How to Read / Write Linux Ext4 Partitions in Windows
1. Download and install usbipd. You can get the latest release on Github or type "winget install usbipd" from within PowerShell.
Get Tom's Hardware's best news and in-depth reviews, straight to your inbox.
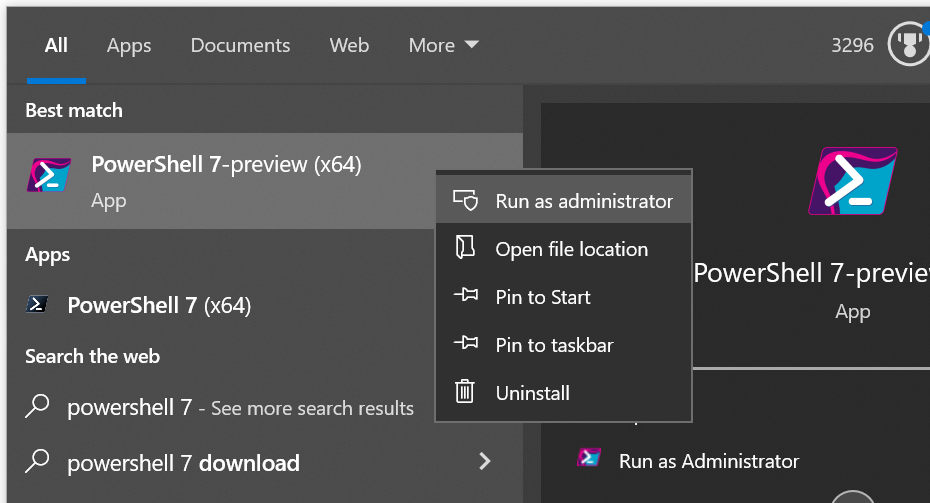
2. Launch Powershell 7 as Administrator.
3. Update WSL to the latest Linux kernel by typing wsl --update in PowerShell. If you already have the latest version, it will say so.
4. Launch Ubuntu in Windows.
5. Update and Upgrade your packages with these commands. The -y switch will auto-accept the installation of any new packages.
sudo apt-get update
sudo apt-get upgrade -y
6. Enter uname -a to determine what version of the Linux kernel you have. Take note of the exact version number. In our case, that was 5.15.153.1.
7. Assign the version number to an environment variable called VER.
VER=5.15.153.18. Install some required packages with this command. The -y switch will auto-accept the installation of the required packages.
sudo apt install -y build-essential flex bison libgtk2.0-dev libelf-dev libncurses-dev autoconf libudev-dev libtool zip unzip v4l-utils libssl-dev python3-pip cmake git iputils-ping net-tools dwarves usbutils9. Clone the kernel source from Github and change into its directory with the following command.
sudo git clone -b linux-msft-wsl-${VER} https://github.com/microsoft/WSL2-Linux-Kernel.git ${VER}-microsoft-standard && cd ${VER}-microsoft-standardNote that the kernel source will take several minutes to download. When it is done, you will be in the new directory it created (ex: 5.15.153.1-microsoft-standard).
10. Copy the config.gz file to the current directory and unzip it to filename .config.
sudo cp /proc/config.gz config.gz && sudo gunzip config.gz && sudo mv config .config11. Enter sudo make menuconfig to open the modules menu.
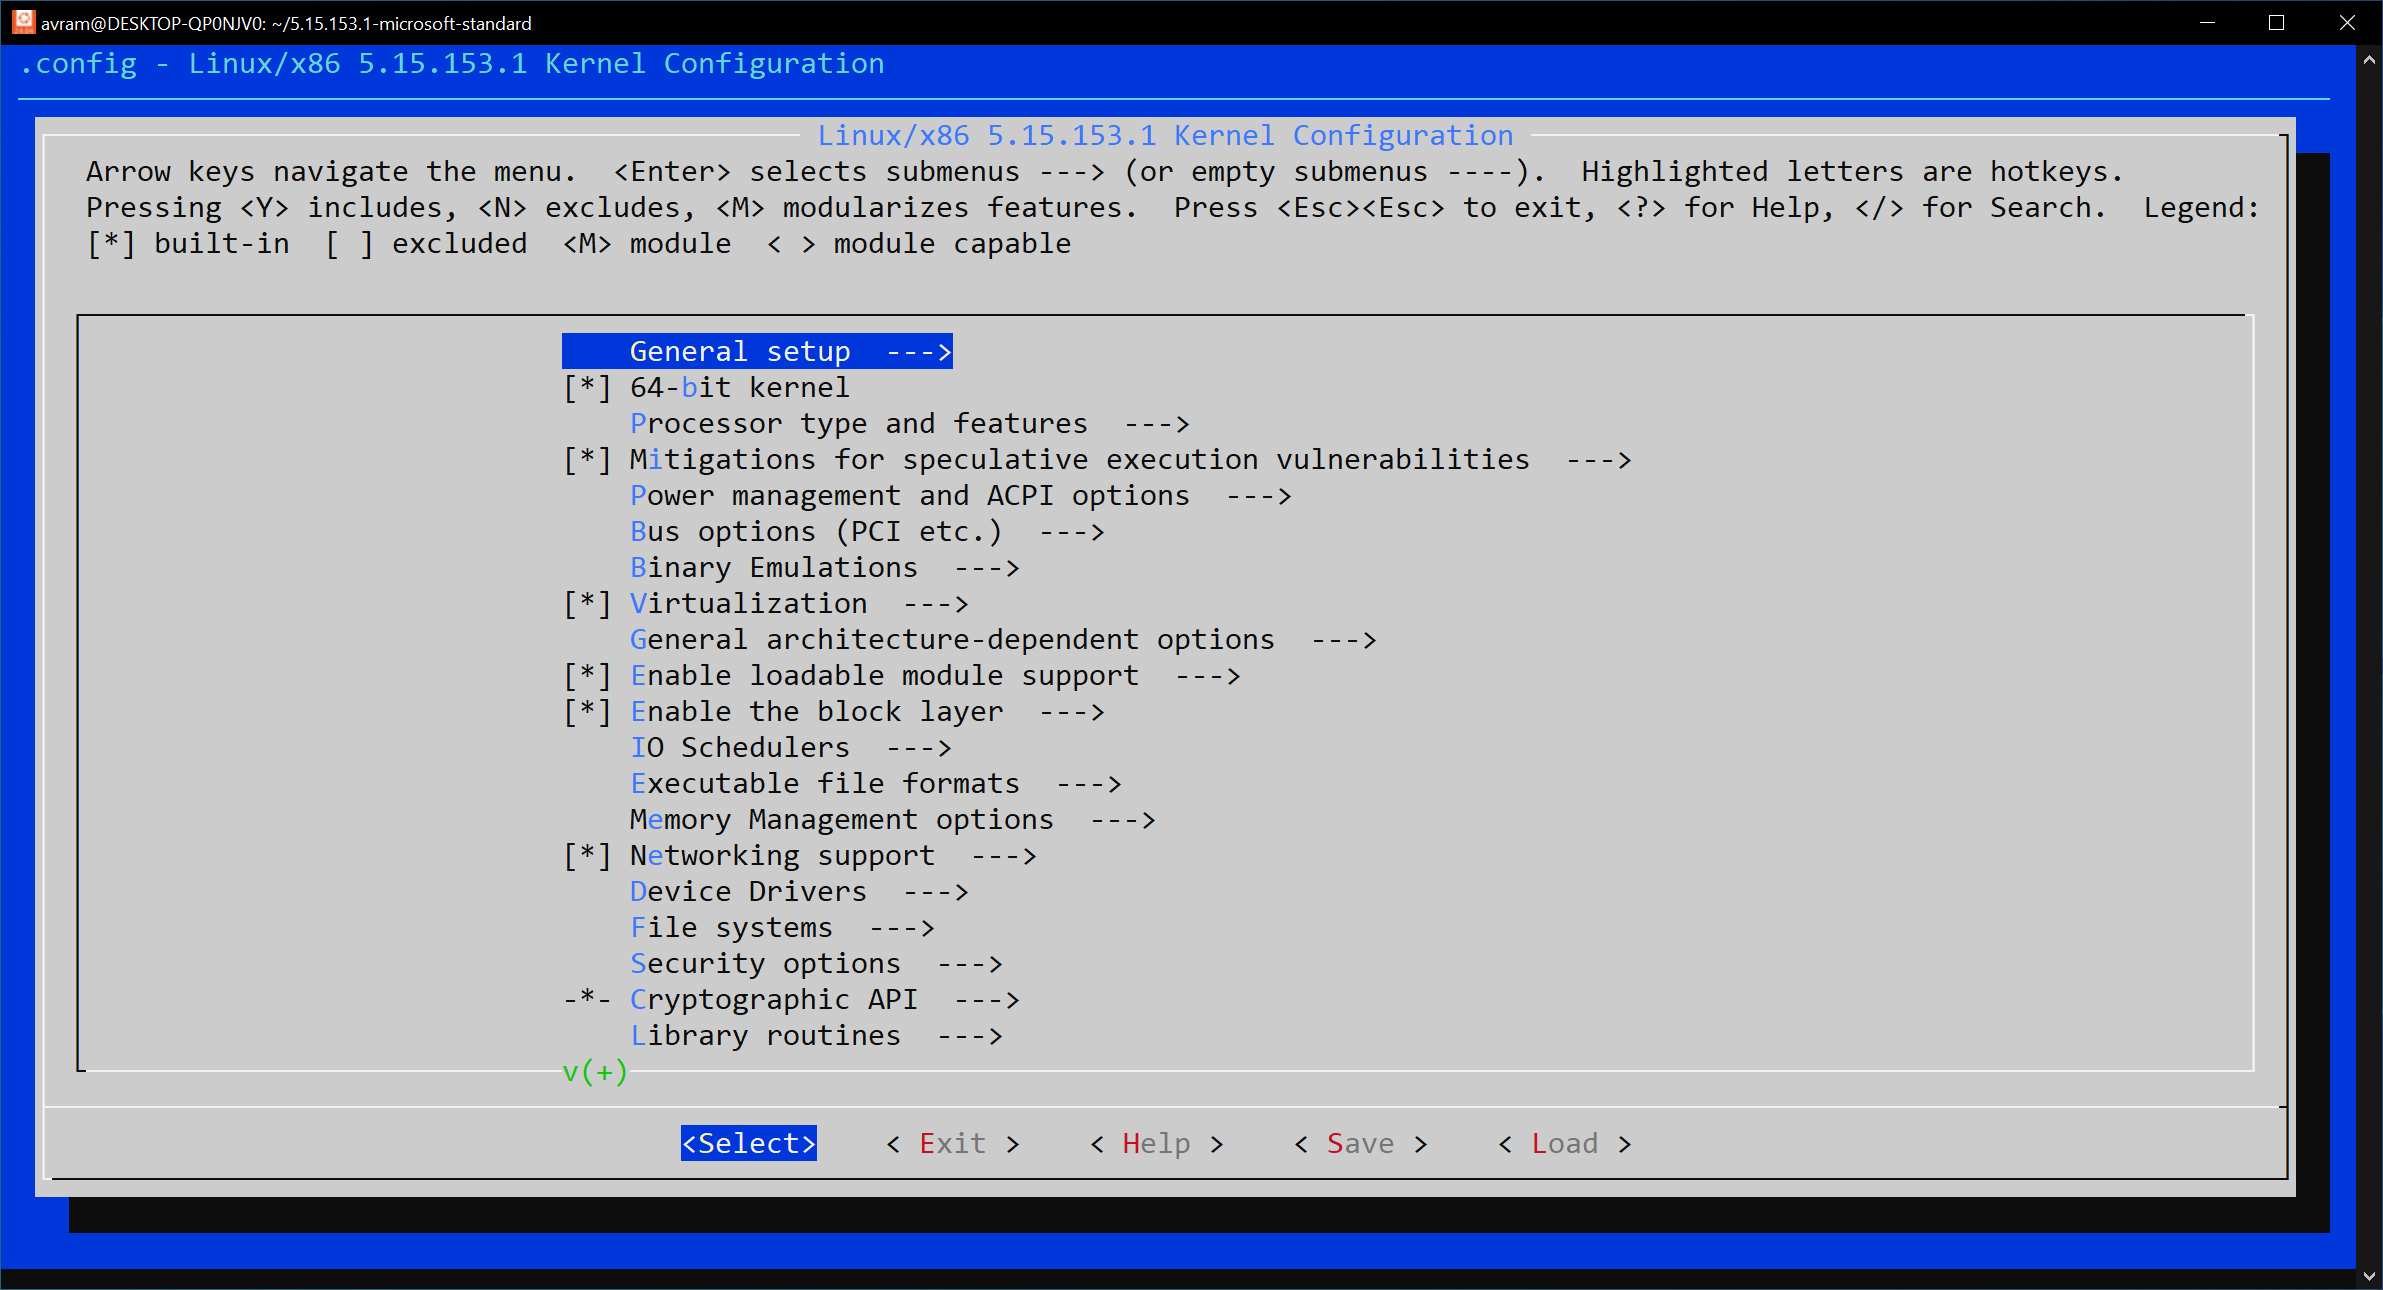
sudo make menuconfigYou will now see a GUI menu. We recommend stretching your Ubuntu window out so you can see more of it.
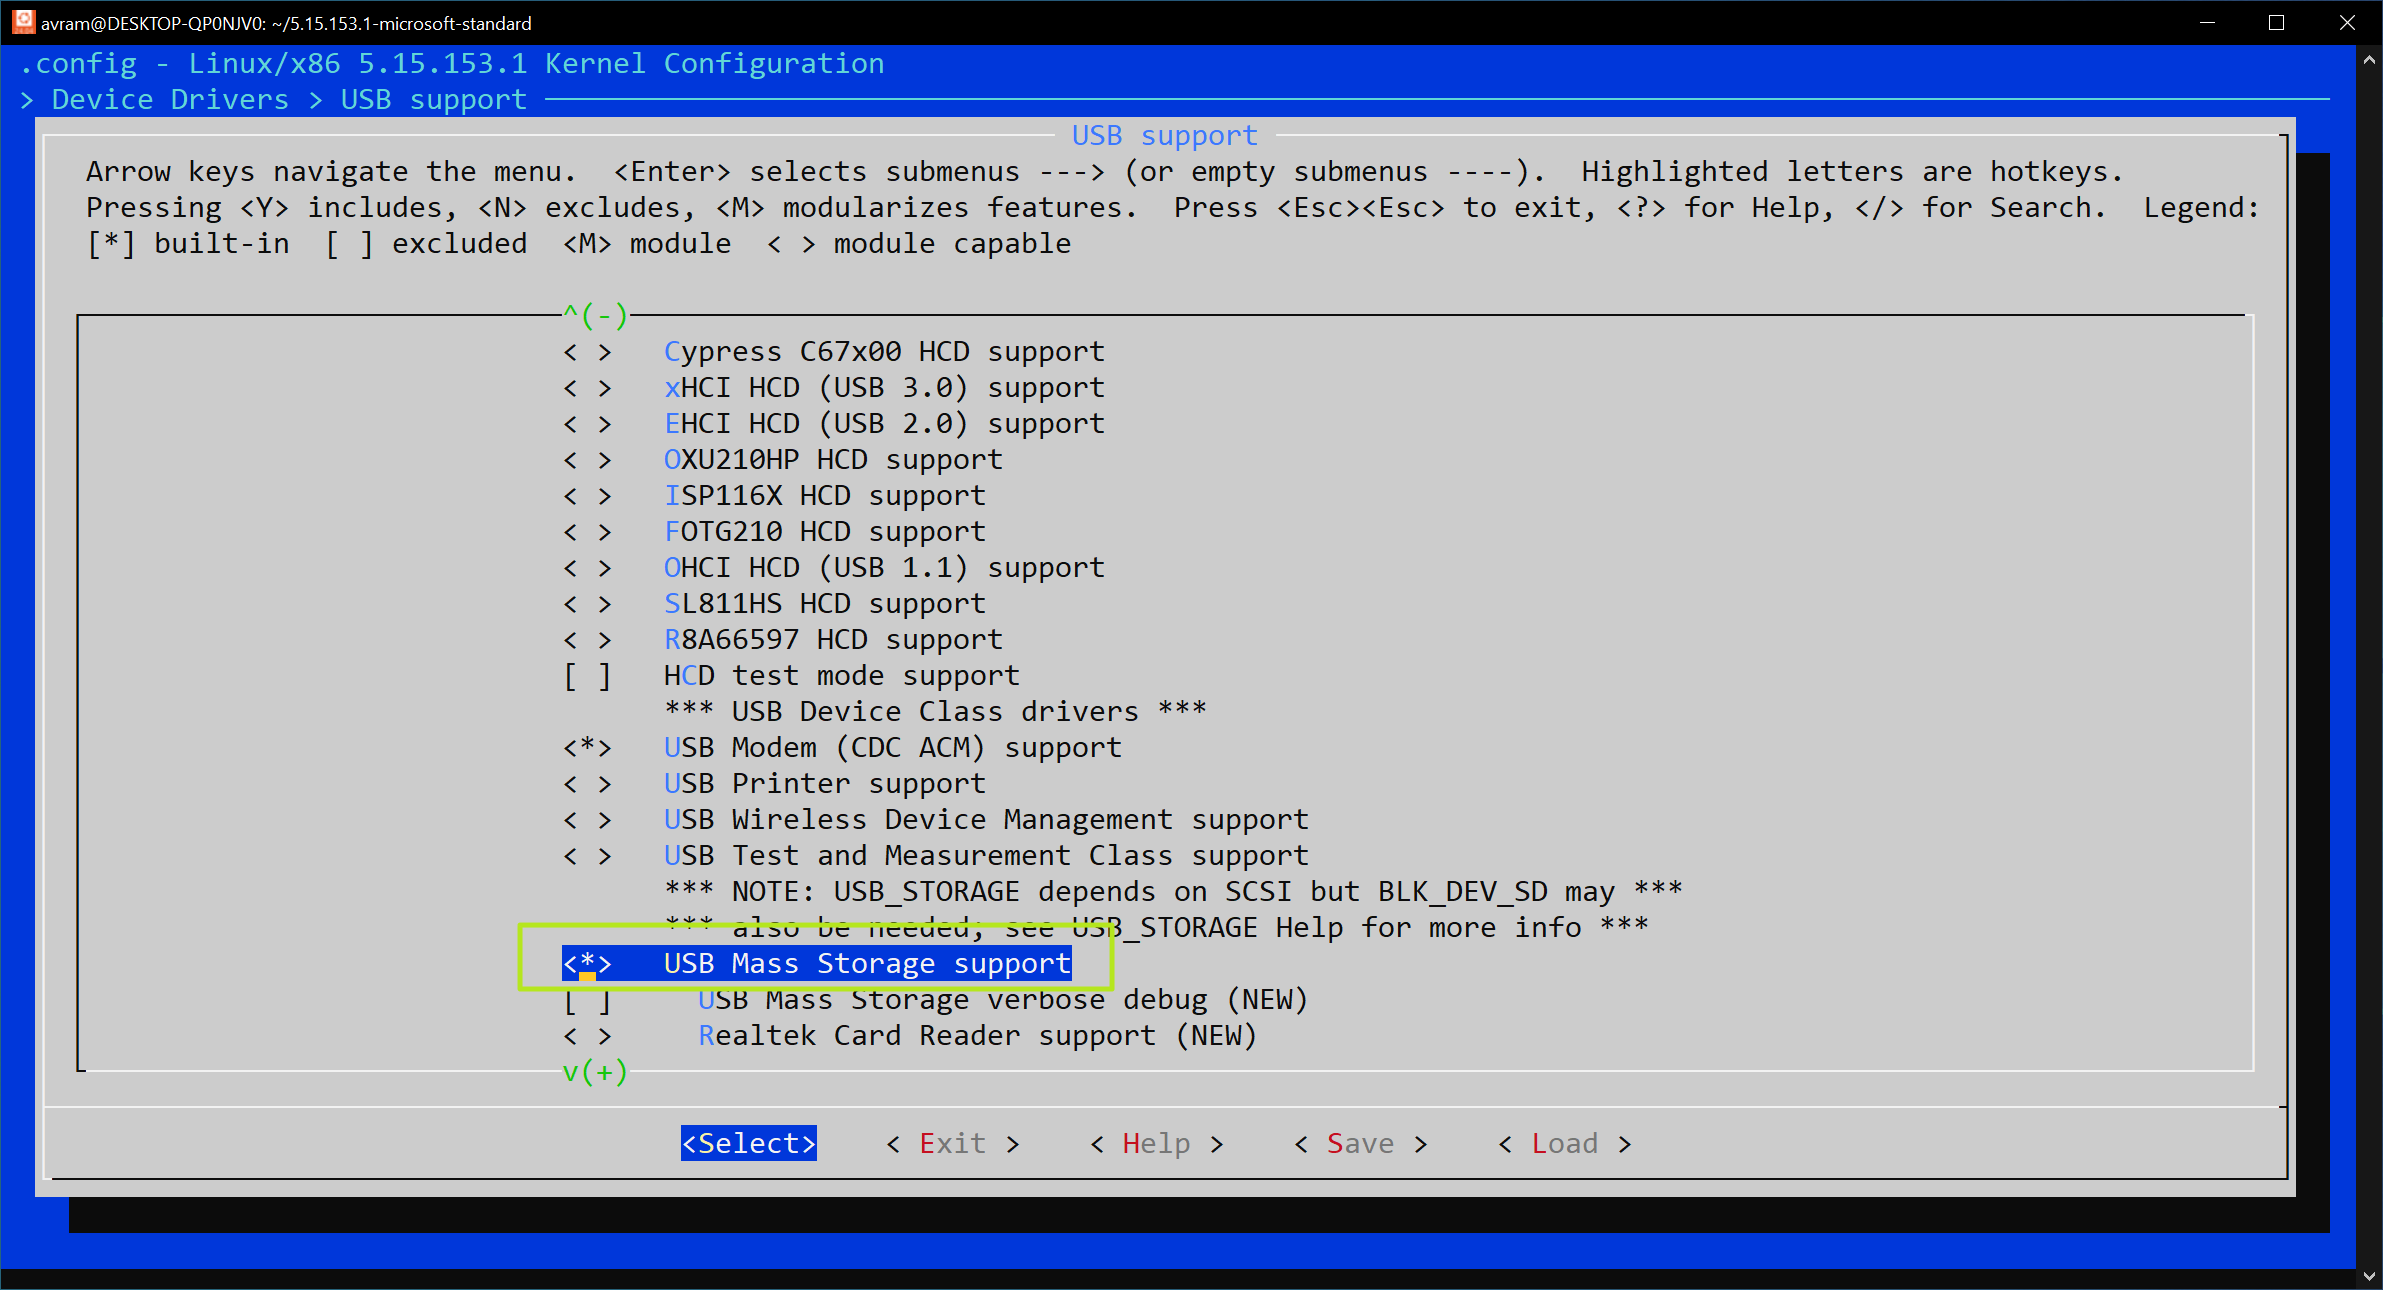
12. Navigate to Device Drivers -> USB support
13. Select USB Mass Storage Support and hit Y to put an * next to it.
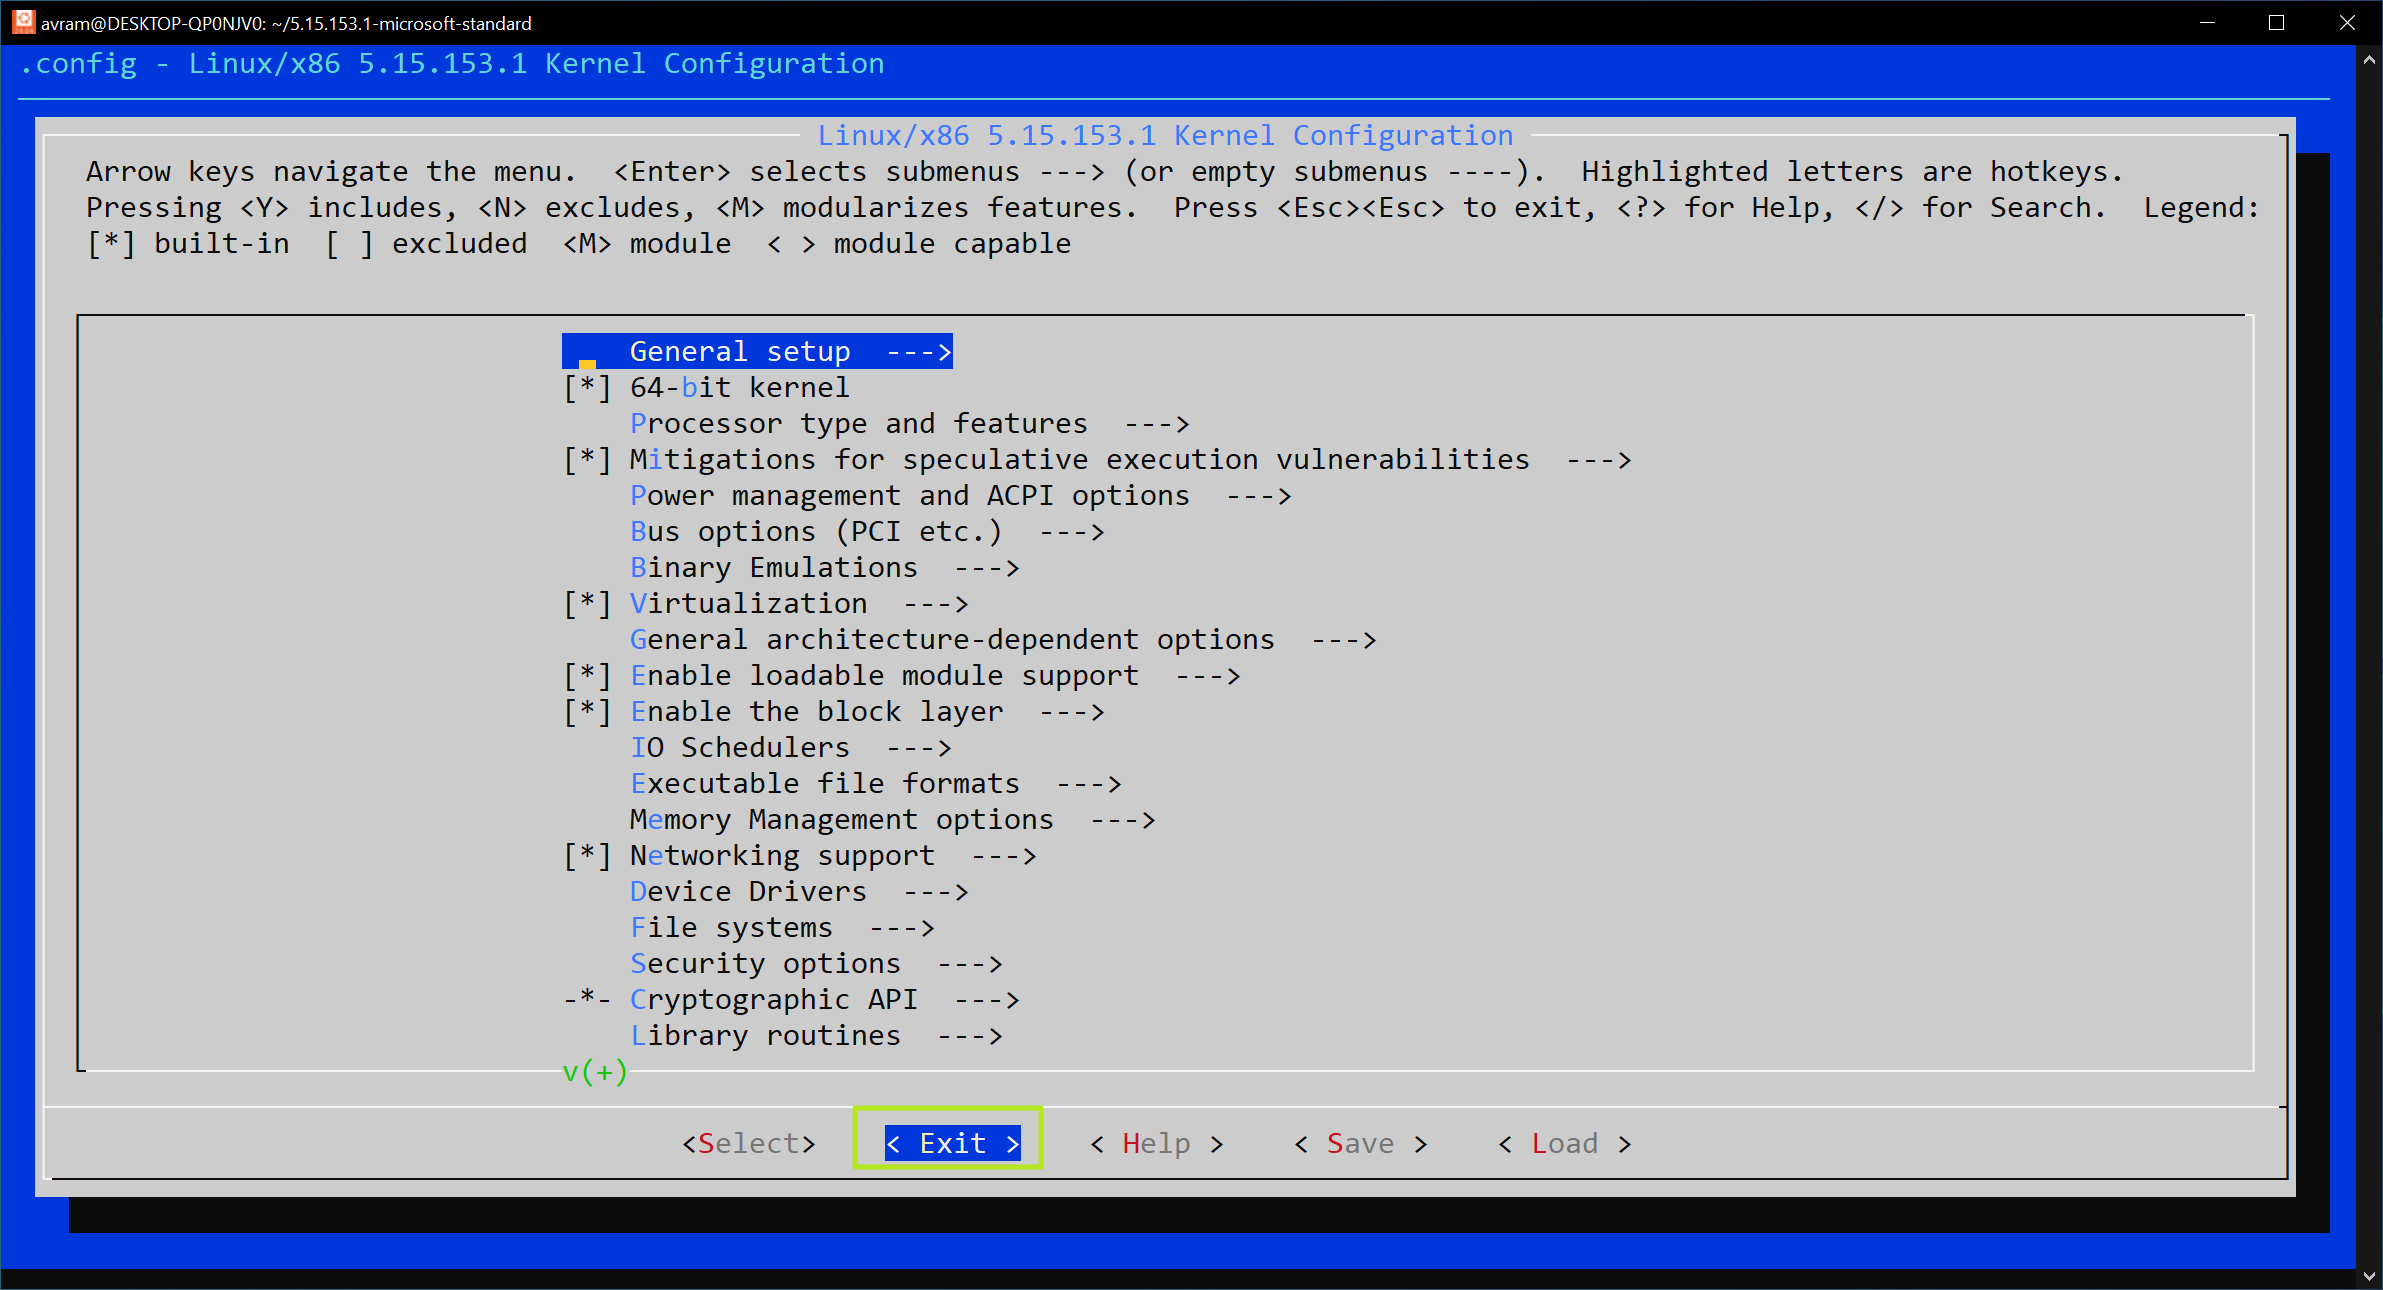
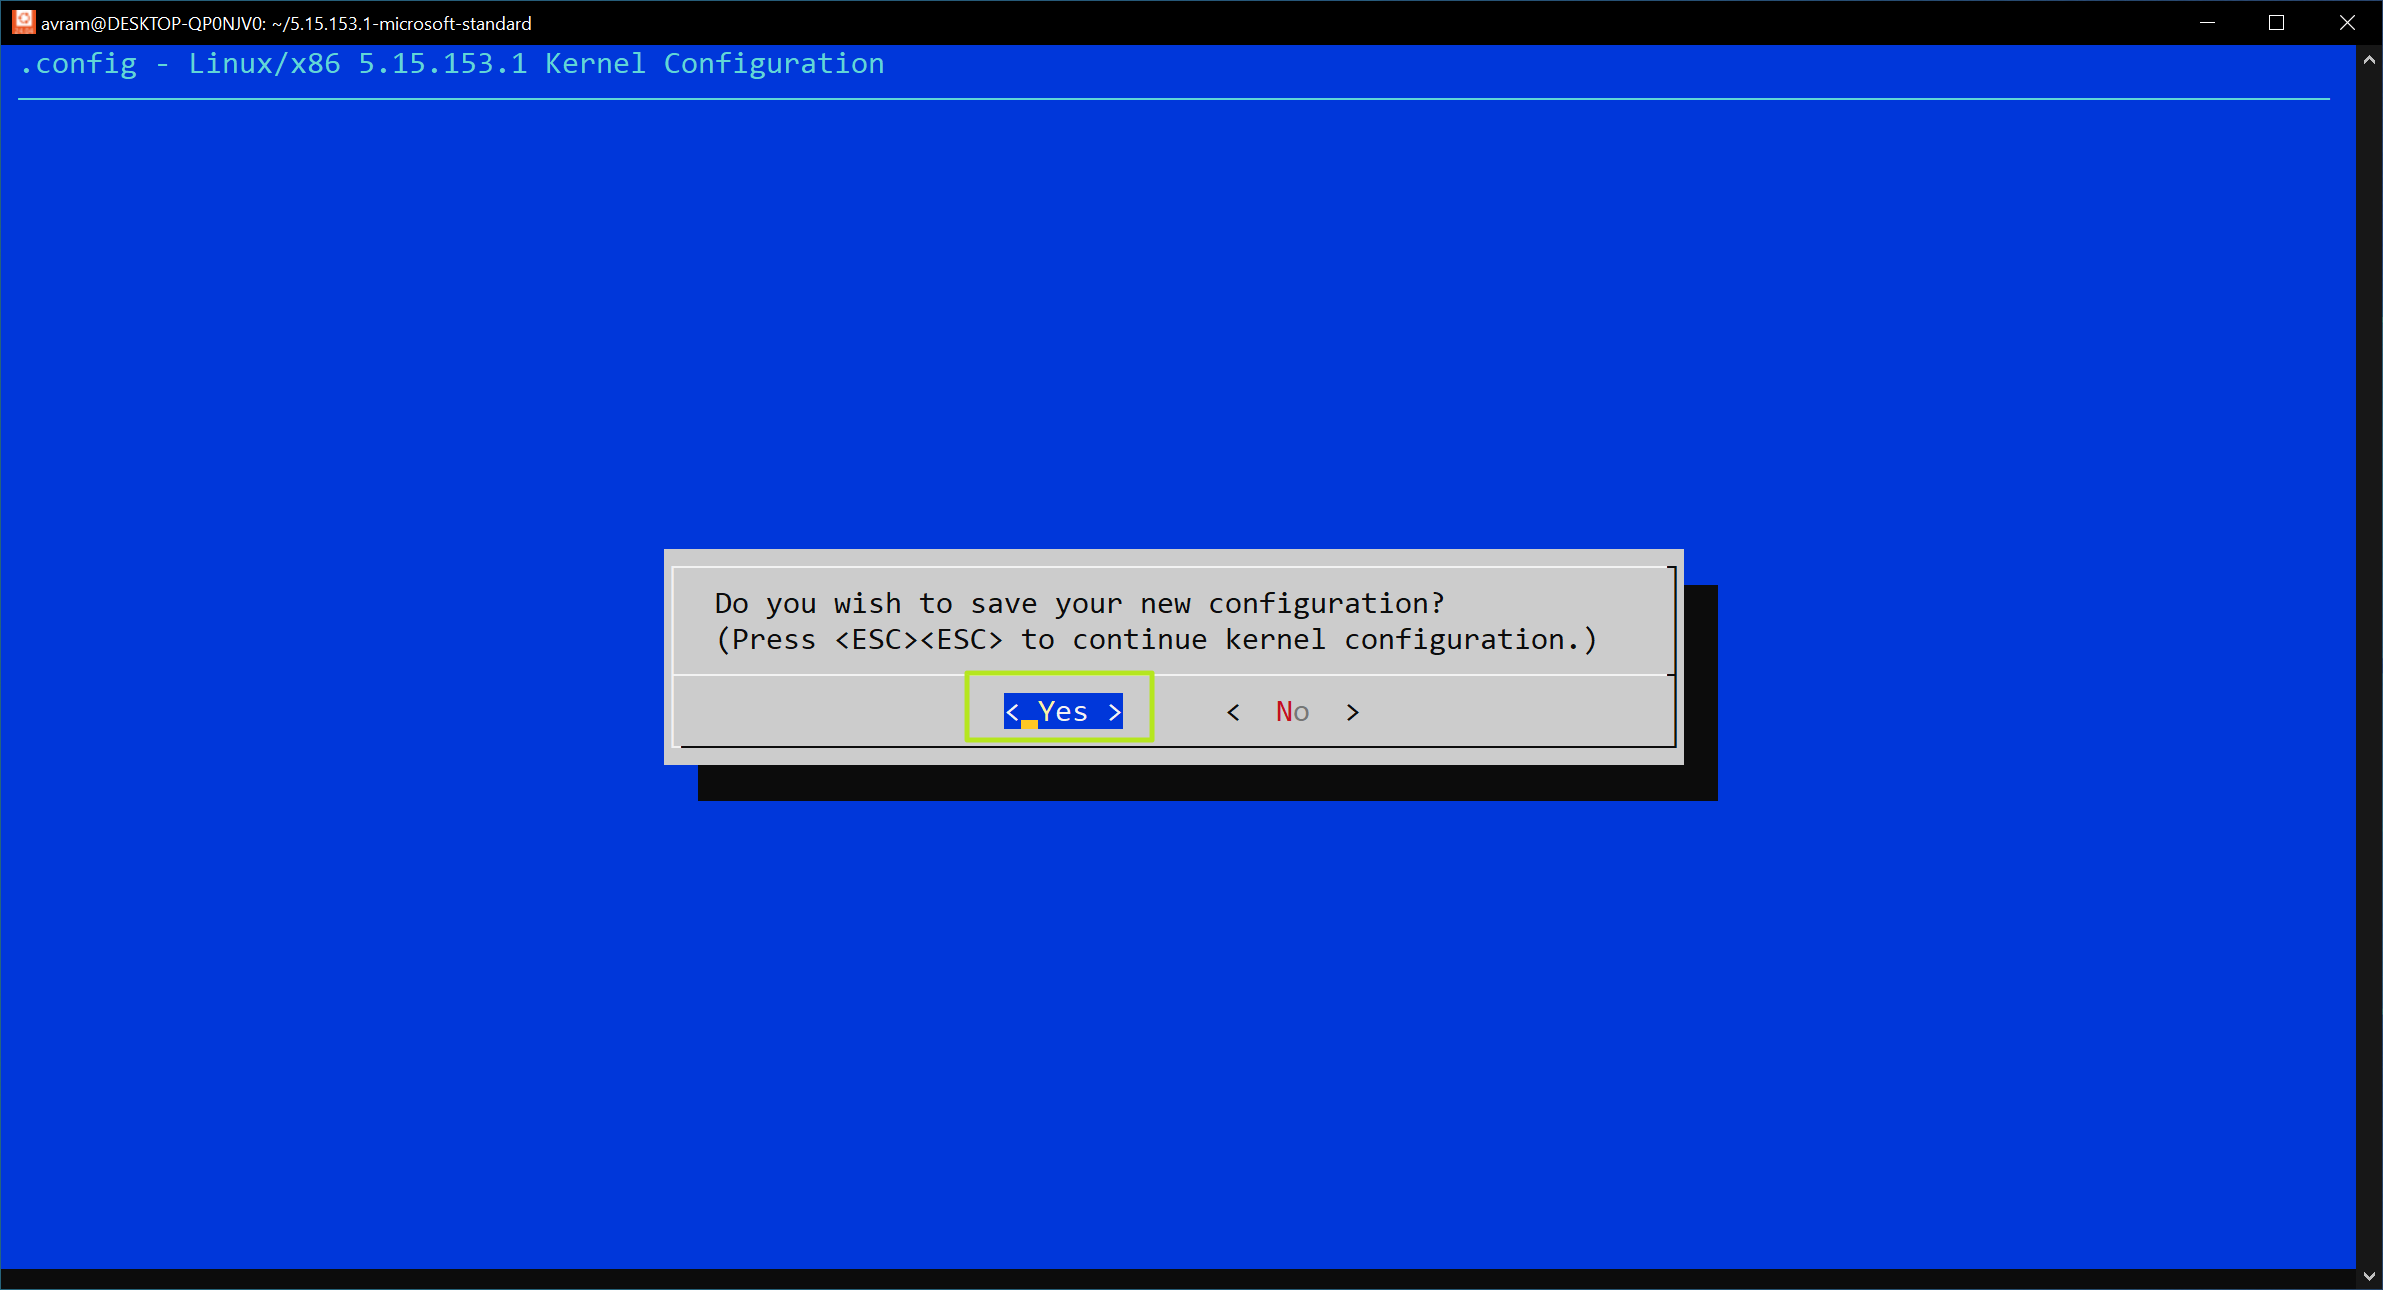
14. Select Exit on the bottom of the screen (using the Tab key) multiple times until you get asked to save.
15. Select Yes when asked to save.
16. Enter the following make commands, one after the other. This process will take a few minutes.
sudo make -j$(nproc)
sudo make modules_install -j$(nproc)
sudo make install -j$(nproc)
17. Copy the vmlinux file to your user folder in windows. Replace [USERNAME] in the example below with your Windows user folder. For example my account is "avram" or /mnt/c/users/avram.
sudo cp -rf vmlinux /mnt/c/users/[USERNAME]18. Change directory to your Windows user directory.
cd /mnt/c/users/[USERNAME]19. Open / create a text file in that directory called .wslconfig. Use nano to edit the file from within Ubuntu.
sudo nano .wslconfig20. Enter the following text in the .wslconfig file and save it. Replace [USERNAME] with the correct folder name that matches your username. In my case, it was C:\\users\\avram\\vmlinux.
[wsl2]
kernel=C:\\users\\[USERNAME]\\vmlinux
21. Close Ubuntu.
22. Shut down wsl by typing wsl --shutdown in PowerShell.

23. Open Ubuntu.
24. In Powershell (opened as admin), list all available drives by typing usbipd list.
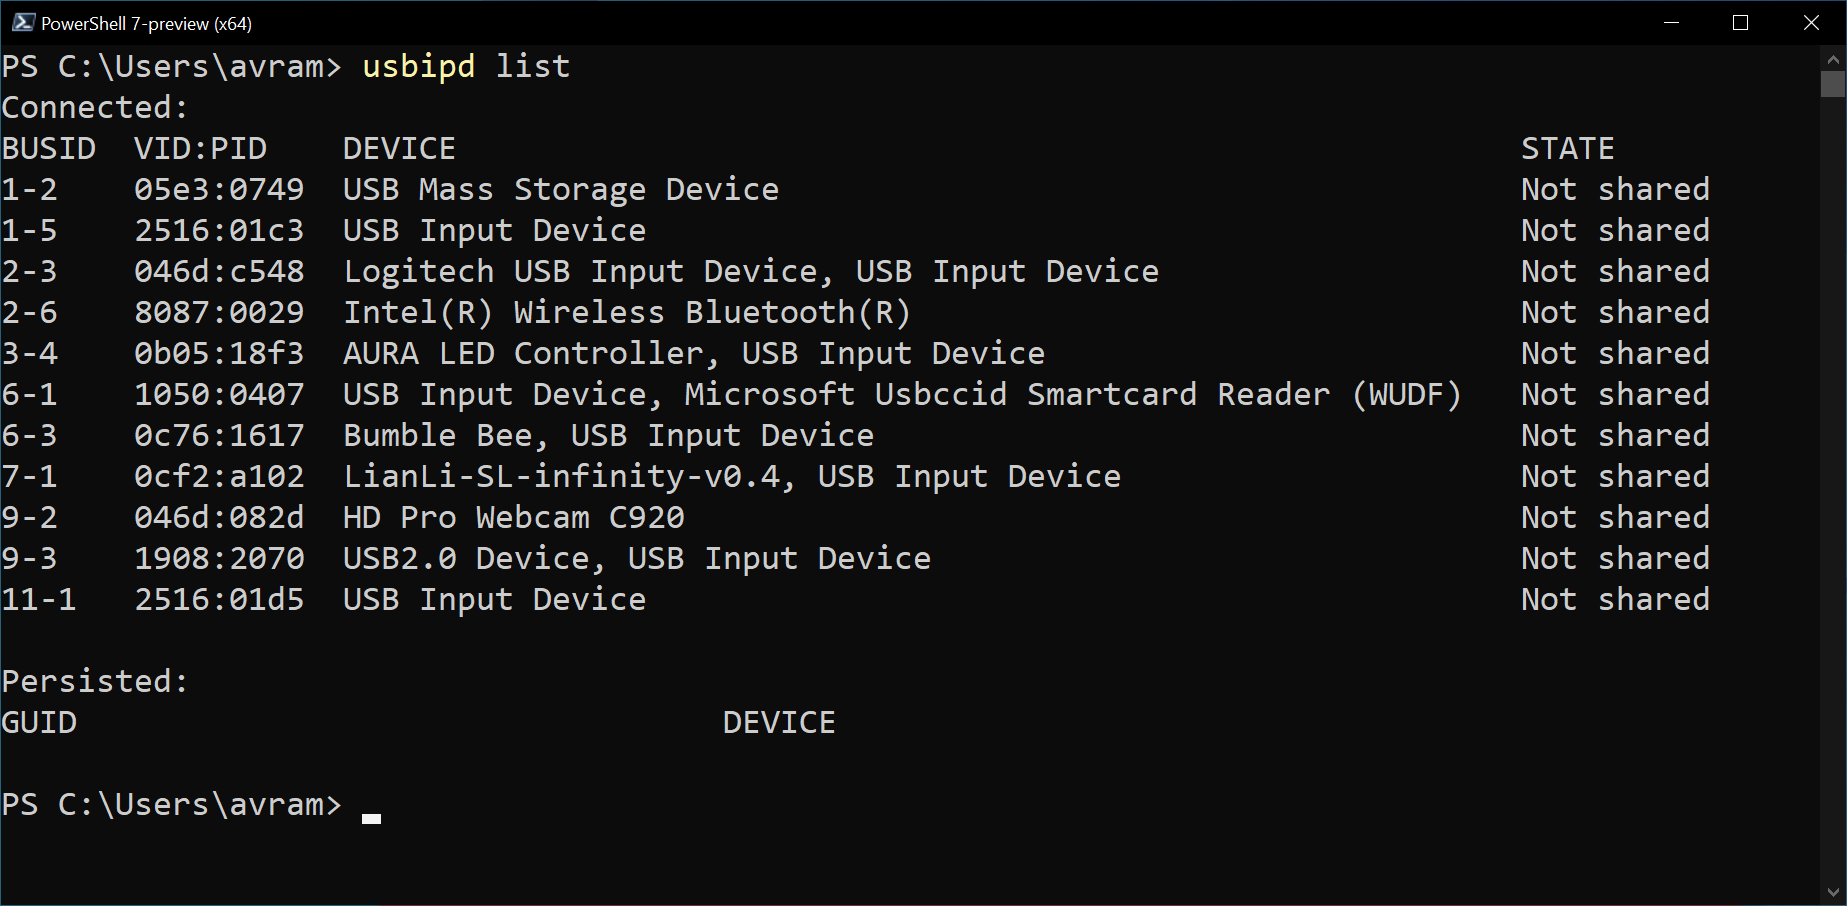
Take note of the BUSID number of the USB Mass Storage Device, which is likely the USB disk you want to mount. In our case, the ID was 1-2.
25. Bind the drive by entering usbipd bind --busid=[BUSID], replacing [BUSID] with the actual ID on the list. In our case, it was usbipd bind --busid=1-2.
26. Attach the drive to wsl by entering usbipd attach --wsl --busid=[BUSID]

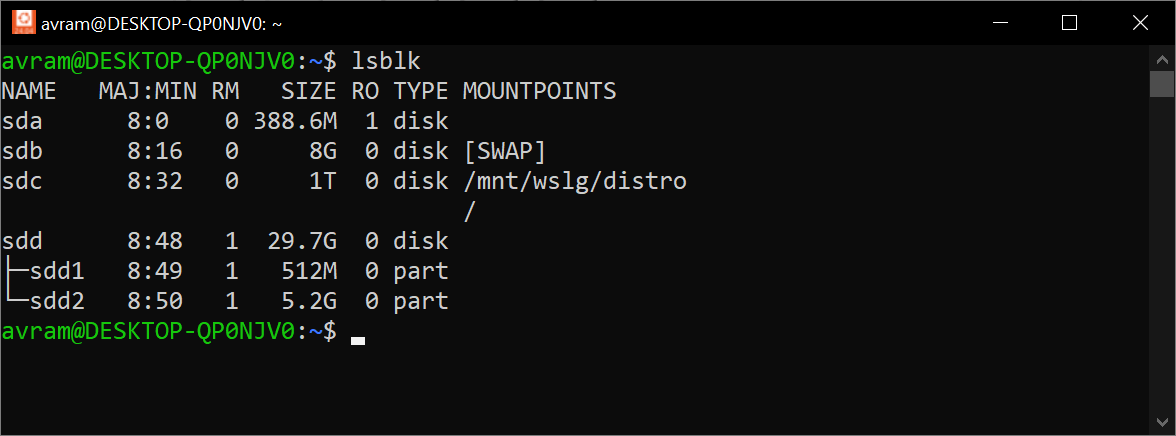
27. In Ubuntu, enter lsblk to see a list of drives. If everything worked, you'll see your Flash drive / microSD card on the list. In the case of a Raspberry Pi microSD card, there will be two partitions listed. The first one is the /boot partition which is FAT and readable by Windows natively, but the second one is ext4.
On our system, the partitions on the microSD card were assigned as sdd1 and sdd2.
28. Make folders in Ubuntu for mounting your partition(s) using mkdir and placing them under the /mnt directory. For example, we made /mnt/raspi but you could call your folder anything as long as it's under /mnt.
sudo mkdir /mnt/raspi29. Use the mount command to mount your partition to the folder you created. Replace [PARTITION] with the actual partition name (ex: sdd2) and [FOLDER] with the one you created. In our case, this was sudo mount /dev/sdd2 /mnt/raspi.
sudo mount /dev/[PARTITION] /mnt/[FOLDER]30. Make the partition writable by using chmod 777. In our case, it was sudo chmod 777 /mnt/raspi. The chmod 777 command will make the partition readable and writable by any user. Typically this is a bad security practice, but in this case it is viable given that we're not working in a secure environment.
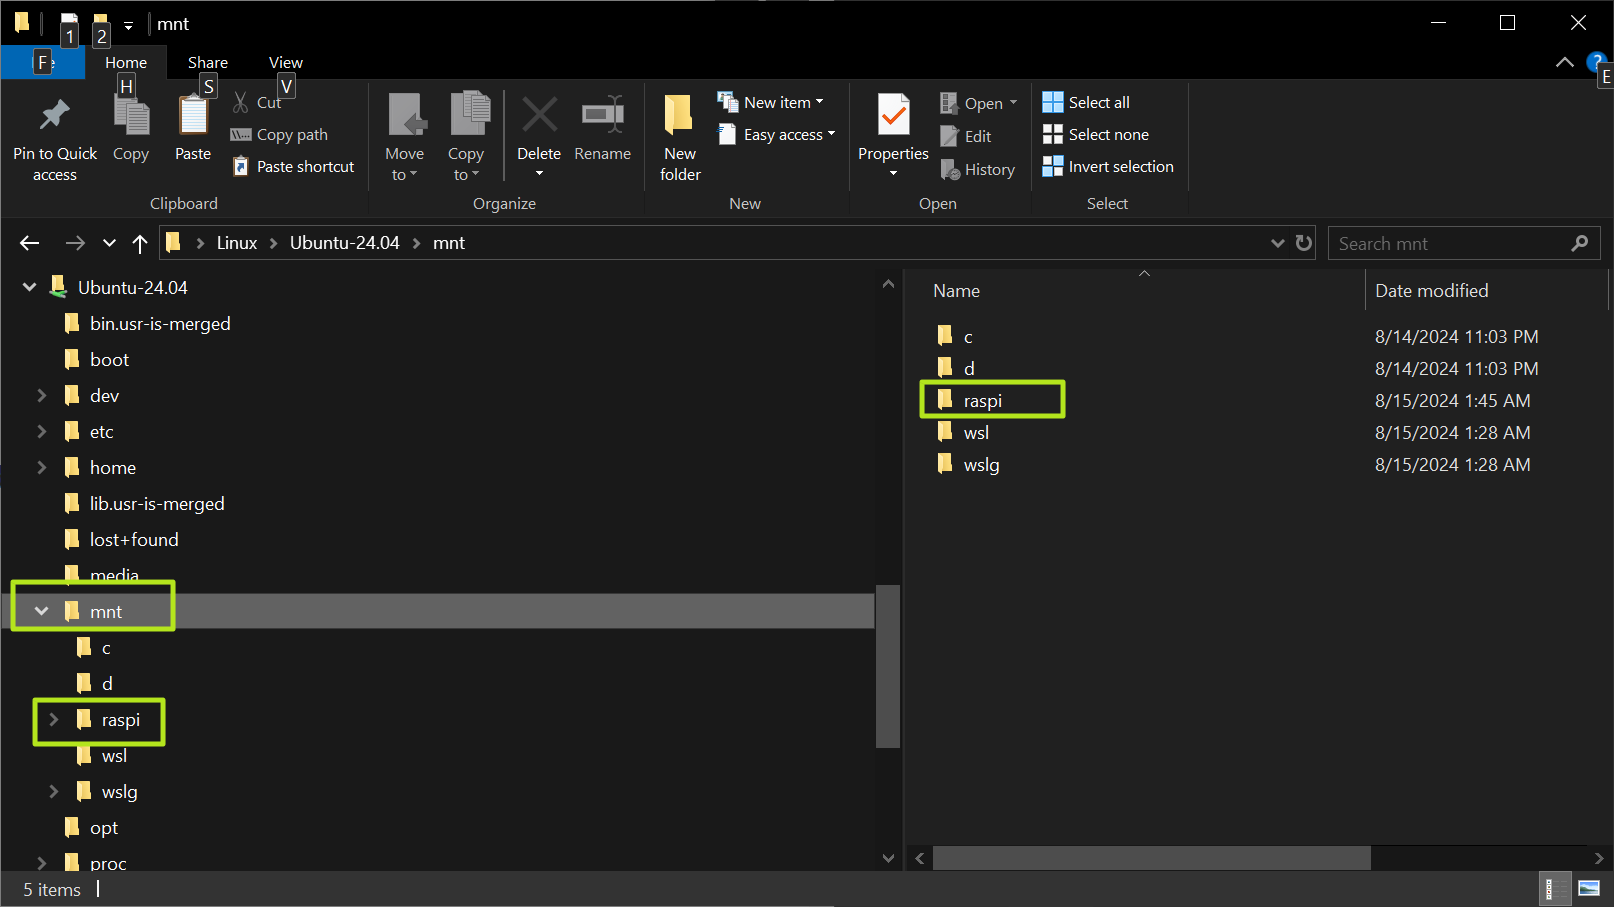
sudo chmod 777 /mnt/[FOLDER]31. Locate the folder in Windows Explorer. It should be under Linux->Ubuntu->mnt. If you have a specific version of Ubuntu installed (in our case 24.04 LTS), it will be under that name instead of just Ubuntu. If you have a different version of Linux installed in WSL2, it will be under that.
You can now read from and write to that partition from Windows Explorer. You can close the Ubuntu window if you want or you can use the Ubuntu command line to copy files instead of using Windows Explorer.
The next time you want to mount a drive with ext4 on it, you simply need to use PowerShell and follow steps 23 to 31 to get it to show up in Windows Explorer. If you have an existing USB drive you have already mounted once and you unplug it and then plug it back in, it should continue to be available, at least if you haven't shut down wsl and PowerShell.
Avram Piltch is Managing Editor: Special Projects. When he's not playing with the latest gadgets at work or putting on VR helmets at trade shows, you'll find him rooting his phone, taking apart his PC, or coding plugins. With his technical knowledge and passion for testing, Avram developed many real-world benchmarks, including our laptop battery test.
-
Rabohinf Paragon Software Group published Linux File Systems for Windows and ExtFS for Windows decades ago.Reply -
JohnBussoletti I have a dual boot system with both Windows 11 and Ubuntu 24.04 installed, WSL2 also with Ubuntu 24.04 and a Virtual Box installation of Ubuntu 24.04 installed on the Windows system. It would be convenient to mount/access the two NVMe drives on the Linux OS side within Windows. Is there a similar kernel build process that would expose the Linux NVMe drives to Windows or do I need something like the Paragon Software Group product?Reply -
apiltch Reply
This tutorial should work with accessing Linux partitions on internal drives, but you won't need to use the usbipd steps.JohnBussoletti said:I have a dual boot system with both Windows 11 and Ubuntu 24.04 installed, WSL2 also with Ubuntu 24.04 and a Virtual Box installation of Ubuntu 24.04 installed on the Windows system. It would be convenient to mount/access the two NVMe drives on the Linux OS side within Windows. Is there a similar kernel build process that would expose the Linux NVMe drives to Windows or do I need something like the Paragon Software Group product? -
JohnBussoletti Yes, well, there is no visibility for the ext4 formatted nvme drives evident under either Windows or WSL2.Reply -
raymondclark Ran into a problem, not sure how to proceedReply
sudo make modules_install -j$(nproc)
arch/x86/Makefile:142: CONFIG_X86_X32 enabled but no binutils support
sed: can't read modules.order: No such file or directory
make: *** Error 2
modules.order is an empty file
More info
sudo make -j$(nproc)
arch/x86/kernel/smp.o: warning: objtool: sysvec_reboot()+0x4d: unreachable instruction
net/ipv4/netfilter/ipt_ECN.c:26:46: warning: ‘struct ipt_ECN_info’ declared inside parameter list will not be visible outside of this definition or declaration
26 | set_ect_ip(struct sk_buff *skb, const struct ipt_ECN_info *einfo)
| ^~~~~~~~~~~~
net/ipv4/netfilter/ipt_ECN.c: In function ‘set_ect_ip’:
net/ipv4/netfilter/ipt_ECN.c:30:51: error: invalid use of undefined type ‘const struct ipt_ECN_info’
30 | if ((iph->tos & IPT_ECN_IP_MASK) != (einfo->ip_ect & IPT_ECN_IP_MASK)) {
| ^~
net/ipv4/netfilter/ipt_ECN.c:37:35: error: invalid use of undefined type ‘const struct ipt_ECN_info’
37 | iph->tos |= (einfo->ip_ect & IPT_ECN_IP_MASK);
| ^~
net/ipv4/netfilter/ipt_ECN.c: At top level:
net/ipv4/netfilter/ipt_ECN.c:45:47: warning: ‘struct ipt_ECN_info’ declared inside parameter list will not be visible outside of this definition or declaration
45 | set_ect_tcp(struct sk_buff *skb, const struct ipt_ECN_info *einfo)
| ^~~~~~~~~~~~
net/ipv4/netfilter/ipt_ECN.c: In function ‘set_ect_tcp’:
net/ipv4/netfilter/ipt_ECN.c:55:21: error: invalid use of undefined type ‘const struct ipt_ECN_info’
55 | if ((!(einfo->operation & IPT_ECN_OP_SET_ECE) ||
| ^~
net/ipv4/netfilter/ipt_ECN.c:55:35: error: ‘IPT_ECN_OP_SET_ECE’ undeclared (first use in this function); did you mean ‘IPT_ECN_OP_MATCH_ECE’?
55 | if ((!(einfo->operation & IPT_ECN_OP_SET_ECE) ||
| ^~~~~~~~~~~~~~~~~~
| IPT_ECN_OP_MATCH_ECE
net/ipv4/netfilter/ipt_ECN.c:55:35: note: each undeclared identifier is reported only once for each function it appears in
net/ipv4/netfilter/ipt_ECN.c:56:32: error: invalid use of undefined type ‘const struct ipt_ECN_info’
56 | tcph->ece == einfo->proto.tcp.ece) &&
| ^~
net/ipv4/netfilter/ipt_ECN.c:57:21: error: invalid use of undefined type ‘const struct ipt_ECN_info’
57 | (!(einfo->operation & IPT_ECN_OP_SET_CWR) ||
| ^~
net/ipv4/netfilter/ipt_ECN.c:57:35: error: ‘IPT_ECN_OP_SET_CWR’ undeclared (first use in this function); did you mean ‘IPT_ECN_OP_MATCH_CWR’?
57 | (!(einfo->operation & IPT_ECN_OP_SET_CWR) ||
| ^~~~~~~~~~~~~~~~~~
| IPT_ECN_OP_MATCH_CWR
net/ipv4/netfilter/ipt_ECN.c:58:32: error: invalid use of undefined type ‘const struct ipt_ECN_info’
58 | tcph->cwr == einfo->proto.tcp.cwr))
| ^~
net/ipv4/netfilter/ipt_ECN.c:66:18: error: invalid use of undefined type ‘const struct ipt_ECN_info’
66 | if (einfo->operation & IPT_ECN_OP_SET_ECE)
| ^~
net/ipv4/netfilter/ipt_ECN.c:67:34: error: invalid use of undefined type ‘const struct ipt_ECN_info’
67 | tcph->ece = einfo->proto.tcp.ece;
| ^~
net/ipv4/netfilter/ipt_ECN.c:68:18: error: invalid use of undefined type ‘const struct ipt_ECN_info’
68 | if (einfo->operation & IPT_ECN_OP_SET_CWR)
| ^~
net/ipv4/netfilter/ipt_ECN.c:69:34: error: invalid use of undefined type ‘const struct ipt_ECN_info’
69 | tcph->cwr = einfo->proto.tcp.cwr;
| ^~
net/ipv4/netfilter/ipt_ECN.c: In function ‘ecn_tg’:
net/ipv4/netfilter/ipt_ECN.c:81:18: error: invalid use of undefined type ‘const struct ipt_ECN_info’
81 | if (einfo->operation & IPT_ECN_OP_SET_IP)
| ^~
net/ipv4/netfilter/ipt_ECN.c:81:32: error: ‘IPT_ECN_OP_SET_IP’ undeclared (first use in this function); did you mean ‘IPT_ECN_OP_MATCH_IP’?
81 | if (einfo->operation & IPT_ECN_OP_SET_IP)
| ^~~~~~~~~~~~~~~~~
| IPT_ECN_OP_MATCH_IP
net/ipv4/netfilter/ipt_ECN.c:82:38: error: passing argument 2 of ‘set_ect_ip’ from incompatible pointer type 82 | if (!set_ect_ip(skb, einfo))
| ^~~~~
| |
| const struct ipt_ECN_info *
net/ipv4/netfilter/ipt_ECN.c:26:60: note: expected ‘const struct ipt_ECN_info *’ but argument is of type ‘const struct ipt_ECN_info *’
26 | set_ect_ip(struct sk_buff *skb, const struct ipt_ECN_info *einfo)
| ~~~~~~~~~~~~~~~~~~~~~~~~~~~^~~~~
net/ipv4/netfilter/ipt_ECN.c:85:18: error: invalid use of undefined type ‘const struct ipt_ECN_info’
85 | if (einfo->operation & (IPT_ECN_OP_SET_ECE | IPT_ECN_OP_SET_CWR) &&
| ^~
net/ipv4/netfilter/ipt_ECN.c:85:33: error: ‘IPT_ECN_OP_SET_ECE’ undeclared (first use in this function); did you mean ‘IPT_ECN_OP_MATCH_ECE’?
85 | if (einfo->operation & (IPT_ECN_OP_SET_ECE | IPT_ECN_OP_SET_CWR) &&
| ^~~~~~~~~~~~~~~~~~
| IPT_ECN_OP_MATCH_ECE
net/ipv4/netfilter/ipt_ECN.c:85:54: error: ‘IPT_ECN_OP_SET_CWR’ undeclared (first use in this function); did you mean ‘IPT_ECN_OP_MATCH_CWR’?
85 | if (einfo->operation & (IPT_ECN_OP_SET_ECE | IPT_ECN_OP_SET_CWR) &&
| ^~~~~~~~~~~~~~~~~~
| IPT_ECN_OP_MATCH_CWR
net/ipv4/netfilter/ipt_ECN.c:87:39: error: passing argument 2 of ‘set_ect_tcp’ from incompatible pointer type 87 | if (!set_ect_tcp(skb, einfo))
| ^~~~~
| |
| const struct ipt_ECN_info *
net/ipv4/netfilter/ipt_ECN.c:45:61: note: expected ‘const struct ipt_ECN_info *’ but argument is of type ‘const struct ipt_ECN_info *’
45 | set_ect_tcp(struct sk_buff *skb, const struct ipt_ECN_info *einfo)
| ~~~~~~~~~~~~~~~~~~~~~~~~~~~^~~~~
net/ipv4/netfilter/ipt_ECN.c: In function ‘ecn_tg_check’:
net/ipv4/netfilter/ipt_ECN.c:98:18: error: invalid use of undefined type ‘const struct ipt_ECN_info’
98 | if (einfo->operation & IPT_ECN_OP_MASK)
| ^~
net/ipv4/netfilter/ipt_ECN.c:98:32: error: ‘IPT_ECN_OP_MASK’ undeclared (first use in this function); did you mean ‘IPT_ECN_IP_MASK’?
98 | if (einfo->operation & IPT_ECN_OP_MASK)
| ^~~~~~~~~~~~~~~
| IPT_ECN_IP_MASK
net/ipv4/netfilter/ipt_ECN.c:101:18: error: invalid use of undefined type ‘const struct ipt_ECN_info’
101 | if (einfo->ip_ect & ~IPT_ECN_IP_MASK)
| ^~
net/ipv4/netfilter/ipt_ECN.c:104:19: error: invalid use of undefined type ‘const struct ipt_ECN_info’
104 | if ((einfo->operation & (IPT_ECN_OP_SET_ECE|IPT_ECN_OP_SET_CWR)) &&
| ^~
net/ipv4/netfilter/ipt_ECN.c:104:34: error: ‘IPT_ECN_OP_SET_ECE’ undeclared (first use in this function); did you mean ‘IPT_ECN_OP_MATCH_ECE’?
104 | if ((einfo->operation & (IPT_ECN_OP_SET_ECE|IPT_ECN_OP_SET_CWR)) &&
| ^~~~~~~~~~~~~~~~~~
| IPT_ECN_OP_MATCH_ECE
net/ipv4/netfilter/ipt_ECN.c:104:53: error: ‘IPT_ECN_OP_SET_CWR’ undeclared (first use in this function); did you mean ‘IPT_ECN_OP_MATCH_CWR’?
104 | if ((einfo->operation & (IPT_ECN_OP_SET_ECE|IPT_ECN_OP_SET_CWR)) &&
| ^~~~~~~~~~~~~~~~~~
| IPT_ECN_OP_MATCH_CWR
net/ipv4/netfilter/ipt_ECN.c: At top level:
net/ipv4/netfilter/ipt_ECN.c:116:34: error: invalid application of ‘sizeof’ to incomplete type ‘struct ipt_ECN_info’
116 | .targetsize = sizeof(struct ipt_ECN_info),
| ^~~~~~
CC lib/kasprintf.o
cc1: some warnings being treated as errors
make: *** Error 1
make: *** Error 2
make: *** Error 2
make: *** Waiting for unfinished jobs....
and
make: *** No rule to make target 'net/netfilter/xt_HL.o', needed by 'net/netfilter/built-in.a'. Stop.
make: *** Waiting for unfinished jobs....
and
make: *** Error 2
make: *** Error 2
make: *** Waiting for unfinished jobs....
CC drivers/input/serio/serport.o
CC drivers/usb/core/usb.o
CC drivers/input/serio/serio_raw.o
CC fs/xfs/scrub/health.o
AR drivers/usb/phy/built-in.a
CC fs/xfs/scrub/ialloc.o
CC drivers/input/serio/hyperv-keyboard.o
AR drivers/scsi/built-in.a
CC fs/xfs/scrub/inode.o
CC fs/xfs/scrub/parent.o
CC fs/xfs/scrub/refcount.o
CC drivers/usb/core/hub.o
CC drivers/usb/core/hcd.o
drivers/net/wireguard/allowedips.c: In function ‘root_free_rcu’:
drivers/net/wireguard/allowedips.c:67:1: warning: the frame size of 1040 bytes is larger than 1024 bytes 67 | }
| ^
drivers/net/wireguard/allowedips.c: In function ‘root_remove_peer_lists’:
drivers/net/wireguard/allowedips.c:80:1: warning: the frame size of 1040 bytes is larger than 1024 bytes 80 | }
| ^ -
GertN I solved the problem!Reply
The ECN errors are caused by using a file system that is not case sensitive; Windows using NTFS. Sources:
GitHub Issue WSL #8319
GitHub Issue WSL #11457The solution is to enable case-sensitivity for the directory where you are building the kernel:
Open PowerShell as an administrator.
Create a directory on your Windows drive:
mkdir C:\WSL-BuildEnable case-sensitivity for this directory via PowerShell:
fsutil.exe file setCaseSensitiveInfo C:\WSL-Build enableNavigate to this directory in WSL. From the Linux/WSL prompt, enter:
cd /mnt/c/WSL-BuildBesides that, why would you use an older kernel version? Just compile the latest version. For the moment (Feb 2025), that’s version 6.6. Enter this command to get a list of all available branches:
git ls-remote --headshttps://github.com/microsoft/WSL2-Linux-Kernel.git
My instruction (below) starts after step 6 of the original instruction:
After VER=, put the newest version, in my case 6.6:
VER=6.6
The download took me 41 minutes (speed restricted by GitHub); NOTE: this is a single line/command:
sudo git clone -b linux-msft-wsl-${VER}.y https://github.com/microsoft/WSL2-Linux-Kernel.git /mnt/c/WSL-Build/linux-msft-wsl-${VER}.y && cd /mnt/c/WSL-Build/linux-msft-wsl-${VER}.y
Copy and unzip the default config file:
sudo cp /proc/config.gz config.gz && sudo gunzip config.gz && sudo mv config .config
Edit the config file to enable ‘USB Mass Storage Support’. In nano, use Ctrl+W to search for USB_STORAGE. Enable it and set it to y:
nano .configUSB_STORAGE=y
Now build it (takes 62 minutes):
sudo make -j$(nproc)
Install the kernel modules:
sudo make modules_install -j$(nproc)
Install the kernel:
sudo make install -j$(nproc)Now continue at the original step 17. -
darrroe Just saying thanks. I followed the tutorial and it worked without any errors as mentioned in the previous comments.Reply -
LanceJZ That broke my WSL2 install. Now when I attmpt to open it I get. "Error code: Wsl/Service/CreateInstance/CreateVm/WSAENOTCONN"Reply
