


NeoPixels, or to give them their formal name WS2812B RGB LEDs are candy for makers. They produce pleasing light shows and can be controlled by nearly every microcontroller, we’ve even controlled them using a Raspberry Pi Pico and the BASIC programming language.
Writing code to control NeoPixels isn’t difficult, but what if you just want to bring a little light into your home or workplace, and control it all from the browser? For that we look to WLED, a feature-rich web server for the ESP8266 and ESP32 that enables us to have ultimate control of many different RGB LEDs.
Right now there is no WLED software for the Raspberry Pi Pico, so for now we are going to use the venerable ESP8266 as our microcontroller. We’ll be using the Wemos D1 Mini, one of the most popular development boards for ESP8266 projects. The ESP8266 may be a bit long in the tooth, and massively underpowered when compared to the Raspberry Pi Pico. But when all we want to do is control a few LEDs, we don’t need the extra horsepower.
In this how to, we will install WLED on to a Wemos D1 Mini, and learn how to use WLED to control a string of NeoPixel LEDs.
For This Project You Will Need
Building the Circuit

The Wemos D1 Mini and NeoPixels come with unsoldered header pins, so now is a great opportunity to grab the best soldering iron and solder the header pins on for use with the breadboard.
Controlling NeoPixels is a simple task. Electrically, we need only three connections between the Wemos D1 Mini and the NeoPixels.Power is supplied by the 3.3V pin, and that connects to the 5V (VCC) pin of the NeoPixels. NeoPixels work between 3 and 7V, but the Wemos D1 Mini uses 3.3V logic for the GPIO, so matching the voltage to the logic is the best option. GND (G) on the Wemos D1 Mini connects to GND on the NeoPixels. Finally, we connect D4 on the Wemos D1 Mini to the Data Input pin of the NeoPixels, via a 330 Ohm resistor. This resistor is there to limit the current drawn from the data pin. Any value of resistor between 300 and 500 Ohms can be used, just check the color code before connecting it into the circuit.
The shape of your NeoPixels doesn’t really matter. They all follow the same principle of power, data and ground connections. If you intend to power long chains of NeoPixels, the 3.3V pin of the Wemos D1 Mini will not be enough. Instead you should inject power into the pixels from an external source. Adafruit’s Uberguide to NeoPixels explains how to approach this.
| Wemos D1 Mini | Wire Color | NeoPixel |
|---|---|---|
| 3V3 | Red | VCC |
| G | Black | GND |
| D4 | Yellow | Data In |
Installing WLED on to a Wemos D1 Mini
WLED has made it super easy for us to install this custom firmware. Gone are the technical steps of preparing the device for firmware. We just plug it in and click a few buttons and the installer does all the hard work.
1. Connect your Wemos D1 Mini (ESP8266) to your computer using a good quality USB cable. Some cables are power only, others have bad connections. When flashing firmware to a board, always use a good quality cable.
2. Open a browser to the WLED installer page. This page is where all the installation steps are taken.

3. Click Install.

4. Select your Wemos D1 Mini and click Connect. WLED uses Web Serial to open serial ports on your computer. The Wemos D1 Mini / ESP8266 is connected via a USB serial port.

5. Click Install WLED to begin the process.

6. Confirm the installation to flash the firmware to the board. Installation should take a few minutes. This extra step is your last warning. After this, any data on the device will be destroyed.

7. Click Next to end the installation process.

8. Enter your Wi-Fi details and click Connect. This will connect your Wemos D1 Mini to your Wi-Fi access point and save the details for future use.

9. Click Visit Device to open the control panel. This will connect to WLED running on the Wemos D1 Mini. Make a note of the IP address as you will need it to access the control panel.

10. The NeoPixels should come to life and glow a single color. If that isn’t the case, check your wiring before moving on.
Controlling WLED

WLED’s user interface is simple, but can appear overwhelming at first. By default it opens in a mobile friendly page, and this is how we should use WLED from a mobile device. As we are sitting at a PC, we need to change the interface to make best use of the screen.
1. Click on PC Mode. This will reformat the interface for a wider display.
2. Select a color using the color wheel. This is a basic check to see if we have control of the NeoPixels.
WLED’s user interface is broken down into five areas.

1. Configuration: Here we can find buttons to open advanced features such as Sync (to sync multiple lights using WLED across your network) and Config, where we can access advanced features such as JSON and MQTT and set the number of LEDs in our display.
2. Color Picker: Using the color picker we can set the current color of the LEDs, be they a static display or animated. Scrolling down this section we can access different color palettes that we can use in effects.
3. Effects: This section contains pre-written animated sequences that we can use with our NeoPixels. Effects come with their own color palettes but we can use the Color Picker section to change these to our requirements.
4. Segment: If you have a large array or matrix of NeoPixels, splitting them into segments means that we can control each segment with a different color, animation or color palette.
5. Presets: Here we can create presets for our custom light show, and create a playlist to cycle through the many animations on offer.
Setting the Number of NeoPixels
1. Click on Config. This opens a mobile centric user interface.

2. Select LED Preferences.

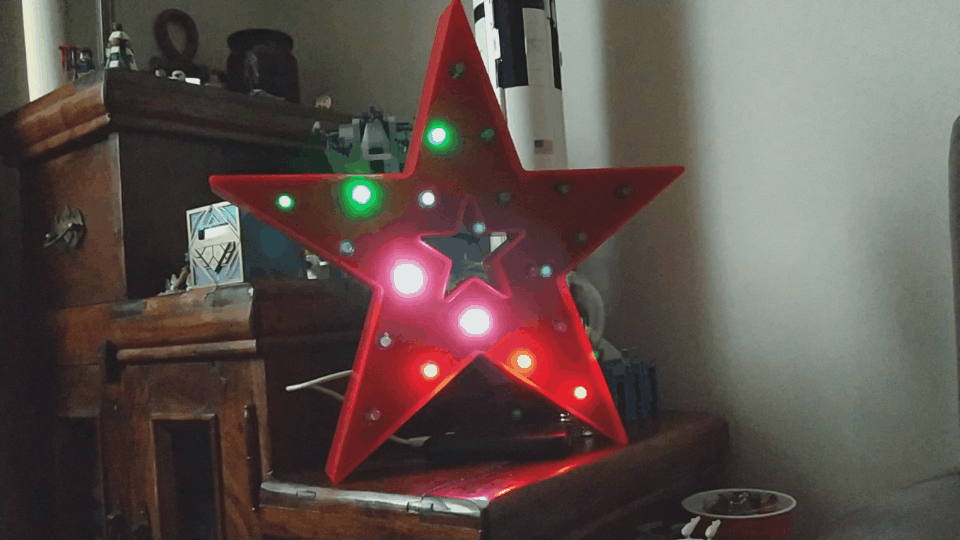
3. Scroll down to Hardware Setup and set the length to match the number of NeoPixels. We tested with a string of eight pixels, but we routinely run an LED star with 20 pixels.

4. Scroll down to the bottom and click Save.

5. Click Back to return to the main screen.

Changing Effects
Changing effects is merely a matter of selecting one of the great options from the effects list (3).
1. Select an effect. The NeoPixels will instantly react.

2. Change the effect speed and intensity. The higher the slider, the faster and more intense the effect. Note that it may cause strobing so users with photo-sensitivity should take care.

3. Change the color palette using the presets under the color picker. This will keep the animation effect but replace the colors.

