How to Enable Remote Desktop in Windows Server 2016
Learn how to enable Remote Desktop Protocol (RDP) sessions in Windows Server 2016 to administrate server PCs from anywhere.
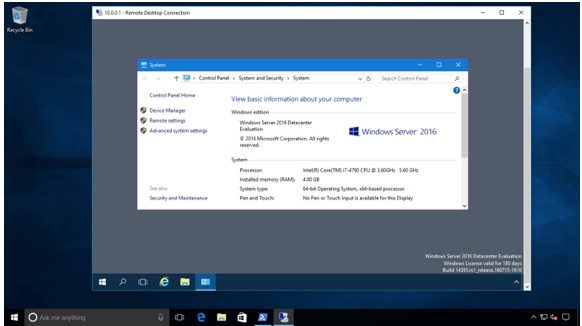
Remote Desktop Protocol (RDP) is a Microsoft-proprietary remote access protocol that is used by Windows systems administrators to manage Windows Server systems remotely. What sets RDP apart from, say, Windows PowerShell or Secure Shell (SSH) remoting is the presence of the full graphical desktop, as shown in Figure 1.
MORE: Best Remote Access Software and Solutions
By default, the RDP server component listens for incoming connections on TCP port 3389 by default, although this can be changed by the administrator for security reasons.
To be sure, Microsoft's current push is for admins to reduce their reliance upon RDP and instead (a) deploy Windows Servers in Server Core or Nano mode; and (b) employ Windows PowerShell command-line remote administration instead of RDP.
Microsoft's justification for this advice is two-fold:
- A GUI layer consumes unnecessary system resources
- A GUI layer broadens the attack surface of your servers
Regardless, many admins are accustomed to RDP-based remote administration, and seek to do so even in the newly released Windows Server 2016 operating system. Let's learn how to enable RDP in Server 2016 (tl;dr: the process is identical to Windows Server 2012 R2).
Server Manager
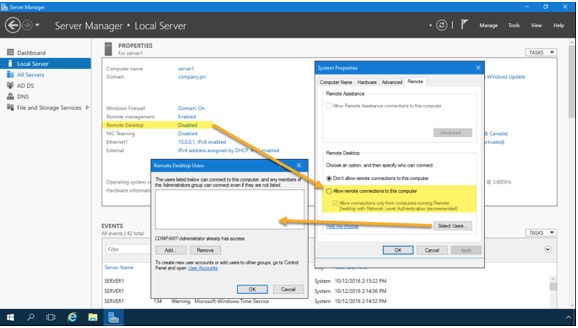
Open the Server Manager console, navigate to the Local Server node, and click the Remote Desktop hyperlink as shown in Figure 2.
Get Tom's Hardware's best news and in-depth reviews, straight to your inbox.
The Remote Desktop hyperlink is simply a shortcut to the System Properties sheet from the System Control Panel item. Select Allow remote connections to this computer, and optionally enable Allow connections only from computers running Remote Destkop with Network Level Authentication (recommended).
Network Level Authentication (NLA) protects Windows Server against denial-of-service (DoS) attacks by requiring authentication to take place before any graphical session is established by the server. NLA also conserves server system resources.
Windows PowerShell
From a lower-level perspective, incoming RDP connections are enabled on a server through two Registry values and a Windows Firewall rule.
Open an elevated Windows PowerShell session and run the following commands. This first one creates the fDenyTSConnections value and sets it to 0 (off). This makes sense, because we don't want to deny Terminal Services (TS) connections.
New-ItemProperty -Path 'HKLM:SystemCurrentControlSetControlTerminal Server' -Name 'fDenyTSConnections' -Value 0 -PropertyType dword -Force
The next command creates and enables the UserAuthentication (Network Layer Authentication) value; NLA is a good idea and you should consider enabling it by default on your servers.
New-ItemProperty -Path 'HKLM:SystemCurrentControlSetControlTerminal ServerWinStationsRDP-Tcp' -Name 'UserAuthentication' -Value 1 -PropertyType dword -Force
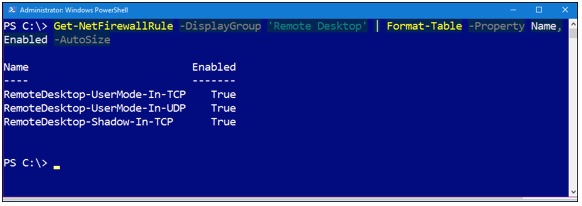
The next command enables the predefined "Remote Desktop" Windows Firewall rule. We can then invoke the Get-NetFirewallRule PowerShell cmdlet to verify as shown in Figure 3.
Enable-NetFirewallRule -DisplayGroup 'Remote Desktop'
Group Policy
The chances are good that you want to standardize RDP behavior across all your infrastructure servers. Therefore, we turn to Group Policy to accomplish this goal.
Start by creating, linking and scoping a new Group Policy Object (GPO) that targets the servers that should share RDP server settings.
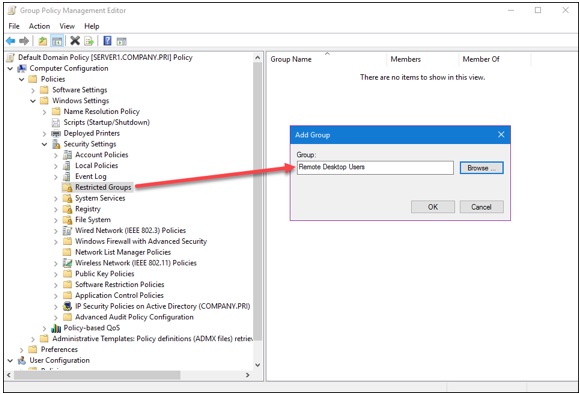
Next, navigate to the following Group Policy path and add a new Restricted Groups entry (shown in Figure 4):
Computer ConfigurationPoliciesWindows SettingsSecurity SettingsRestricted Groups
You can customize the membership in the servers' built-in Remote Desktop Users group; members of this group can establish RDP sessions to the server. Note that the local Administrators group (and, by extension, the Domain Admins global group) is automatically granted this privilege in Active Directory.
The following three Group Policy settings govern:
- Windows Firewall incoming RDP exceptions
- User right to establish RDP sessions
- Requiring NLA
Computer ConfigurationAdministrative TemplatesNetworkNetwork ConnectionsWindows FirewallDomain ProfileWindows Firewall: Allow Inbound Remote Desktop exceptions
Computer ConfigurationAdministrative TemplatesWindows ComponentsRemote Desktop ServicesRemote Desktop Session HostConnectionsAllow user to connect remotely by using Remote Desktop Services
Computer ConfigurationAdministrative TemplatesWindows ComponentsRemote Desktop ServicesRemote Desktop Session HostSecurityRequire user authentication for remote connections by using NLA
Creating the Client Connection
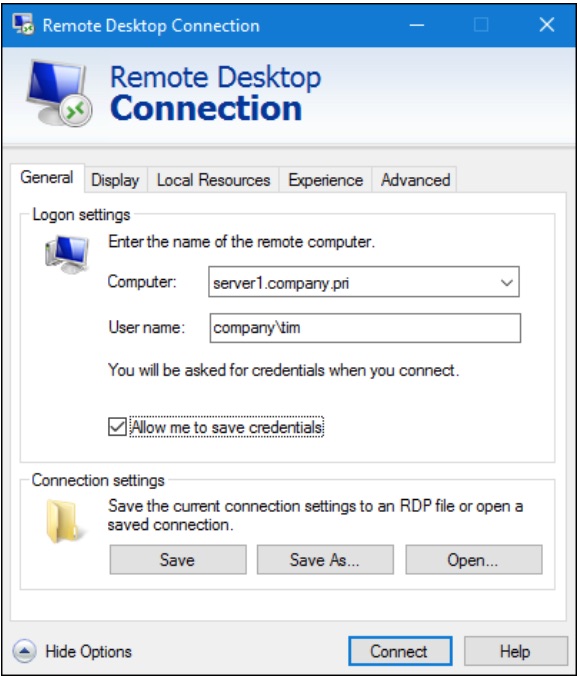
Windows Client and Windows Server both include the Microsoft RDP client, called Remote Desktop Connection. My favorite way to invoke this tool is to:
Press WINDOWS KEY+R
Type mstsc (which stands for "Microsoft Terminal Services Client")
Press ENTER
I show you the Remote Desktop Connection user interface in Figure 5.
What's cool about RDP clients is that they are available for just about every desktop or mobile operating system. Here is a representative list:
- Android: Microsoft Remote Desktop
- iOS: Microsoft Remote Desktop
- Linux: rdesktop
- macOS: Microsoft Remote Desktop
- Windows Phone: Microsoft Remote Desktop
Note that Windows Server supports only two simultaneous RDP sessions at once. If you need more than that, then you'll have to install the Remote Desktop Services (RDS) Session Host server role and purchase additional RDS connection licenses from Microsoft.
Final Thoughts
If you've configured RDP on previous Windows Server versions, then you'll find that Windows Server 2016 behaves the exact same way. Keep in mind, however, that Microsoft's ever-widening embrace of "assume breach" security posture and the hybrid cloud scenario and its accompanying "manage herds, not pets" philosophy means the emphasis is on command-line automation rather than on-off RDP GUI sessions.

