HP Z27x Dreamcolor Professional Display Review
HP's new Z27x DreamColor supports all the important color gamuts and carries some distinctly unique features. This screen simply blows us away.
Why you can trust Tom's Hardware
OSD Setup And Calibration Of The HP Z27x
The Z27x can’t be calibrated using the OSD, but there are many options to configure. Most features are included to address specific user requests. We’ll cover the calibration procedures below. First, though, let’s check out the monitor’s other features.
OSD Tour
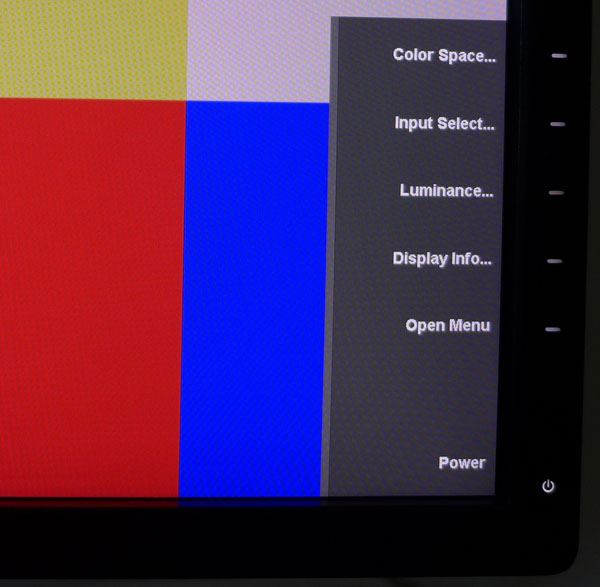
Pressing any key brings up a quick menu. Once the Z27x is set up, you rarely need to venture past this point.
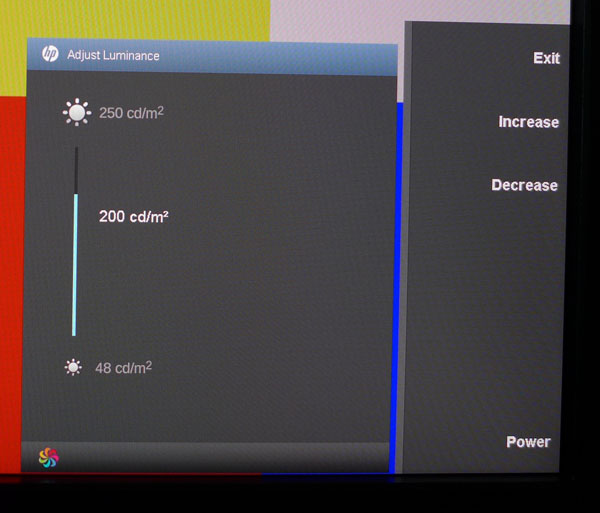
Selecting Luminance brings up a slider that tracks pretty closely to the actual brightness value. We found it to be off by about 5 cd/m2.
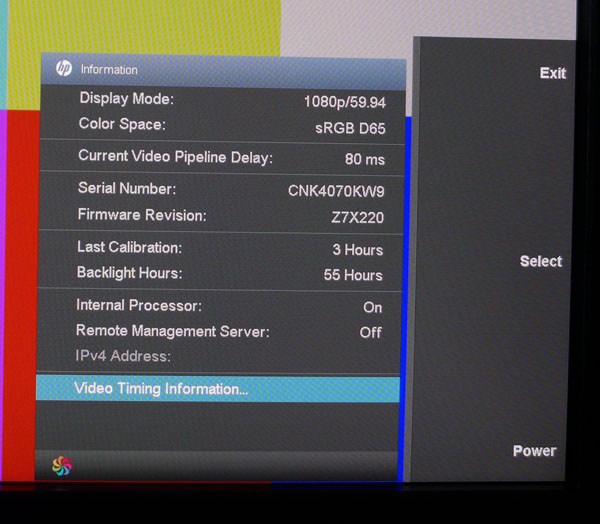
There are two pages of signal and monitor information available. Most visual effects artists work in multiple colorspaces, so it’s important to know how the display is set. If you color correct a project using the wrong settings, a lot of time can be wasted.
Note that in addition to the serial number, you also get a firmware version. This really helps when tracking support issues across a large group of displays.
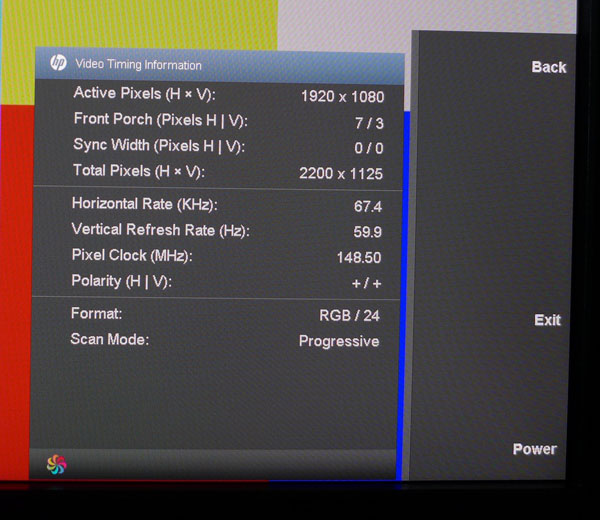
The second screen has detailed signal info, including scan rates and color formats.
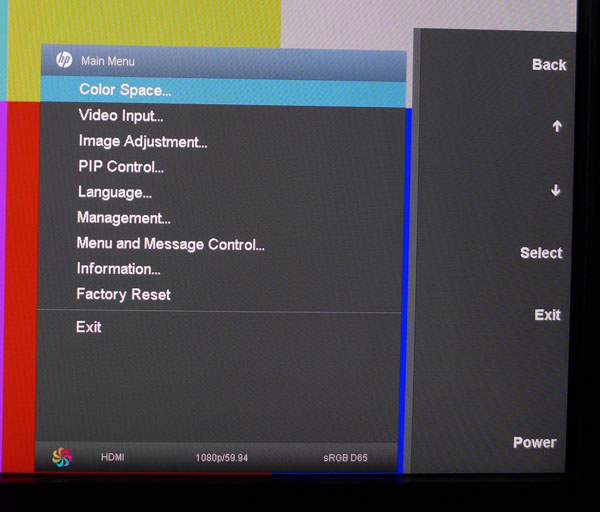
Here’s the main menu tree. You can change the color space without going in this far if you want, but if you make changes from the main OSD, you get a few extra options.
Get Tom's Hardware's best news and in-depth reviews, straight to your inbox.
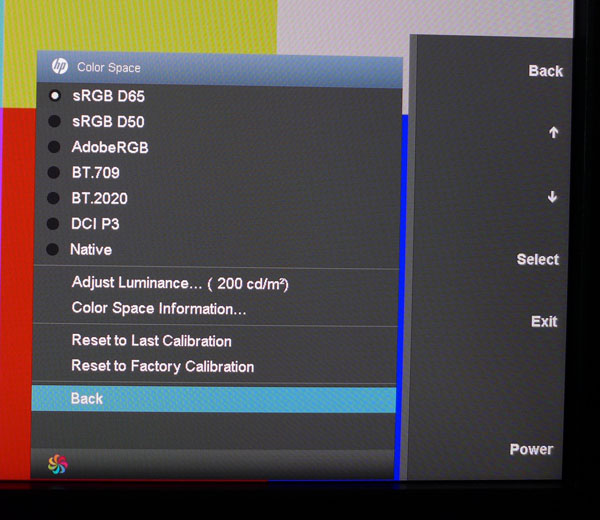
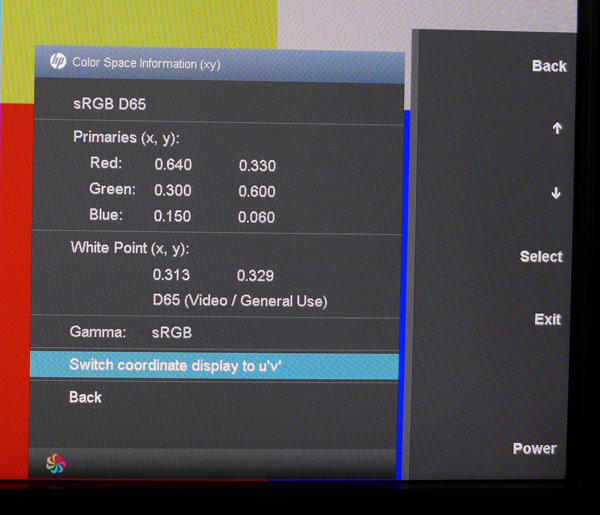
There are seven color modes corresponding to broadcast industry standards, plus a Native mode. That’s where you’ll find extra light output if you need it, as the other modes are limited to 250 cd/m2. You can also back up to a previous calibration or reset to the factory one. If you select Color Space Information, this screen pops up:
This is a quick and easy way to see all image parameters in one place. You can review the color coordinates in either xy or u’v’ format, and you get the white point and gamma specs. When calibrating the Z27x, any specs can be assigned to any color mode. For example, if you wanted a 2.4 gamma in Rec.709 instead of 2.2, you’d only need to specify that when you calibrate.
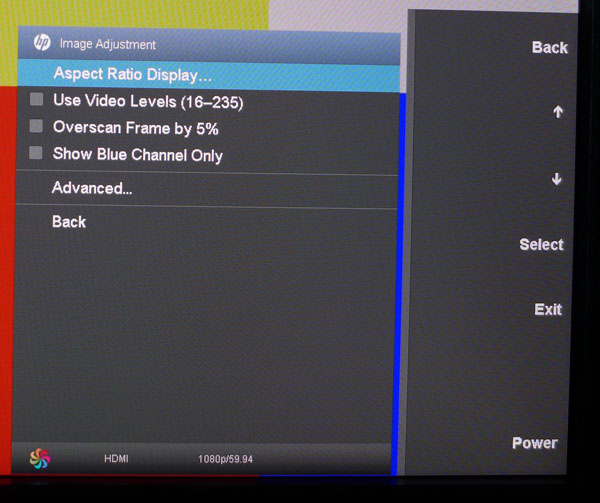
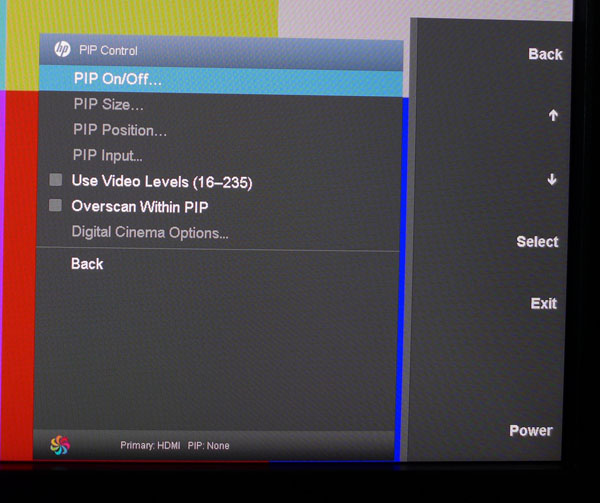
Here are some options you won’t find on many computer monitors. Video levels are different from PC levels, and the Z27x lets you specify them on the fly. Let’s say you’re mastering a Blu-ray transfer. You’d have to view the signal with video levels to set the black and white thresholds correctly.
Overscan imitates the typical five-percent zoom-in many HDTVs do when not set to a pixel-mapped aspect ratio. If you’re composing an image, it helps to know what content will be cut off and this option shows that.
Showing only the blue channel is a way to easily see compression and encoding errors when mastering content.
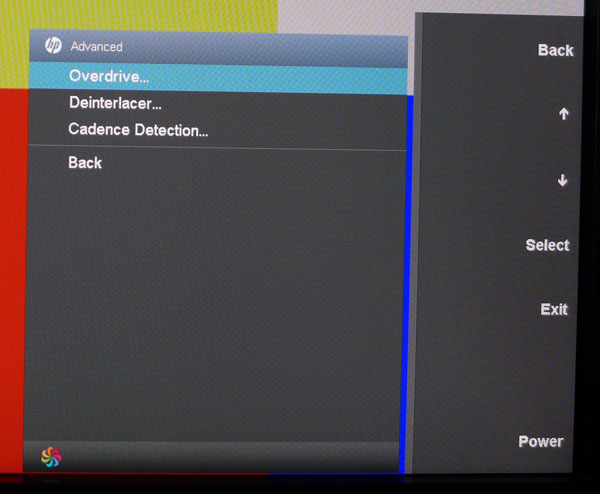
Selecting Advanced accesses three more features.
Overdrive is found on most computer monitors today. It simply attempts to reduce motion blur by bumping up the pixel clock.
Deinterlacers are found on all progressive-scan displays. Most computer monitors include a rudimentary video processor to accomplish the task, but the Z27x boasts a more advanced solution. To correctly process film-based video, you need a proper implementation of 3:2 pull-down, which HP provides. If you’re working on film-to-video transfer, this feature is invaluable. You can turn both that and Cadence Detection on and off to check for content encoding errors.
PIP options are pretty typical, though the Z27x adds the ability to use video levels and/or overscan for one source only. That makes it easy to compare images to one another.
Digital Cinema Options are grayed out unless a signal of 4096x2160 or 2048x1080 is input. Those resolutions are known as DCI containers. Once you do this, you can crop the image to a 1.85:1 or 2.39:1 aspect ratio, which corresponds to the two most common film formats in use today.
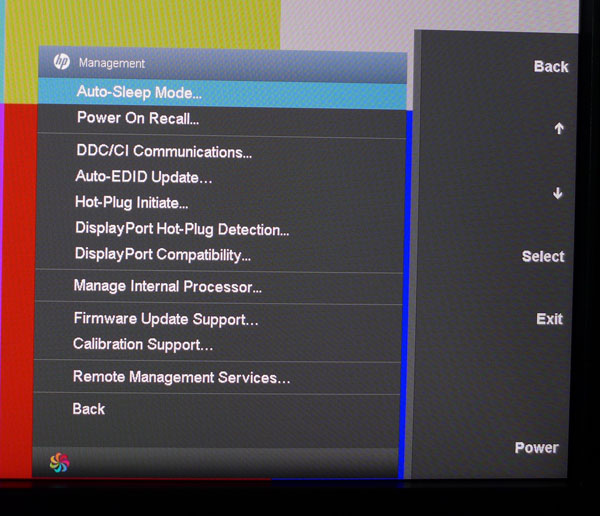
The Management sub-menu has many options that help both users and administrators manage the display. Most of them have an enable/disable switch. DisplayPort compatibility can be set to either version 1.1 or 1.2.
The most important option available is Manage Internal Processor. Enabling this turns on the Z27x’s internal calibration engine. It also allows firmware updates and remote management.
Remote Management Services allow administrators to control multiple Z27x displays via IP, provided you connect them to your network through the Ethernet jack. HP provides a downloadable API that has a large list of management features. When active, administrators can check the calibration status, display hours, and many other statistics simply by polling the displays remotely.
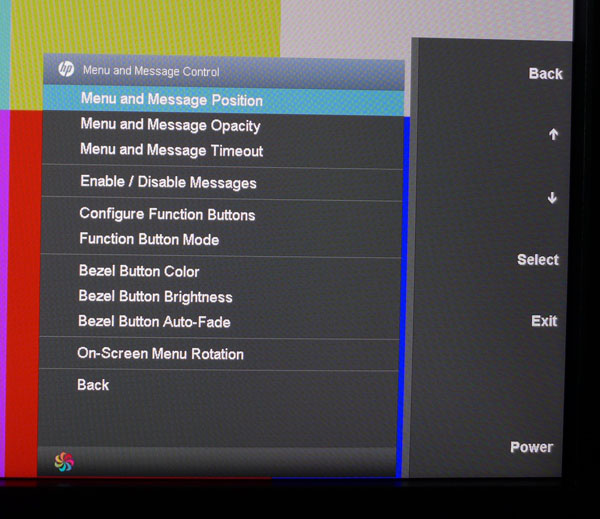
The OSD can be positioned anywhere on-screen. We moved it to the lower-right, leaving the center of the screen free for test patterns. The timeout can be up to 30 seconds.
The bezel buttons can be programmed for different monitor functions, saving you a trip to the OSD. It’s handy when you want to quickly switch aspect ratios or engage overscan, for example.
When working in a dark office, the bezel lighting can make a significant impact on image perception. By default, the buttons fade to black when the OSD disappears. But if you prefer, they can be always white or red. You can also have them switch automatically to red when the luminance is set below 70 cd/m2.
Lastly, the Z27x has a portrait mode that automatically flips the image. This doesn’t extend to the OSD though, necessitating a manual flip in the settings.
Calibration
Calibration options for the Z27x are somewhat different than the norm. There is no way to adjust image parameters using the OSD, aside from color mode selection and luminance level. The factory calibration is pretty accurate according to our tests, but HP recommends re-adjusting every 1000 hours. To that end, there is an internal engine that can automatically calibrate using a supported meter.
The least-expensive solution is HP’s DreamColor Calibrator. It’s an i1Display-based colorimeter made by X-Rite and costs an additional $250. If you want to use a more precise instrument, the Z27x supports five different Photo Research spectroradiometers, along with the Minolta CA-210 and Klein K10-A units. They plug right into one of the USB 2.0 ports and can calibrate without any connection to a computer.
We obtained the DreamColor solution from HP and calibrated four different color space modes. When you plug in, a menu pops up where you can enter gamma, white point, luminance, and color gamut choices. These can be saved to any of six memories. Then you place the calibrator on the screen and the Z27x does the rest. It took us about one minute per color mode, while a spectro can take up to 40 minutes.
As you’ll see in our tests, the DreamColor instrument didn’t really improve upon the factory setup. We feel that, to realize the Z27x’s full potential, you’d need to use an i1Pro at minimum. Unfortunately, the only way to use that particular instrument is with the latest version of CalMAN. It has the appropriate software hooks to calibrate the monitor and write to its internal look-up table.
Current page: OSD Setup And Calibration Of The HP Z27x
Prev Page Packaging, Physical Layout And Accessories Next Page Results: Brightness And Contrast
Christian Eberle is a Contributing Editor for Tom's Hardware US. He's a veteran reviewer of A/V equipment, specializing in monitors. Christian began his obsession with tech when he built his first PC in 1991, a 286 running DOS 3.0 at a blazing 12MHz. In 2006, he undertook training from the Imaging Science Foundation in video calibration and testing and thus started a passion for precise imaging that persists to this day. He is also a professional musician with a degree from the New England Conservatory as a classical bassoonist which he used to good effect as a performer with the West Point Army Band from 1987 to 2013. He enjoys watching movies and listening to high-end audio in his custom-built home theater and can be seen riding trails near his home on a race-ready ICE VTX recumbent trike. Christian enjoys the endless summer in Florida where he lives with his wife and Chihuahua and plays with orchestras around the state.
-
DoDidDont I have 3x Z24x, very impressed with them so far for compositing and 3d work. Would have gone with 3x Z27x but simply don’t have the desk space or room for a bigger desk. My only worry is if they have the same problem as the older ZR24w’s they replaced, in that the whites go yellowish and make greys have a tint of brown after only one or two years of use. Always had a dark grey desktop, and in 3ds max everything is set to Dark GUI, and always been careful not to leave monitors on for long periods with the same image so no idea why the older ZR24w’s go yellowish after a while. Hopefully this problem has been fixed in the new line-up. But at the Mo, highly recommend these monitors, amazing quality for the price if you are into DCC.Reply -
laststop311 .29 is not a good black level really. Hopefully oleds will displace the need for these monitors soon, only a matter of timeReply -
somebodyspecial hopefully 1600p will displace 1440p soon ;) I'm tired of scrolling up/down so much on web pages. Gaming doesn't get any better wide either, and if I want that I'll use more than one monitor to get the best of both worlds (taller for the web, and wider for games if desired).Reply -
laststop311 Reply14215918 said:hopefully 1600p will displace 1440p soon ;) I'm tired of scrolling up/down so much on web pages. Gaming doesn't get any better wide either, and if I want that I'll use more than one monitor to get the best of both worlds (taller for the web, and wider for games if desired).
Agree 100% I had a 24" 1920x1080 Cheapo TN monitor and then I found a Dell u3014 on craigslist and jewed the guy down to 575 for it. The bezel was a little scuffed up but the screen was flawless was a hell of a deal and man once you are used to 16:10 you cant go back to 16:9 it feels claustrophobic.
I am not a graphics professional though. But I fear since 16:10 is more a professional monitor we will never see a gaming monitor with 120hz and g sync in 16:10. I just can't bring myself to downgrade to a 27" asus rog swift even tho i really could use the gaming features. I'm probably just going to hold onto this dell until 120hz 3840x2160 rog swift type monitor is released at 30-34 inches. I don't think there is much hope in 16:10 4k monitors, never seen one yet 3840 x 2400 i believe.
-
Draven35 When I was at HP in Fort Collins for the new Z Workstation launch, I had an opportunity (several opportunities, really) to chat with Greg Staten, the HP DreamColor Solution Architect. He's really enthusiastic about his work and was really excited that this review was coming!Reply -
rajubaju Complaints about lack of CMS in OSD... I couldn't agree with them more. Totally unacceptable... Especially when you know; z24x provides that possibility (like every other, wide gamut, monitor on the market; nec pa272w, dell u2713h, asus pa279q, vp2772, lg 27ea83-D etc.) In the z24x manual, we can read: "the User (User Preset) adjustable color settings for customers who do not have calibration equipment". What is the difference? with z27x - price i guess - you pay more, you get less! ;) I understand that now, when I buy z27x, I must buy a colorimeter (HP ofc)... even if I do not need ideal color accuracy... and i only want adjust monitor (RGB primaries) for my preferences. Not a chance! I hope that Greg Staten read this and add User preset, like in z24x, to Z27x... About saturation, 6 color adjustment, etc. I don't even dream; It would be a miracle! ;)Reply
