System Builder Marathon Q3 2015: AMD Mini PC
This quarter we're building three equally priced PCs, with no theme restrictions! First up is an AMD-based Mini PC for LAN parties dubbed the "Munchkin."
Munchkin, Assemble!
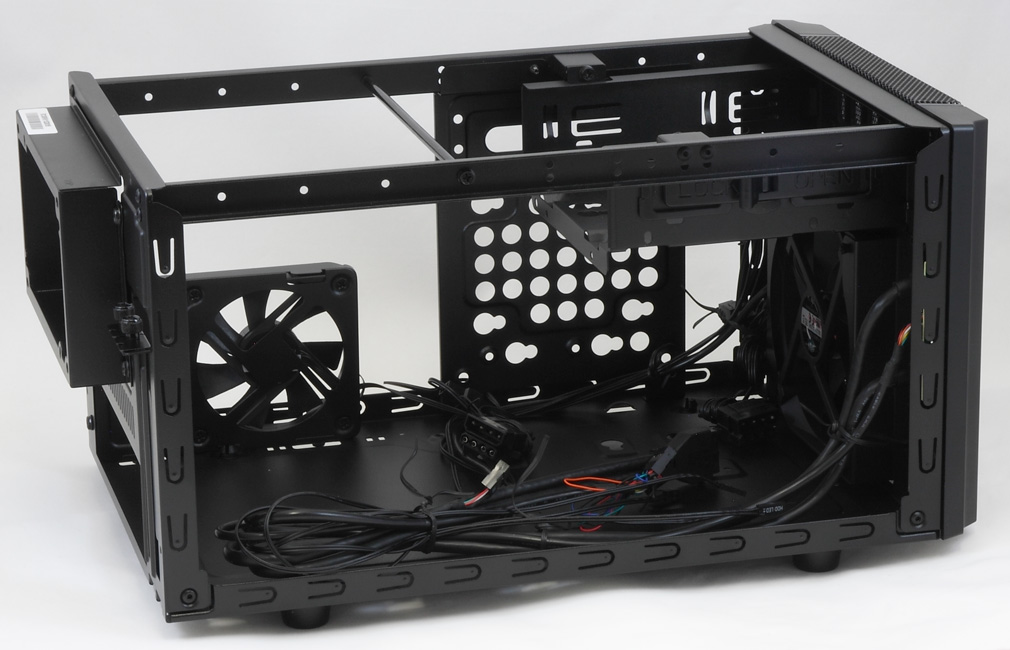
Assembling the build was… an experience. Even if all the parts can fit together, the order of assembly becomes very important in an ITX build. Unlike a tower case, you can't remove any part at any time. Installing one component usually blocks access to anything previously installed. Once most of the pieces were in place, adjusting anything meant removing at least the GPU and usually the DVD drive too.
The Elite 130 case sports two fans, but my motherboard only had two fan headers, and I needed one for the CPU cooler. The case did come with some 4-pin Molex fan adapters, but I pulled an old fan splitter cable from a drawer and used that. Is that cheating? Considering fan splitters are only $3, I'm still within the $800 budget had I bought one with the rest of the parts. And while it's nice for case manufacturers to include fan power adapters, I would ask them to switch away from 4-pin Molex and start using SATA power plugs instead.
The biggest obstacle I faced during assembly was the hard drive. The Elite 130 offers a few mounting points for hard drives and finding the most harmonious location took a few attempts. I originally had it on the case floor in front of the motherboard, however that put it very close to the GPU, and safely threading the data and power cables in the crevices was difficult. I moved it to the opposite wall of the GPU and had a lot more success. This moved it closer to the DVD drive, meaning I could use the shorter SATA power cable from the PSU. It also somewhat closed off the vents on that side. This resulted in the drive not only being cooled by the intake fan, but also channeling the air to the CPU cooler.
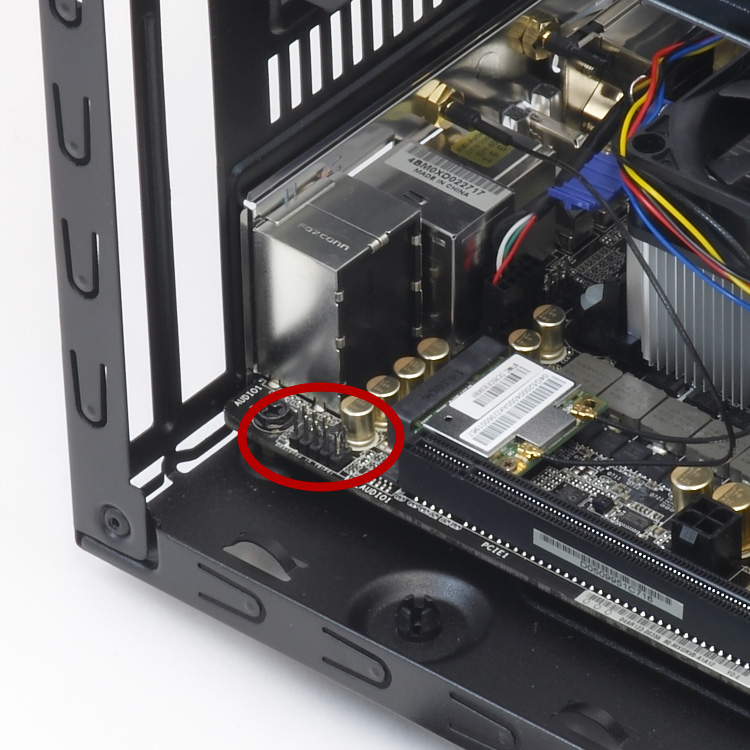
While the hard drive placement was a bit of a puzzle, it never actually prevented pieces from fitting together. I can't say the same about the motherboard, or more particularly its HD audio header. The front audio jack is located right at the head of the PCIe slot. I have no idea why ASRock would decide to put it there since the audio cable now has to smash under the GPU cooler shroud. The Elite 130 comes with both HD audio and AC97 jacks. Since AC97 uses fewer cables I was able to fit that underneath. Fitting the HD audio cable required me to trim the plug a little, but I'm handy with a Dremel.
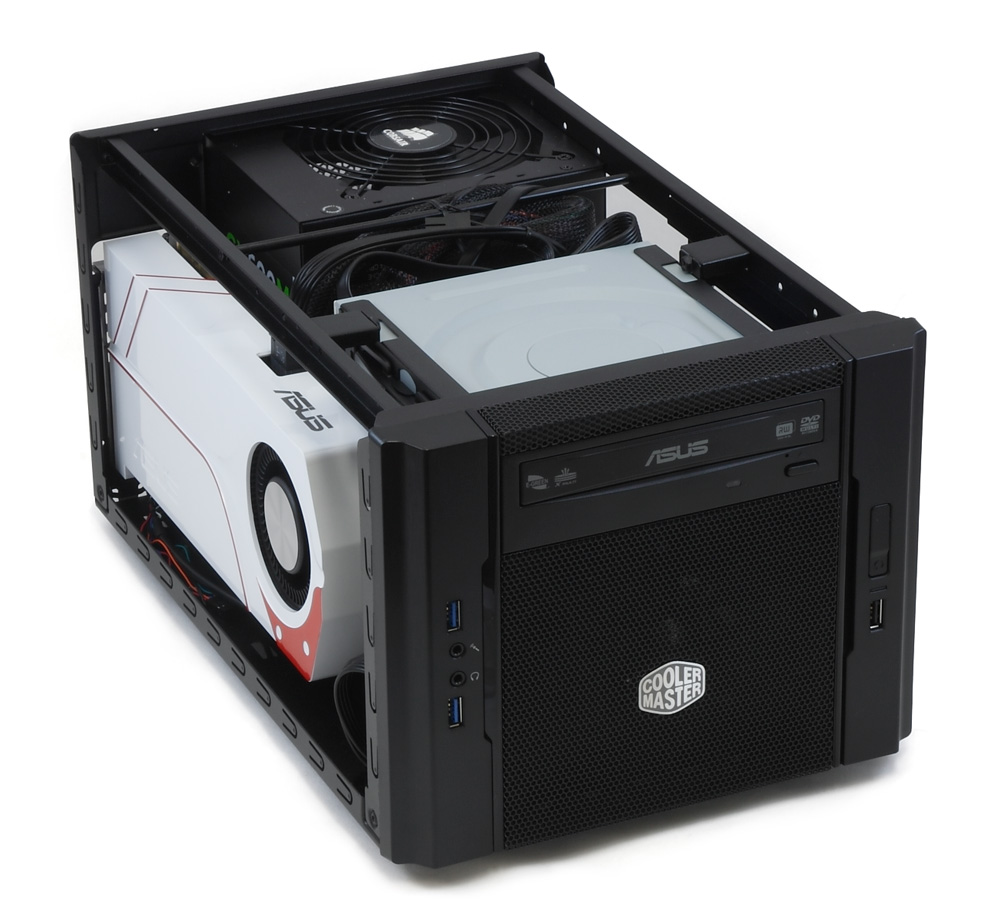
Here you can see the importance of a modular PSU in a case like this. All the cables behind the optical drive may look like a rat nest, but they're actually carefully bundled together and out of the way. I don't know where I would've put the extra power cables from a non-modular PSU without negatively impacting airflow to the CPU.
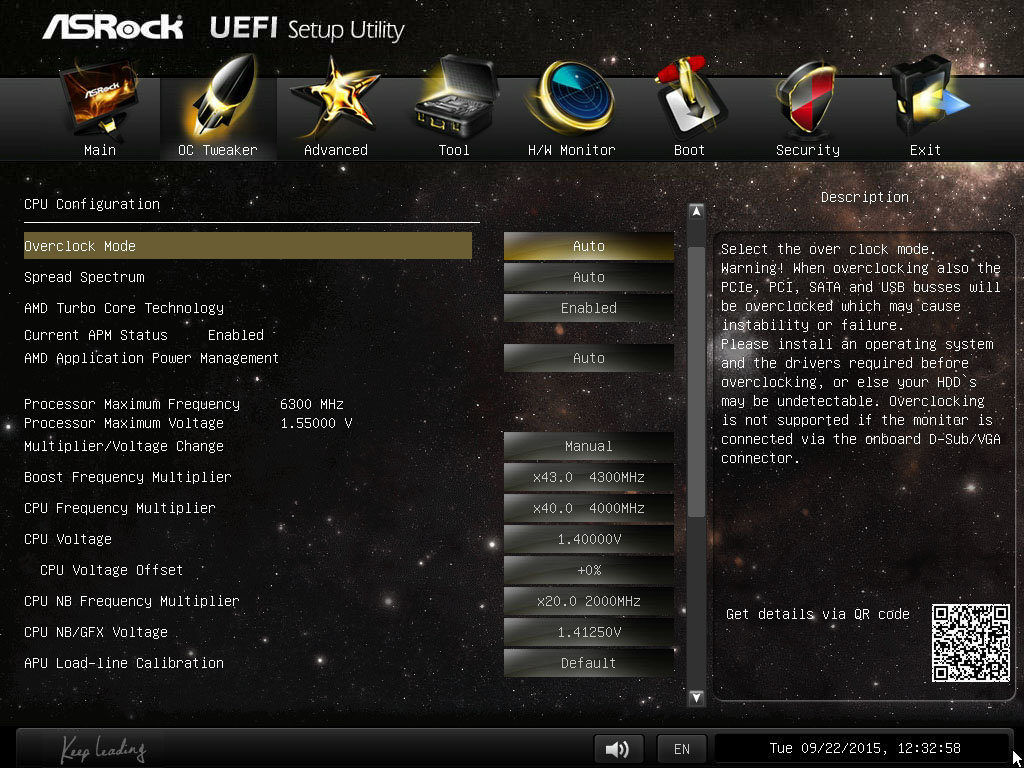
After running the bench suite at stock clocks, it was clear that overclocking the CPU wasn't an option. During the heavy-hitting benches, the CPU would throttle back to 3.5 GHz due to heat. That was expected. The only thing I could do was raise the maximum turbo multiplier to let the CPU speed up during single-threaded work.
I looked to see if I could improve the cooling situation at all. I wasn't going to exhaust the CPU heat through the PSU since I view that as a short-term gain, long-term loss. The small 80mm fan on the side normally acts as an intake. Since it's right by the RAM and CPU, I thought switching it to exhaust might act like a push-pull configuration with the intake fan, placing the CPU in the middle. Temperatures actually climbed a bit after reversing it. My guess is that the Elite 130 has so much mesh on the panels that getting hot air out of the case isn't difficult. It's more important that the side fan deliver a blast of fresh air right by the CPU.
Get Tom's Hardware's best news and in-depth reviews, straight to your inbox.
RAM overclocking was an interesting affair. Left on "auto", the FM2A88X-ITX+ actually ran the RAM at DDR3-1600 8-9-9-24. However it only handles RAM timings on full automatic or full manual. Most boards I've recently worked on will take the primary timings you enter and then automatically calculate the secondary and tertiary timings to match. The ITX+ wouldn't do this. If I wanted to override the XMP timings with a higher frequency, I would have to manually specify every single timing. I didn't have time to optimize the RAM in that detail. I did have Patriot Viper and Corsair Vengeance RAM kits sitting around that I use for motherboard reviews.
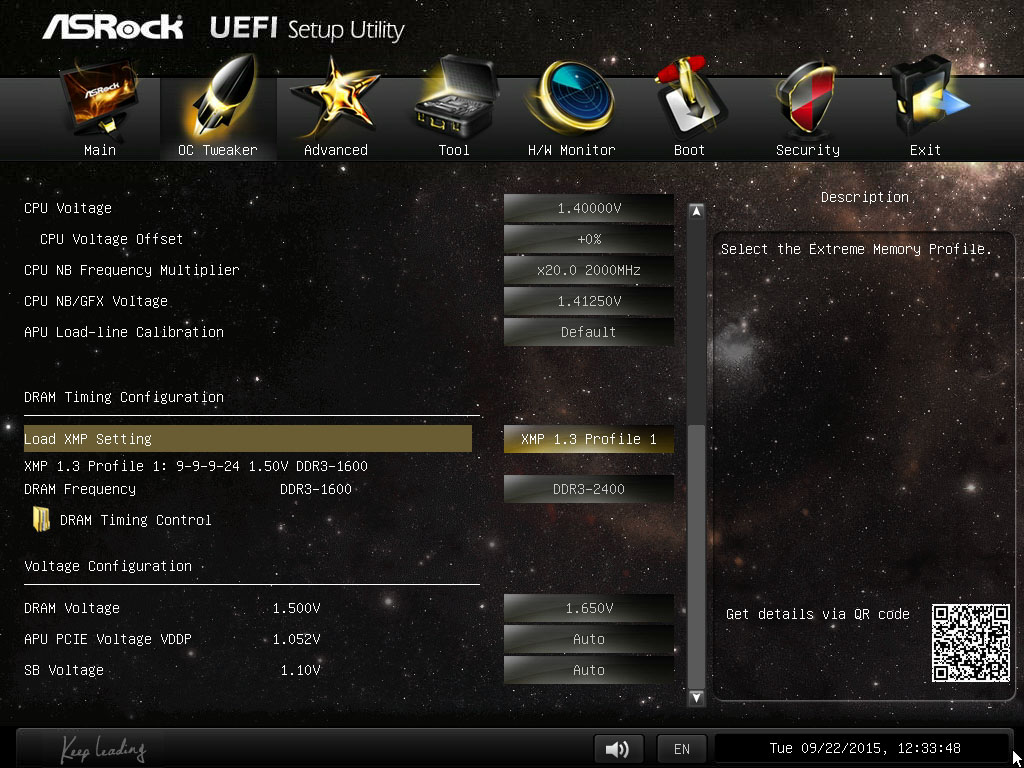
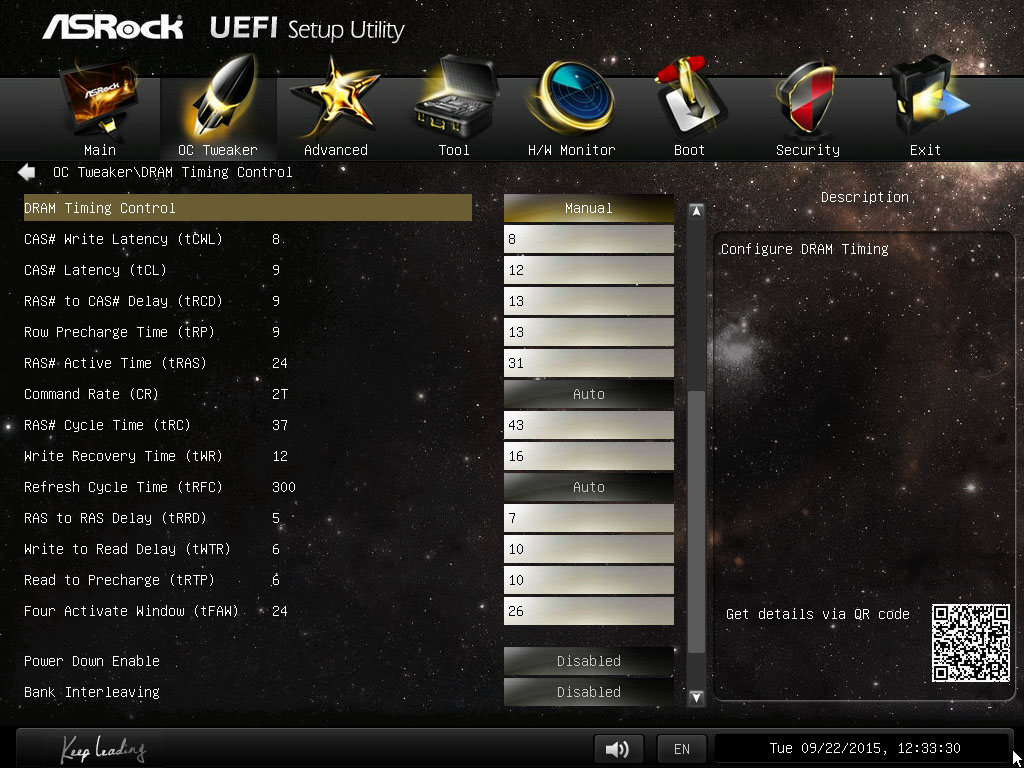
I plugged in each, enabled their XMP profiles, and started testing how high the board could go. The ITX+ couldn't reach the Vengeance's native DDR3-2800 speeds at any level, but both were stable at the Viper's slower DDR3-2400 setting. I saved their timing configs to a BIOS quicksave slot and swapped back to the SBM RAM. After a quick prayer I tried booting the RAM at the new settings. The SBM gods were with me and it worked. The Viper kit had slightly tighter timings at 11-13-13-31 (remember, the Vengeance XMP was 12-14-14-36 at 2800) so I went with those. I increased the northbridge from 1800 MHz to 2000 Mhz and started stress testing. A few errors showed that the RAM wasn't fully stable. I bumped it down from CAS 11 to 12 and had no problems.
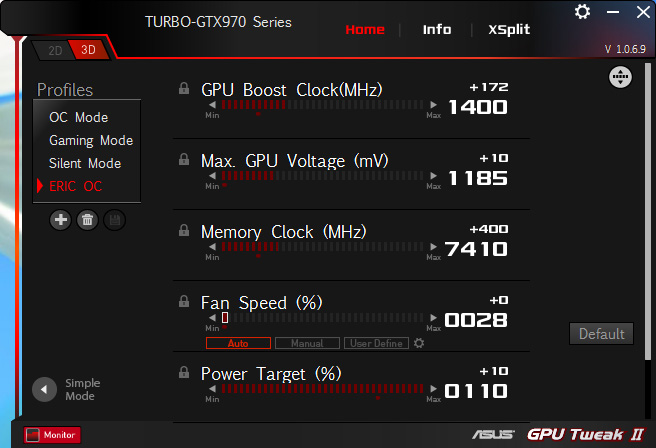
The 970 was the last thing on my overclocking plate. I know MSI's Afterburner is a popular program, but since this is an Asus card, I went with Asus' GPU Tweak II. The 970's stock speed is 1050 MHz with 1178 MHz boost and 1750 MHz memory (7000 MHz effective). Asus factory-overclocks their Turbo to 1088MHz/1228 MHz and adds a tiny 2.5 MHz increase on the memory. Raising the target power to 110 percent and adding 10mV to the GPU, I was able to increase the clock to 1400 MHz (1450 MHz boost) and the memory to 1852.5 MHz (7410 MHz effectively). I left the fan control on auto and limited the GPU temperature to 87 degrees.
Finally, I taped up the inside fan intake on the GPU. The GPU fan is only an inch or two from the main case intake fan, and I felt the GPU was stealing the intake air away from the CPU. The case panel is fully vented, so the GPU still had plenty of breathing room.
-
ykki All the talk about the ''path less travelled" and you still couldn't ditch the optical drive (in favor of a better psu).Reply
Aside from that its nice to see an AMD platform in ITX. -
chimera201 This is what I wanted. Comparing different systems at the same price. And 800$ is a good pick for the price. But what I actually want to see is a comparison ofReply
Intel CPU & Nvidia GPU system
Intel CPU & AMD GPU system
AMD CPU & Nvidia GPU system
AMD CPU & AMD GPU system
at the same price at the same time
-
Flying-Q ReplyAll the talk about the ''path less travelled" and you still couldn't ditch the optical drive (in favor of a better psu).
The ODD wasn't Eric's choice, it was an editorial requirement.
Aside from that its nice to see an AMD platform in ITX.
From the article
My first submitted part list didn't include an optical drive and my chosen GPU had a $20 instant rebate. This allowed me to fit a 240 GB SSD and SeaSonic modular power supply. Management told me I had to include an optical drive. My case didn't have a 5.25" bay, meaning I'd have to get a more expensive external drive or a different case.
Speaking of which, it is about time 'management' recognise that ODDs are no longer mandatory. I built a machine 5 years ago with an ODD and have used it only 3 times in those 5 years, and those occasions only because I couldn't be bothered to go downstairs to get my keys with their attached USB stick. On one of those occasions I had to take an external ODD with me as my friend didn't have any ODD of his own!
Aside from all that, Eric, this is a really great SBM experiment and your writing style is a pleasure to read. Thank you. -
alidan is there any way to move to videos/audio that you make 100% yourself, so that we can run our current systems through the same tests? i'm assuming there are a number of people here who would live to bench their system against these to see what an upgrade would cost them.Reply
also, on the optical drive front, i see no reason not to include one.
if you want to talk music, depending on the band, its cheaper to buy used cd's than it is to buy the songs individually, and its far cheaper to buy a used dvd/bluray than to even rent a movie or tv series, some exceptions can be made if you have netflix dvd/bluray delivery, but even than, a 4 disc or 6 disc season would cost you something like 5-8$ to rent and likely the same to buy and have it shipped for free.
personally, i have a bluray burner that i use quite a bit, and i have a dvd drive that till it broke was almost constantly used... its hooked up to an IDE cable, and the last time i messed with one of those the computer wouldn't go passed the bios anymore... so i dont take it out just because i dont want my computer to screw up in a way i dont know how to fix...
lets also say you want to legitimately buy games, you can get in box on the pc games for cheaper than digital most of the time, and when a game goes on sale digitally, you can get them used on the pc for cheaper, though you probably won't line up with the eula if you go that route.
i would at the very least love to see a drive bay case in all builds like this, but the drive itself does not need to be there, a decent compromise or in the case of you absolutely do not want to have an internal drive space, than make an annotated price that shows what it would cost to hook one up... i believe an external sata ide interface is able to run dvd/bluray drives along with hdds (i had to get one when 2 of my external drive cases failed on me, cheaper getting one 20$ thing opposed to 2 cases, one for each interface. -
RedJaron Reply
As I said, regularly I disagree with the "no ODD" crowd. You're right in that they're not always a hard requirement. However I've had enough requirements for them in the last three years that I'll still include one in my personal builds. But, also as I said in the article, I always have a flexible budget where adding an extra $20 isn't out of the question.16691054 said:Speaking of which, it is about time 'management' recognise that ODDs are no longer mandatory. I built a machine 5 years ago with an ODD and have used it only 3 times in those 5 years, and those occasions only because I couldn't be bothered to go downstairs to get my keys with their attached USB stick. On one of those occasions I had to take an external ODD with me as my friend didn't have any ODD of his own!
In terms of the first version of the Munchkin, I asked management if I could just include a regular internal drive ( even though the case couldn't fit it ), and just say the user would have to use it from the bench before the case was closed up. They wouldn't go for it. ;)
Thank you. I know I tend to get a bit verbose, but I wanted this to be kind of like a narrative.16691054 said:Aside from all that, Eric, this is a really great SBM experiment and your writing style is a pleasure to read. Thank you.
-
RedJaron Reply
This was kinda my idea when Joe and I designed the bench suite used for the $60 mboards. Everything used there was free and freely available so everyone else could run the same thing to compare their system. Joe has modified it for his uses as he has basically come to own that review segment.16691160 said:is there any way to move to videos/audio that you make 100% yourself, so that we can run our current systems through the same tests? i'm assuming there are a number of people here who would live to bench their system against these to see what an upgrade would cost them.
The problem with it is that it's largely made up of synthetics. Synthetic benches are great for hardware testing because they can be more strenuous and use every new feature and instruction set. That means they can show off strengths and weaknesses better.
However, for the SBM we also want to use real-world software to get real-world-applicable results. That means we use things like MS Office, Adobe Creative Cloud, iTunes, and code compilers. You could run the same tests on your machine, but you'd have to have the exact same software as well as the same project files and such. I don't think it's some super Tom's Hardware secret exactly what we use, we just don't want to host a 200 GB image that contains the files and instructions how to use it.
As I said, for myself I usually use an ODD. However, I will recognize that not everyone wants or needs one. If you're fortunate to have a good internet connection, downloading games and software isn't a problem. Someone who lives in the boonies and doesn't have a fat pipe, or that has a metered connection, doesn't want to deal with 20GB downloads. With the Munchkin as a LAN box, I didn't think an ODD was necessary. Ten years ago when I was going to LANs more regularly, sharing a game disc to get everyone a copy so we could all play it was common. If you go to a LAN party now, most files will be shared over network or via USB stick.16691160 said:also, on the optical drive front, i see no reason not to include one.
if you want to talk music, depending on the band, its cheaper to buy used cd's than it is to buy the songs individually, and its far cheaper to buy a used dvd/bluray than to even rent a movie or tv series, some exceptions can be made if you have netflix dvd/bluray delivery, but even than, a 4 disc or 6 disc season would cost you something like 5-8$ to rent and likely the same to buy and have it shipped for free.
personally, i have a bluray burner that i use quite a bit, and i have a dvd drive that till it broke was almost constantly used... its hooked up to an IDE cable, and the last time i messed with one of those the computer wouldn't go passed the bios anymore... so i dont take it out just because i dont want my computer to screw up in a way i dont know how to fix...
lets also say you want to legitimately buy games, you can get in box on the pc games for cheaper than digital most of the time, and when a game goes on sale digitally, you can get them used on the pc for cheaper, though you probably won't line up with the eula if you go that route.
i would at the very least love to see a drive bay case in all builds like this, but the drive itself does not need to be there, a decent compromise or in the case of you absolutely do not want to have an internal drive space, than make an annotated price that shows what it would cost to hook one up... i believe an external sata ide interface is able to run dvd/bluray drives along with hdds (i had to get one when 2 of my external drive cases failed on me, cheaper getting one 20$ thing opposed to 2 cases, one for each interface.
I don't agree with the idea that every SBM case must have an external bay. Getting an external USB ODD is easy enough for those cases and machines. An external drive also has the benefit of being portable so you can share it among all your home computers. -
Onus I do feel compelled to comment on the Corsair CX. Personally I would have risked the untested ARC, under the theory that "the orc that one hears (the CX) is worse than the orc that one fears (the ARC)." With that out of the way, this article was a pleasure to read, and the limited comments we made back and forth did not reveal what an outstanding analysis we would all get to read. Whether anyone would build a PC like this or not, the value of the data point it has provided is undeniable. Very well done.Reply -
RedJaron I'm not crazy on the CX either. If this was in a system that was constantly drawing 400W, I'd be a little worried. But the PSU has it's own air intake to keep it cool, and it doesn't go above 60% load so I think it's fine.Reply -
braincruser When you are building a LAN pc, can we have a same priced laptop in there to compare the performance. Many of us use laptops regularly and would like to know where they stand compared to desktops.Reply
