Benchmarked: Raspberry Pi 4 Hits 2 GHz with New Firmware
The Raspberry Pi 4 is a considerable upgrade over its previous Raspberry Pis, bringing four high-performance Arm Cortex-A72 running at 1.5 GHz to the low-cost single-board computer market. While these cores are both fast and hot-running, they also ship with a surprising amount of overhead available - overhead you can exploit by overclocking.
Previously, overclocking the Raspberry Pi 4 has been limited to 1.75GHz owing to a clock divider pre-set in the machine’s firmware. An upcoming firmware update lifts this limit to 2 GHz - and you can give it a go now, on the understanding it may take some tweaking to get your setup completely stable.
On our tests (see below), performance with the overclock improved by anywhere from 33 percent to just 2.9 percent over stock speeds, depending on the benchmark, but one particular workload crashed. Your mileage will vary based on the Silicon Lottery -- the unique tolerances of your Pi 4's CPU.
For full details on the hows and whys of overclocking the Raspberry Pi 4, see our previous article on the topic. Anyone looking to eke extra performance out of a Raspberry Pi 4 should start, however, by handling its tendency to hit a thermal throttle point and drop to 1 GHz or below - easily resolved by adding a bit of active cooling.
All benchmarks in this article were carried out on a Raspberry Pi 4 Model B 4GB with a Pimoroni Fan Shim fitted and set to always-on operation.
The Silicon Lottery
Not all Raspberry Pi 4s are likely to be able to reach the 2 GHz mark, representing an impressive 33 percent overclock from the stock 1.5GHz speed. This isn’t a heat issue, but the so-called “silicon lottery” rearing its ugly head. Any given semiconductor is built to a tolerance range, and certified to operate within those tolerances. In the case of the BCM2711B0 which powers the Raspberry Pi 4, that certification says the chip can run stably at 1.5GHz.
When overclocking a chip, you’re pushing it outside the rated speed; the further you push, the more likely it is you’re going to hit the upper reaches of the manufacturing tolerances. Some chips will already be near their upper limit and won’t overclock much at all; others may be near the bottom and overclock considerably better.
Get Tom's Hardware's best news and in-depth reviews, straight to your inbox.
Unfortunately, there’s no easy way to know where in the tolerance band a given chip sits beyond “suck it and see.” Given a trio of seemingly-identical Raspberry Pi 4s, one may sit happily at 2 GHz all day; another may become unreliable, crashing when exposed to certain workloads or environmental conditions; and still another may fail to boot altogether.
The good news is there’s no real cost to experimentation: at the absolute worst, you’ll corrupt the data on your microSD card and have to install NOOBS or Raspbian again.
How to Overclock the Pi 4 to 2 GHz
As detailed in our earlier overclocking guide, overclocking a Raspberry Pi is as easy as editing a single file: config.txt, found in the /boot directory. This file acts as the equivalent to a desktop PC’s BIOS, storing settings which control how the Raspberry Pi operates.
To try your Raspberry Pi 4 at 2 GHz, you’ll need to open this file with elevated privileges. Open a Terminal with Control, Alt, and T, and type:
sudo nano /boot/config.txt
Find the section marked [pi4], which contains settings which only run on a Raspberry Pi 4 and means you won’t accidentally try to overclock an older Raspberry Pi to 2 GHz if you’re sharing microSD cards, and type the following as new lines directly underneath:
over_voltage=4arm_freq=2000
The first setting, over_voltage=4, increases the core voltage of the BCM2711B0 system-on-chip (SoC) by around 0.1V. Most Raspberry Pi 4s won’t be able to boot at 2 GHz without this extra voltage; if you’re feeling experimental, you can try dropping this down to 2 (representing 0.05V of additional voltage) to reduce heat.
The second setting, arm_freq=2000, sets the frequency of the four Arm cores to 2,000MHz, or 2 GHz. Don’t try to increase this any further: as the old firmware had a 1.75GHz hard limit, the latest firmware at the time of writing has a 2 GHz hard limit. Values above 2000 will simply lead to a Raspberry Pi 4 which doesn’t boot.
Save these changes with Control and O, then exit Nano with Control and X. Before you reboot to try your new settings, though, you’re going to need to install the new firmware. Still at the Terminal, type:
sudo rpi-update
This loads the Raspberry Pi Updater, which pulls down the very latest kernel models and firmware -- versions even newer than you can access using the general apt update && apt upgrade commands. You’ll see a warning about the tool not being for general use; read it and accept to continue.
When the tool has finished installing the updates, reboot by typing:
sudo reboot
With luck, the Raspberry Pi 4 will reboot as normal. If you see a blank screen, the Raspberry Pi 4 keeps rebooting, or you’re having any other trouble, try increasing the over_voltage setting to 6. If your Raspberry Pi 4 still doesn’t boot, decrease the arm_freq settings in 50MHz increments until it’s stable. That would that your Raspberry Pi 4 is, unfortunately, not a winner in the silicon lottery.
Benchmarking
Increasing the CPU frequency has, as you’d expect, a real-world impact on synthetic benchmarks and real-world workloads - though adding cooling to a frequently-throttling Raspberry Pi 4 should always be the first step for improving performance.
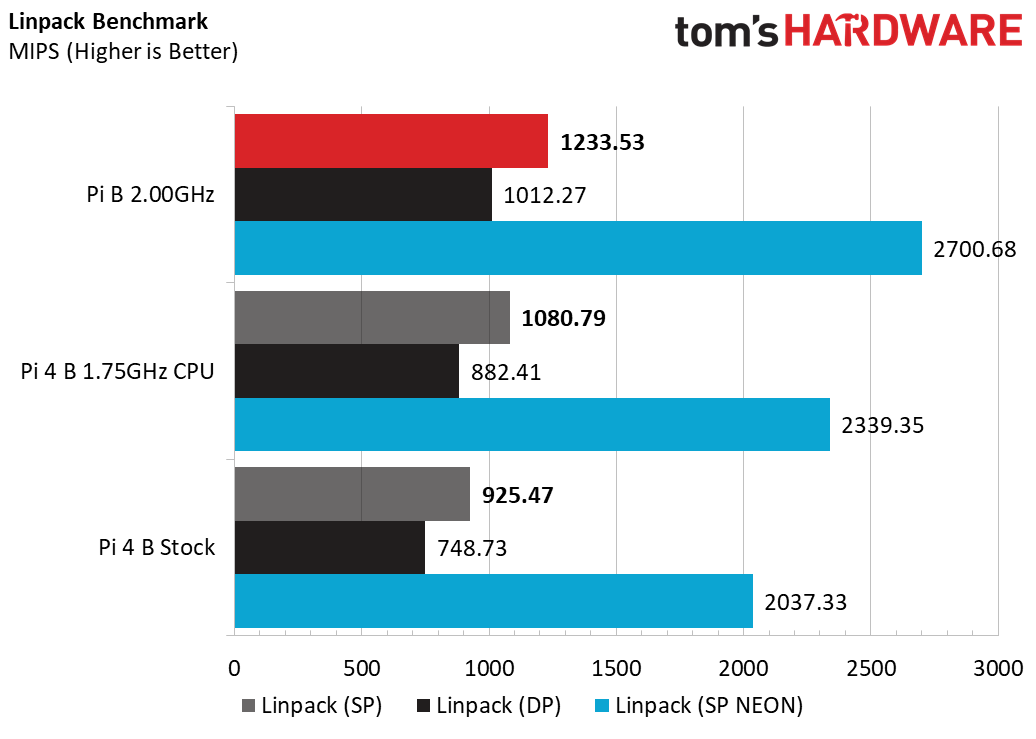
The synthetic Linpack benchmark measures floating-point performance. It’s here the difference in performance can be seen most clearly: increasing the clockspeed by 33 percent has increased the performance, measured in millions of instructions per second (MIPS), by almost exactly the same amount. The result at 2 GHz is a good 15 percent higher than at the previous limit of 1.75GHz, too, carried through all three versions of the benchmark: single-precision, double-precision, and a version of the single-precision benchmark which uses Arm’s NEON instructions to accelerate performance.
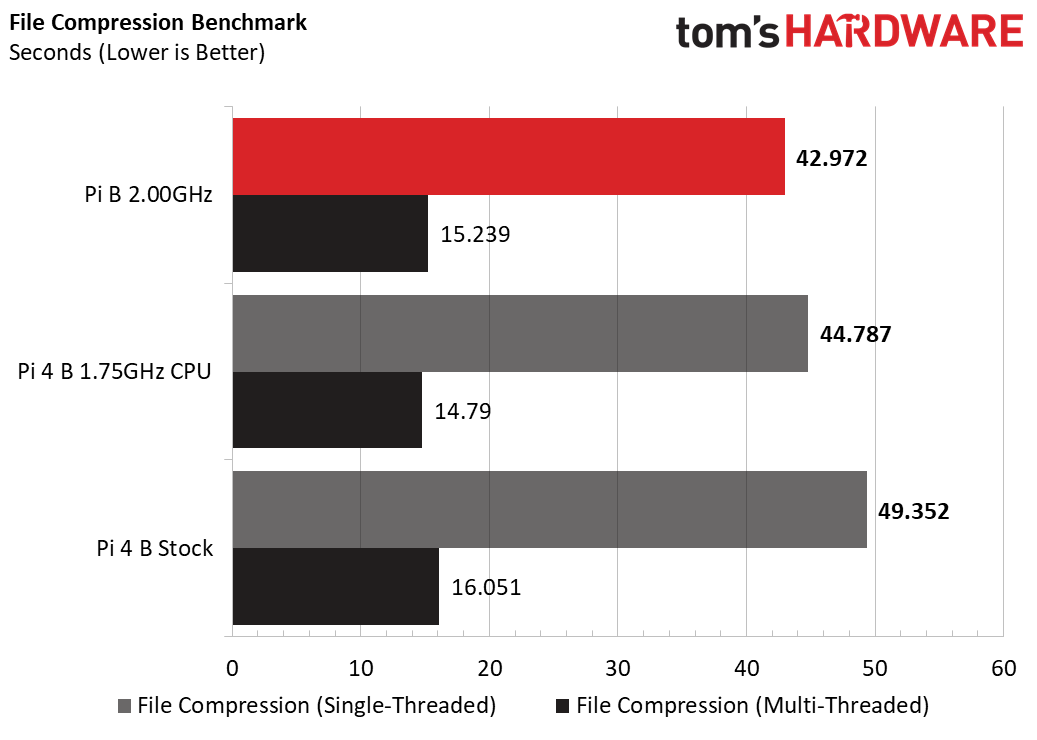
Here a large file containing randomised data is compressed, first using the single-threaded bzip2 application and then again using the multithreaded lbzip2 application. As should be expected, the real-world gains don’t quite live up to those shown by the synthetic benchmark: there’s a 13 percent gain in the single-threaded benchmark, dropping to just over five percent in the multithreaded version.
It’s here we see the first possible signs of a performance loss, too: while the single-threaded bzip2 performs around four percent better at 2 GHz than at 1.75GHz, the multithreaded lbzip2 was three percent slower - suggesting the ideal clockspeed for this workload may lie somewhere between the two.
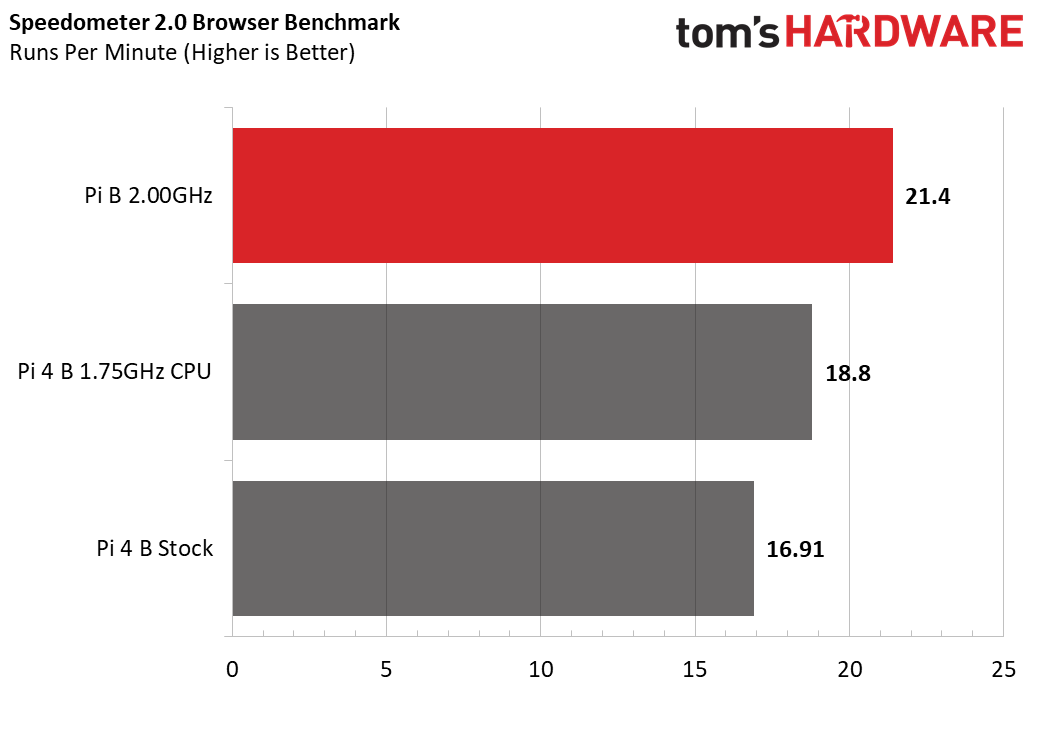
The Speedometer 2.0 benchmark measures web application performance, and is heavily tied to CPU speed. At 2 GHz, the Raspberry Pi 4 scores nearly 27 percent higher than at the stock 1.5GHz, and 13 percent higher than at 1.75GHz -- approaching, but not quite reaching, the maximum performance gain demonstrated in the synthetic Linpack benchmark.
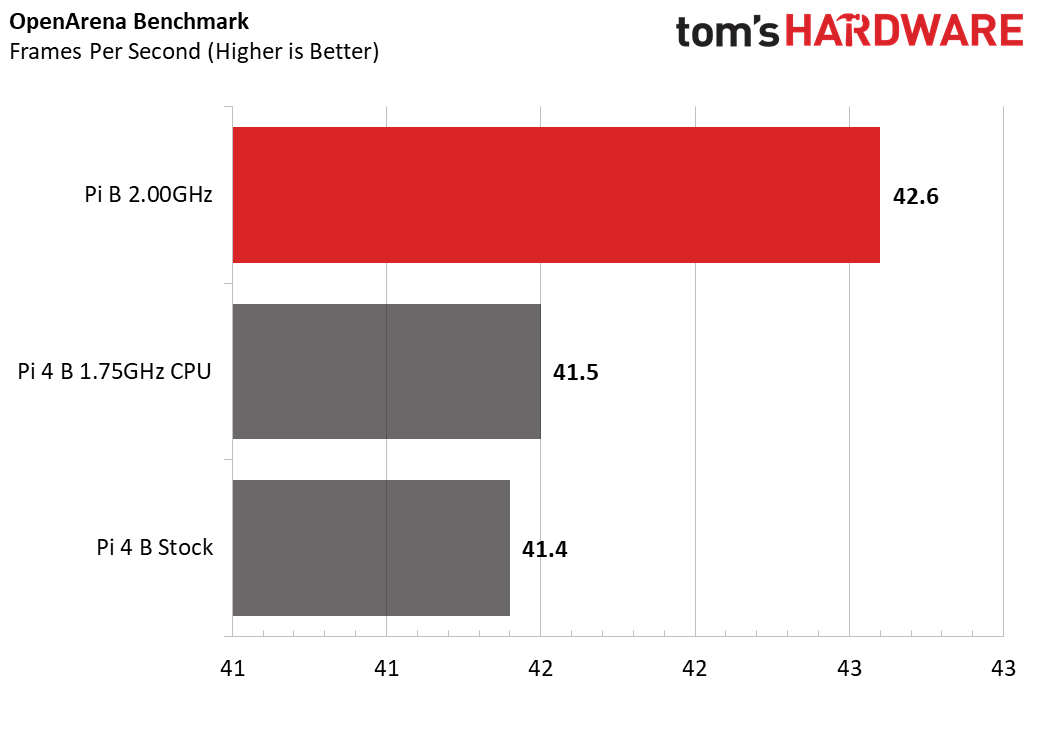
As per our earlier testing, though, CPU overclocking doesn’t do much to help with GPU performance. The OpenArena first-person shooter shows a mere 2.9 percent improvement in frames per second over the same Raspberry Pi 4 running at stock speed, though this is noticeably higher than the 1.75GHz test run’s mere 0.1 frame-per-second performance boost. As always, 3D applications will benefit more from following our guide on overclocking the GPU cores instead.
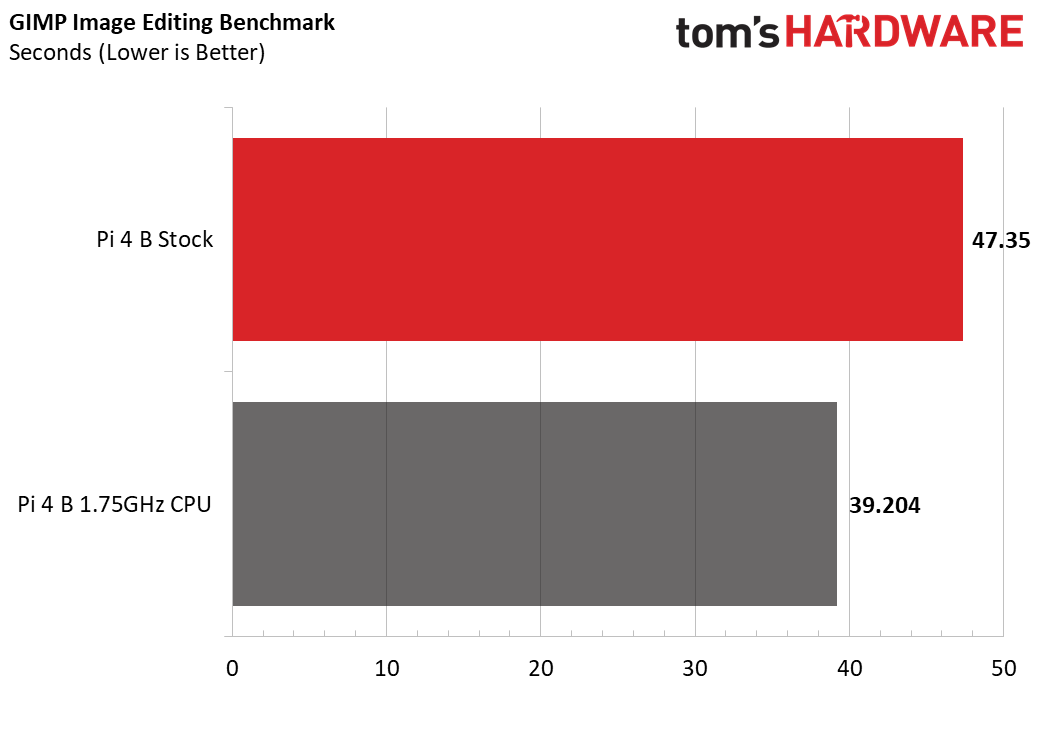
It’s in the image editing workload, using the popular open-source GIMP, the first signs of a silicon lottery loss appear: our Raspberry Pi 4 test unit completely failed to run the benchmark at 2 GHz, crashing and rebooting the machine every single time. The failure wasn’t related to heat - the Fan Shim ensured the BCM2711B0 stayed well below its 80°C throttle point even under the most demanding of workloads - nor could be corrected by increasing the core voltage. For this particular workload on this particular Raspberry Pi 4, then, 2 GHz will remain just out of reach.
Conclusion
Overclocking remains a safe and effective means of getting a little more power out of your Raspberry Pi 4, and the public availability of the updated firmware to allow speeds of beyond 1.75GHz means there’s even more performance to be found. As always, though, the hot-running BCM2711B0 benefits from some form of aftermarket cooling add-on, with a cooled Raspberry Pi 4 running at stock outperforming an uncooled overclocked model for long-running workloads thanks to the ease at which it hits the 80°C thermal throttle point.
Once you have cooling in-hand, though, there’s no real reason not to play around with overclocking your Raspberry Pi 4; just make sure to run a variety of workloads to find out if the speed you’ve achieved, whether that’s 2GHz or somewhere below, is truly stable.
-
MeeLee I'm fairly sure you can get more stable overclocks, when using thermal paste instead of thermal pads, and use the thermal pads for the bottom of the motherboard, on the other side of the CPU, as well as surrounding the CPU, so the bottom is passively cooled, and the top, actively cooled.Reply
The motherboard itself needs a way to extract heat, and sticky, non-conductive thermal pads might be able to transfer this to heat sinks.
Thermal cameras could indicate other areas on the board, as well as other chipsets that need extra cooling. -
MeeLee Reply
Never! They rather kick people with good ideas off the forums!Stokestack said:Let us know when they fix the USB-C port
