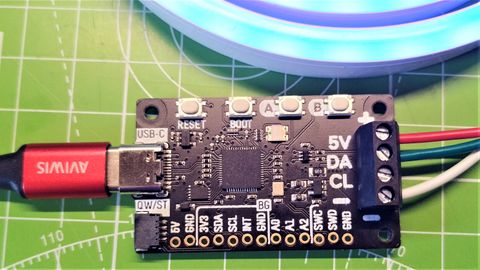
Tom's Hardware Verdict
The easiest and most cost effective means to add RGB to your projects.
Pros
- +
+ Ease of use
- +
+ Secure connections
- +
+ Low cost
- +
+ Stemma QT
- +
+ Support for NeoPixels and APA102
Cons
- -
No external power connection
Why you can trust Tom's Hardware
The Raspberry Pi Pico, and the RP2040 have been with us for some time now and we have seen typical boards with lots of GPIO pins, smaller boards with curated GPIO pins, and specialist boards which use the power of the RP2040 in an unusual form factor, for example Pimoroni’s Keybow 2040 and Adafruit’s Trinkey QT2040.
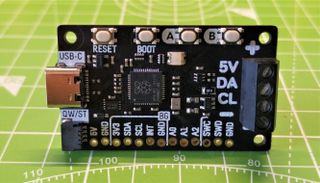
For the latest specialist board, we see Pimoroni’s Plasma 2040, a board designed specifically for use with RGB LEDs such as NeoPixels and DotStars. The Plasma 2040 is powered by the RP2040 and features a Stemma QT connector, along with sturdy screw terminals to connect to our chosen RGB LEDs.
The bespoke hardware is backed up by solid software, with support from a custom MicroPython library and Adafruit’s CircuitPython software with a Plasma specific release based around v7.0. But before we head into the review, we ask “Why do we need Plasma 2040? Can’t I just use a regular Raspberry Pi Pico?” The answer is yes you can.
For years we have hacked RGB LEDs with Arduino, Raspberry Pi, PIC and other microcontroller boards. What plasma 2040 brings to the table is simplicity. We don’t need to worry about a resistor on the NeoPixel data line, nor a capacitor to prevent the onrush of current damaging our LEDs, we just connect to the screw terminals, load some code and away we go. Without further delay, we put the Plasma 2040 on our bench, dug out a selection of RGB LEDs and took it for a test drive.
Pimoroni Plasma 2040 Hardware Specifications
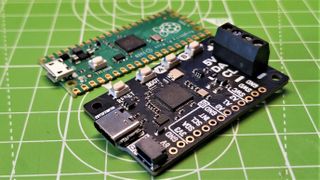
| System on Chip | RP2040 microcontroller | Row 0 - Cell 2 |
| Row 1 - Cell 0 | Dual-core Arm Cortex M0+ processor, flexible clock running up to 133 MHz | Row 1 - Cell 2 |
| Row 2 - Cell 0 | 264KB of SRAM, and 2MB of on-board Flash memory | Row 2 - Cell 2 |
| GPIO | Screw Terminals for use with WS2812 / NeoPixels / SK6812 and APA102 / DotStar / SK9822 RGB LEDs | Row 3 - Cell 2 |
| Row 4 - Cell 0 | USB C power (3A max) and data | Row 4 - Cell 2 |
| Row 5 - Cell 0 | Stemma QT | Row 5 - Cell 2 |
| Row 6 - Cell 0 | Current Sensing | Row 6 - Cell 2 |
| Row 7 - Cell 0 | Breakout pins for 3 x Analog inputs | Row 7 - Cell 2 |
| Row 8 - Cell 0 | Debugging | Row 8 - Cell 2 |
| Row 9 - Cell 0 | I2C (shared with Stemma QT) | Row 9 - Cell 2 |
| Row 10 - Cell 0 | 5V, 3V3 and GND | Row 10 - Cell 2 |
| Row 11 - Cell 0 | 3 x User inputs (A, B and BOOT) | Row 11 - Cell 2 |
| Dimensions | 50 x 28 x 12 mm | Row 12 - Cell 2 |
Using the Pimoroni Plasma 2040


The Pimoroni Plasma 2040 is really easy to use. Connect your RGB LEDs, load up some code and rainbows are bestowed upon you. We’ve used many different RGB LED controllers in the past and we have even made our own for the holidays, but the Plasma 2040 is almost plug and play.
First of all the screw terminals are a blessing. They keep a tight grip on the wires and provide a simple means to connect. We can use these terminals to connect APA102 (four wires) and WS2812 (three wires) RGB LEDs with power being provided by the USB C port, up to 3A at 5V. Using this power source, and allowing 90mA for the Plasma 2040 (we confirmed this with Pimoroni) we can run approximately 48 NeoPixels at full brightness (60mA per LED), but if we drop the brightness to 90% we can theoretically run upto 100 LEDs. The number of LEDs that can be run from the 3A supply depends on the brightness, color and animation / patterns in use. White is the most costly color, requiring each of the red, green and blue LEDs to be lit inside the NeoPixel package. If you need to power longer chains of RGB LEDs, which often exceed 3A current draw, then you will need to supply an external power source directly to the LEDs and not via the screw terminals. Just remember to connect the GND of the external power source to the GND of the RGB LEDs.


A useful addition to Plasma 2040 is a Stemma QT connector, a small connector typically used in Adafruit and SparkFun (renamed Qwiic) boards that breaks out I2C connections for compatible add-ons. We tested Plasma 2040 with an MPR121 capacitive touch sensor board and all we needed were a few lines of code and the mpr121.mpy library and we had touch-controlled RGB LEDs which flashed when we pressed on the touch inputs. Stemma QT add-ons are best used with CircuitPython, but Pimoroni does offer a version of MicroPython that supports CircuitPython libraries.
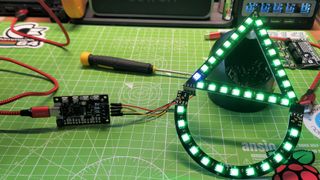
Speaking of CircutPython we tested basic control of two types of RGB LEDs. First we tested WS2812 “NeoPixels.” To be precise, we tested a one-meter strip of “neon” effect NeoPixels. In total we had 96 NeoPixels performing rainbow effects and color changes in mere minutes. Then we replaced the RGB LEDs with a series of APA102 “DotStar” shaped LEDs and altered the code and library to favor APA102. In just a few more minutes, we had the same effects running.
MicroPython, via Pimoroni’s custom release, is ready to go as soon as we flash the image. As of release 0.2.5, we see support for Plasma 2040 baked into Pimoroni’s custom MicroPython release. We have it on good authority that version 0.2.6 will include a series of examples to illustrate how to use the Plasma 2040 library. We flashed 0.2.5 to our Plasma 2040 and then used the examples provided by Pimoroni’s GitHub account to test that our board worked, and boy did it!
Our initial test saw the APA102 LEDs lit at 100% brightness, and for a moment it felt like we had opened the Ark of the Covenant. We added a line of code to act as brightness control and then edited the script to create our own light sequence. The Plasma 2040 MicroPython library is easy to use as it abstracts many of the configuration steps including a means to monitor the current draw of your LEDs via an analog pin. We create an object “led_strip” which stores the type of RGB LEDs, the number of LEDs in the chain, and to which pins they are connected. The three button inputs are also dealt with via the library, keeping the number of imports necessary for our code to a minimum.
The Pimoroni Plasma 2040 has three M2.5 screw points that can be used to mount and secure the board into a case or frame.
Use Cases of Pimoroni Plasma 2040
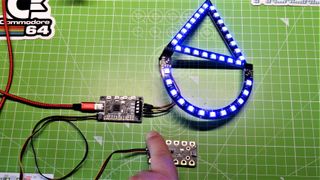
For $18 (£12.90) the Pimoroni Plasma 2040 is a cheap and easy to use board for holiday light shows or adding mood lighting to your home. The sheer simplicity of setting up your RGB LEDs and the software to support it means that Plasma 2040 is well placed for creative technologists eager to add RGB LEDs to their art, and to hobbyists who want to add a little light into their homes as the nights draw dark.
The inclusion of a Stemma QT connector is welcome, and it means that the Pimoroni Plasma 2040 can be used in scientific and data driven projects which require RGB LEDs as a means to display data, think temperature controlled LEDs or motion controlled cosplay.
Bottom Line
If you want to dip your toe into the world of RGB LEDs and have no idea what you are doing, then Plasma 2040 is for you. Equally, if you are an old hand at interactive light installations and want to make your next job easy, then this is the board for you. Low cost, solid hardware and great software means that the Pimoroni Plasma 2040 will be lighting up a few homes for years to come.
Les Pounder is an associate editor at Tom's Hardware. He is a creative technologist and for seven years has created projects to educate and inspire minds both young and old. He has worked with the Raspberry Pi Foundation to write and deliver their teacher training program "Picademy".
