


The Raspberry Pi has many of the best accessories and one that is sure to appear on that list is the new Camera Module 3. In our Raspberry Pi Camera Module 3 review, we said that we love the fast autofocus and HDR images and we want to share these features with you in this how to.
If you have never used a Raspberry Pi camera before, our beginner's guide to Picamera2 is a great primer to get your Pi taking great pictures. In this how to, we shall explore the many ways that we can use the Camera Module 3’s focus system with Picamera2 and learn how to take HDR images with a quick and simple script that automates the process. If Python isn’t your thing then the Camera Module 3 can also be controlled using libcamera via the terminal.
Getting to Know Autofocus
Autofocus has three modes in which it operates.
- Manual: Requiring the user to specify the LensPosition control to alter the focus of the lens. A value of zero will produce an infinite focus. Values up to 10 are accepted with 10 setting the focus to 1/10 of a meter (10CM).
- Auto: The typical autofocus which uses AfTrigger to start an autofocus cycle.
- Continuous: The camera will hunt for a target, refocusing on the target when the algorithm detects it.
Project 1: Using Continuous Focus
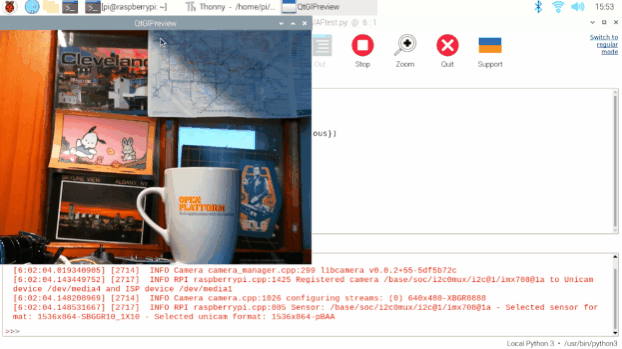
Continuous focus uses an algorithm to search the image stream for a target. It doesn’t matter if the target is near (around 10cm) or far, the algorithm will find the target and lock on. But how do we use it? Let's run a quick test. We’ll use a continuous focus mode to hunt for the best possible focus on our target. It would be useful to have an object that you can hold to the camera, we used a dollar bill.
1. From the main menu open Programming >> Thonny.
2. Import Picamera2.
from picamera2 import Picamera23. Import libcamera’s controls class. With this we can configure the camera to suit our requirements.
from libcamera import controls4. Create an object, picam2 which we will use as a link between the code and our camera.
picam2 = Picamera2()5. Start a preview window. The preview is where we see the output of the camera.
picam2.start(show_preview=True)6. Set the AfMode (Autofocus Mode) to be continuous.
picam2.set_controls({"AfMode": controls.AfModeEnum.Continuous})7. Save the code as AFtest.py.
8. Click Run to start the code. A preview window will appear. Move an object, we chose a dollar bill, around the frame and watch as the focus shifts. Try moving the object nearer to the lens, remember that the nearest focus point is 10 centimeters.
Complete Code Listing
from picamera2 import Picamera2
from libcamera import controls
picam2 = Picamera2()
picam2.start(show_preview=True)
picam2.set_controls({"AfMode": controls.AfModeEnum.Continuous})
Project 2: Setting the Focus Manually
Sometimes a fixed focus is what we need to get that great shot. After all, we don’t want to capture a blurry mess. Fixing the focus is relatively straightforward; in fact it is so easy that we can reuse most of the code from the previous example.
1. Use Save As on the previous example to create a new file called ManualFocusTest.py
2. Change the last line to use LensPosition, in this case set the value to 0.0 for an infinite focus.
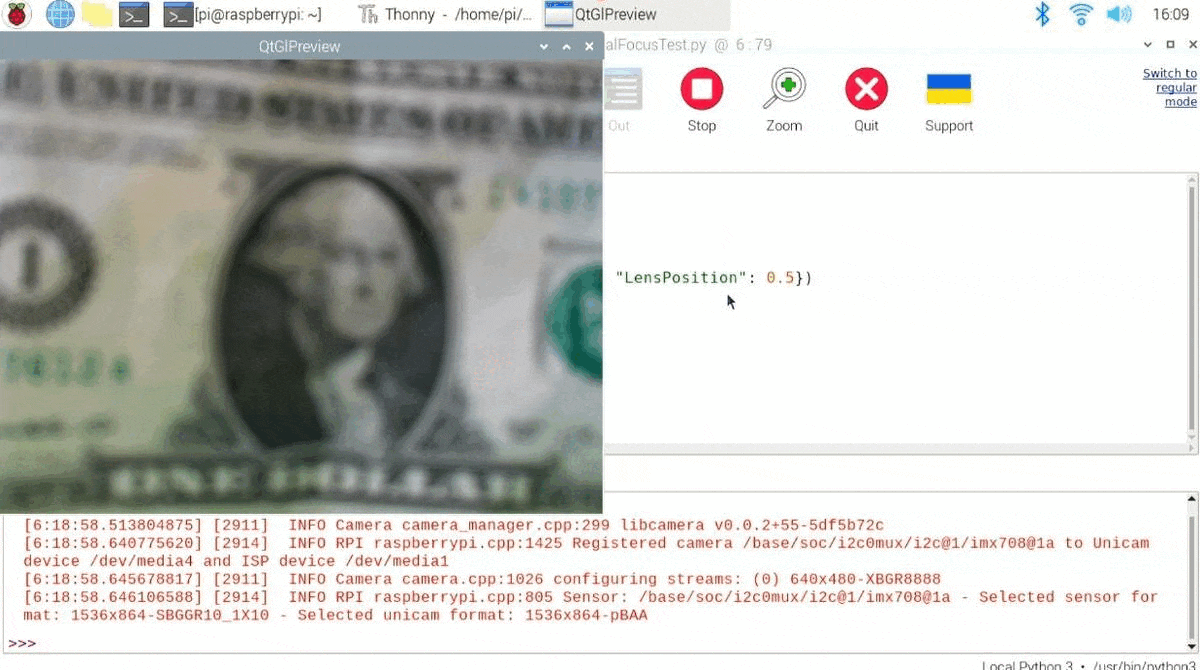
picam2.set_controls({"AfMode": controls.AfModeEnum.Manual, "LensPosition": 0.0})3. Run the code. Notice how the focus is sharp for objects far away, but close up they are blurred.
4. Change the LensPosition value to 0.5. This will give us approximately a 50 cm focal distance.
5. Save and run the code. Move an object towards and from the camera. Notice how the focus becomes sharp around 50 cm.
Complete Code Listing
from picamera2 import Picamera2
from libcamera import controls
picam2 = Picamera2()
picam2.start(show_preview=True)
picam2.set_controls({"AfMode": controls.AfModeEnum.Manual, "LensPosition": 0.5})
Project 3: Fast Focus for Multiple Images
Be it a bird cam, school sports day or home security, sometimes we need to get a series of sharp images. Luckily we can set the Camera Module 3 to take a series of rapid images and set the autofocus to high speed.
1. Create a new file called AfFastFocus.py
2. Import Picamera2.
from picamera2 import Picamera23. Import libcamera’s controls class. With this we can configure the camera to suit our requirements.
from libcamera import controls4. Create an object, picam2 which we will use as a link between the code and our camera.
picam2 = Picamera2()5. Start a preview window. The preview is where we see the output of the camera.
picam2.start(show_preview=True)6. Set the autofocus mode to Continuous and set the AfSpeed to Fast.
picam2.set_controls({"AfMode": controls.AfModeEnum.Continuous, "AfSpeed": controls.AfSpeedEnum.Fast})7. Set the camera to capture three files, with a delay of half a second between each shot. The filename “fastfocus.jpg” will append 0, then 1 and 2 to each file. Giving us three files in numerical order.
picam2.start_and_capture_files("fastfocus{:d}.jpg", num_files=3, delay=0.5)8. Close the preview window.
picam2.stop_preview()9. Close the camera connection.
picam2.stop()10. Save and run the code. Hold an object at three different distances to the camera and watch as the focus changes, the preview window freezes as the camera takes a shot, then releases for the next shot. Once three shots are taken, the preview window will close.


Complete Code Listing
from picamera2 import Picamera2
from libcamera import controls
picam2 = Picamera2()
picam2.start(show_preview=True)
picam2.set_controls({"AfMode": controls.AfModeEnum.Continuous, "AfSpeed": controls.AfSpeedEnum.Fast})
picam2.start_and_capture_files("fastfocus-test{:d}.jpg", num_files=3, delay=0.5)
picam2.stop_preview()
picam2.stop()
Capturing an HDR Image With Picamera2
HDR (High Dynamic Range) images can be easily captured with libcamera. We just need to pass the –hdr argument when we run the command. But for Picamera2 we need to run a terminal command before we run our Python code.
HDR increases the dynamic luminosity range of images. With HDR we get deeper darkness and brighter images. This works by capturing multiple images of the same scene, each with different exposures. These images are then combined into a single image which encompasses the entire range. Camera Module 3 can capture HDR images, but not at the full 12MP resolution. Instead we get a 3MP image with a resolution of 2304 x 1296 pixels.
For our test we are going to reuse the code from the AfFastFocus.py project, to capture a series of HDR images. We will also use Python’s OS library to run a terminal command that will turn on and off the HDR setting with no user interaction. This means we will not forget to turn on and off the HDR settings.
1. Create a new file called HDRAfFastFocus.py
2. Import Picamera2.
from picamera2 import Picamera23. Import libcamera’s controls class. With this we can configure the camera to suit our requirements.
from libcamera import controls4. Import the OS module. This enables our code to interact with the underlying operating system, in this case Raspberry Pi OS (Linux).
import os5. Create an object, picam2 which we will use as a link between the code and our camera.
picam2 = Picamera2()6. Use the system function from the os module to set the camera to use HDR. Picamera2 supports HDR, but not directly in the module. The issue is with V4L2, the kernel interface between the camera and the Linux video system. Right now, it does not offer ready support for HDR with this camera so we have to run this quick workaround to make it available in Picamera2.
7. Print a message to the Python Shell informing us that HDR is on.
print("Setting HDR to ON")8. Start a preview window. The preview is where we see the output of the camera.
picam2.start(show_preview=True)9. Set the autofocus mode to Continuous and set the AfSpeed to Fast.
picam2.set_controls({"AfMode": controls.AfModeEnum.Continuous, "AfSpeed": controls.AfSpeedEnum.Fast})10. Set the camera to capture three files, with a delay of one second between each shot. The filename “HDRfastfocus.jpg will append 0, then 1 and 2 to each file. Giving us three files in numerical order. We double the delay between each shot to give the camera time to save the previous image and then set the focus for the next image. We tested it with a 0.5 delay and our shots were sometimes a little too blurred.
picam2.start_and_capture_files("HDRfastfocus{:d}.jpg", num_files=3, delay=1)11. Close the preview window.
picam2.stop_preview()12. Close the camera connection.
picam2.stop()13. Print a message to the user that HDR is now off, and then run the command using os.system.
print("Setting HDR to OFF")
os.system("v4l2-ctl --set-ctrl wide_dynamic_range=0 -d /dev/v4l-subdev0")
14. Save and run the code. Hold an object at three different distances to the camera and watch as the focus changes, the preview window freezes as the camera takes a shot, then releases for the next shot. Once three shots are taken, the preview window will close.


Complete Code Listing
from picamera2 import Picamera2
from libcamera import controls
import os
picam2 = Picamera2()
os.system("v4l2-ctl --set-ctrl wide_dynamic_range=1 -d /dev/v4l-subdev0")
print("Setting HDR to ON")
picam2.start(show_preview=True)
picam2.set_controls({"AfMode": controls.AfModeEnum.Continuous, "AfSpeed": controls.AfSpeedEnum.Fast})
picam2.start_and_capture_files("HDRfastfocus{:d}.jpg", num_files=3, delay=1)
picam2.stop_preview()
picam2.stop()
print("Setting HDR to OFF")
os.system("v4l2-ctl --set-ctrl wide_dynamic_range=0 -d /dev/v4l-subdev0")
Python How Tos
- How To Install Python on Windows 10 and 11
- How to use For Loops in Python
- How to Enumerate in Python
- How to Create Executable Applications in Python
- How To Remove Backgrounds From Images With Python
- How to Create Web Apps with Python, HTML and Thonny
- How To Use Raspberry Pi Camera Module 3 with Python Code
