


I’ve been building PCs since Windows 3.1 was the latest operating system and, in that time, I’ve seen some major chassis changes. We’ve gone from boring gray boxes that sat horizontally under your CRT monitor, to mostly vertical towers that are designed to showcase the components inside. However, the way we build in most cases hasn’t fundamentally changed: You bolt the motherboard onto a backplate and then proceed to add in coolers, drives, a PSU and other components.
Designed for both younger builders and experienced folks who are looking for a new twist, Cooler Master’s Qube 500 comes in several pieces that you screw together in order to complete your build. You start by attaching the motherboard and PSU to the backplate then add the rear panel, the front, the bottom and the top, all as part of the process.
After all the sides are attached to the case, you get to snap on some colorful panels to the top and front. And there are a number of accessories, including shelves and headphone holders that you can then snap onto circular holes in the panels. If you have a 3D printer (perhaps one of the best 3D printers), you can print some of these accessories yourself and even submit your creations to win a prize.
I had a chance to build a PC in the Qube 500 case with some help from my 11-year-old son, who as a younger builder, is part of the target audience for it. Overall, we enjoyed the process – it was particularly convenient to be able to mount the motherboard without having any sides on the case – but we also ran into some snags because of the chassis’ cramped interior and atypical PSU placement. If you’re looking for a convenient and unique case, the Qube 500 is a good choice, but one with quirks we wish Cooler Master would fix if the company chooses to continue and refine this concept.
I should note that, since I didn’t use our standard case testing components, I was not able to do noise or airflow benchmarking. So my impressions below are based purely on the building experience.
Specs
| Case | Qube 500 Flatpack |
| Colors | Black, White, Macaron Edition (Mint, Pink, White) |
| Materials | Steel, Plastic |
| Dimensions | 406 x 231 x 415mm (including protrusions) |
| Row 4 - Cell 0 | 380 x 231 x 381mm (excluding protrusions) |
| Volume | 33.4 Liters |
| Motherboard Support | ATX / Micro ATX / ITX / E-ATX (Width up to 296mm w/ SFX PSU, up to 273 w/ ATX PSU) |
| Power Supply Support | SFX, SFX-L, ATX |
| Expansion slots | 7 |
| Drive Bays | Max 4 x 3.5 HDD |
| Row 10 - Cell 0 | Max 3 x 2.5 inch SSD |
| I/O Panel | 2 x USB 3.2, 1 x USB Type C 3.2 Gen 2, 2 x USB Type C |
| Row 12 - Cell 0 | 3.5mm Audio Jack |
| Pre-Installed Fans | 1 x 120mm 1800 RPM rear fan |
| Fan Support | Front: 120/140mm x 1 (x2 if PSU is mounted in bottom) |
| Row 15 - Cell 0 | Top: 120/140mm x 2 |
| Row 16 - Cell 0 | Rear: 120mm x 1 |
| Row 17 - Cell 0 | Bottom: 120/140mm x 2 |
| Row 18 - Cell 0 | Left Side: 120/140mm x 2 |
| Radiator Support | Front: 120/140 mm (240/280mm w/ PSU in bottom) |
| Row 20 - Cell 0 | Top: 120/140/240/280mm |
| Row 21 - Cell 0 | Rear: 120mm |
| Row 22 - Cell 0 | Bottom: 120/140/240/280mm |
| Row 23 - Cell 0 | Left Side: 120/140/240/280mm |
| Clearances | CPU Cooler: 164mm~172mm (Remove the water cooling bracket) |
| Row 25 - Cell 0 | PSU: 173mm to first GPU slot, 216 maximum space (w/o cable management space) 332mm space mounted in bottom (w/o cable management space) |
| Row 26 - Cell 0 | GPU: 365mm |
| Dust Filters | Front, Top, Bottom, Right side |
| Warranty | Two Years |
The Qube 500 is being sold, at least in the U.S., in three different configurations: Qube 500 Black and Qube 500 White are $79.99 and come with panels only in those colors. Qube 500 Macaron, the unit I was sent for review, costs $99 and comes with a white body but three different sets of panels: cream (yellowish), pink and mint, all of which are pastels. The bolder teal and yellow panels we saw on display at Computex, when the Qube 500 was first announced, apparently are not for sale at launch.
It’s not clear if Cooler Master will provide a way for you to buy just the panels so you can swap colors on an existing Qube 500 case. That’s a shame, because one of the benefits of this case is flexibility, so, if you bought just the black or white model and then could never change colors, you’d be missing out on a key feature.
To be clear, the colorful panels only attach to the top and front of the chassis, snaping on top of the front and top surfaces which are white (or black if you bought the black case). They have holes in them that you can use to attach accessories and mesh behind the holes, but you could theoretically use the case without them.
In the Box
Given that the Qube 500 is made up of a series of flat metal surfaces, I thought it would come in a lightweight, flat pack package -- but I was wrong. The box was heavy and packed full of foam designed to hold the parts in place. Each surface is as heavy and rigid as those on most higher-end prebuilt cases. This stands in contrast to InWin’s POC flat pack case, which comes in a thin cardboard box and is pretty light and small. Unlike the POC which can only handle a mini ITX motherboard, the Qube 500 can support up to an ATX board (E-ATX if you use an SFX PSU) and it leaves decent room for a discrete graphics card and other standard components.

The Macaron configuration comes with separate pieces for the back plate, the rear panel, the front panel, the top panel and the bottom panel. It also has left and right side panels to close the case and three sets of decorative snap-ons (mint, cream and pink pasteles) for the top and bottom. There’s a white handle that comes pre-attached to the rear panel, though you could swap it out with a mint one that’s also in the box. There are also a pair of accessory hooks that can snap onto the panels (to hold headphones or a keyboard) and a “Gem mini” accessory that can hold your headset cable in place.


For the sides, there is a panel with a tempered glass window and another one (for the back / left side) that just has mesh holes in it. If, for some reason, you want to use the non-windowed side panel to cover the right side, you can, but then you’d have to use the windowed side panel there (or leave the panel off entirely) and just see your messy cables.
If you want to mount your GPU vertically, there’s a bracket in the box that allows you to do that, but you’ll still need to get your own PCIe riser cable (more on that later). There’s also a metal bracket that allows you to mount an AIO radiator so that it’s facing out the side panel. However, this seems impractical. If you use the windowed side panel, you’d be blowing air against the glass, and Cooler Master only gives you one non-windowed side panel (also who buys a non-budget case and doesn’t want a window?).
The kit includes all the screws you’ll need and, to the company’s great credit, you can use the same small Phillips head screws for almost everything in the build, from attaching the motherboard to bolting on the sides to holding the PSU in place. The only time I had to use a different kind of screw is when I attached a 2.5-inch SATA drive to the rear of the backplate. For that, I had to attach four included rubber grommets to holes in the plate and then attach some pointy screws to the drive so it could pop into the grommets.
Our Build Configuration
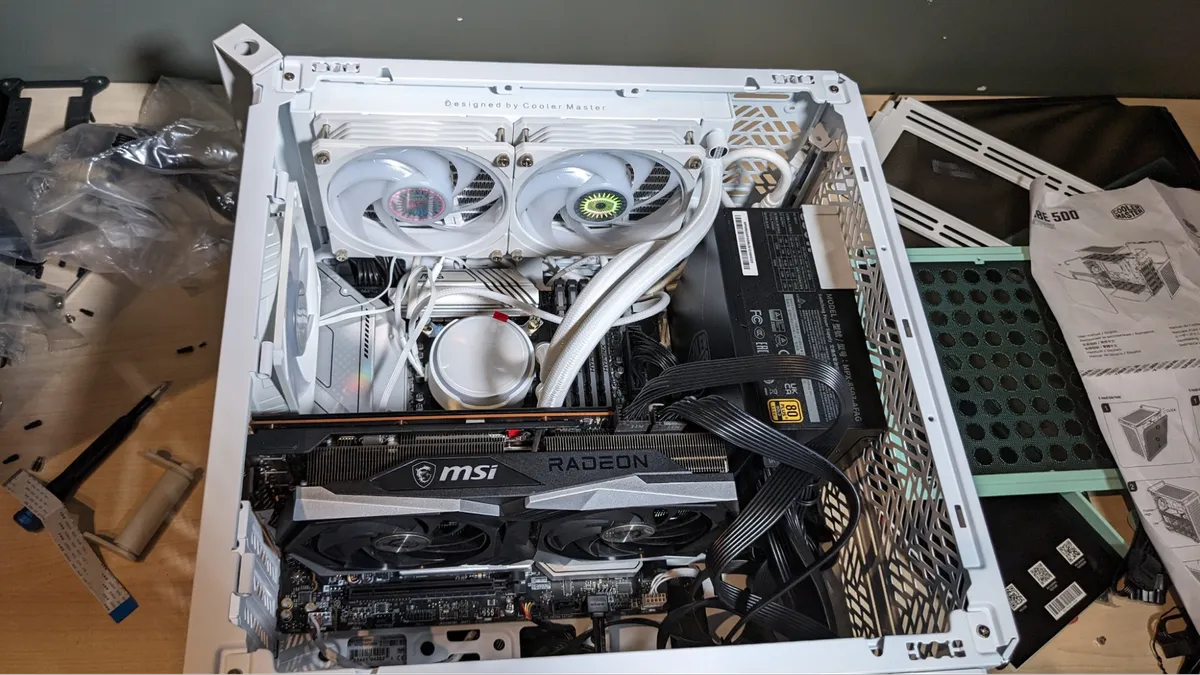
For our build, I used some older parts, along with an 850-watt PSU and 240mm AIO cooler that Cooler Master provided specifically for this build.
| Processor | Intel Core i5-12400 CPU | Row 0 - Cell 2 |
| Graphics Card | MSI Radeon RX 6700 XT Gaming X 12G GPU (279mm) | Row 1 - Cell 2 |
| Motherboard | MSI MAG B660M mATX Motherboard | Row 2 - Cell 2 |
| Storage | Samsung 980 M.2 SSD | Row 3 - Cell 2 |
| Row 4 - Cell 0 | TeamGroup 2.5-inch, SATA SSD | Row 4 - Cell 2 |
| Memory | 4x 8GB HyperX DDR4 RAM | Row 5 - Cell 2 |
| Power Supply | Cooler Master GX III 850 Gold PSU | Row 6 - Cell 2 |
| Cooling | Cooler Master PL240 Flux 240mm AIO Cooler | Row 7 - Cell 2 |
Getting Started
While you can try putting the entire case (or most of it) together before you insert the motherboard and PSU, your best move (and what the instructions recommend) is to start with the back plate and install the motherboard and PSU on it. Attaching the motherboard was very straightforward and the same as it is on any chassis.
The case comes with a series of holes that have standoffs already in them to accommodate a Mini-ITX, <icro ATX or full-ATX motherboard. I merely had to move a couple of the standoffs (and remove a couple of others) to mount my mATX motherboard. It was really convenient to be able to do that work without bumping my hands into the sides of a case or having to use a flashlight to view the holes. Decades ago, many more PC cases had removable motherboard trays, which were a huge convenience that building with the Qube 500 reminded me of.


PSU in the Motherboard Tray
The most unique and polarizing design choice Cooler Master made is that the Qube 500 effectively makes you mount the PSU on the backplate, to the right of the motherboard, with its fan facing the front of the case. On most PC cases these days, the PSU is mounted in the bottom rear, and is often hidden under a shroud. Here it’s front and center and because the plug doesn’t face the outside, there’s a pass-through power cable that runs from the PSU to a three-prong plug on the rear surface of the case. If you want to access the power switch on the back of your PSU, you’d need to open up the case, though it’s probably not something most people often need to do.


To mount the PSU, I had to put a bracket around it and then slide it into its tray, where the bracket locks into one of three notches, depending on how large the PSU is and how high or low you want it to sit. Then you need to attach screws on either side of the PSU to secure it. One side of the PSU is adjacent to the front panel, so you need to screw it in before you put the front panel on.

Putting the PSU at the upper right corner of the motherboard tray is interesting, but also problematic. This placement pretty much prevents you from being able to mount front-facing case fans (in theory, you might be able to squeeze a single intake fan below the PSU, but the cables that send power to your motherboard, CPU and GPU might get in the way). Worse still, the PSU will probably block longer graphics cards (more on that later).
The Qube 500’s instruction manual says that you can place the power supply in the lower left quadrant of the case instead, but I tried that orientation and it didn’t work for me. There’s no tray or bracket there to hold the PSU in place, but the instructions suggest that you could use the bracket that you screw onto the PSU to lock it against the bottom of the case. I tried that, but it did it not seem secure and, more importantly, the PSU blocked access to the pin headers on the motherboard and was dangerously close to bumping into the motherboard itself.

There is one advantage to having the PSU in the motherboard tray. If you want to stop your build and just use the Qube 500 as an open-air case, you can do that, though you wouldn’t have a good place to mount an AIO (an air cooler would work though). The instructions even tout the open-air case as a usage mode and say that you can just put the snap-on feet on the bottom of the backplate to keep it stable. However, it’s hard to imagine someone buying this case to use it that way.
Rear Surface
After mounting the motherboard and PSU, my next step was to attach the rear panel, which contains the card slot mounts and comes with a rear, 120mm RGB fan on it. The panel slid onto the backplate easily and it took just a few screws to secure it in place. When I realized that my case fan cable was somehow sticking out of the back, it was easy for me to loosen the rear panel temporarily and pull the cable back in.

The main problem with the rear panel is that it has a large empty space next to the card slots and nothing to cover it. On most other cases, there’s some kind ofsnap-in or screw-in slot cover that goes in this area – you remove it when you’re screwing or unscrewing in a PCIe card and put it back when done. Here there’s just a permanent, gaping hole.

I could imagine not only dust getting into this space, but also insects or other household pests who might like the warm environment inside the case. I could also imagine a cat sticking their paw into this gap.
In fact, one potential issue with the Qube 500 is that it has so many large air holes that it would be easy for dust to get in. Almost every inch of the white body is full of large vents that visually give it the density of a wicker basket. However, on all of the surfaces but the rear panel, there’s some kind of mesh you can put over it. The bottom has a magnetic mesh cover while the top and front surfaces are where you put the colorful, snap-on accent panels (these have holes in them but mesh underneath the holes). The left side of the case is covered by a panel which also has holes backed by mesh and the right side is solid tempered glass.
Bottom, Front and Top Surfaces
At this point, I could have put in a graphics card, but I decided to attach the bottom and front panels first. Each of those slid into place easily and had just a handful of screw holes I needed to fill in order to secure them.
Before putting on the top panel, I mounted the AIO pump on the CPU. Then I attached the top panel and began the process of attaching the 240mm radiator to it. Unfortunately, I ran into a little bit of a hassle here as the radiator; which its eight screw holes didn’t align perfectly with the mounting holes in the top panel.
I had to move the AIO toward the rear of the case, but there was one fan there bumping into a heatsink on the motherboard. Some of this is to be expected with a compact case and a full-size motherboard, but it's still annoying.

Accordingly, I had to move the radiator forward a bit and two of the screw holes were then obstructed by metal in the top panel, so I could only use six of the eight attachment screws. That was sufficient to hold the radiator in place tightly, though. In the picture below, I’ve circled the two screw holes that were obstructed.

Front Panel Ports
The front panel has two USB 3.2 Gen 1 (5 Gbps) Type-A ports and a single USB 3.2 Gen 2 x 2 (20 Gbps) Type-C port, along with a 3.5mm audio jack and the power button. Connecting these ports, the power button and the power light to the motherboard was really easy. The power / lights have a single connector that plugged directly into the header pins on my motherboard – no trying to figure out which pins are for the light, for reset or for power. However, there is no reset button.
I had no problems connecting the USB ports or the 3.5mm audio jack to the appropriate headers on the motherboard either.
Cable Management
The backplate has lots of holes you can use to route and hide cables. In fact, there’s a nice big cable hole right below where you mount the power supply, so it’s easy to hide the power cables that connect to the motherboard and CPU.
There are also a series of channels in the back where you can keep cables in place if you use zip ties. However, I found that it was really difficult to constrain or organize the wires because there isn’t a lot of room behind the backplate. It was a bit of a mess for me, and the cables stuck out so much that it was a little challenging to snap the left-side panel on and close the case.

Graphics Card Issues
The biggest problem I had during my build was in getting my graphics card to fit. Originally, I wanted to use an Asus TUF Gaming RTX 3080 card which is 300mm long, but it was blocked by the power supply. I tried moving the power supply to the bottom of the case, but as I said above, the PSU didn’t fit there.
Then I got a PCIe 4.0 riser cable, attached it to the slot on the motherboard and tried using the special bracket Cooler Master includes for mounting a graphics card vertically. Unfortunately, the case was still too cramped and the card was still bumping into the power supply or smushed against the motherboard.
The picture below shows the RTX 3080 card positioned vertically with the power supply removed (which obviously it couldn’t be). Even without the PSU in place, it was still too tight of a fit.

In its spec sheet, the Qube 500 claims a GPU clearance of 365mm, which is much longer than my RTX 3080 card. But that assumes the power supply isn’t in the way, which it is. To complete the build, I switched to the MSI Radeon RX 6700 XT X 12G which is 279mm long and fit, but without much space to spare. In other words, if you have a graphics card that’s longer than about 280mm, it probably won’t fit in this case.
Colorful Panels, Accessories
After I had the GPU in and all the cables connected, I snapped the left and right side panels into place, no screws required. Then I snapped on the decorative front and top panels, which also require no screws.
I tried the case with all three panel colors. The yellowish “cream” color is pretty bland. Pink is nice but not my favorite, and mint appealed to both me and my son. You can also mix and match.


Once you have the panels on, you can attach the accessory hook and Gem mini by snapping them onto the holes in a panel. I snapped two accessory hooks onto the side and then onto the front and used them to hang a pair of headphones, which they held well.


You can also change the handle, which attaches via a couple of nuts (there’s an Allen wrench in the box). The default handle is white, but I swapped it out for a mint handle that came in the box. The kit didn’t include pink or cream-colored handles.
Bottom Line
The Cooler Master Qube 500 offers a unique building experience that’s convenient and fun, provided you use a graphics card that’s not too long to fit. The case’s atypical placement of the power supply really limits the length and your ability to put intake fans on the front surface. Yes, you’re supposed to be able to put the PSU in the lower left quadrant of the case, but a standard-size PSU doesn’t fit there comfortably and securely
The concept of the colorful panels and accessories is great, but Cooler Master, at least at launch, isn’t taking it far enough. You can only get the three pastel colors in the Macaron kit, but if you buy the black or white Qube 500 kits, you get no color choices at all. Cooler Master should sell the panels and accessories separately for those who want to upgrade the style of their cases after they’ve built them.
Overall, this is definitely a case worth considering, particularly if you don’t need a ton of fans or a large graphics card. However, there’s a lot of room for Cooler Master to improve if the company chooses to make a second version. I'd like to see a roomier version, giving you a better place to put the PSU, more panel color options offered, and a fix for that gaping hole in the rear panel.
MORE: Best PC Cases
MORE: Best Mini-ITX Cases
