Tom's Hardware Verdict
The CR-Scan Lizard has potential, but buggy software and a mediocre scan quality hold it back.
Pros
- +
+ No need for marking dots
- +
+ Scans black objects
- +
+ Fully automatic mode
Cons
- -
Buggy software makes scanning difficult
- -
Needs to be tethered to a computer
- -
Scans often miss fine details
Why you can trust Tom's Hardware
Even if you have one of the best 3D printers, you’re faced with a dilemma: what do I print? If you’re a talented artist, you can design your own models and, if not you can free ones on sites such as a Thingiverse. You can even convert a 2D logo into a 3D print. However, if you want to take a real-world object and make it printable, you’ll need a 3D scanner.
This month Creality launched a Kickstarter for a new 3D printing accessory: the CR-Scan Lizard. Named after the fantastic eyesight of the lizard (they didn’t say which one) this scanner promises to open doors for makers who don’t want to design models from scratch.
The CR-Scan Lizard has interesting possibilities, and with better software could be a must have tool in any maker’s workshop. But what we were given to review is limited by a poor user interface, buggy software and modest scan quality. The software had functions that were not explained and often crashed while attempting to process data. Marketing for the scanner is overly optimistic and shows a happy family doing things I was not able to replicate, like face scans or taking it more than 6 feet from a power outlet.
Retail pricing starts at $599, but Kickstarter backers will receive an Early Bird discount, currently 45% off. Units are promised to ship in April 2022.
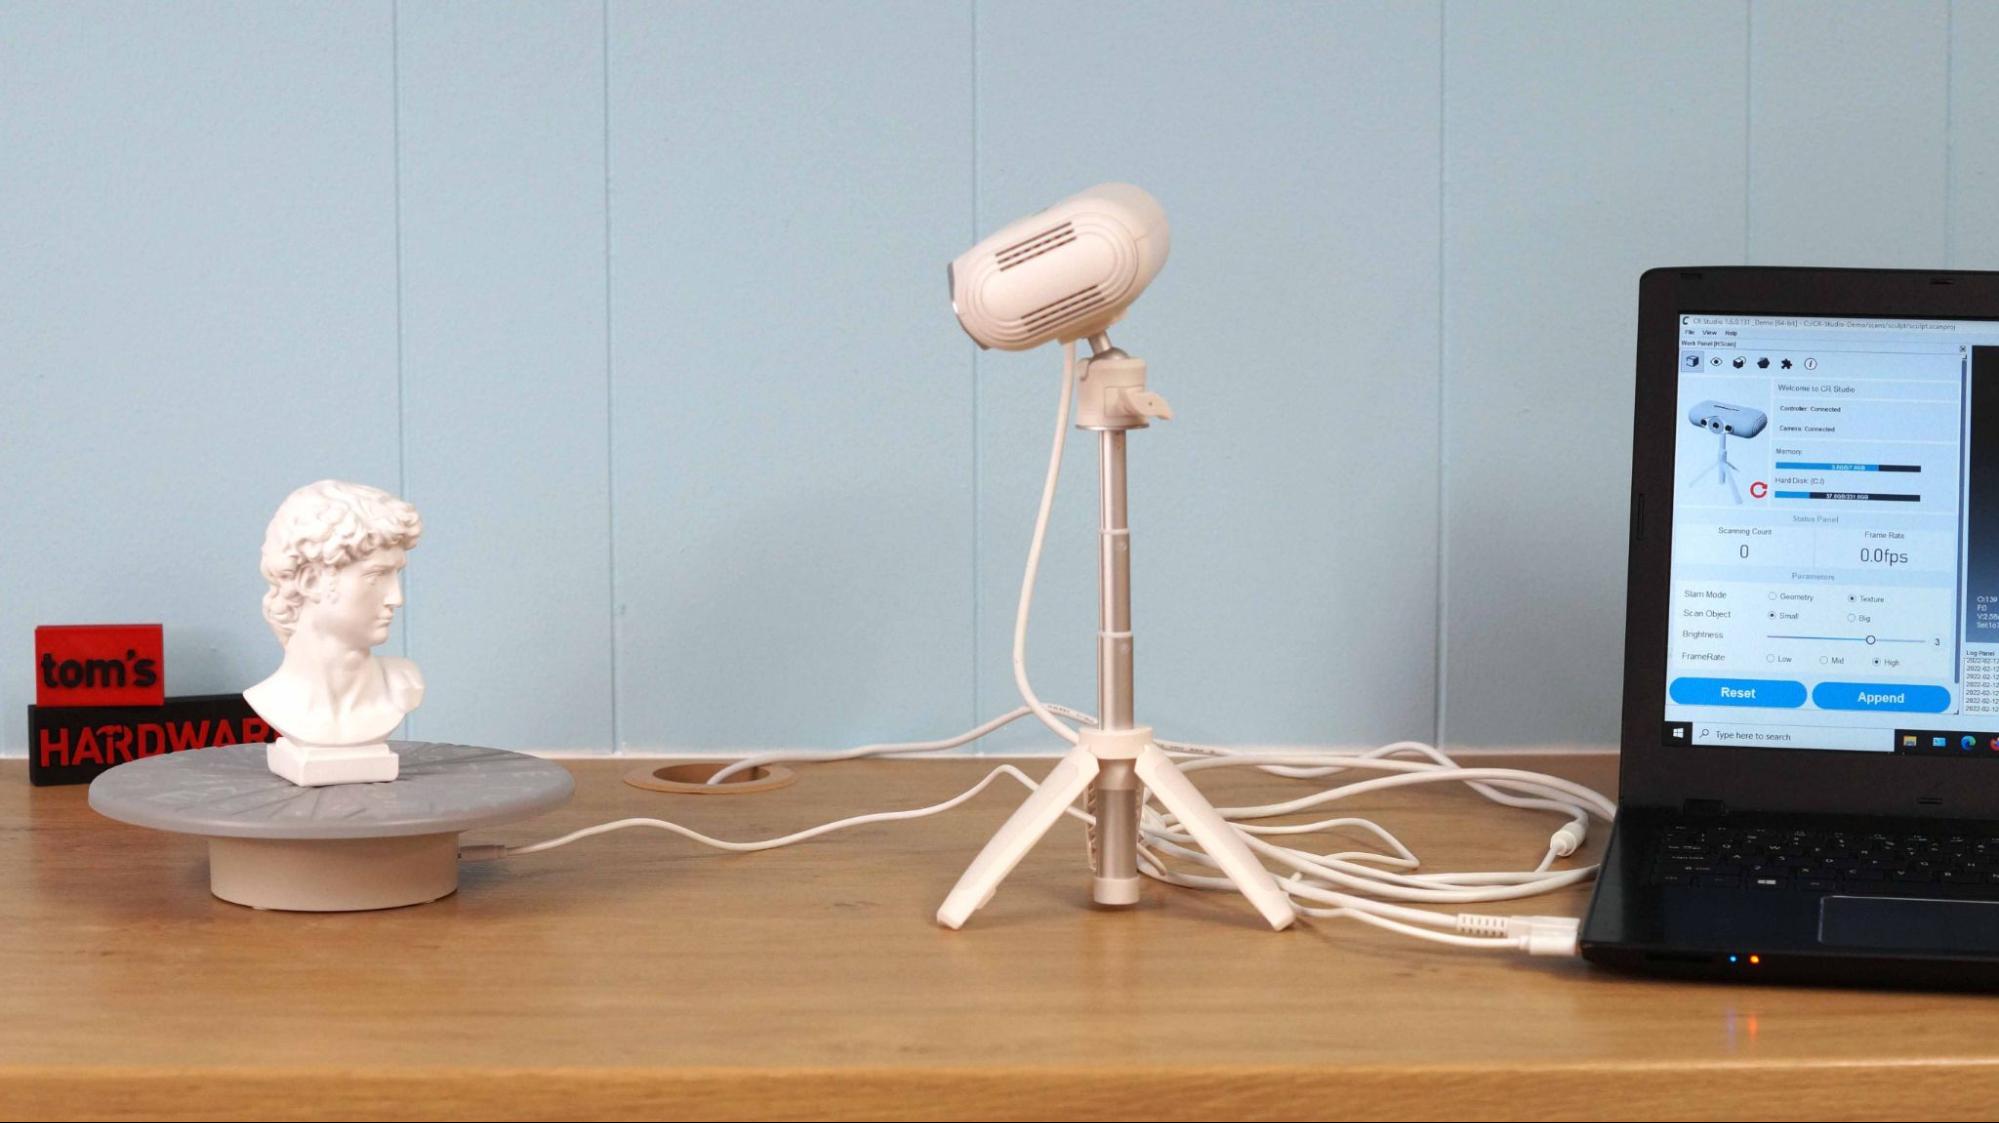
The CR-Scan Lizard copies lightly colored objects quite well and does a decent job with dark items. It doesn’t need marking points, but when removed from its rotating baseplate the scanner easily gets lost. It works best as a tabletop unit, especially since it requires three different wires with 7 connection points, making your desk a bit messy. If you need a portable 3D scanner, this is not the one for you.
Kickstarter
I want to emphasize that the CR-Scan Lizard is currently a Kickstarter. It smashed the pledge goal of $12,819 within minutes of launch and currently has nearly 6000 backers pledging over 2 million dollars. Creality is also a well-known leader in the 3D printing space. It’s a safe bet that backers will receive their product.
However, pre-launch review models – like the one sent to Tom’s Hardware – came with buggy Beta software and vague directions. As other reviewers unboxed their scanners online, I noticed at least two models of baseplates and different colored cords were shipped out. The scanner I’m reviewing for you today may very well be different from the one you would get if you buy it.
Get Tom's Hardware's best news and in-depth reviews, straight to your inbox.
Specifications: Creality CR-Scan Lizard
Accuracy: | up to .05 mm |
Single Capture Range: | 200 x 100 mm |
Working Distance: | 150 to 400 mm from the subject |
Minimum Scanning Volume: | 15x15x15 mm |
Scan Speed: | 10 frames per Second |
Light Type: | LED and Near IR |
Alignment: | Visual Tracking |
Color: | Optional Iphone or DSLR camera kit coming soon |
Output Format: | OBJ/STL/PLY |
Required PC: | Windows or Mac |
Included in the Box: CR-Scan Lizard
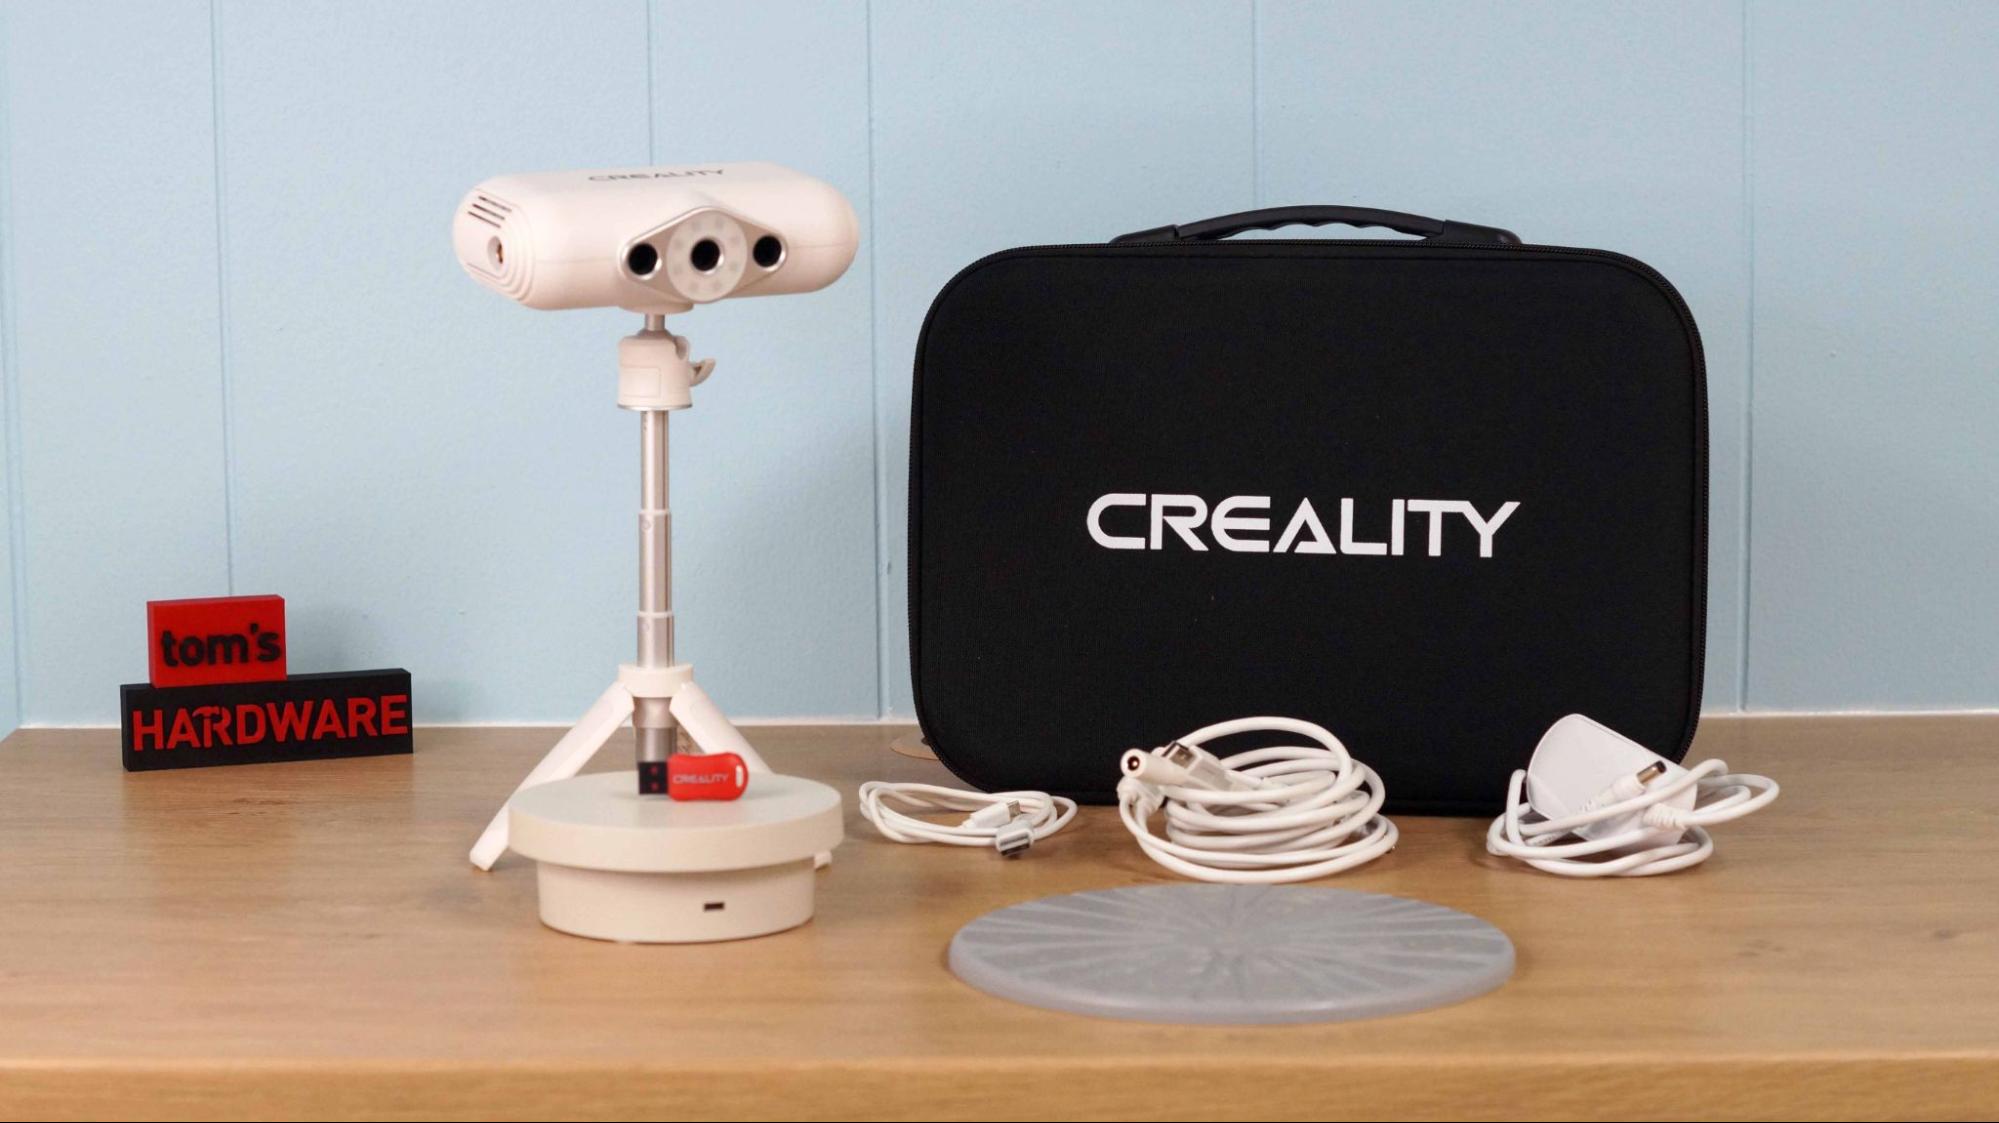
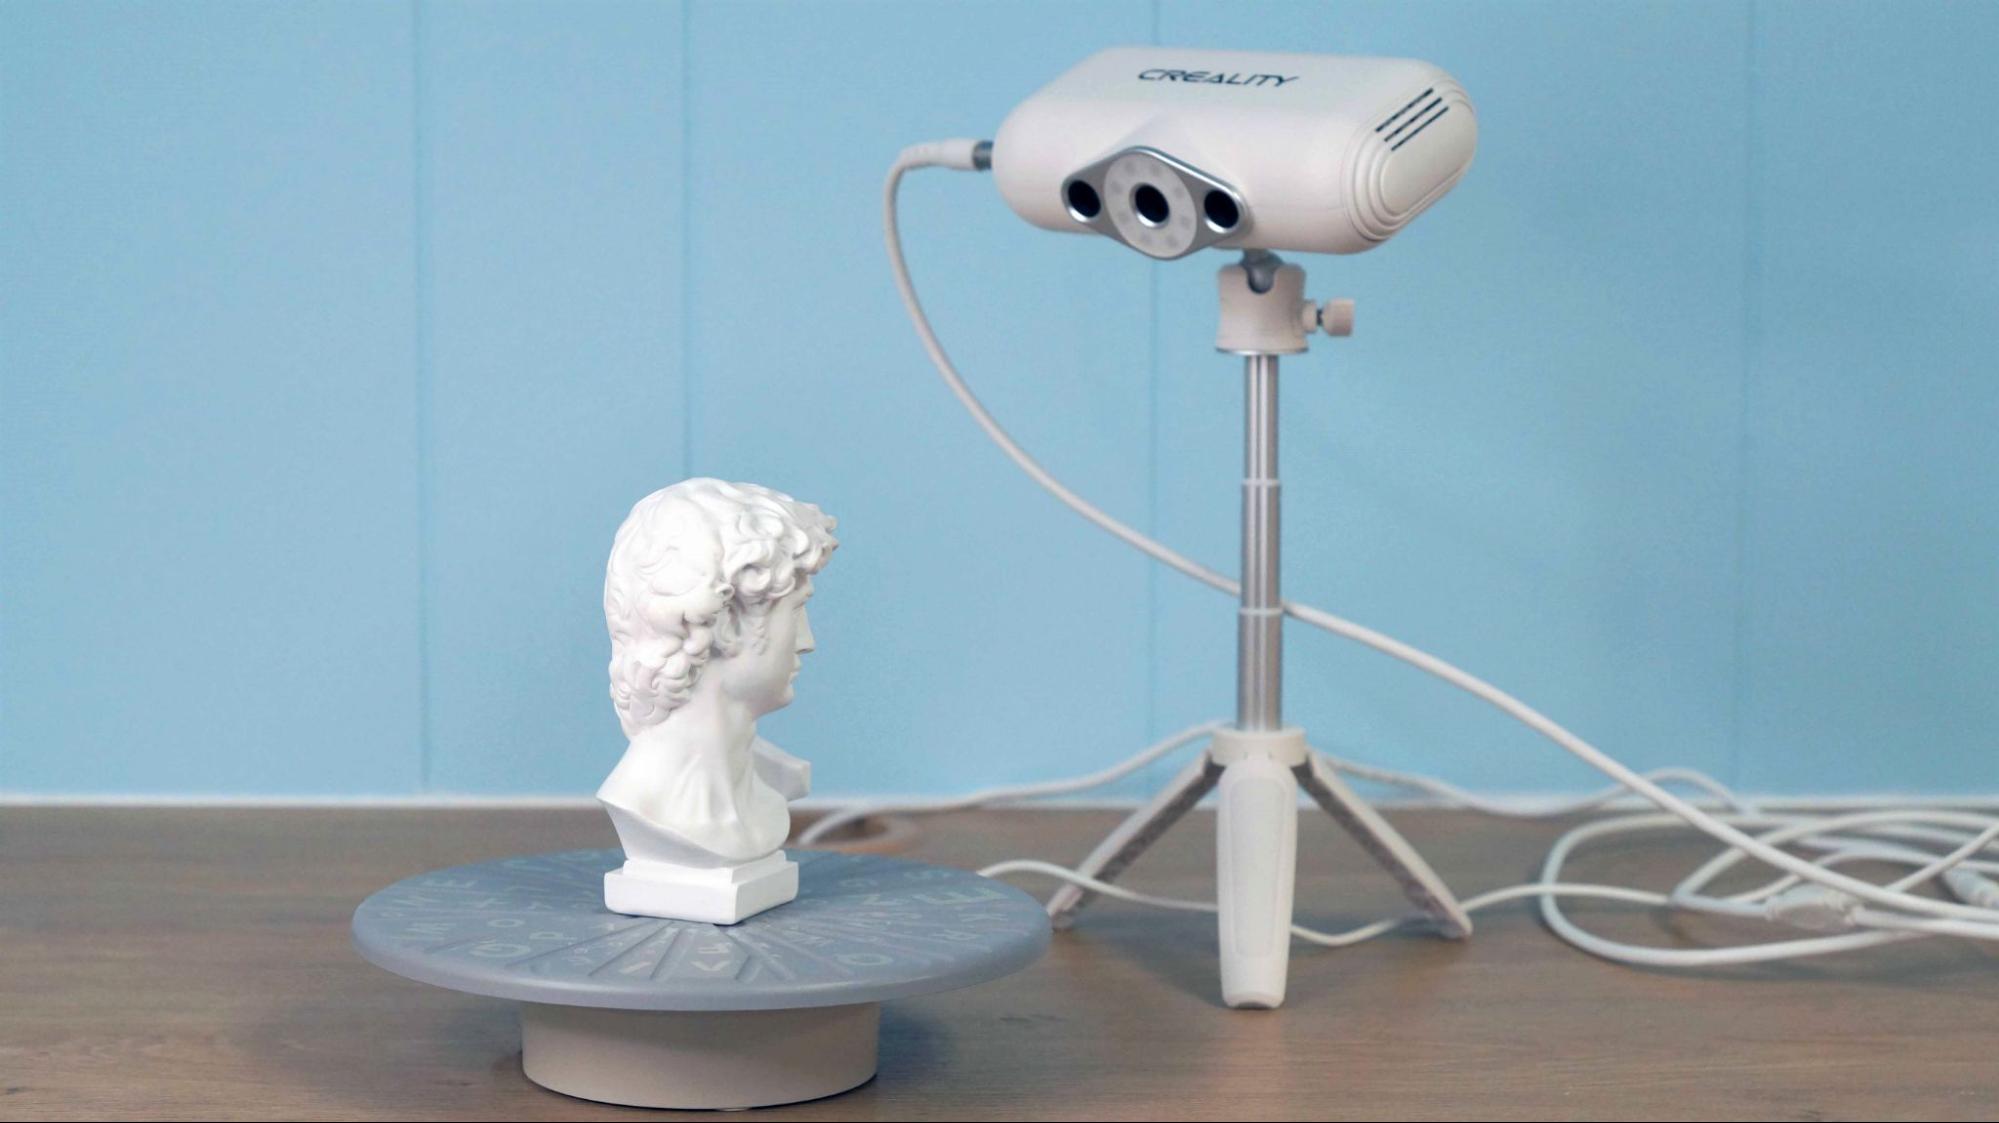
I received the CR-Scan Lizard premium package for review, which comes with a USB powered turntable, tripod and all the required cords tucked into a padded carrying case. The review scanner came with a USB stick with a “demo” copy of CR Studio and a PDF of the quick start guide. I also received a small plaster bust of Michelangelo’s David for practice. The bust is not mentioned in the Kickstarter.
The scanner has a sleek design and at 370 grams feels quite solid. The data cable connects to the scanner with a sturdy aviation grade plug that won’t fall out when attempting hand held scans.
It has a noticeably loud cooling fan and the LED lights strobe when it scans dark objects. It’s not a stealthy machine.
PC or Mac
The CR-Scan Lizard is compatible with both Windows and Mac and requires a minimum of 8GB of ram to process scans.
Software Compatibility of CR-Scan Lizard
The CR-Scan Lizard comes with CR Studio, a one-stop shop for scanning and editing the resulting data. Under good conditions, this is all you need to take an object from scan to a sliceable STL file for 3D printing.
CR Studio saves files as proprietary project files, STL and OBJ. STL and OBJ files can be imported to the modeling software of your choice for further touch up or transformation.
Assembling the CR-Scan Lizard
The CR-Scan Lizard is shipped fully assembled. You only need to plug the various cords into the scanner, turntable, a computer and power source.
Three cords are needed for Table Top Mode. There is a Data Transmission cable that connects the scanner to your computer via a USB 2.0 port, with a Y split that connects to a separate power cable. The power cable is about 5 feet long.
The turntable is USB powered, meaning you have another cable to connect to a USB power source. The table spins at one speed and does not have a power switch. It is not controlled by the software, it just spins until unplugged.
The 10-inch tall tabletop tripod is well-designed and feels sturdy. It has a short telescoping neck and folds down into a handheld monopod. The screw mount is a standard size and can be swapped out with any commercial tripod.
Installing the Software for CR-Scan Lizard
The CR-Scan Lizard requires CR Studio to operate and has no buttons or monitor of its own. Installing the review copy of CR Studio was far from simple – hopefully the final version will have a better user interface.
Directions for how to use CR Studio were vague and many options had to be discovered by trial and error. Creality seems to have great faith in its automatic scan processing, so when I had a bad scan I was on my own to sort it out. It took several frustrating sessions with the software to find a good routine.
Table or Hand Scan Modes
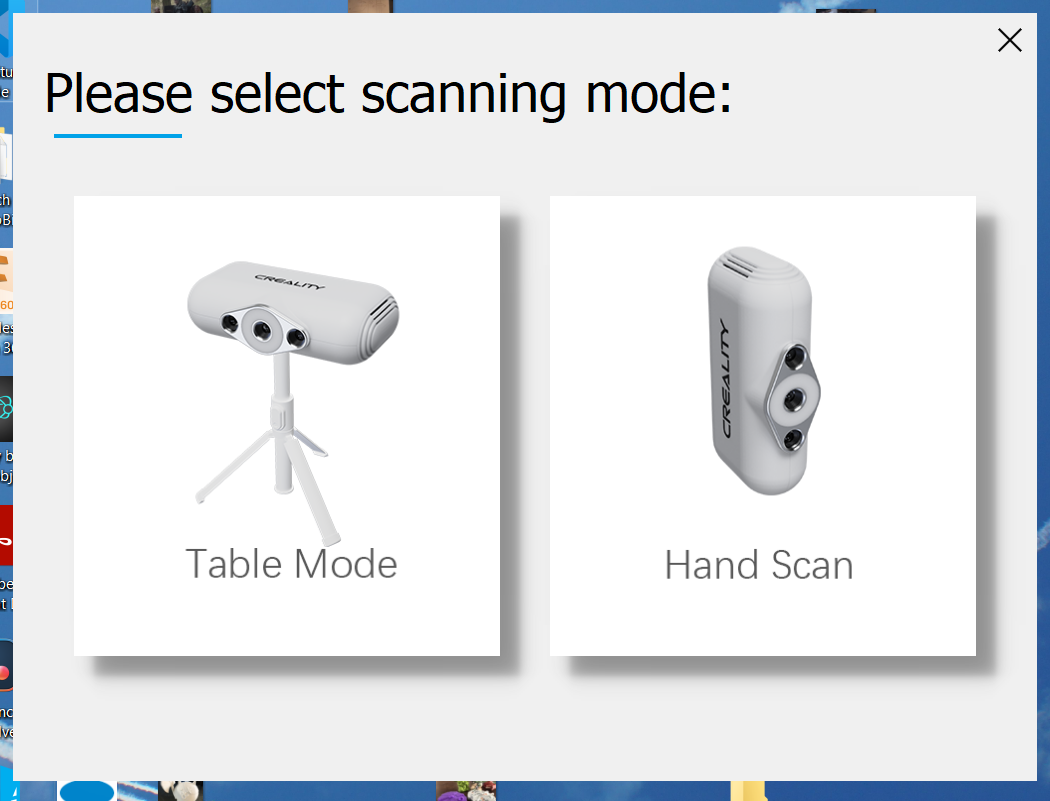
After CR Studio is launched, you’ll be asked if you want to do a Table Mode or Hand Scan.
Table Mode is fully automatic and the easiest method. This technique uses the turntable and tripod.
Handheld removes the need for the turntable and its alignment aids. You will need to carefully and slowly pass the scanner over an object, covering all sides. I did not have the patience to make this method work, as the scanner kept losing its place and crashing.
A third technique uses Hand Scan mode and the turntable together. This eliminates the need to walk around the object you’re trying to scan. It’s useful for items that fit on the turntable but are too large for the scanner to capture while mounted on the tripod. This works better than a pure handheld as you can concentrate on holding the scanner steady while slowly moving it up the object.
How to Scan with CR-Scan Lizard
The CR-Scan Lizard works best in Table Mode while scanning objects with the smallest dimension being 15 mm to 200 mm for the longest side.
The scanner body lacks a power switch, so it immediately turns on when plugged in.
Lighting does not matter to the CR-Scan Lizard as it scans with an infrared light beam. I scanned in normal indoor lighting without trouble. The scanner also works fine under studio lights or outside if you have a power source. Here are the steps you need to take to scan an object.
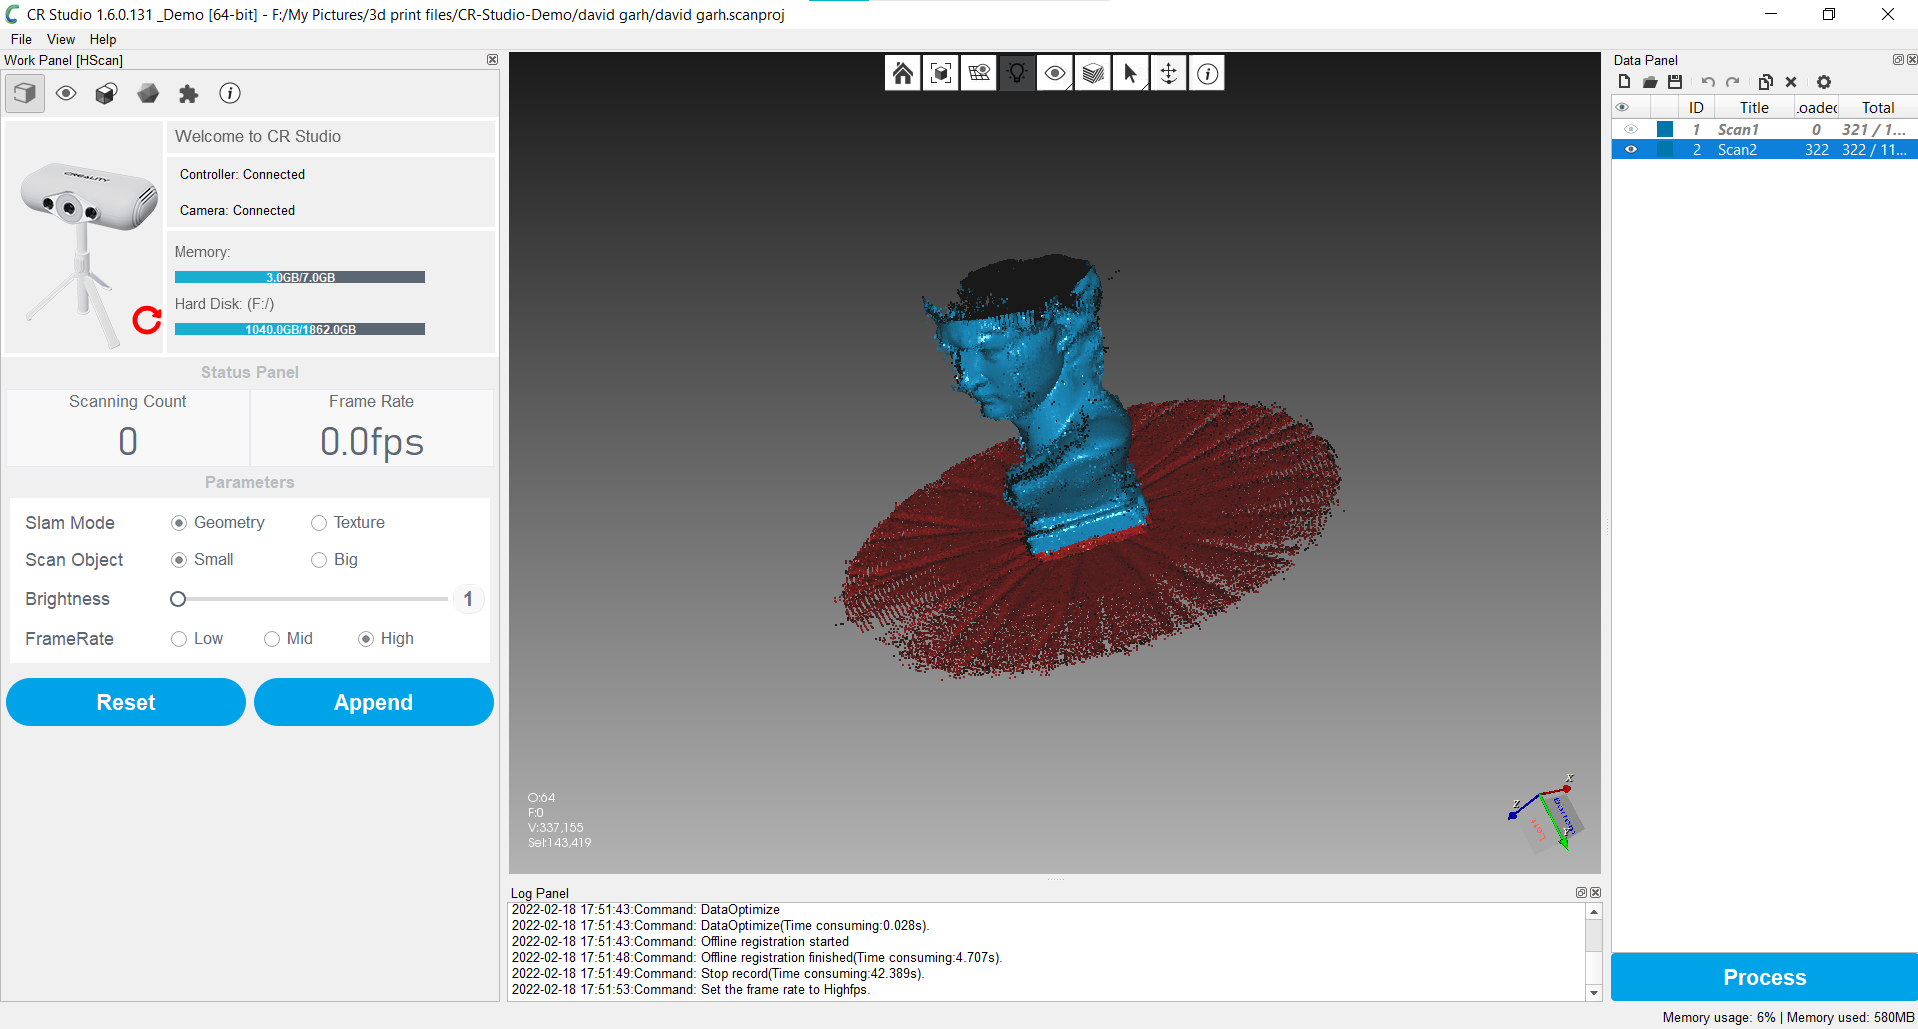
1. Mount the scanner on the tripod and set it 300 mm (about one foot) from the turntable. The scanner only “sees” 400 mm from the lens, so make sure the immediate area behind the turntable is free of clutter. Place your item on the center of the turntable. Adjust the tripod so that scanner is pointing at the center of the turntable and most of your object is within view.
It’s ok if you can’t see the entire object, as the CR-Scan Lizard is able to combine multiple scanning passes.
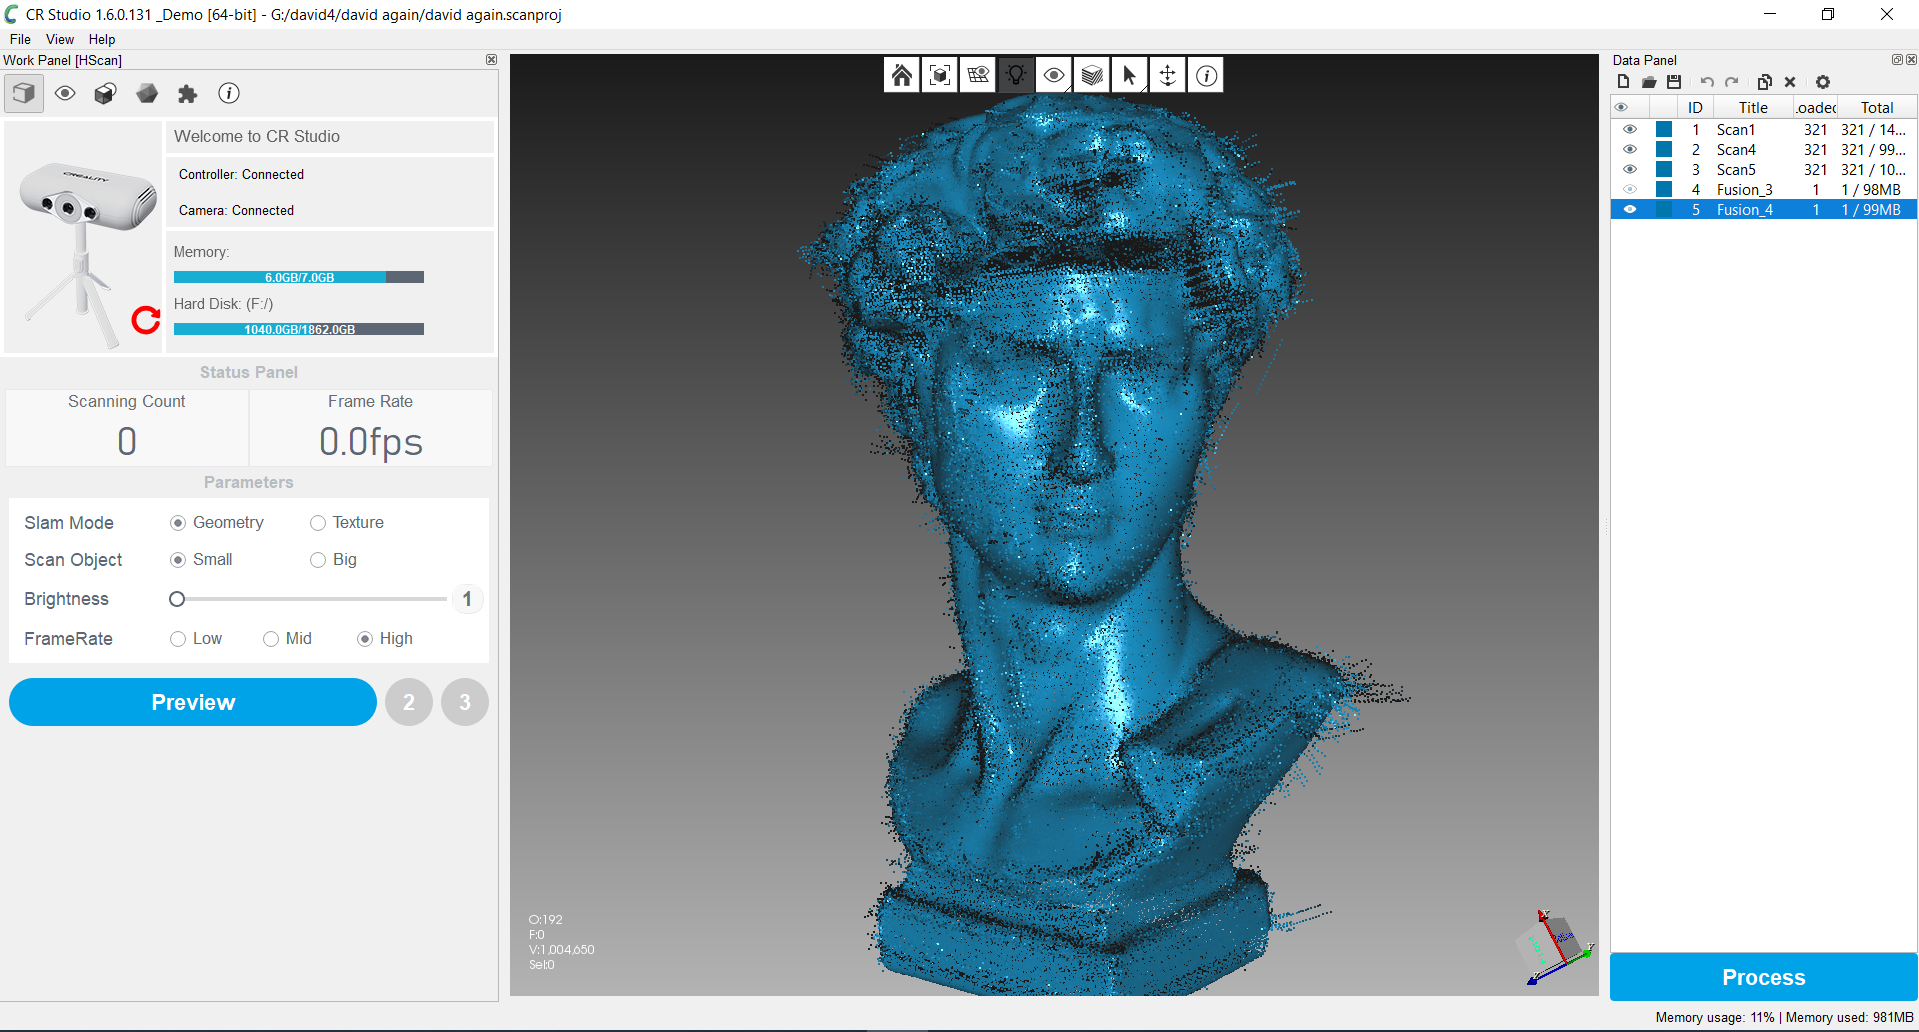
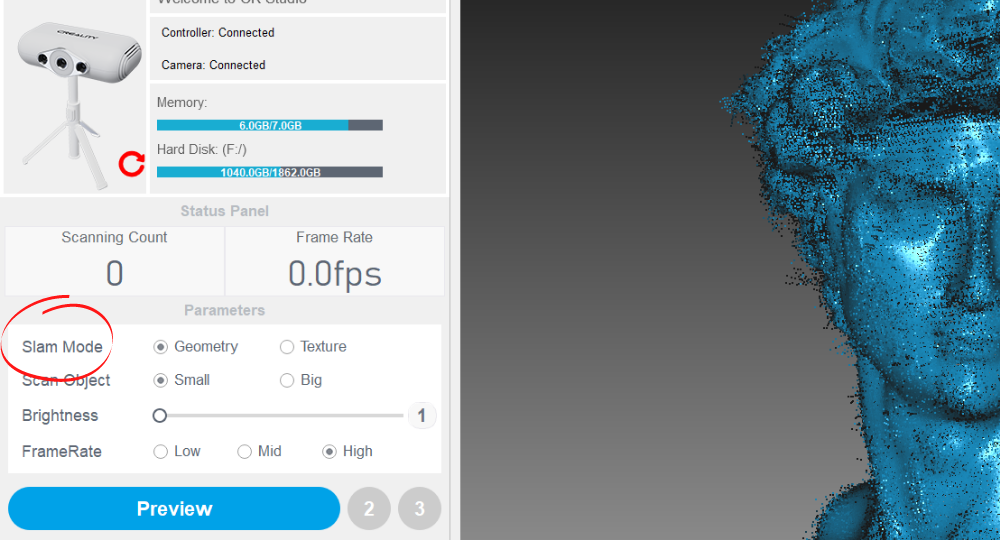
2. Select the “Slam Mode” (Simultaneous Localization and Mapping) to Geometric for objects with three-dimensional details or Texture for smooth objects with painted details. I used Geometric mode for all my test scans.
Note: Texture mode appears to be for a full color option that Creality will release at a later date. I saw no benefits when testing the texture mode on the several items I scanned.
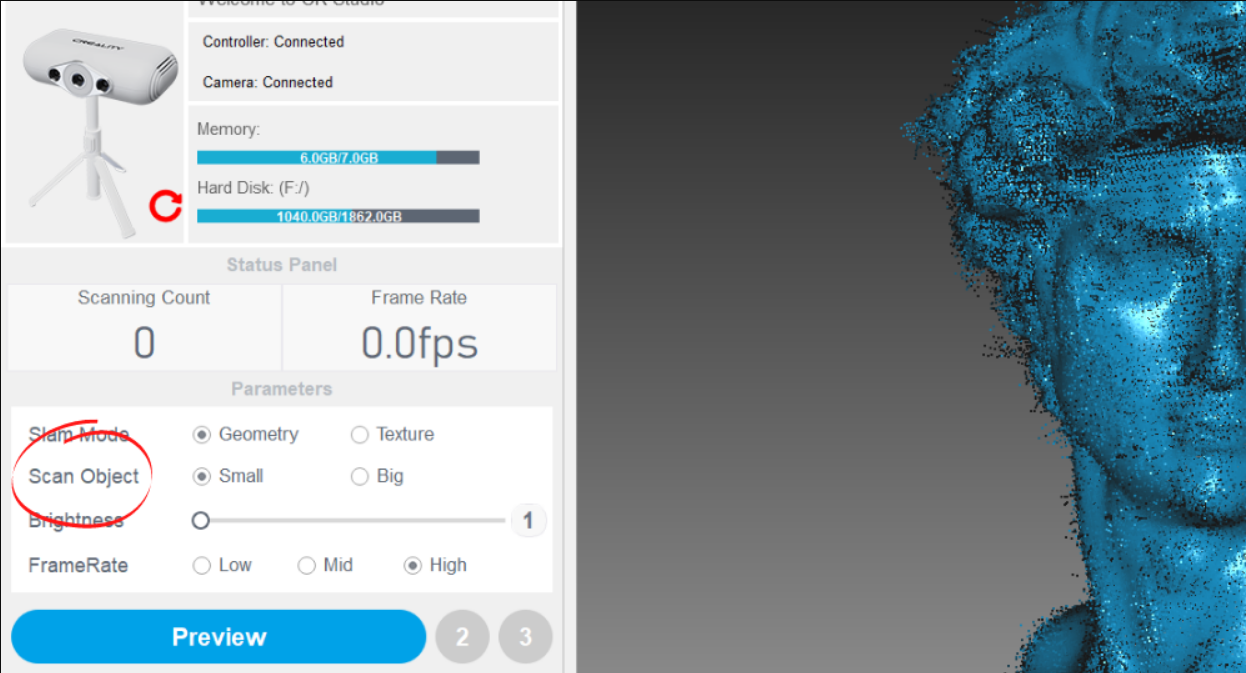
3. Select Size (Scan Object). On the Demo version of the app I was given, you need to select the size of the item. The PDF directions show screenshots where this information is either missing or replaced with a Scan Quality of Normal/Fine. I don’t know which version you will get on the final release. Small objects are under 500 mmm, so I selected “small”.
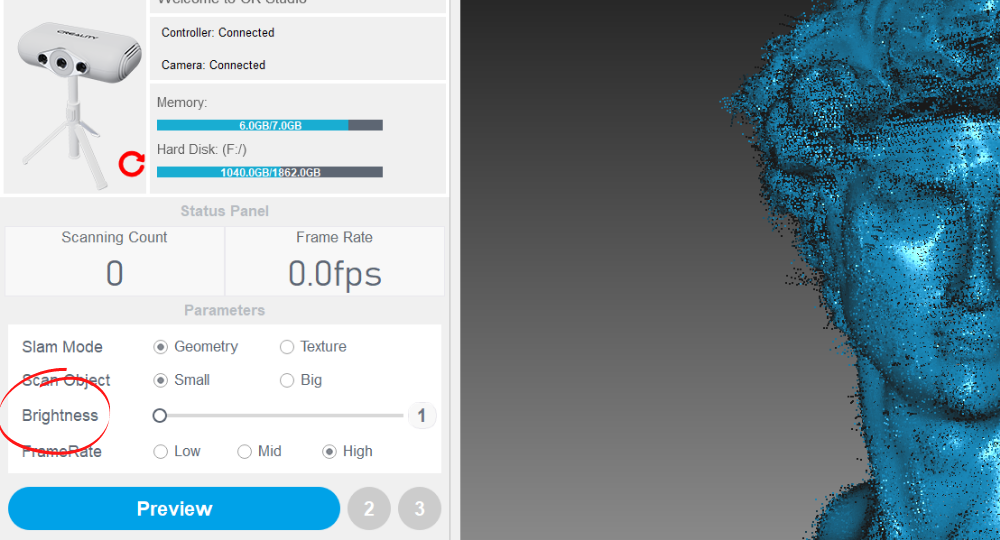
4. Set the Brightness, which is the scanner’s exposure setting. This is a scale from 1 to 4, with 1 being used for white objects, 2 and 3 for medium shades and 4 for black. We’ll use the 1 setting for this bust of David.
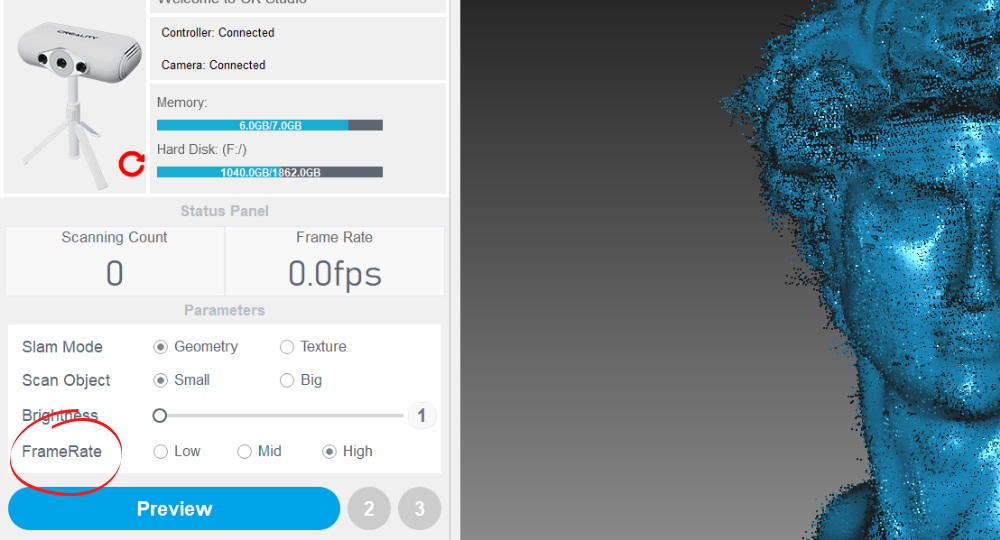
5. Select Frame Rate. Creality gives no advice on how to set this, so I used a High frame rate.
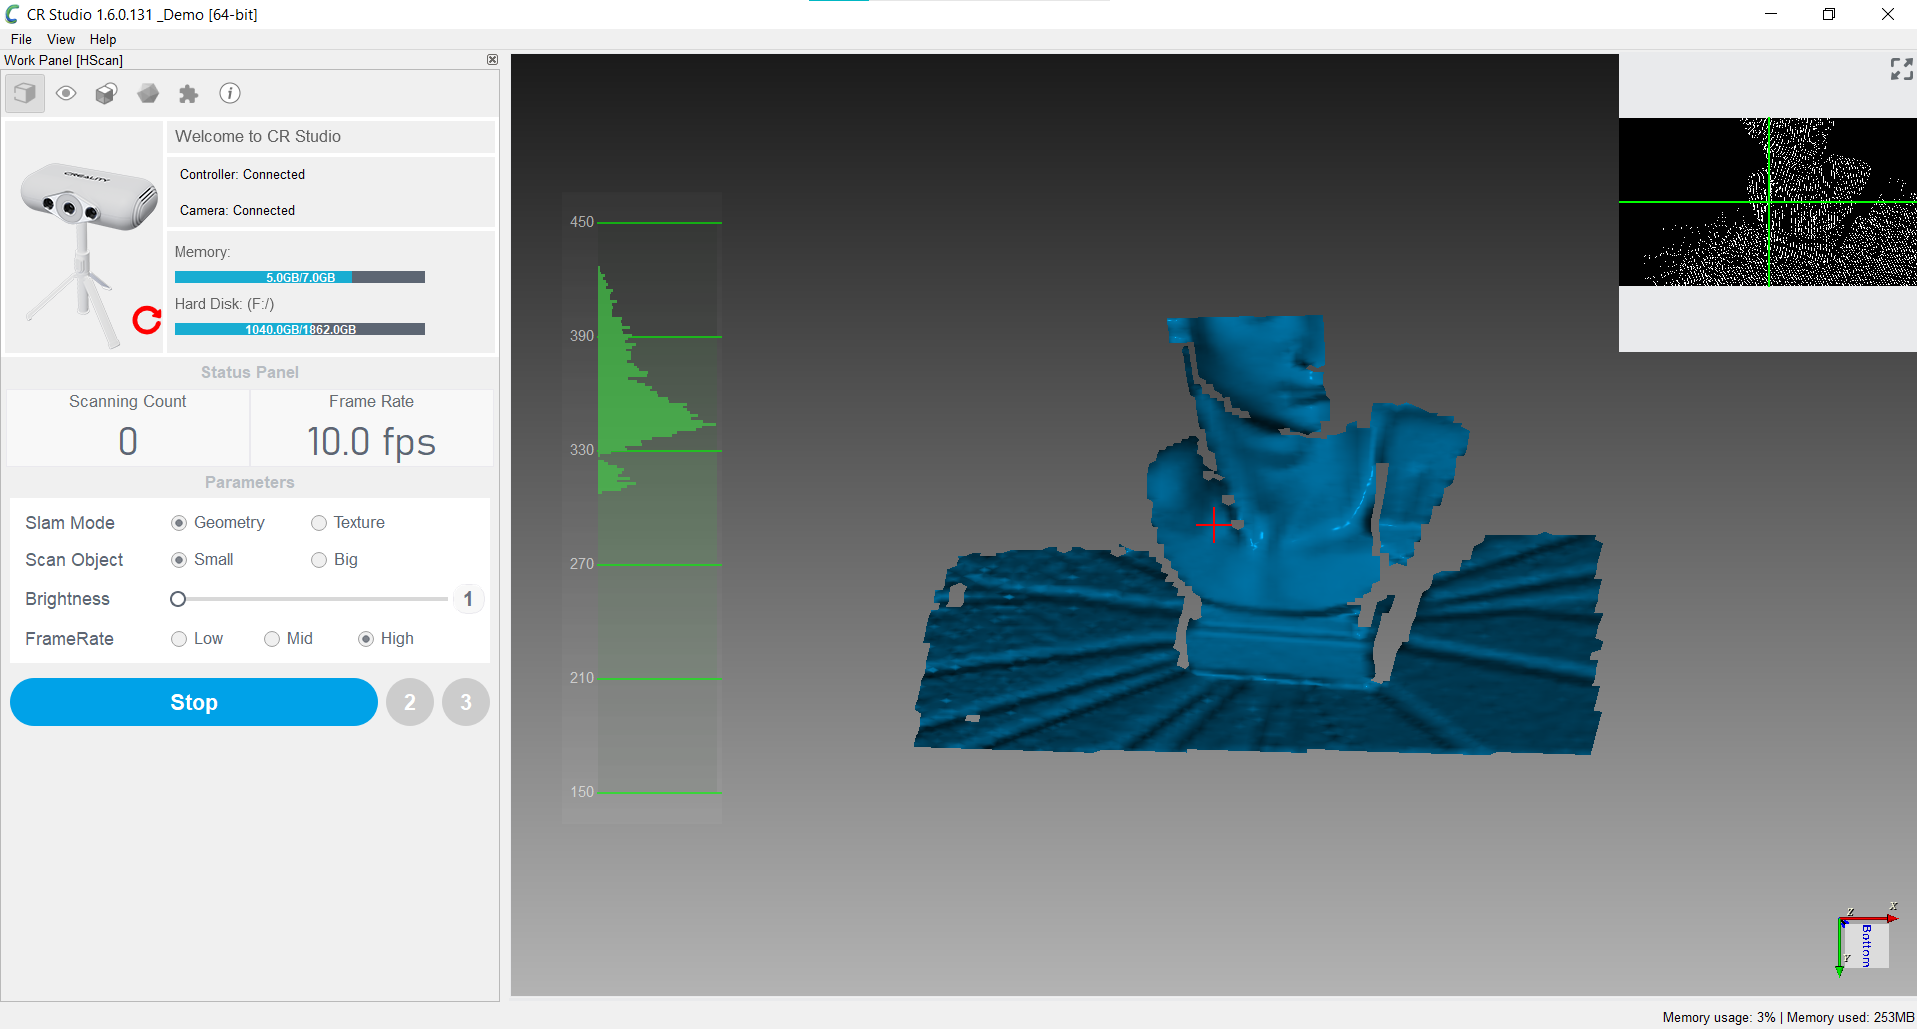
6. Click the blue Preview button. The screen will show what the scanner sees and you can make adjustments to the tripod’s angle and the brightness levels. Preview mode continues until you press Stop.
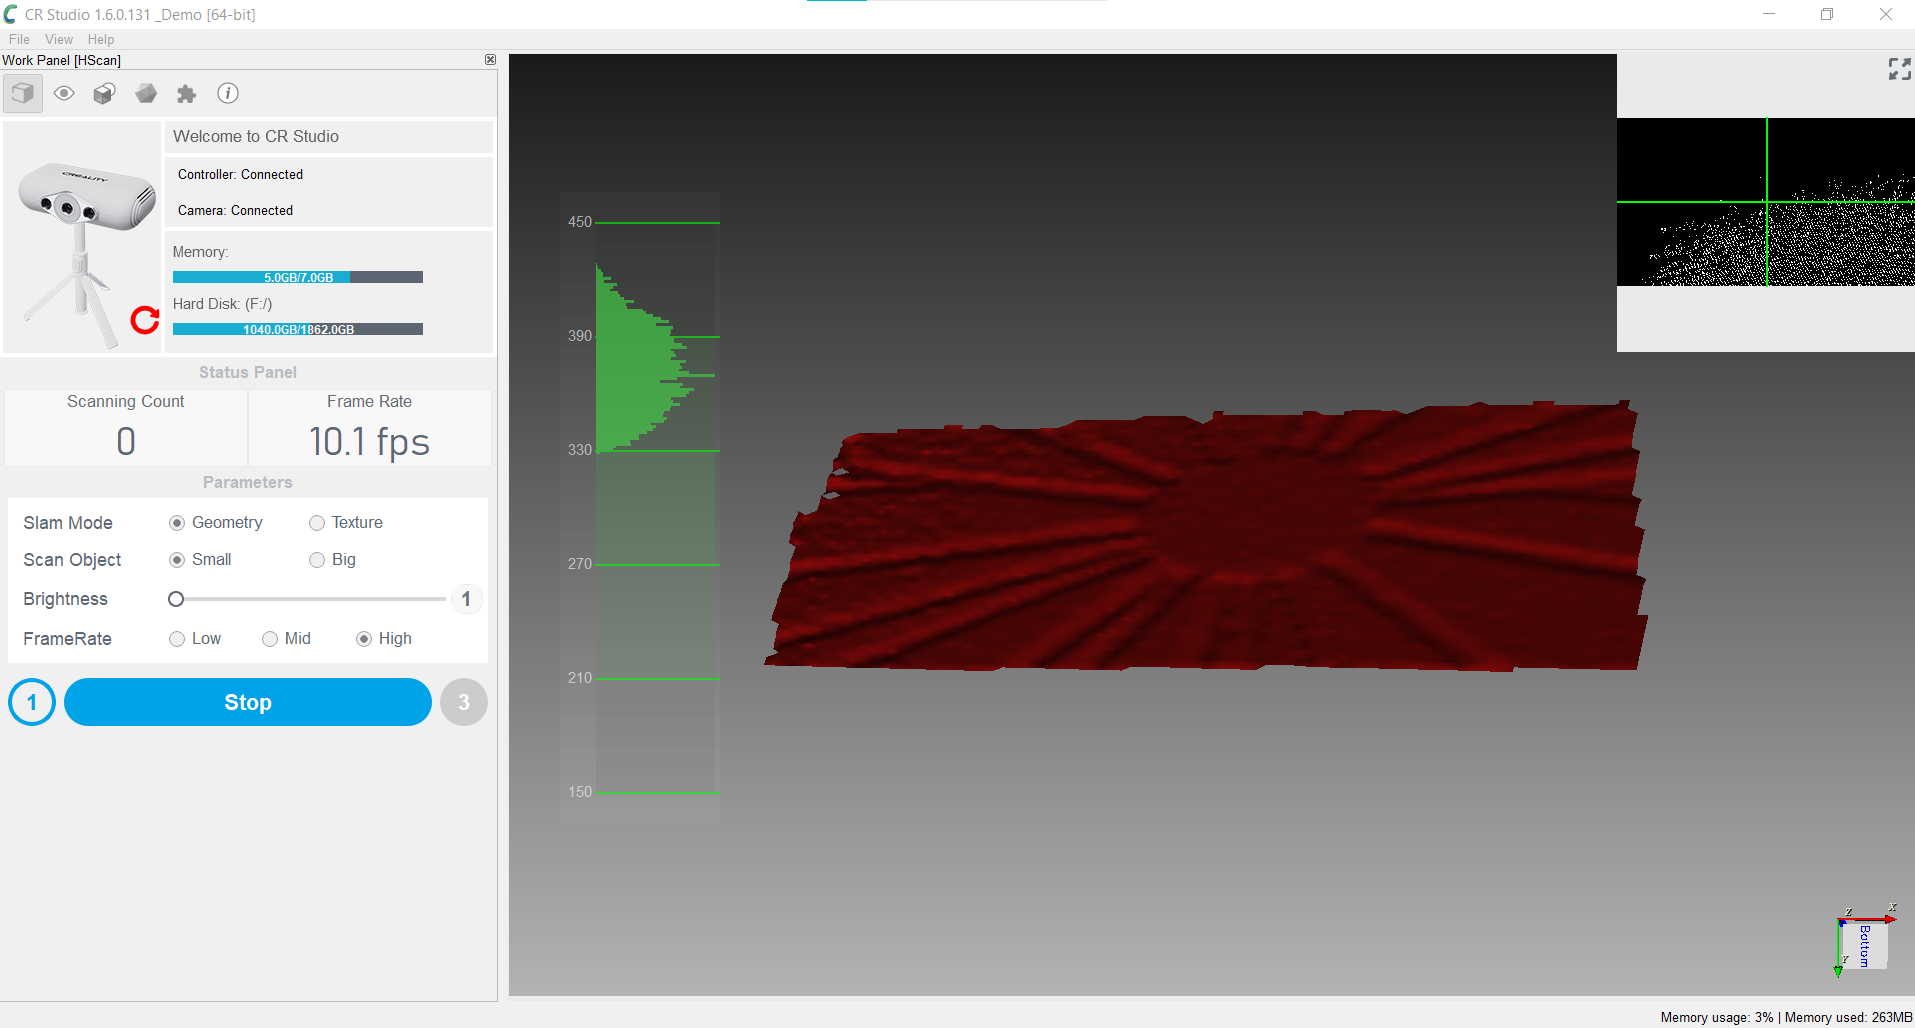
7. Conduct initial scan for the baseplate. After pressing Stop, the button now reads “Initial”. Remove the object and click the button. It will now scan the turntable to assist with aligning the scanned images. Creality didn’t say how long you should do this step, I waited at least 15 seconds. Press “stop.”
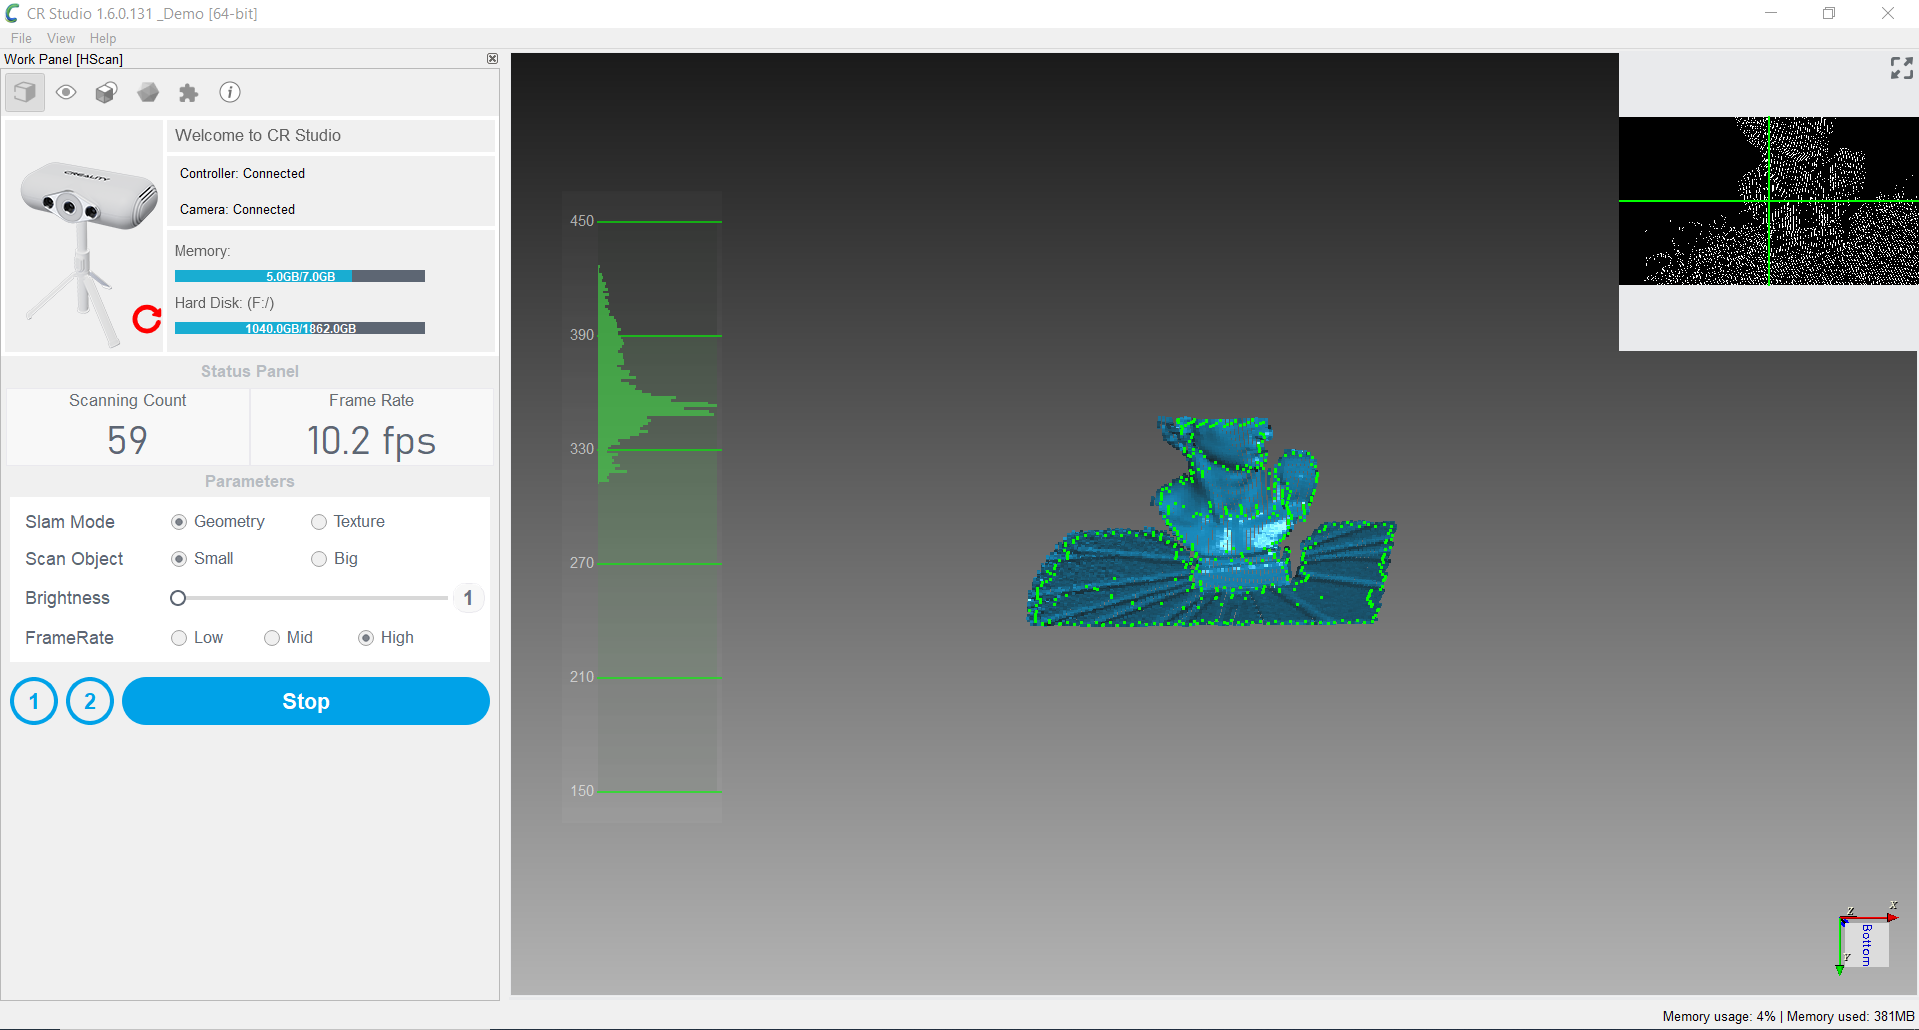
8. Scan. Place the object back in the middle of the turntable approximately where you set it up during the preview and scan. The CR-Scan Lizard will now scan a full rotation of the object. Most scans take about 320-340 images, which you can see on the “scanning count” box. Wait for the scanner to stop on its own.
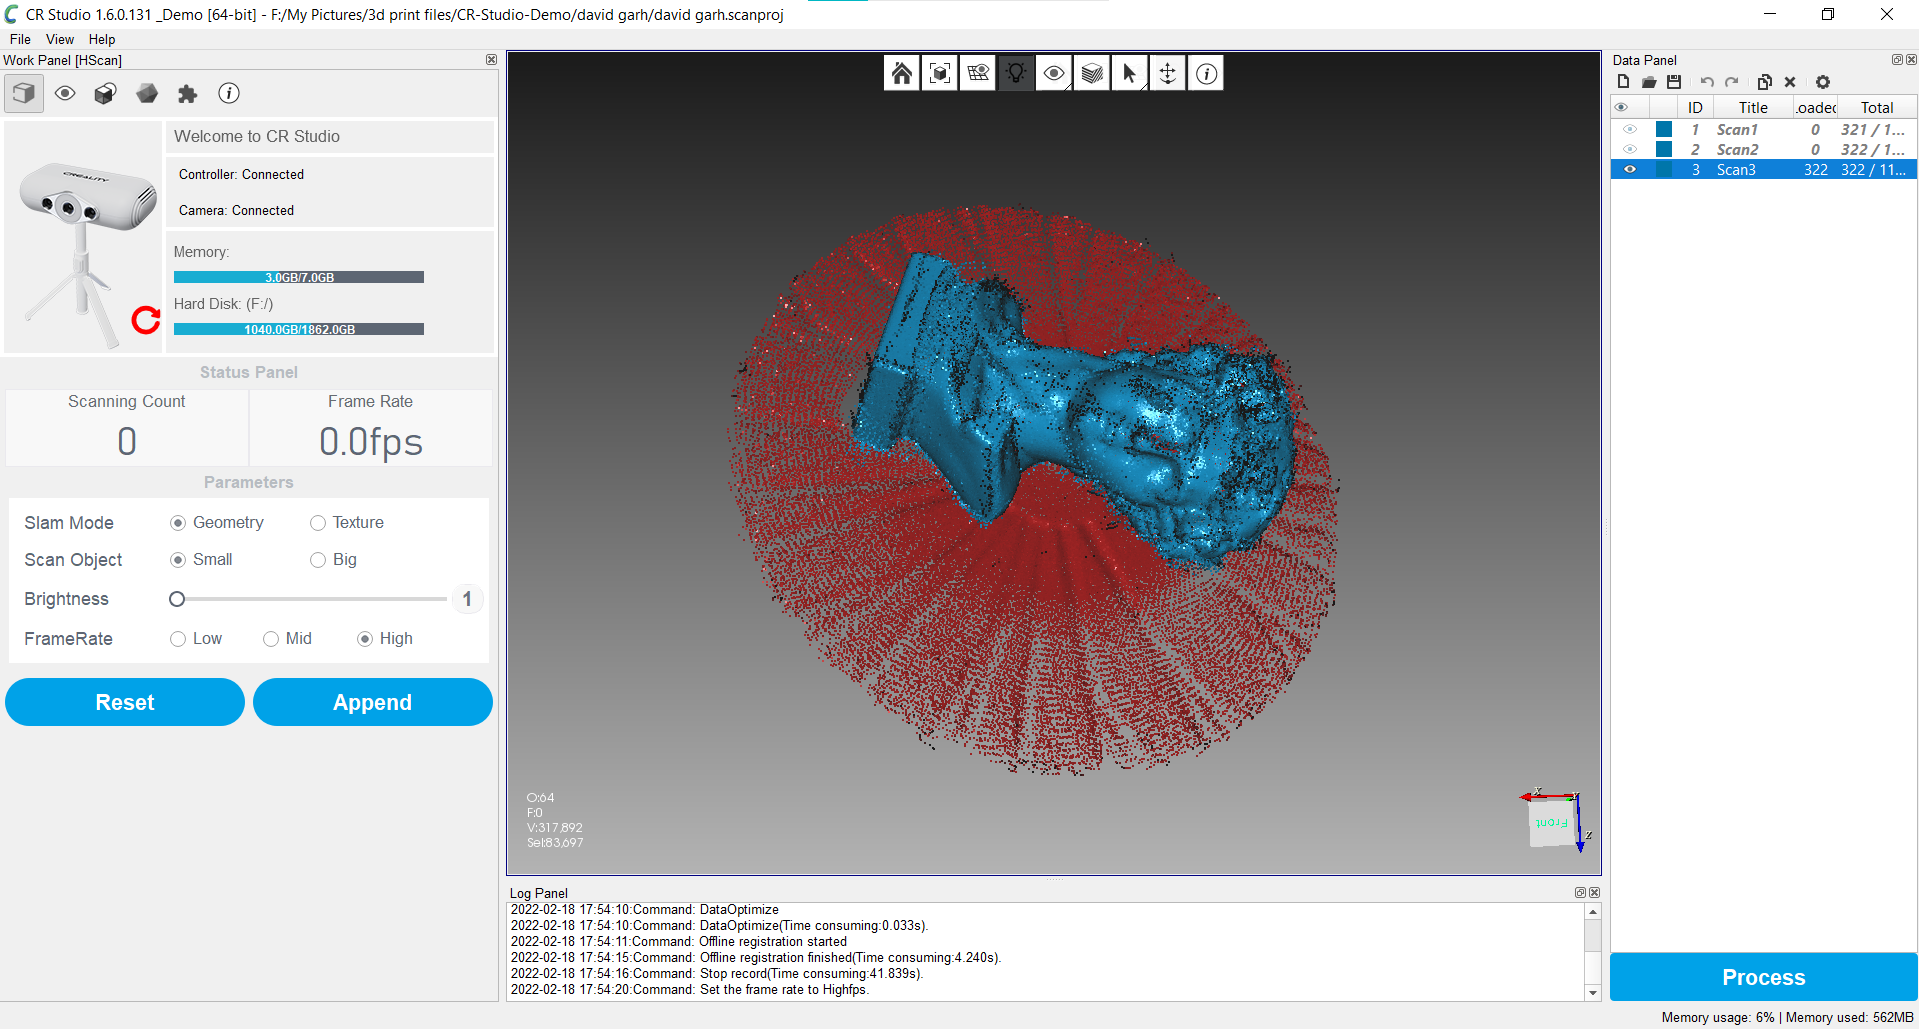
Most objects need at least two passes to capture all the angles. You can see that the David bust is missing the top of it’s head. Reposition your object on it’s side or back for a second pass.
9. Click Append to add another scan, then click Scan when you have it in place. Wait for the CR-Scan Lizard to make another pass.
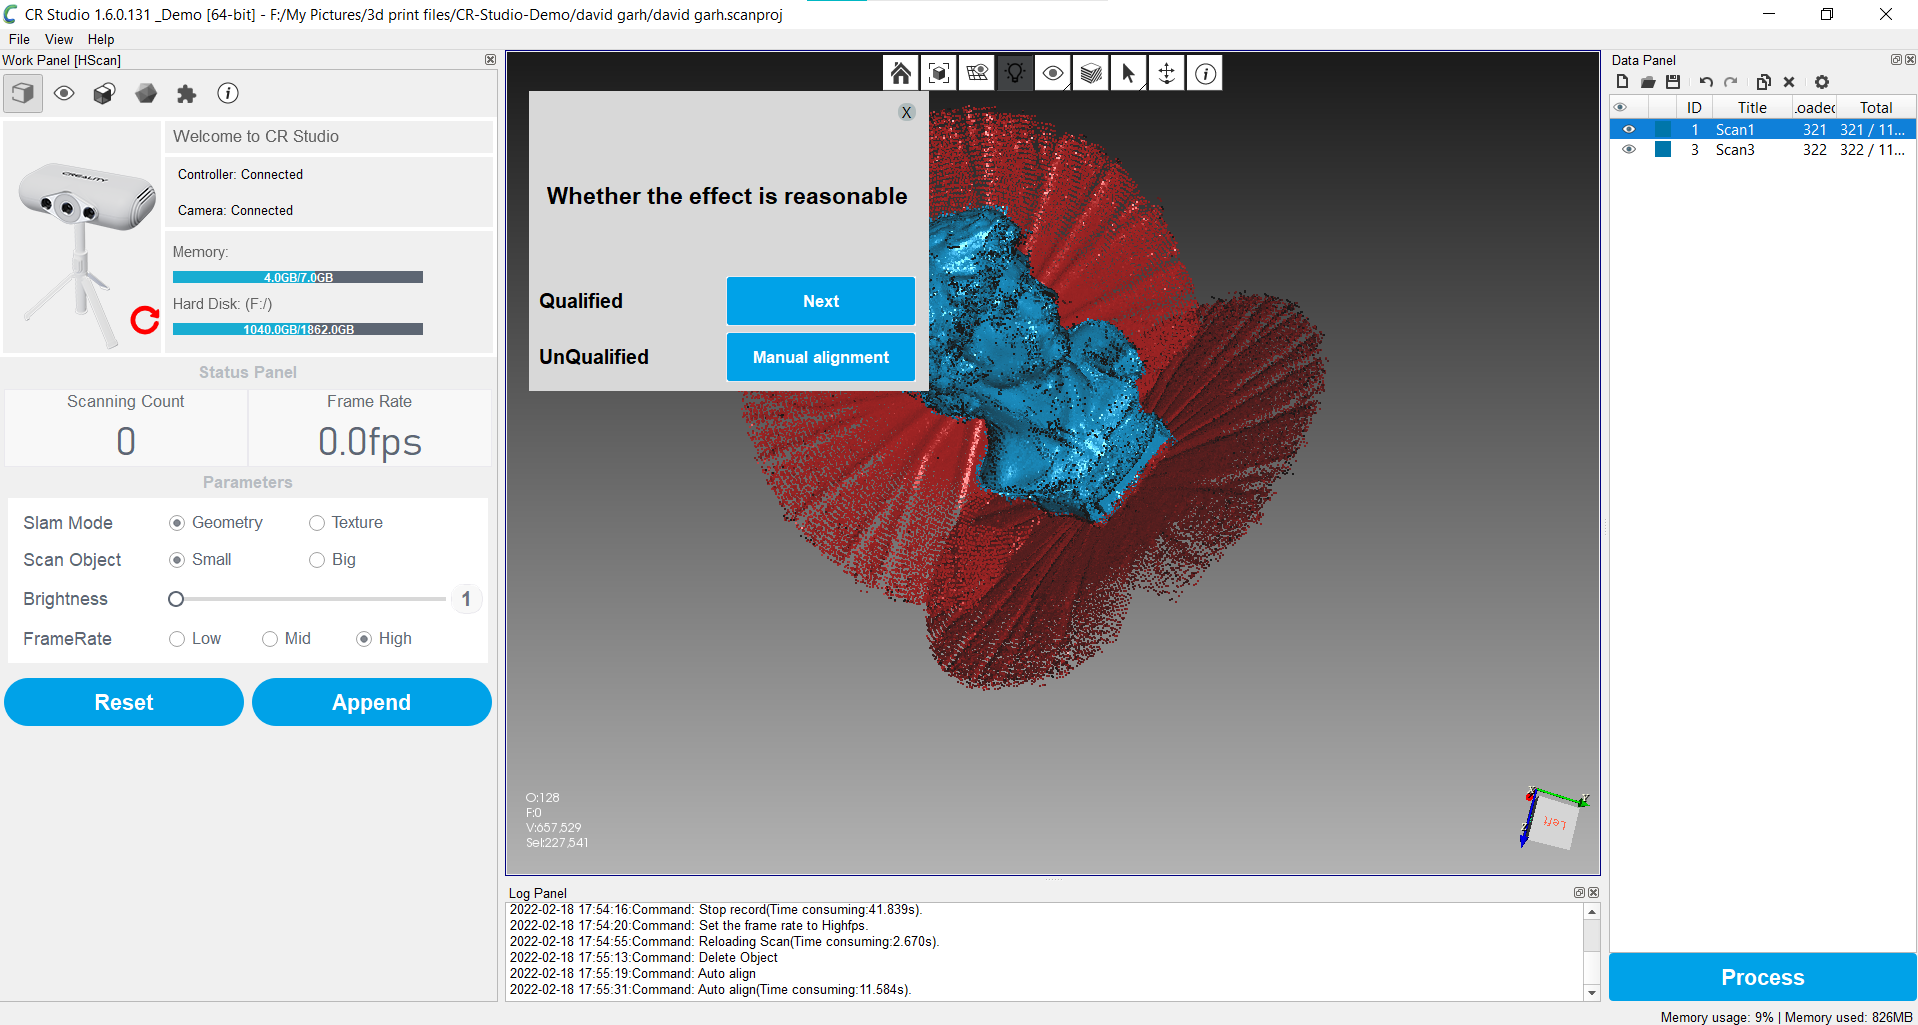
10. Process. Two scans are enough for this model and now we can click the Process button in the lower right corner. CR Studio will analyze the scans and try to fit them together. It will ask you “Whether the effect is reasonable” which means, “did I line this up right?” If all the images are facing the same direction, click “Qualified” and CR-Studio will process the scans automatically.
If images are facing different directions you’ll need to manually align the scans.
Creality’s directions on manual alignment are vague and honestly, this is the buggiest part of the software I was given for review. It only works if you have two scans – I was never able to align three or more scans using their method. Instead of painstakingly matching three points of each hard to read scan, let me share a hack with you.
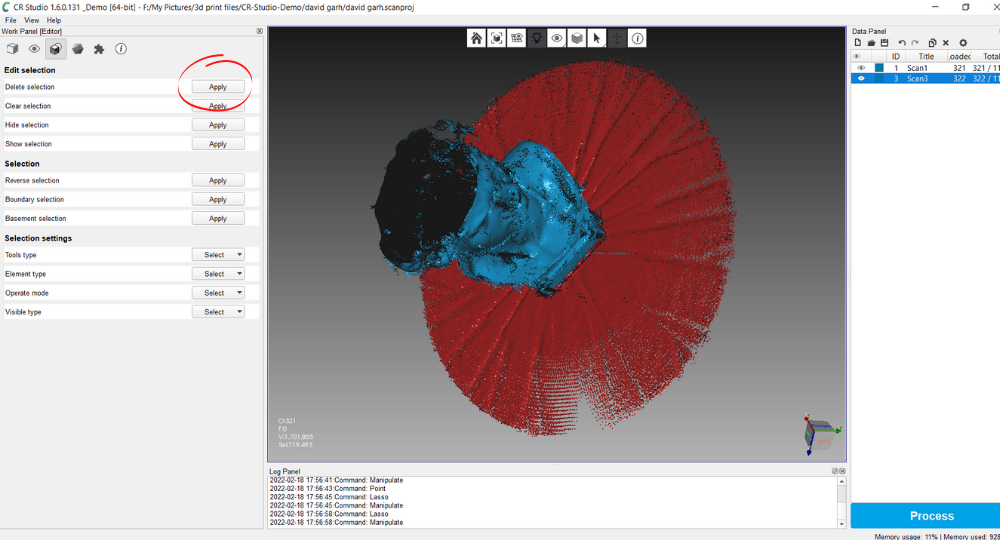
11. Delete the bases. I don’t know why, but if you merely delete the base of each scan – highlighted in red – it works. To delete parts of the scan you need to switch to Edit Mode which is the symbol with the cube and circle. Anything that is red can be deleted. Click delete.
12. Select any stray pixels surrounding the scan with the polygon sector and delete these too. Now press Process and your scans should pop together correctly.
One thing the CR-Scan Lizard does right is allow you to take as many scans as you want for one project. You can reposition the tripod, select a new light level or even frame rate. All the scans are saved in the project folder and you can examine them closer later.
Bad scans can be cleaned up in editing mode or discarded entirely. You can process the scan as many times as you like.
Once you’re happy with your scan, export it as an .OBJ or .STL. You can take these files directly into Cura or PrusaSlicer and print them.
Here’s my print of the David bust. You can see that it lacks details around the eyes, lips and hair, but is a fair representation of the model. This scan was only edited using CR Studio, brought into Cura 1.13 and printed with a .12 layer height on my Ender 3 Pro. I used Printerior White PLA.
How to Scan Difficult Surfaces
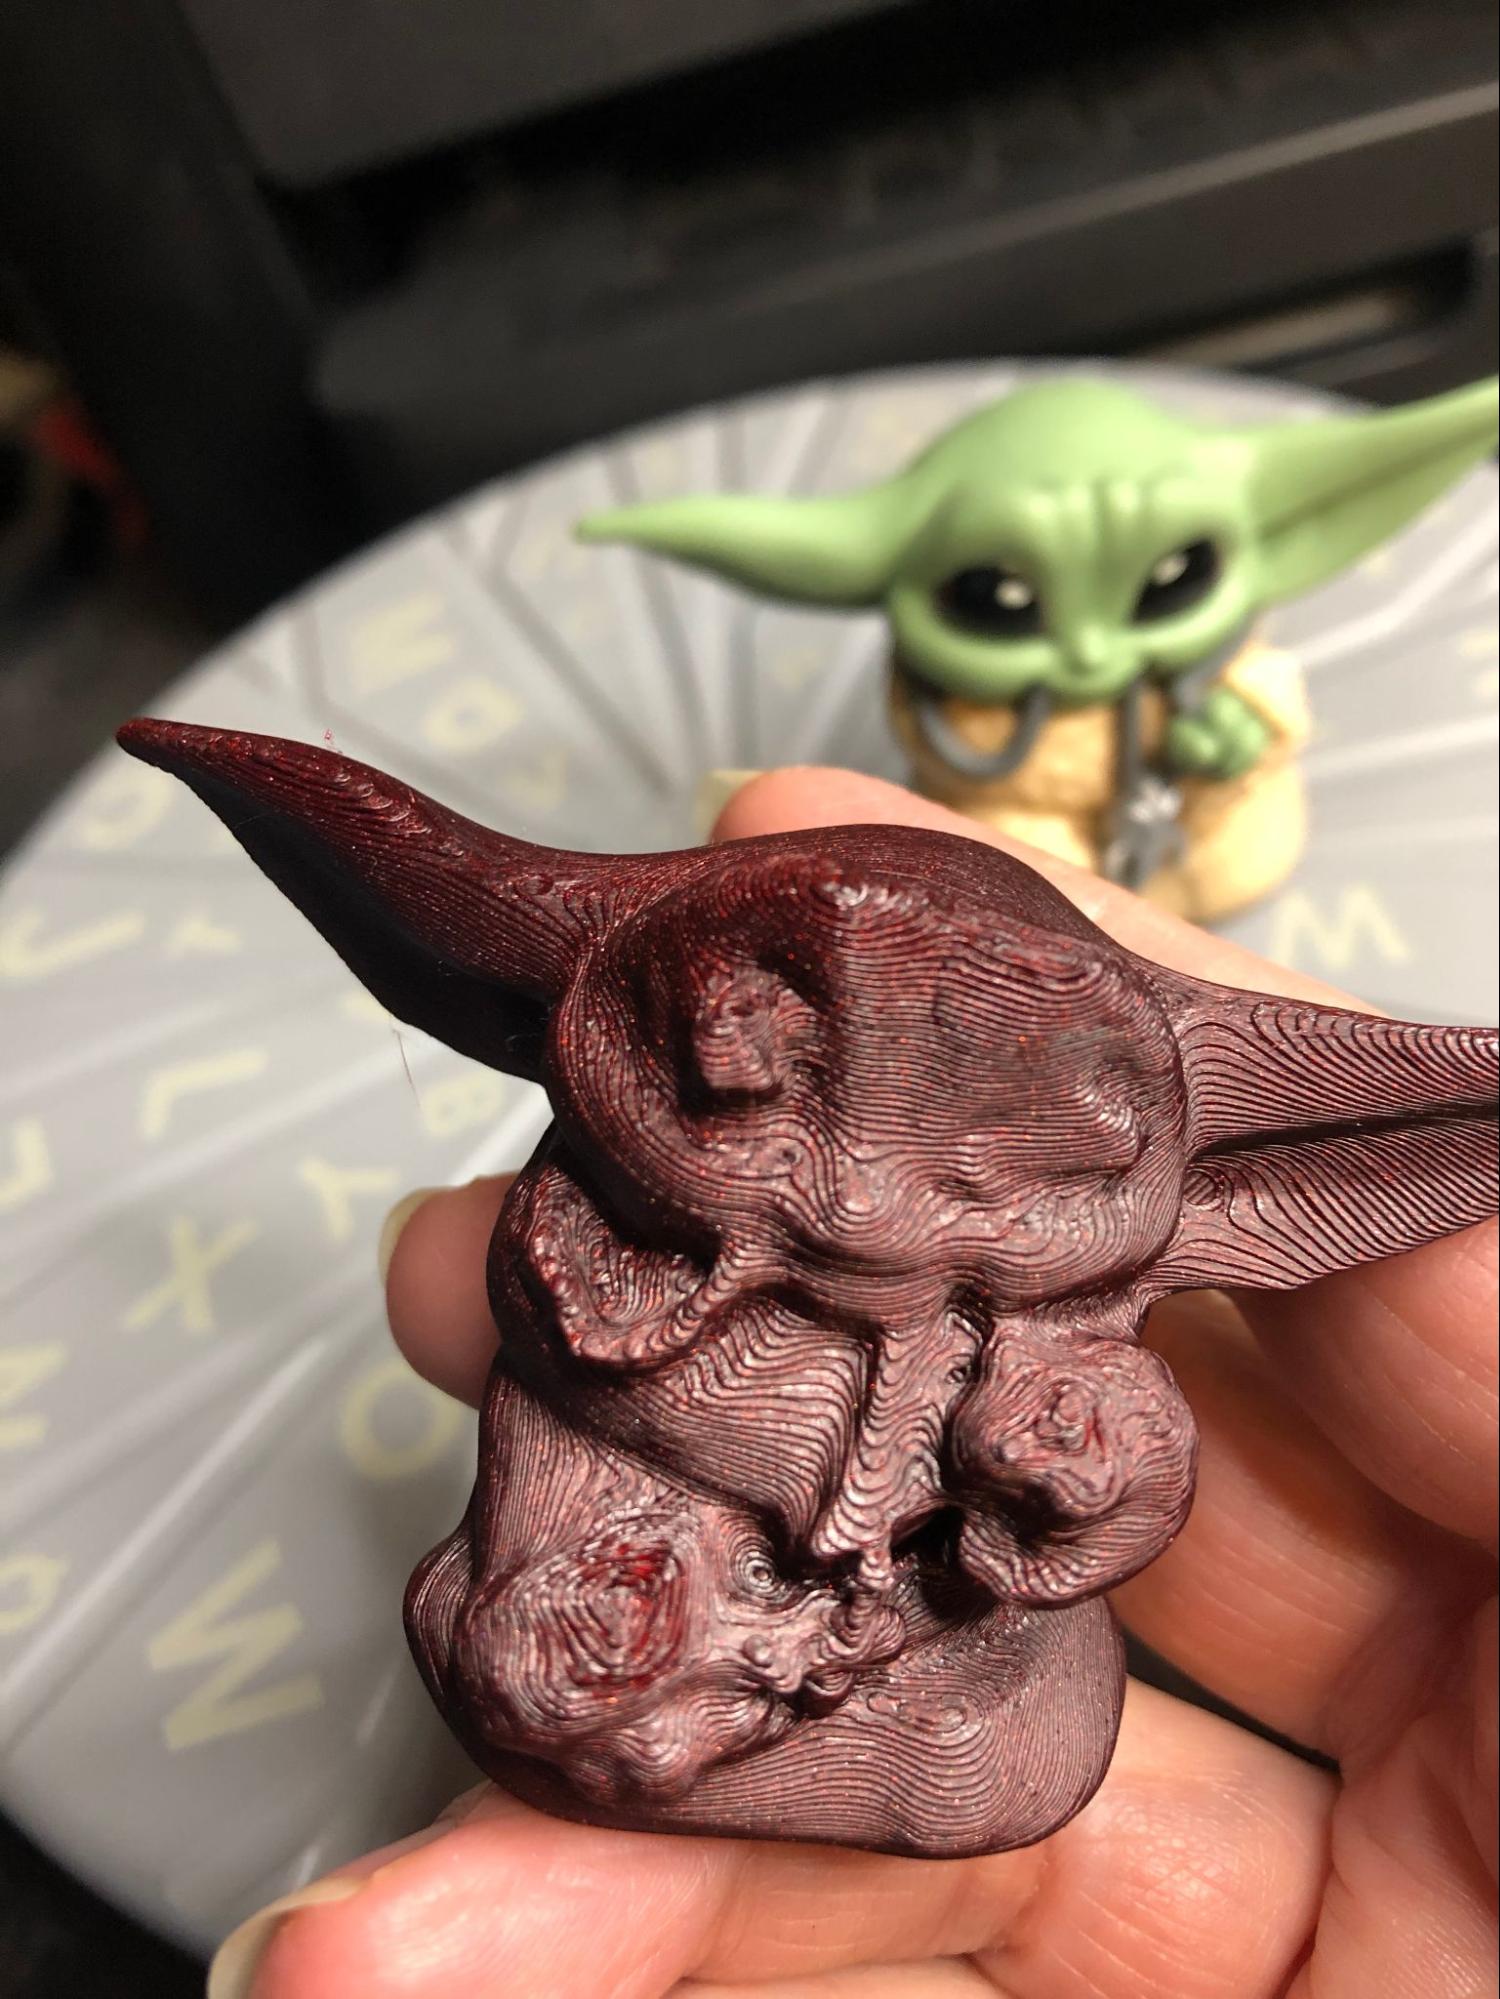
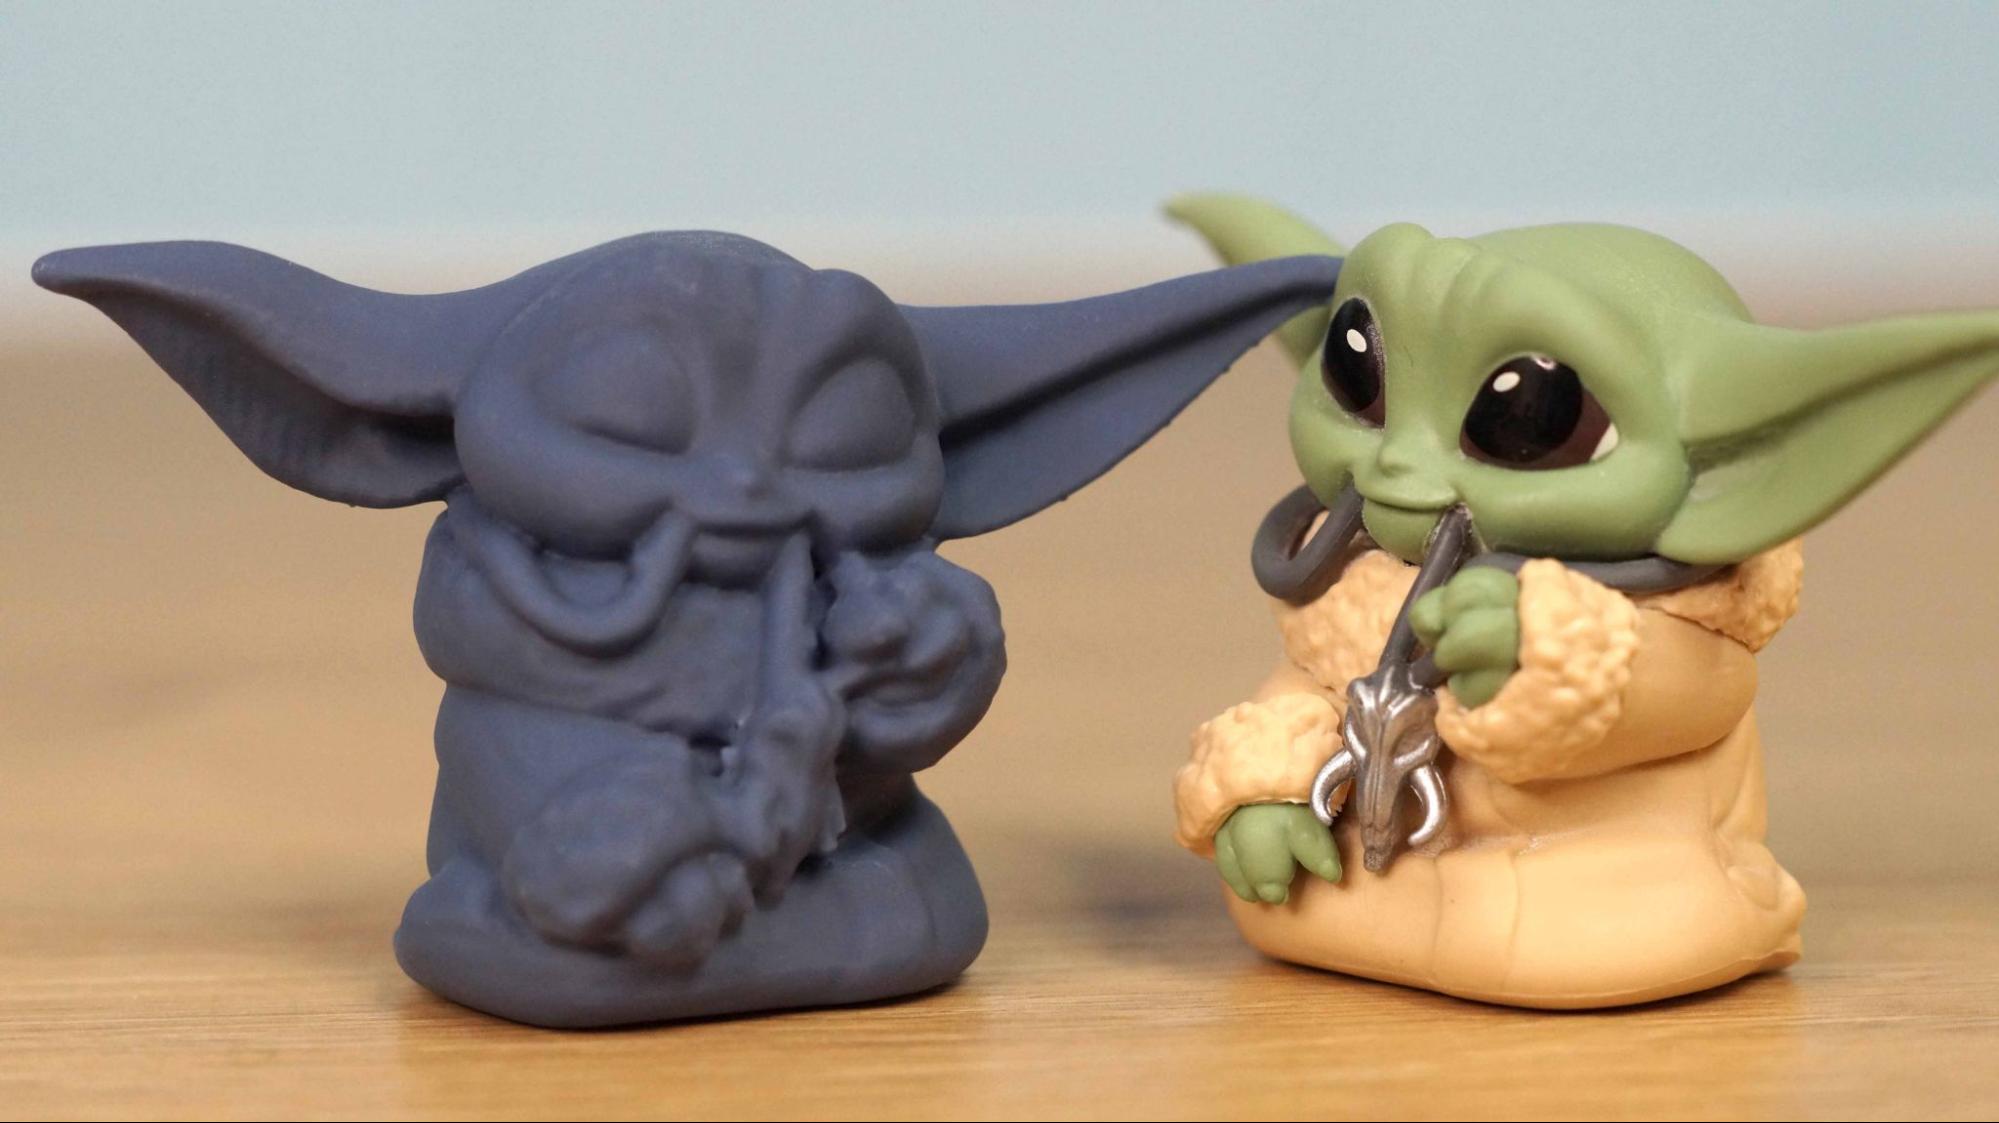
Shiny, clear or black items are incredibly difficult for any hobby level scanner to capture with current technology. Though Creality has made great strides in capturing darker objects, it is still hard to scan items with both dark and light portions, like this Baby Yoda figure. The plastic toy is green, gray and tan with shiny black eyes. It looked pretty bad, even after printing it in Protopasta Recycled Still Colorful 10 PLA.
For $45 you can buy a can of professional “fixing” spray – a substance that coats your object in a mat finish that disappears after several hours.
Instead, I found that cheap dry shampoo works as a fixer. Dry shampoo is basically alcohol, starch and fragrance. Since it's made to spray on a human head, it’s pretty safe to use on your scannable objects. I used a can of Suave I picked up for $6 at Walmart. It coats your item with a fine, light tan powder that wipes right off and is easy to read for the scanner.
After spraying Baby Yoda with dry shampoo I was able to capture a good scan. It’s soft around the cuffs and necklace, but you can see how well the ears and eyes are replicated. To make sure no detail was lost in printing, I sent this to the Phrozen Sonic Mini 8K and used Siraya Tech Fast Navy Gray resin.
How Accurate is the CR-Scan Lizard?
Creality lists the scanning accuracy of the CR-Scan Lizard as .05 mm. Items scanned do have decent dimensional accuracy but are not perfect copies. Fine details and texture are lost. No one is going to be counterfeiting Baby Yodas with this scanner.
However, the scans are close enough to serve as a template in CAD software. If you wanted to scan a tool so that you could make a cover or holster for it, this scanner would do great.
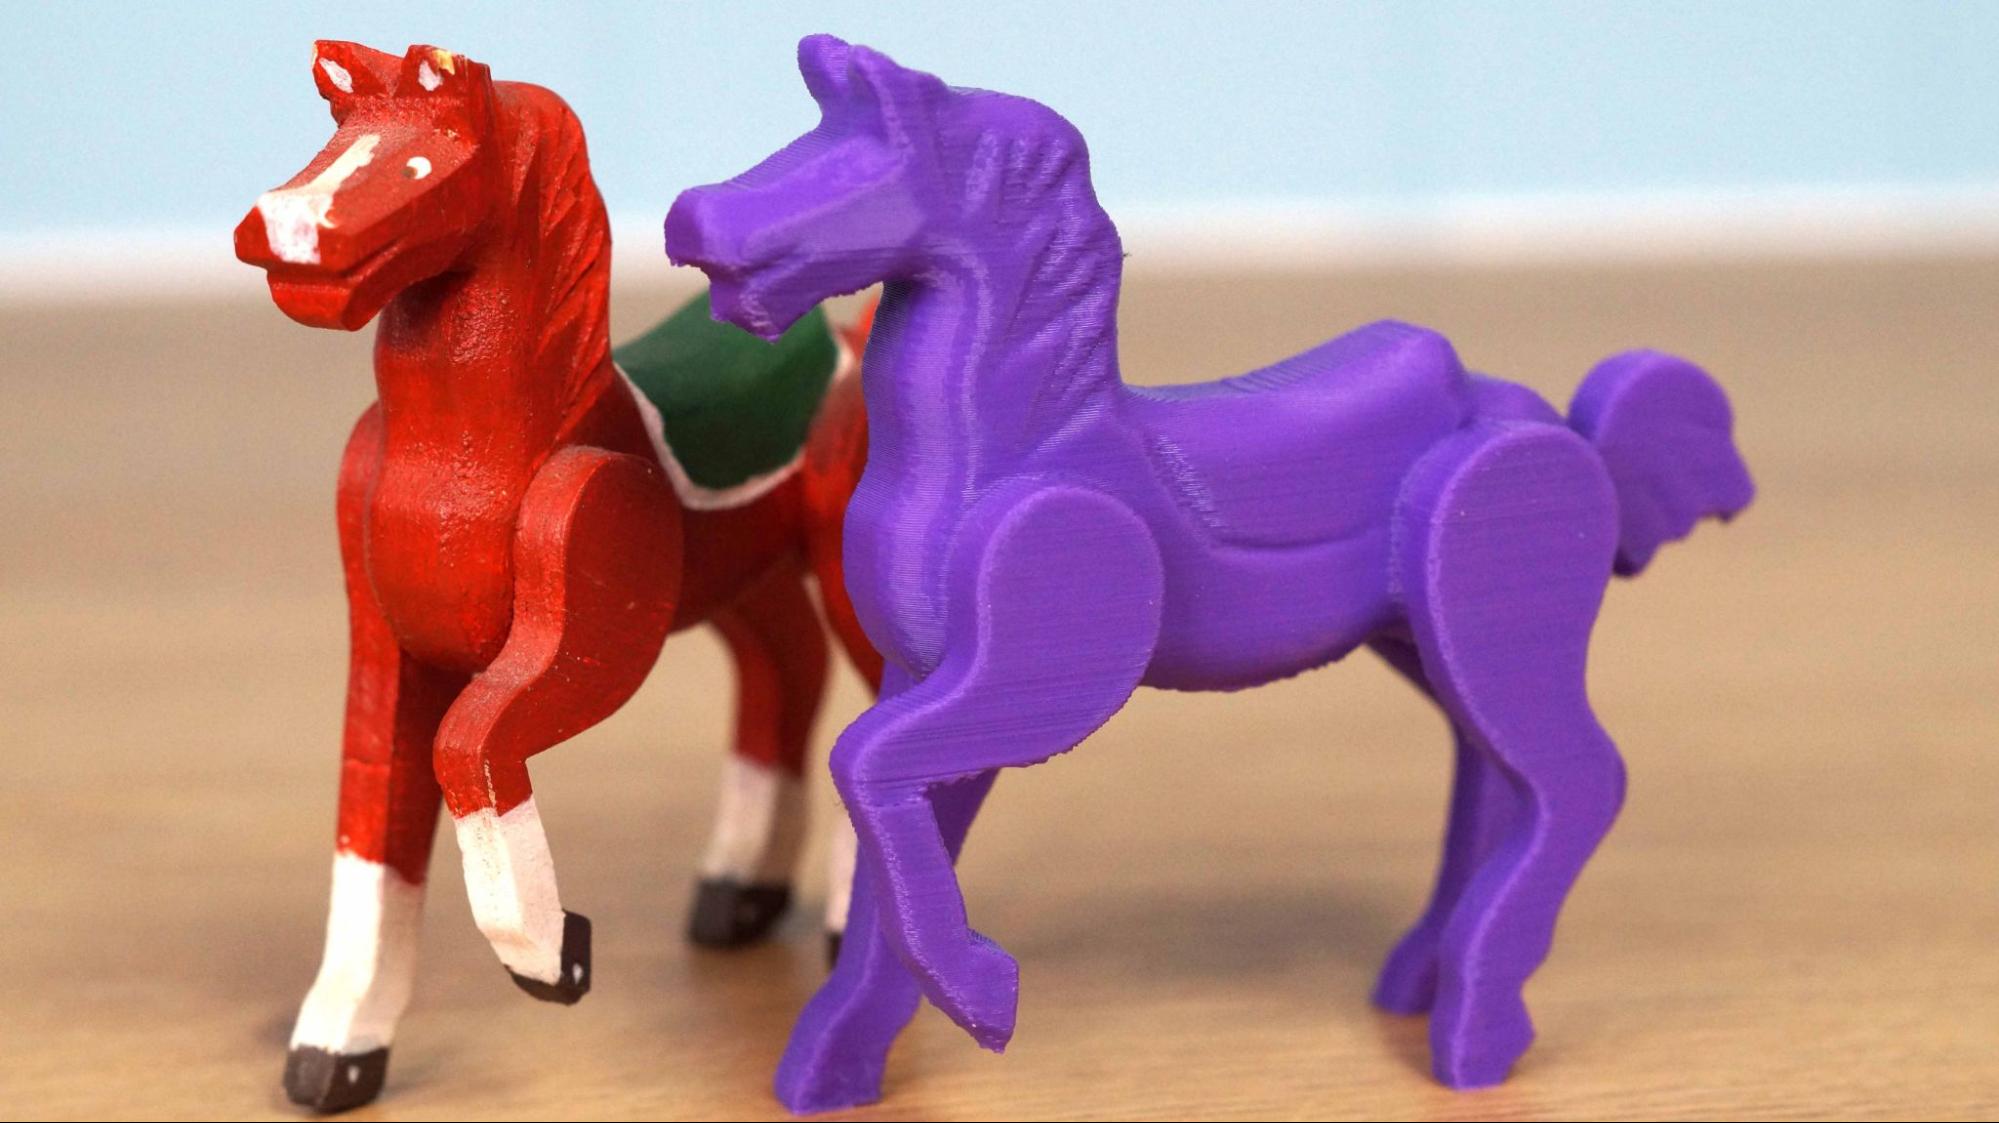
As you can see, the simple lines of this wooden horse scanned very well and required only minimal clean up in CR Studio. This horse was printed at .2 line height on the Ender 3 Pro, using Printerior Purple PLA.
Bottom Line
The Creality CR-Scan Lizard is an interesting foray into the world of 3D scanning. The potential for this device is amazing – imagine being able to scan your kid’s actions figures and put their own faces on them? Or scan an object to make a perfect replacement part? There’s a lot of fun things we could do with a 3D scanner.
I believe the scanner that Creality sent for review works – but its software currently does not work well a all. The demo copy often crashed and has many features without explanations. The scans I’ve shared on this review took several hours of trial and error in scanning and clean up efforts.
The scanner’s resolution is overhyped, with results – even printed on the best resin printer currently on the market – soft and unfocused.
The need to tether the scanner to a robust laptop or your desktop PC really limits how you can use this device. I tried the unit on three computers – two of them custom-built gaming PCs with good video cards – and still the CR-Scan Lizard would falter on darker colors.
Creality can release updated software, and they have until April to fix the bugs before paying customers receive their units. If you have money to gamble on a fun experiment, go ahead and buy the CR-Scan Lizard while it's on Kickstarter for a deep discount. Otherwise, wait for more final software to come out before making your decision. We’ll update this review if and when a new and less-buggy version of the app comes out.

Denise Bertacchi is a Contributing Writer for Tom’s Hardware US, covering 3D printing. Denise has been crafting with PCs since she discovered Print Shop had clip art on her Apple IIe. She loves reviewing 3D printers because she can mix all her passions: printing, photography, and writing.
-
nc10 Did you consult Creality about their software problems? Do they have decent tech support and did you get any info on planned software updates?Reply
