
Tom's Hardware Verdict
The high resolution of the Elegoo Mars 3 makes beautifully detailed parts, but the plastic shell of the machine feels like a step backwards for the Mars line-up of printers.
Pros
- +
4K resolution creates highly detailed models
- +
2.5 second per-layer cure time
- +
Native integration with Chitubox means no software tweaking required
- +
Build platform leveling is so simple, it almost feels like cheating
Cons
- -
Plastic base feels a little cheap compared to metal bases in this price range
- -
Included test print will likely lead to frustration for first-time users
Why you can trust Tom's Hardware Our expert reviewers spend hours testing and comparing products and services so you can choose the best for you. Find out more about how we test.
The $300 Elegoo Mars 3 is the latest in the Mars series of printers, and Elegoo has clearly listened to feedback from their users. The 4K screen on the Mars 3 provides razor-sharp detail without compromising on print speed thanks to a brand-new high-output COB UV LED light source that enables rapid 2.5 second per-layer cure times.
During testing, this printer proved to be accurate and reliable, but falls just short of being one of the best 3D printers due to a poorly designed test print, a cheap-feeling plastic case and the fact that, as of publication time, the printer was unavailable for purchase. If your primary concern is resolution and speed, than the 0.035mm XY resolution of the Elegoo Mars 3 makes this printer absolutely worth the price for fast, high-resolution printing.
Elegoo Mars 3 Specifications
| Machine Footprint | 8.93" x 8.93" x 17.28" (22.7cm x 22.7cm x 43.85cm) |
| Build Volume | 5.64" x 3.52" x 6.89" (143mm x 89.6mm x 175mm) |
| Resin | DLP Photopolymer Resin |
| UV Light | 405nm COB UV LED |
| Masking LCD Resolution | 4098 x 2560 |
| Masking LCD Size | 6.6-inch |
| Interface | 3.5-inch LCD Touchscreen |
| XY Axis Resolution | .035mm |
Included in the Box of Elegoo Mars 3

The Elegoo Mars 3 ships in a “just-add-resin” state; included with the printer is multiple sets of gloves for handling resin, several surgical-style facemasks, funnels for filtering resin, and a few assorted tools that are used during printing. The printer includes a USB thumb drive that includes a copy of the slicer app Chitubox as well as a pre-sliced demo model to verify the functionality of the machine.
I appreciate the addition of the consumables (gloves, masks, etc.); first-time users of resin printers may not be aware they need all of this additional safety equipment. By including these in the box, Elegoo has ensured you can use the printer as soon as you unbox it.
Design of Elegoo Mars 3


The curved UV lid of the Elegoo Mars 3 is a striking design element that immediately sets it apart from most other resin MSLA 3D printers. Other resin printers like the Creality LD-002R and the Anycubic Mono usually have prismatic covers that simply extend the footprint of the base of the machine up to the top.
The UV lid of the Mars 3 features compound curves and a sweeping line that extends from the back of the lid all the way down to the base. This is a departure from other prints in this price range, and it guarantees that even a silhouette of the Mars 3 is instantly identifiable and sticks out amongst the competition.
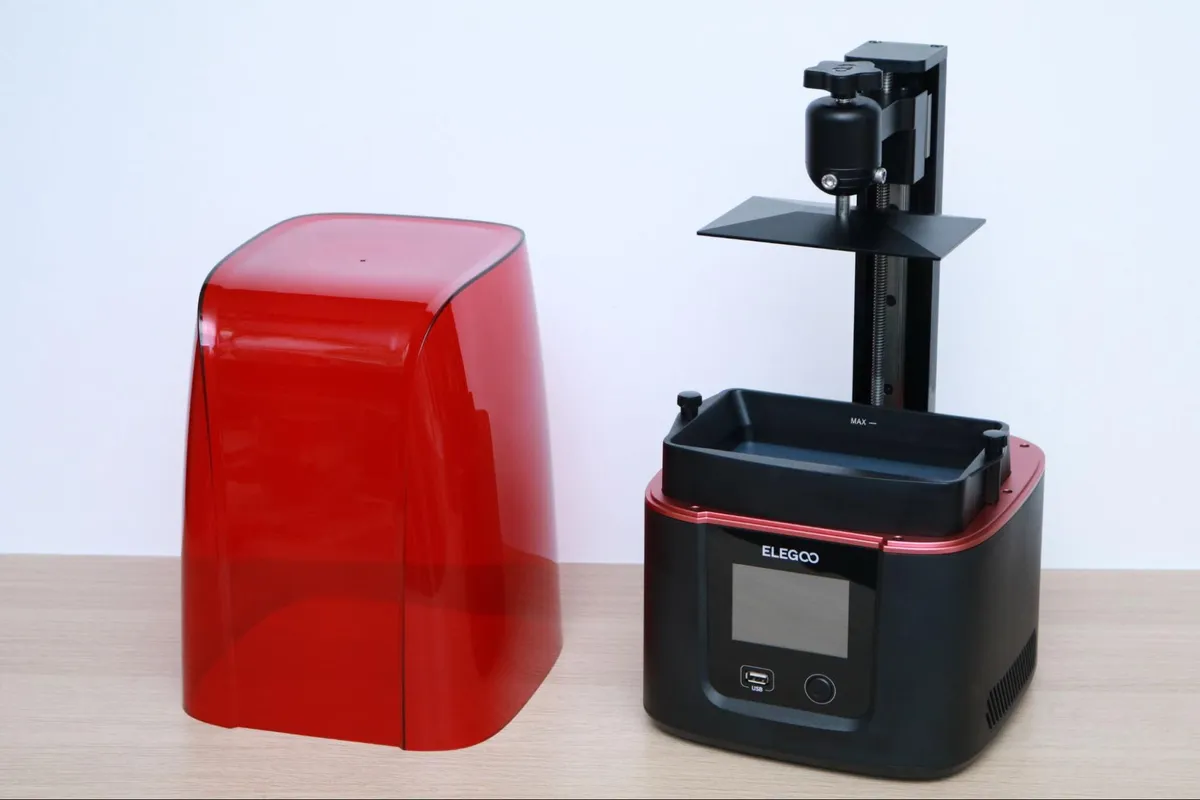
The overall design of the Mars 3 is consistent with other Elegoo MSLA resin 3D printers; a UV light source is projected through a masking LCD into a vat of resin, and a build platform suspended from a linear rail is moved up and down in the Z direction to create a 3D model as the resin cures.
Unlike the other Mars printers, the body of the Mars 3 consists of a plastic shell, which feels a little less sturdy than a solid metal base and also weighs less (the Mars 2 Pro weighs 13.67 lbs while the Mars 3 weighs in at 11.5 lbs). This doesn’t necessarily affect performance, but it doesn’t feel quite as rigid and sturdy as previous generations of printers.

The Mars 3 uses a front-facing 3.5-inch color touchscreen LCD as a primary interface, and the USB input as well as the power button are both mounted on the front of the machine. This may not seem like a noteworthy detail, but having to reach behind a printer filled with liquid resin to feel around for a power button is something I don’t particularly enjoy doing. Having these mounted on the front of the machine means I can place several printers side-by-side without having to worry about knocking them over, a big benefit for anyone planning to operate multiple printers simultaneously.

The Mars 3 uses a 6.6-inch masking LCD with a 4K resolution of 4098 x 2560px, giving it an XY resolution of .035mm. It’s worth taking a moment to examine that XY resolution so we can better compare it to similar machines. The XY resolution is a function of the LCD size and the LCD resolution, and it will increase on larger screens that have the same resolution.
| Header Cell - Column 0 | Longer Orange 10 | Elegoo Mars 2 Pro | Elegoo Mars 3 | Elegoo Saturn |
|---|---|---|---|---|
| Resolution (px) | 854 x 450 | 2560x1620 | 4098x2560 | 3840x2400 |
| LCD Size | 4.5-inch | 6.08-inch | 6.6-inch | 8.9-inch |
| XY Resolution | .115mm | .05mm | .035mm | .05mm |
Adding more pixels (like a higher resolution screen) will yield a smaller per-pixel size but also typically increase the cost of the screen. Large format printers (like the Elegoo Saturn and Photon Mono X) typically have slightly larger per-pixel sizes, while 4K screens on smaller printers will have a smaller per-pixel size.

Just like the resin vat on the Elegoo Saturn, the Mars 3 vat has a bolt head at each corner which is used for two reasons; acting as a locating point to align the vat on the printer and to keep the delicate FEP film from making contact with the surface the vat is sitting on.
The Mars 3 FEP film is advertised as having a thickness of .127mm, slightly thinner than the .15mm FEP film used on the Mars, Mars 2, and Saturn 3D printers. This new thinner FEP film, combined with the sandblasted surface of the build platform, allows models to adhere better without delaminating and sticking to the vat.

Like other resin MSLA 3D printers, the Mars 3 uses a combination of a threaded rod, a captive nut, and a linear rail for movement on the Z axis. The rail feels rigid and sturdy, and Elegoo claims a positional accuracy of 0.00125mm, a fraction of the typical layer height used during printing. I don’t have any way to verify that level of positional accuracy, as my Mitutoyo calipers only measure down to hundreths of a millimeter, (ex 0.01), as opposed to measuring in the hundred thousandths of a millimeter (ex 0.00125mm). This level of precision is splitting hairs (literally), but I found the Mars 3 to be an exceptionally accurate printer when making fine details and textures.

The Mars 3 is powered by a Chitu M20 Basic controller board, which isn’t currently listed on the Chitu site for purchase. This board controls the COB (Chip On Board) light source which has a custom-designed heat sink to provide a longer life than LED arrays that use less efficient cooling systems. The wiring job on the Mars 3 is top-notch, with an adhesive applied to the various connectors and terminals to prevent them from coming loose or detaching during shipping.

The build platform of the Mars 3 has a trapezoidal shape to it to prevent excess resin from pooling after it’s submerged in the vat. This is a great feature in theory, but the edges of the platform don’t have a chamfer to allow the resin to fully run off, leading to resin pooling at the very edge of the bed. I was able to clean this easily after a print by using the plastic scraper to drag the resin to an edge, but a slight taper to this edge would make the build platform easier to clean.
Leveling the Build Platform on Elegoo Mars 3

Calibrating a resin MSLA 3D printer is critical to the success of a part, and this particular category is one that Elegoo continues to dominate in. Calibrating the Elegoo Mars 3 involves the same two bolt system used by the Mars, Mars 2 Pro, and Saturn 3D printers, and is so easy it almost feels like cheating. First, I loosened the two bolts that hold the spring-loaded build platform rigid, which allows the ball joint to move freely. Next, I placed a single sheet of paper over the masking LCD to protect it from scratches and set the offset distance for the build platform.

After lowering the platform to the bottom of the Z travel distance, I tightened the two bolts, confirmed that the current Z position is set as 0.0mm, and raised the platform again. That entire process only took me a minute or two, and after setting the calibration, I didn’t touch it again for the remainder of my testing. Compared to the four bolt system used on printers like the Longer Orange 10, this calibration process is faster, more accurate, and easier.
Printing Safety with Elegoo Mars 3

The Elegoo Mars 3 uses 405nm UV resin, a material that you need to handle safely when in an uncured state to avoid injury. The resin can be harmful when making contact with skin, so make sure to wear gloves when pouring, cleaning up, or handling uncured resin. I also make sure I’m wearing gloves when removing the build platform after a print, as the resin tends to pool on top of the platform and can drip off while the platform is being removed.
Make sure you use the Mars 3 in a well-ventilated room to minimize the danger from inhaling fumes. Any spills or uncured resin stuck to a surface should be cleaned using 99% isopropyl alcohol and the container for the resin should be kept closed and secured when not actively pouring material.
Printing the Included Test Prints on the Elegoo Mars 3
A test print is an opportunity for 3D printer manufacturers to demonstrate the strengths (and possibly the weaknesses) of their machines. Because the success of a print is often determined by the settings chosen by the user, the manufacturer is able to cherry-pick the settings to guarantee a successful outcome. However, I’ve found that the test prints included with many printers (including the Elegoo Mars 3) tend to be a last-minute consideration before shipping a printer, and often have issues the user may not be anticipating or looking for.

The rook pieces included with the Elegoo Mars 3 are a perfect example of this type of print. This test print completed in 2 hours and 24 minutes, and at first inspection, the model appears to be a successful print. The model prints directly onto the build plate, which leads to a relatively wide cross-section of solid cured material on a solid metal plate. This is the same test print included on the Elegoo Saturn (and other Elegoo machines), and it can be surprisingly difficult to remove without damaging the part or the build plate with the metal scraper.

I covered this problem extensively in my review of the Elegoo Saturn, so if you’re interested in learning more about why this benchmark isn’t ideal, you can read about it there. Unfortunately, new users who expect parts to be easy to remove from the build platform may be aggravated when they realize how difficult these parts are to remove. Conversely, if the build platform isn’t well calibrated, the rook will delaminate due to the increased suction force and will instead stick to the FEP film.
Elegoo could solve this problem by simply lifting and angling this chess piece so it prints with a thin raft, or choosing a different model altogether. Given that the chess piece on the Mars 3 appears to be identical to the chess piece from the Mars 2, I don’t see any reason why a different model couldn’t be used.
Washing and Curing Models with Elegoo Mercury X Bundle

Post-processing a resin model can be a messy process, and usually involves a solvent (typically isopropyl alcohol) to remove excess resin from a model and a UV light source to fully cure and polymerize the resin after printing. The Elegoo Mercury X, a separate $120 wash and cure station, is designed to complement the Elegoo Mars 3 and make post-processing a clean and simple process. I found using it to be a more effective method for cleaning parts than doing it manually.

If it’s not clear from their site, the Mercury X is actually two separate machines, a wash station and a cure station, and not a single machine with a removable top (like the original Elegoo Mercury Plus). Some clever packaging tricks allowed Elegoo to fit both of these stations in a single box, an impressive feat that allows users to effectively get both stations without being constrained to using one at a time.


The typical workflow for a resin printer is: print model, wash model, remove supports, cure model. To illustrate this, we’ll use the Half-Elf Rogue model from Loot Studios and go through the print / wash / cure cycle using the Mars 3 and Mercury X bundle. I printed this model out using Elegoo Beige Standard Photopolymer Resin and used the default settings for the Mars 3 in the included Chitubox slicing app.

The Mercury X wash station uses a bucket filled with a solvent (in this case, 91% isopropyl alcohol), a magnetic impeller to create agitation, and a metal basket to safely cradle the part above the impeller. After filling the bucket, I removed the model from the Mars 3 and placed it in the Mercury X, closed the resealable plastic lid with rubber gasket, and activated the wash cycle.


The knob on the front of the Mercury X is used as a dial to set the wash time, and automatically counts down as the station runs. The direction of agitation changes periodically, so the part is thoroughly rinsed and any trapped resin can be accessed. I ran the model through the wash cycle for two minutes, lifted the basket to gently shake the model a few times, and ran it through for another two minutes. The basket has two metal handles that extend to the top of the bucket, which make it easy to remove after the wash cycle is completed.


After removing the model from the wash station, I let it air dry to completely remove the last of the isopropyl alcohol on the surface of the model. Once the model was dry to the touch, I gently removed the support structures and cleaned up the areas where the support had made contact with the model.

The Mercury X curing station is equally easy to use: just place the model on the turntable, select an interval of time, and let the station do the work. In addition to the two vertical arrays of UV LEDs, the Mercury X curing station has a horizontal array located underneath the build platform that shines up from below, which is helpful for curing large flat pieces that are difficult to angle.

This process resulted in a model that has an even surface finish and no uncured or wet spots. The Mercury X bundle is an optional accessory for the Mars 3, but if you’re interested in reducing the amount of time you spend cleaning models and are looking for a solution that is less messy than several tubs of alcohol and a UV wand, you’ll want to make sure you get one of these as well.
Preparing Files for Printing with Chitubox

Just like the other resin MSLA 3D printers in the Elegoo line-up, the Mars 3 uses Chitubox to slice, prepare, and export files. Preparing files for printing on a resin MSLA 3D printer is a bit more complex than preparing files for filament FDM printers like the Creality Ender 3 Pro. When making a file on a resin MSLA 3D printer, you first need to hollow out the model to reduce the amount of resin used, add drain holes for the trapped resin, angle the model to avoid wide cross-sections that may cause suction force issues, generate support material, check for disconnected pixels or “islands”, and then export the file as a series of images to display on the masking LCD.

This can be a lot of steps, and Chitubox offers the ability to complete all of them in a single software package without requiring third party software or slicers. For this model, I’m printing a 3D model of a bunny vase hugger that needs to be fully processed. In Chitubox, I was able to hollow the model and add drain holes and support in a few clicks, and the process only took a few minutes. Chitubox includes a built-in profile for the Mars 3, so I didn’t need to add my own settings or tweak the settings of a similar printer to generate a printable file.

Once the model has been hollowed and a drain hole added, the support structure can be added using an automatic process from Chitubox. This process will detect overhangs where the resin requires support, and will automatically generate support structures to act as a scaffolding to prevent the part from delaminating or deforming.

I printed this model using Elegoo’s new Translucent Plant-based Photopolymer Resin, and after washing and curing, it looked great. This vase hugger model was created from a 3D scan, and the level of detail captured by the Mars 3 shows how easily the software can generate a print-ready file without requiring a complicated set-up process.


Comparison of the Elegoo Mars 3 vs. Elegoo Mars 2 Pro


The Elegoo Mars 3 may seem like the natural successor to the Elegoo Mars 2 Pro, but it’s worth taking a closer look at the features of these two machines to better understand how they differ. The Mars 3 uses a 6.6-inch Mono LCD with a 4K resolution to create larger parts with finer features, but it’s notably lacking a few of the quality-of-life features present on the Mars 2 Pro.
| Header Cell - Column 0 | Elegoo Mars 3 | Elegoo Mars 2 Pro |
|---|---|---|
| Masking LCD Resolution | 4098 x 2560 | 2560 x 1620 |
| XY Resolution | .035mm | .05mm |
| Build Dimensions | 5.64 x 3.52 x 6.89 inches | 5.08 x 3.15 x 6.3 inches |
| Build Volume | 136.79 cubic inches | 100.81 cubic inches |
| Printer Dimensions | 8.93 x 8.93 x 17.28 inches | 7.87 x 7.87 x 16.14 inches |
| Printer Volume | 1378 cubic inches | 999.66 cubic inches |
| Build / Footprint Ratio | 9.90% | 10.00% |
| (higher is better) | Row 7 - Cell 2 |
The Mars 2 Pro features a built-in air filter, something that is notably absent on the Mars 3. Despite the lack of a built-in air filter, I didn’t notice any odor when printing with the Elegoo Plant-Based Photopolymer Resin. In addition, the Mars 2 Pro uses a large rubber gasket to seal the gap between the UV lid and the base of the machine, another feature missing from the Mars 3. While the resolution of the Mars 3 is superior, it seems likely that a “Mars 3 Pro” will include some of these missing features at a later date.

The build volume of the Mars 3 is slightly larger than the volume of the Mars 2 Pro, but it’s probably not going to be a defining feature of this printer. The increased build volume averages out to almost exactly half an inch of extra usable volume on the X,Y, and Z axes, which will probably be most useful to users trying to squeeze additional small parts onto the tray as opposed to making large objects in a single print.

The vat on the Mars 3 feels like a step backwards from the vat included on the Mars 2 Pro. The Mars 2 Pro vat has a pour spout designed right into the corner, so changing materials or just draining the vat is a clean and easy process. The Mars 3 doesn’t have a pour spout, so when pouring material out of the vat it tends to drip onto the side and can be difficult to clean.

The vat on the Mars 3 feels like a step backwards from the vat included on the Mars 2 Pro. The Mars 2 Pro vat has a pour spout designed right into the corner, so changing materials or just draining the vat is a clean and easy process. The Mars 3 doesn’t have a pour spout, so when pouring material out of the vat, it tends to drip onto the side and can be difficult to clean.
Printing a Large Model on the Elegoo Mars 3

The build volume of the Elegoo Mars 3 is large enough to print complex models in a single piece, so I tested out the ability of Chitubox to handle this sort of model by printing Geralt the Witcher - Action Rider Figure by Rudolf Arendt. This model required extensive support material, and Chitubox had no problem generating this structure to support the various fine features and details. I was also able to use Chitubox to identify separated pixels and remove them before printing, which is a very helpful feature for preventing print failures due to floating islands of resin.

With a per-layer cure time of 2.5 seconds, this model took seven hours and 22 minutes to print using the Elegoo Beige Standard Photopolymer Resin. Leaving the build platform attached to the gantry after printing is a non-labor intensive way to let excess resin drip back into the vat, but using the included plastic scraper speeds up this process and also cleans off the resin from the top of the platform.

Despite it not being fully cured, I was able to easily handle the model without damaging it and place it into the Mercury X wash station to rinse the excess resin from the part. After washing the part, I removed the support structure and finished curing the part in the Mercury X cure station.

The quality of the print was top-notch, and fine details like the reins on the horse are not only visible, but also look sharp and in-focus. I used a macro lens to try and capture the detail on the face of this model, and you can even see the scar over his left eye and individual hairs on his beard are visible. This is where the 35 micron XY accuracy of the Mars 3 comes into play; details like this simply wouldn’t be visible if printed on a printer with a coarser resolution.

Printing Hollow Models on the Elegoo Mars 3

To test out the ability of Chitubox to print completely hollow models, I printed this Tawny Frogmouth model that was sculpted by artist Louise Driggers and published on her Patreon page. This model doesn’t require any support, and prints out hollow with drain holes modeled directly into the model.

Since the model had already been hollowed, the large cross-sectional width of the model wasn’t a problem for the Mars 3 and it printed perfectly on the first attempt. I printed this model using the Elegoo Beige Standard Photopolymer Resin and standard slicing settings on Chitubox.

The upward-facing horizontal UV LED array on the Mercury X curing station came in handy for curing this model. Normally, it can be a challenge to cure the inside of a hollow model as the model would have to be placed sideways on a rotating platform to allow the light inside the model. The Mercury X curing station was able to project light up into the inside of the model while simultaneously curing the outer contour.


A well-sculpted model, Loubie3D’s Tawny Frogmouth has clearly visible detail throughout the model, including the wood grain sculpted into the base. The large crack in the base is actually a cleverly hidden drain hole, which allows air to escape during printing and prevents a vacuum from forming when the model lifts off the FEP film but remains submerged in the vat. The .035mm XY resolution of the Mars 3 results in a model that requires magnification to see the contours of each individual layer and gives the model a smooth and even appearance.
Bottom Line

The $300 Elegoo Mars 3 is a well-designed 3D printer that offers 4K resolution, a fast 2.5 second per-layer cure time, and a footprint that is comparable to other sub-$400 resin 3D printers on the market. The native integration with Chitubox means first-time users won’t have to spend a lot of time tweaking settings to create a printable file, and the dead-simple two-bolt calibration process dramatically lowers the learning curve. There are a few notable features missing from this machine (no rubber gasket on the UV lid, no air filter, the base is plastic instead of solid metal), but these are all likely secondary concerns to speed and accuracy.
At publication time, the Mars 3 was unavailable to buy. The first run of 5000 pre-release units sold out, and the standard units have not been released for sale yet, though Elegoo told us it expects to have the units on Amazon sometime in September.
Given the upgrades in resolution over the Mars 2 Pro, it’s easy to see that the Mars 3 is the printer to choose if you want high resolution and fast speed. However, if price is the primary concern, the Mars 2 Pro may be cheaper, depending on sales, and the Anycubic Photon Mono is available for the blow-out price of $189 direct from Anycubic.
