Monoprice G-Pro 30-Inch 120Hz IPS Gaming Monitor Review
So far we’ve only had the chance to test one 120Hz IPS monitor, Overlord’s X270OC. Now Monoprice has brought its G-Pro 120Hz 30-inch 16:10 screen to the fast IPS party. Today we see how it performs in our benchmark suite.
Why you can trust Tom's Hardware
120Hz Setup, OSD Tour And Calibration
120Hz Setup
When we unpacked the G-Pro 120Hz, we were unable to find any instructions on how to enable refresh rates above 60Hz. The Nvidia Control Panel only showed 60Hz as an available choice. Of course, we had the monitor connected via DisplayPort. What Monoprice left out of its manual is the fact that you have to use the included heavy-gauge dual-link DVI cable for faster refresh rates.
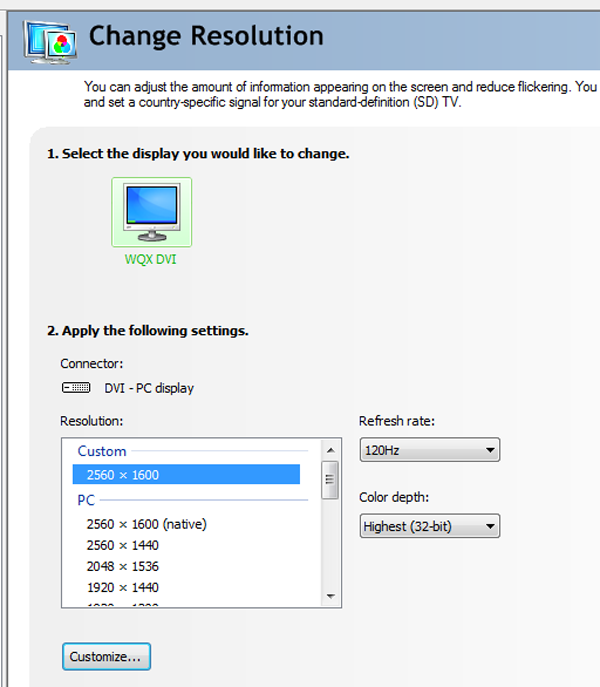
Once we rectified this, there was still the matter of creating custom resolution presets, since the G-Pro’s EDID (Extended Display Identification Data) has not been modified. Normally, manufacturers do this so the video card can see the display’s supported refresh rates. Luckily, these presets are easy to set up in Nvidia's software.
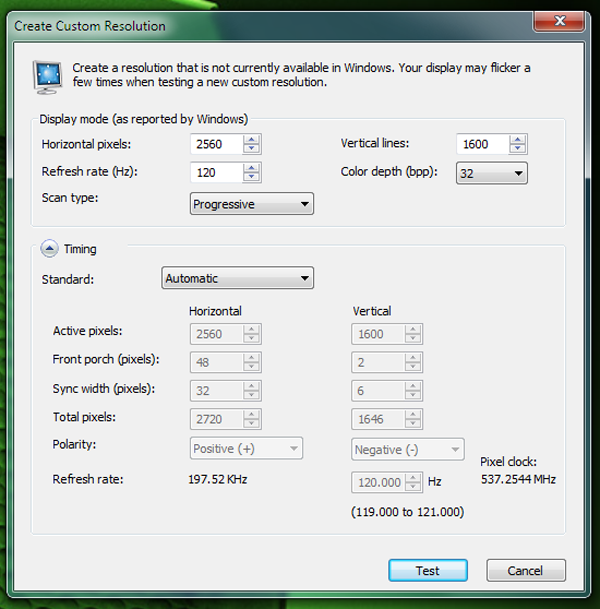
We’ve already created a 120Hz preset here. To do this, click Customize and you’ll see the dialog box below.
All you have to do is change the refresh rate to 120Hz, or any number between 60 and 120. Leave the timings on Automatic. The driver will test different settings for you until the image remains stable. In our case, it only took a few seconds.
While the G-Pro is stable at 120Hz, we did encounter some frame-skipping artifacts. Our tests and findings are on page seven, along with the response and input lag results.
OSD Tour
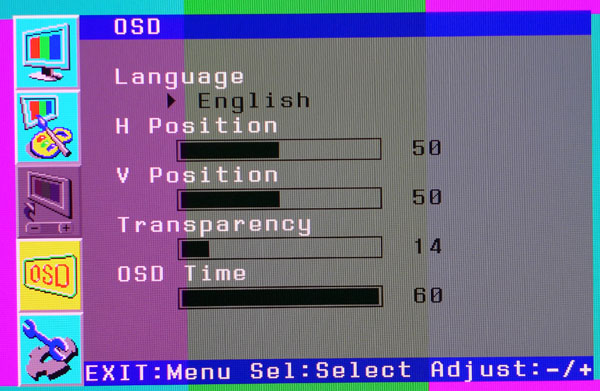
The OSD is incredibly simple, with only four sub-menus to explore.
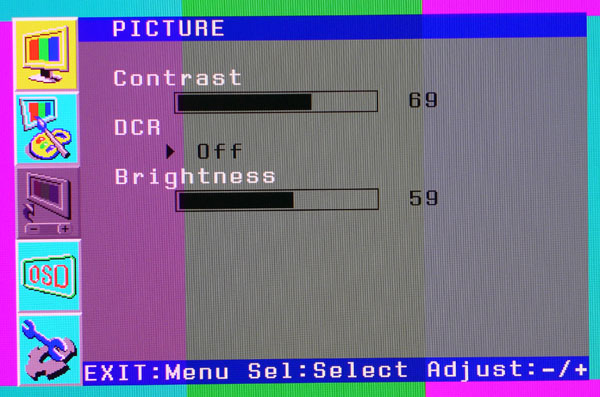
The first screen has the brightness, contrast and dynamic contrast controls. The brightness slider appears to work in reverse. Lowering the number raises the backlight level. Contrast comes set to 70 and should not be set higher since clipping will result. Dynamic contrast should be avoided entirely; it will crush detail at both ends of the brightness scale.
Get Tom's Hardware's best news and in-depth reviews, straight to your inbox.
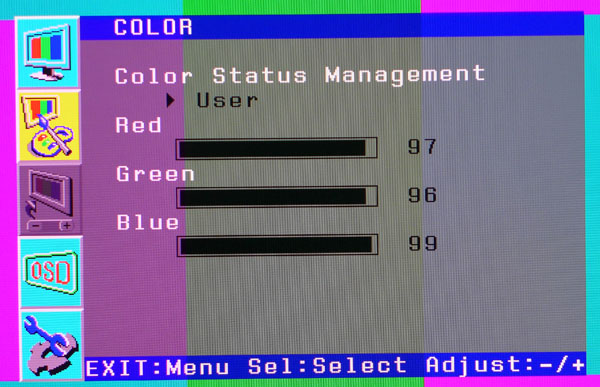
Screen two contains three white balance presets plus a user-configurable mode. The RGB sliders interact a bit, making it tricky to achieve perfect grayscale tracking. Our results were pretty good though. If you don’t calibrate, User mode is still the best choice.
The OSD can be viewed in either English or Korean. You can move it to any position on the screen and extend its timeout to a maximum of 60 seconds.
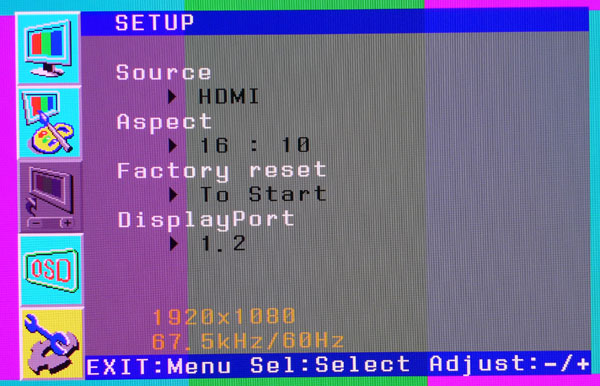
The final screen has source selection, aspect ratio options (16:10 or 4:3), factory reset and a field for choosing the DisplayPort version. Even though we chose 1.2, it still wouldn’t support refresh rates over 60Hz. You’ll have to use DVI for that.
Calibration
Once we figured out that the brightness control works backwards, it was a simple matter to dial in the G-Pro 120Hz. There are no picture modes, so you can only create a single group of settings. The only feature we missed was an sRGB gamut option. Our tests confirmed that this is an Adobe RGB-native screen and you can’t throttle the color back to the more commonly-used Rec.709 standard. We left DCR (dynamic contrast) off and tweaked the RGB sliders for a solid grayscale tracking result. Gamma tracked well in our tests, which is fortunate since there’s no gamma control. While the out-of-box color is decent, you might realize some gains by trying our settings below.
Calibration Settings
| Contrast | 79 |
|---|---|
| Brightness | 59 |
| Color Status Management | User |
| RGB | Red 97, Green 96, Blue 99 |
Current page: 120Hz Setup, OSD Tour And Calibration
Prev Page Packaging, Physical Layout And Accessories Next Page Results: Brightness And Contrast
Christian Eberle is a Contributing Editor for Tom's Hardware US. He's a veteran reviewer of A/V equipment, specializing in monitors. Christian began his obsession with tech when he built his first PC in 1991, a 286 running DOS 3.0 at a blazing 12MHz. In 2006, he undertook training from the Imaging Science Foundation in video calibration and testing and thus started a passion for precise imaging that persists to this day. He is also a professional musician with a degree from the New England Conservatory as a classical bassoonist which he used to good effect as a performer with the West Point Army Band from 1987 to 2013. He enjoys watching movies and listening to high-end audio in his custom-built home theater and can be seen riding trails near his home on a race-ready ICE VTX recumbent trike. Christian enjoys the endless summer in Florida where he lives with his wife and Chihuahua and plays with orchestras around the state.
-
kyuuketsuki Generally a Monoprice fan, but the frame-skipping makes this monitor pretty unappealing for its intended market. Hopefully they can fix it with a firmware update.Reply -
blackmagnum Monoprice is such a cheap-skate name. Why not chose a brandname less price concious like Lemon or something?Reply -
MonsterCookie I think this FINALLY is a step in the RIGHT direction. Sadly you cannot buy this in Europe.Reply
I was long ago looking for a 2560x1600 screen, and I got a Dell second-hand, because for whatever reason manufacturers ignore the customers, and they
stick to 1080p. No offense to anybody who plays at 1080p, but you need to understand, that most people do productivity and game when they have too much free time, and they want to immerse into the game on a large screen.
Personally I still love older games (Wolfenstein, FC1, Half-Life etc.) more than newer releases, and those run on these resolutions at any half-decent video card.
Furthermore, nowadays even a 500Euro *MOBILE PHONE* can do above 1080p resolution on a tiny 6" screen, and for that money they give you 32-64GB of flash, 1GB of RAM and a quad-core CPU in a tiny box.
Thus, I do not buy into this 1080p-1440p crap screen manufacturers are trying to shovel down at our throats for 1000Euros. -
danlw At this point, I think an IPS gaming monitor is like SATAe... A technology that can be skipped because something better exists. Give me an OLED gaming monitor. LG makes a 55" 1080p OLED TV for $2000... why not a 24"-ish OLED monitor for under $1000? You'd have a ginormous color gamut, infinite contrast, true black, and response times <1ms. It's time for somebody to come out with an OLED monitor that doesn't cost $5500! (Sony PVMA250)Reply -
MasterMace I'm more of the type of consumer that likes products to work as advertised out of the box - i.e. 120hz IPS 1080p out of the box. I don't want to have to "overclock" it to its advertized settings, and then have it not work on the advertised ports.Reply
Any overclocking I do personally shouldn't be advertised on the box. -
toddybody Cool Specs, and I really dig the larger panel sizeReply
...that said, after using G-Sync for 6 months now I'm scratching my head as to why any manufacturer would make a gaming panel without G-Sync or Free Sync in it.
Refresh induced stuttering and frame tearing shouldn't be acceptable in 2015 -
soldier44 Been gaming on a HP 30 inch IPS now for 5 years at 60hz. Its been worth every penny for $1200. I would steer clear of this off brand monitor regardless of 120 hz.Reply -
Eggz Close, but no cigar, MonoPrice. Looks like the Acer Predator XB270HU stays on top for now.Reply
