How to Fix a Windows Blue Screen of Death (BSOD)

Its appearance is a cause for concern if not consternation. You might be in the middle of working on a project, reaching a major game milestone, or booting up a Windows 10 or 11 PC. And just like that, the OS crashes and presents you with the eponymous “Blue Screen of Death” (aka BSOD).
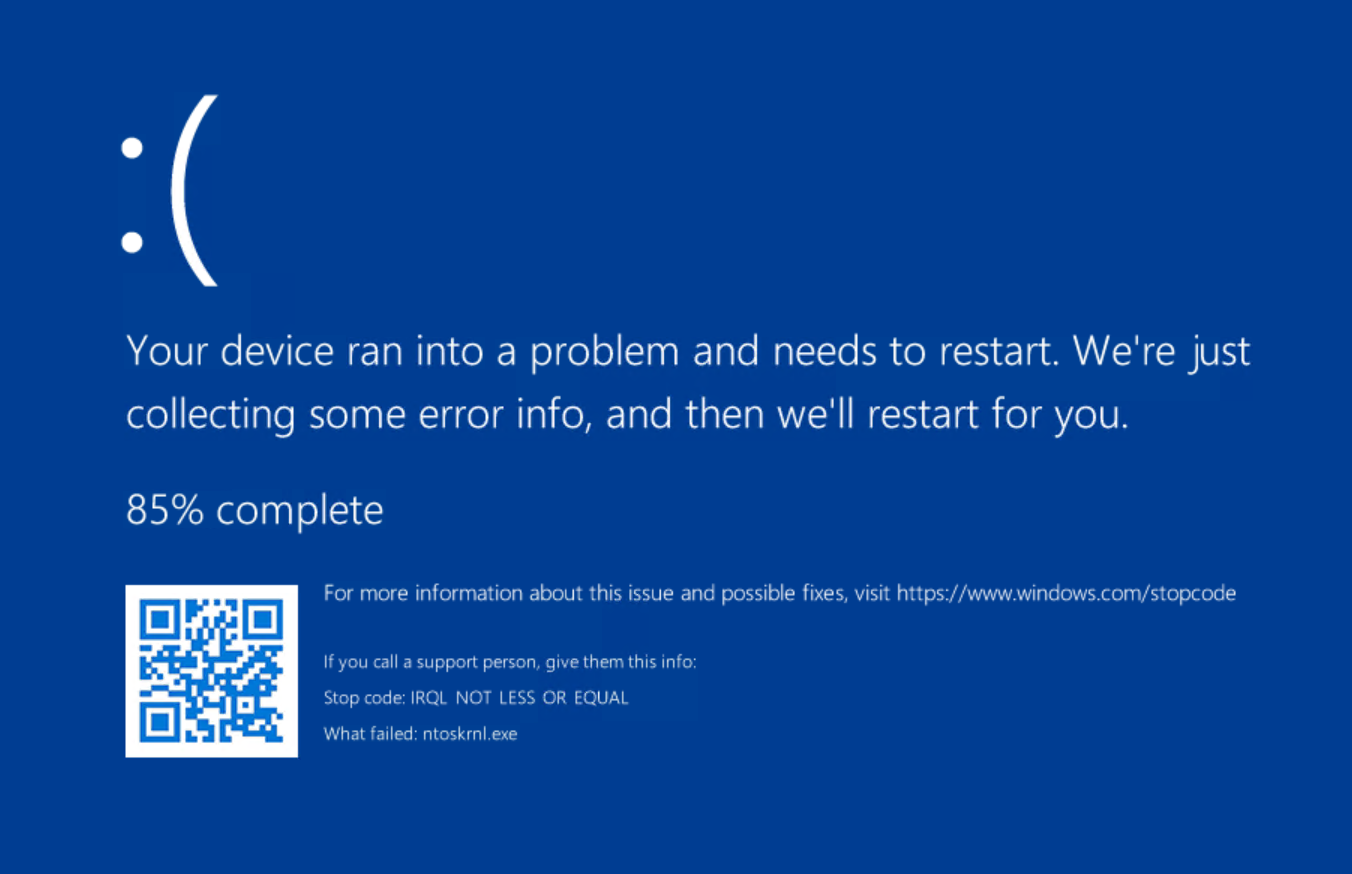
A BSOD occurs when Windows issues what’s called a “stop code.” This is an error that’s severe enough to force the OS to quit working, write some log files, and then restart. The lead-in photo shows a BSOD on a computer monitor. Here’s an example that stands up to closer investigation:
This particular BSOD comes courtesy of the SysInternals NotMyFault program, a tool designed to forcibly crash Windows 10 or 11 PCs with one of 8 different stop codes. It’s handy when testing recovery tools and strategies (and when gathering screenshots for stories like this). Behind the scenes the program includes a variety of illegal instructions that can provoke a variety of BSODs on demand.
Understanding a BSOD Display
The screen starts with an old-fashioned “frowny face” emoticon “ :( “ (a colon, followed by an open parenthesis). Next, you see a brief explanation that “Your PC ran into a problem and needs to restart.” Windows writes one or more log files when a stop error occurs, so you see language about “collecting some error info” and a counter that keeps track while it’s writing such data (shows as “85% complete) above.
Microsoft provides a scannable QR code for modern BSODs (lower left) that you can scan with a smartphone and look up that way. The message also provides a lookup URL for stopcodes, where you can enter a numeric stopcode (and where you’ll see most common stopcodes, including the one shown above). The most common stop codes include:
- CRITICAL_PROCESS_DIED
- SYSTEM_THREAD_EXCEPTION_NOT_HANDLED
- IRQL_NOT_LESS_OR_EQUAL
- VIDEO_TDR_TIMEOUT_DETECTED
- PAGE_FAULT_IN_NONPAGED_AREA
- SYSTEM_SERVICE_EXCEPTION
- DPC_WATCHDOG_VIOLATION
You can also download the Microsoft Error Lookup Tool (current version: Err_6.4.5.exe) to look up numeric error codes at a command prompt or in PowerShell, if you prefer.
Here’s a Catch: BSODs Aren’t Always Blue
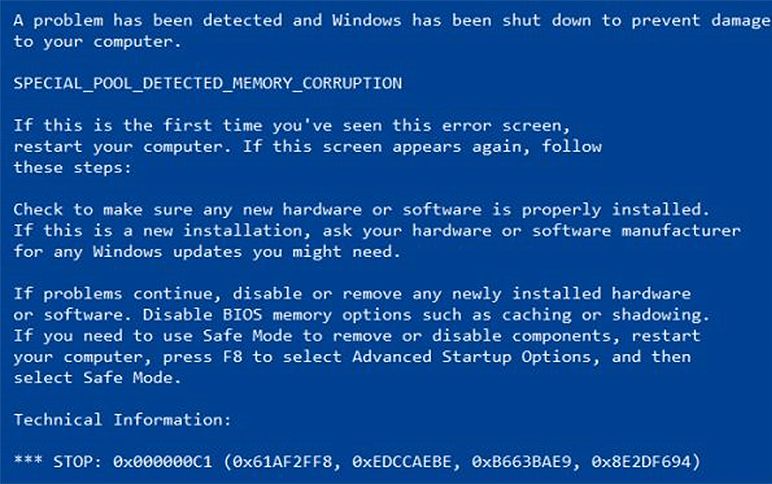
Before Windows 8 came along in October 2012, BSODs always appeared in text-only formats on dark blue screens. These were chock-full of tips and instructions (see below). With Windows 8, Microsoft switched to a kinder, gentler format like the one shown in the preceding screencap.
Get Tom's Hardware's best news and in-depth reviews, straight to your inbox.
The company also whittled down the information that appears on screen. In fact, the background color in Windows 11 or 10 is sometimes black, green or even red. Here’s an example of an old-fashioned, pre-Windows-8 BSOD to put this information into historical context:
Making Sense of BSOD Information
Nobody wants to see a BSOD on a Windows PC. Even so, they do occur from time to time. In the vast majority of cases, the PC will restart itself automatically after an error log, called a crash dump or a dump file (extension .dmp) is created. By default, Windows stores OS dump files in one of two locations – namely:
C:\Windows\Minidump
C:\Windows
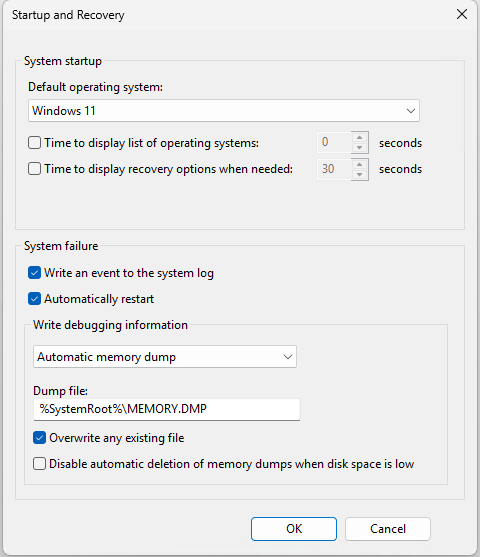
You can manage crash dumps through Advanced System Settings in Windows 11 or 10 (type “Advanced System Settings” into the search box, then click “Settings” in the Startup and Recovery pane). You can also choose to toggle “Automatically restart” to off here, if you would prefer that any future BSODs stay on-screen until you get a chance to see them and write down (or take a pic of) any relevant data.
Other memory dump options include a small memory dump (256 KB), kernel memory dump, automatic memory dump, and active memory dump. Each of these will vary in size (the so-called small memory dump corresponds to the foregoing minidump folder).
If you select “Small memory dump” as the option for saving crash dumps, such files show up as Minidump.dmp files. For all other selections, the crash dump is named Memory.dmp. Crash dumps get written to the %SystemRoot% folder, which usually expands to C:\Windows. By design, small memory dump files are limited to 256KB in size. Other memory dumps vary in size up to the size of memory on the PC where the dump occurs. Thus, on a PC with 16GB of RAM, a Complete memory dump file will always be 16GB in size (and other dump files, except for the small memory dumps, can be as large as 16GB, but will often be smaller).
Examining a crash dump file can be helpful when troubleshooting related causes. For more details, see our story on how to use a minidump file to fix your Windows BSOD. That said, many users simply search on the stopcode and/or the numeric error code when seeking remediation advice. (Note that Microsoft also calls that numeric code a “bug check code” or “bug check string.”
What To Do When Troubleshooting BSODs
The immediate tendency following a BSOD is to get right into fix-it mode, start looking things up, and attempting repairs. Not so fast! Microsoft explains the entire troubleshooting process in its “Resolving Blue Screen errors in Windows” tutorial. While you can – and probably should – read the Microsoft advice in its entirety, here’s a summary of its key recommendations:
- Shut down the Windows PC that experienced the BSOD. Sometimes a restart will clear things up all by itself.
- Disconnect all USB-attached devices except for mouse and keyboard (or wireless dongles).
- Reboot your system into safe mode from the Windows Recovery Environment (WinRE)
- If you recently installed new software, uninstall that software.
- If you recently installed a new device driver (or your BSOD info points to a driver or device), uninstall or roll back that driver (if you don’t really need the device you can disable it temporarily instead)
- Restart the PC, and see if the BSOD recurs. If not, you’ve probably isolated the cause and can start researching some kind of fix.
If the BSOD recurs despite the items taken out of the picture by removing, disabling or uninstalling them, whatever’s still left in the picture remains problematic. At this point you want to reboot into safe mode once again, and open an administrative command prompt or PowerShell session. From the command line, enter these commands, one at a time:
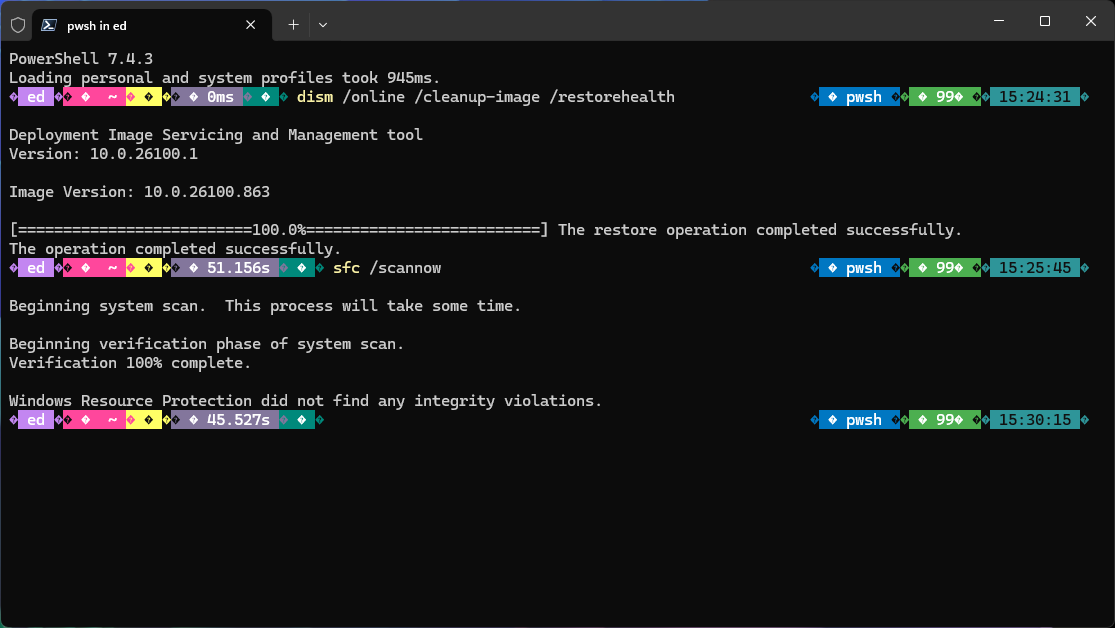
- DISM /Online /Cleanup-image /Restorehealth
- SFC /scannow
The first of these two commands finds and replaces any damaged operating system components in the side-by-side filestore (aka WinSxS). The second of these commands runs the System File Checker (SFC) and will repair any damaged files it finds.
Note that if SFC finds and fixes anything, you should run that command until it comes back with a clean bill of health (in some cases, I’ve had to run it two or three times before it came back clean). Note further that running either or both of these commands can take some time to complete, especially if one or both find items in need of fixing. Here’s what you want to see after your final SFC run:
Try NifSoft’s BlueScreenView Tool
There’s a complete BSOD handling infrastructure available from Microsoft, built around a tool called the Windows Debugger (aka WinDBG). You can download it as part of Microsoft’s free Windows SDK if you really want to dig into the gory details. There are a lot of details to learn about, and minutiae to address, if you want to put this tool to work on crash dumps. For non-IT professionals or non-developers, I recommend Nir Sofer’s excellent BlueScreenView utility instead. It’s set up to automatically load the symbol tables it needs to resolve error codes, and it knows where to find crash dumps in need of analysis. It also presents crash dump data in a highly-readable form.
As an illustration, I forced one of my test laptops (a Lenovo Yoga Slim 7 Copilot+ PC) to blue screen using the SysInternals NotMyFault program. As you can see the stop code is 0X13a, which the error code lookup tool describes as KERNEL_MODE_HEAP_CORRUPTION error (NotMyFault calls it “Double free” for whatever reason).
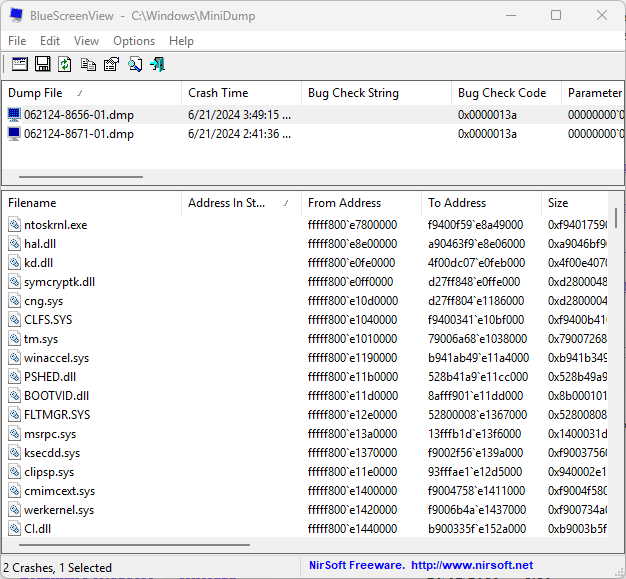
When I fired up BlueScreenView on that PC, it found a pair of mini-dump files that the forced BSOD created during its post-crash log collection, to wit:
The top pane of the window shows all the crash dumps it finds on the target PC. Because there are only two, I shrunk it down to more details from the bottom pane. Even so, the data in the top pane is important, with information in certain columns of special interest. Column 1 shows the name of the dump file. Column 3 shows an empty “Bug Check String.” Column 4 shows the associated hexadecimal error code, 0x13a which it labels “Bug Check Code.”
For most genuine BSODs (remember, I forced this one to happen) the stopcode and the error code will often help affected users zero in on causes and potential cures for their woes. In my experience, at least 90% of BSODs get fixed thanks to this information. That’s because it will often be solved by disconnecting, disabling, or uninstalling related devices, drivers, applications, or updates – just as Microsoft recommends, and I summarized in the preceding section.
The Other 10%
Ultimately, where there’s enough will to get a Windows BSOD fixed, there’s a way to make that happen. Keep at it, and you’ll learn this for yourself.
Some BSODs won’t be amenable to quick and easy fixes. When they come up, as they sometimes will, it’s time to ask for help to get things figured out. I can recommend several terrific sources of troubleshooting assistance available online, each with its own dedicated user forum specifically focused on solving BSOD issues. Likewise, each one stipulates certain requirements on users seeking BSOD help.
Source number one comes from TenForums.com (key disclosures: I am a VIP member of this community; I contribute input and suggestions to its members daily). The TenForums venue is in its BSOD Crashes and Debugging forum; its Windows 11 equivalent is named BSOD Crash Analysis. Posting instructions are explicitly provided, along with a collection of BSOD tutorials, including those on WinDBG Basics,and how to Install and Configure WinDBG for BSOD Analysis, Run BSOD Error Troubleshooter in Windows 10, and Enable or Disable BSOD Automatic Restart in Windows 10 (similar items for Windows 11 are available at ElevenForum.com as well: visit the Tutorials page and search on “BSOD” for the good stuff).
Source number two comes from British PC security and troubleshooting site BleepingComputer.com. They operate a user forum named Windows Crashes and Blue Screen of Death (BSOD) Help and Support. There, you’ll find pinned threads for the following topics (all of which are worth reading through):
- BSOD – Using WinDbg (Windows Debugger) and !analyze -v: information for those seeking deep and advanced details inside Windows crash dump files.
- BSOD Posting instructions: what information users should gather (based on downloading and running WinDbg) to obtain necessary dump files and content.
Thus, you’ll have to read up a bit, download some tools, run some scripts and/or collect some logs that you’ll submit to make a semi-formal request for BSOD help. This will take one or more hours and force you to do some homework before such help becomes available. It may also involve numerous back-and-forth communications, where you’re asked to run additional diagnostic tools and collect additional logs and data to shed more light on your situation. Trust me: these guys know what they’re doing. I’ve seen only a handful of issues where users did everything asked of them where the BSOD experts couldn’t help them get things fixed.
Related Tutorials
Ed Tittel is a long-time IT writer, researcher and consultant, and occasional contributor to Tom’s Hardware. A Windows Insider MVP since 2018, he likes to cover OS-related driver, troubleshooting, and security topics.
