How To: Properly Plan And Pick Parts For An Air-Cooled PC, Part 2
After discussing the theory of PC cooling, in Part One, we now move on to technology and implementation, discussing case fans, CPU coolers, and thermal grease. We even wrap up with a recipe you can use if you fail to cool your PC properly.
VGA Coolers: We Rescue A GeForce GTX 480
Unconventional Repair Job Instead Of Expensive Replacement
Swapping or upgrading a graphics card's cooler is not a job for beginners. Thus, we omit that in this entry-level tutorial. However, even a neophyte can reproduce our unconventional experiment.

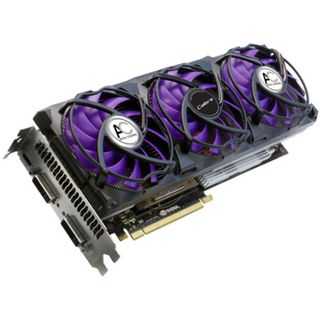
Let’s assume you own a factory-overclocked GeForce GTX 480 (like the one in the picture), and let’s further assume that the Accelero Xtreme's fans just died on you. Naturally, your warranty already expired and a quick search on eBay doesn't turn up any results for spare parts. Now what?

Broken is broken, and a new Accelero fan assembly costs something like 50 bucks. Thus, the only option is to dig up a fan out of the spare parts bin. The new blower can't be any thicker than the original because we don’t want to block an additional PCI slot, and it should at least boast the same performance.
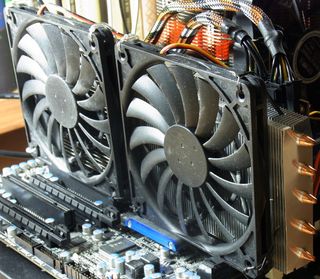
Two Slip Stream Fans Cool The GeForce Like Never Before
Now, granted, we attached both fans in a somewhat haphazard manner, since we weren't even sure if this would work. We didn't take a boatload of pictures, either.

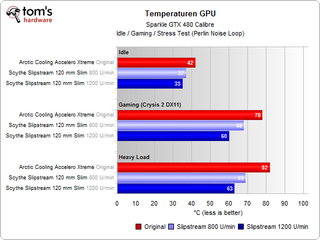
However, our measurements would make an Eskimo proud: the home-grown solution is slimmer, quieter, and significantly cooler! As an added benefit, the air stream that passes through the protruding fans also cools the top of the card. An experiment with 92 mm fans, which don’t stick out the same way, wound up 5 kelvins warmer, and thus we didn’t even bother to take pictures.
Stay on the Cutting Edge
Join the experts who read Tom's Hardware for the inside track on enthusiast PC tech news — and have for over 25 years. We'll send breaking news and in-depth reviews of CPUs, GPUs, AI, maker hardware and more straight to your inbox.
Rigged Fans Beat Nvidia's Factory Setup
This is amazing, but true. Our ugly ducklings beat the Accelero Xtreme's factory-installed fans in all respects. This puts the fun back into big old Fermi! Take a look at the measurement data:


We could have taken full-sized 120 mm fans and seen even better results. However, the card would have then monopolized three slots, which would have been too much for our tastes.
MacGyver would applaud us, even though these fans won’t detonate. Some digging in the spare parts bin saved an expensive graphics card from the garbage heap, and we even managed to improve its cooling. Had we bought the fans brand new, a ~$20 total for both wouldn’t have broken the bank.
Current page: VGA Coolers: We Rescue A GeForce GTX 480
Prev Page CPU Coolers: Initial Startup And Test Run Next Page VGA Coolers: Single-Slot Whisper Cooler-
Ragnar-Kon Helpful even for myself (who has been building PCs for years). Granted all it really told me is that I was doing it right all along, but it did give me some useful bits of information that I didn't know before.Reply
Kind of disappointed that the process of aftermarket GPU cooling wasn't explained more. That is something I have never done before, but always wanted to try out on one of my older cards. -
drutort gloves? who uses gloves :P I use my finger :) I have been doing it before there was even aftermarket paste :PReply
the trick is, that i did and do twist, BUT i double check how much paste there is on the heatsink and the cpu, if there is enough I then fix it up on both ends and press the 2 together and do small twist... in fact if you have it lapped, you can twist a bit and it starts to give some resistance... IMO this tells me that access paste has distributed even and any access is gone...
This works so well that you cant separate the heatsink and cpu if you try to pull it straight off most of the time, but have to switch and move it.
How do I know it works? wouldnt be getting the results i did.. my old 720 be unlocked 4 cores and running at 3.3ghz .. I recently replaced it recently with Noctura D14 and phenom II X6, that I dialed into 4.13ghz
but then again I would say don't do this at home :P (the way I do it works good enough when using thicker pastes, such as the arctic silver 5)
***I forgot to mention that this works for those heatsinks were you have a strap and not screws... I agree that those that have high pressure through screws you probably should not move or twist... but all those heatsinks that can create a lopsided effect due to the strap, this way works very well, especially when having thermal paste on both ends, and best way is to strap it down and take it apart, examine it and then fix it up add/remove any paste and place it back on.***
For the noob this is a good enough article... -
fancygoods On page 5 the second picture the top case fan points down yet hot air comes up.Reply
Im curious although it wont have a large affect, if the CPU cooler fan would act like a puller if put on the left side whether it would hurt or help the memory temps -
ojas Really good article, and a real help. Just thought i'd chip in with what i know/have to ask....Reply
I remember reading that sleeve bearing fans should not be used horizontally, that shortens the life span of the fan and makes it noisier over time. Something to do with the fluid in the bearing. Other bearings don't have this problem.
I also remember watching a program on NatGeo on submarines. Apparently modern day subs use propellors with a large number of thin blades. This basically avoids pressure diferences between water in front of the blade (in the direction it's spinning), thus prevents excessive low pressure in the region through which a propellor has passed. This avoids small bubbles of steam from building up and then popping, causing noise.
Seeing that air is a fluid too, i wonder if a similar principal will apply to it. Of course, there wont be any air bubbles popping in air, but i'm wondering if turbulence has any role to play, since i assume more blades=less turbulence. not sure though.
dB(A) is the A-curve...what about the C-curve? That's got more bass, which may be audible as a hum...C-cure measurements seem to ba a decible or three higher than A...
If the fans are connected to the mobo, you could use SpeedFan too...
With respect to the positive pressure section:
You say it goes against natural convection. What if i set the front and side panel as intake and the rear and top fans as the exhaust? I'm assuming the PSU is bottom mounted. Would it still go against convection?
What about neutral air pressure?
If, for example, the cooler needs to be re-seated following improper installation, is it a good idea to use isopropyl alcohol (Doctor's Alcohol) to clean the CPU and heatsink?
Cooler Master fans are pretty good, their higher quality fans 120mm fans move 79 to 90 CFM, their 200mm megaflow moves about 110 CFM. In both cases, rated noise is 19 dB(A). however, no rubber screws or frame so a that's a con.
BTW there's no prob with exposed heatpipes and the Arctic Silver, is there?
-
gio2vanni86 I've been doing the whole spread the paste evenly flat onto the CPU/Cooler for almost 8 years now. I'm not a professional when it comes to this solution, nor do i have eyes of a hawk to know if i do it right all the time, the temps seem to be right. I wish you guys did a temp difference on how the paste was spread in a lot different ways to give me a point of view of if there is any difference in temps, obviously the one where you can see the writing more then likely is not effective. Great article as always, cheers!Reply -
Augray37 @ ojasReply
I'm not sure about all the other questions, but i know 90% isopropyl alcohol will work to remove thermal paste. "Goof Off" or similar products are even better. Also, i'd suggest using a coffee filter to apply the alcohol or goof off and wipe away the paste. that's what i do, works every time. -
icepick314 I read years ago that thinner the layer of thermal paste, the better.Reply
Well...not THIN as in barely there thin but just enough to make lettering opaque, not completely covered.
I thought the paste is just to fill in cracks and imperfections on the heat sink and the surface of the processor...
also any word on Zalman's heat paste that comes in liquidy paste? it comes in a small bottle with a brush like nail polish...been using that all this time... -
Branden i've sometimes moved a fan's molex wires from 12v to 5v for silence's sake, but sometime it was too much. never knew i could get 7v by crossing the 12v and 5v lines like that (and wouldn't have dared try if i'd even thought of it anyway), glad to know there's another option there!Reply -
mjmjpfaff I would have liked to seen silverstone's air penetrater fans in here. Just to see how they stack up against other fans.Reply -
chesteracorgi I think that you may have proven my case for GPU cooling being superior as a case exhaust design over the shroud design. The shroud design produces temperatures from 10-30 C above the case exhaust designs.Reply
My own experience with a GTX 470 (from PNY) with a shroud showed an idle temperature abour 45-48 C. When I modded the card with a Zalman 2000F cooler the temperatures dropped to 30 C at idle. This (delta) temperature reduction was consistant for all uses: from idle to load. Similar loads produced temperatures that were 15-20 degrees C cooler with the case exhaust method over the shroud.
Just two weeks ago I added a second GTX 470 (from Galaxy) in SLI. This model has, what is touted to be, superior cooling to the reference design. It consistantly runs about 10 C hotter than the PNY cooled by thge Zalman aftermarket cooler at idle. Because of space considerations the shroud design had to be mounted above the case exhaust GPU. When the GPU load is increased the shroud design temperatures show a increase (delta) of 15- 20 C over the case exhaust. This is expected, as the top mounted GPU is the one with the major work load.
I ordered the mesh sided side door from Corsair (600T) to provide extra ventillation from a side panel fan blowing on the GPUs. If this configuration works, I expect a 5-7 degree C in the top mounted
GPU. I will be using the 200 mm fan (from Corsair) that was modded out from the top of the case when I replaced it with two 120 mm fans (from Xigmatek).
Most Popular


