Why you can trust Tom's Hardware
We are using the following system for today’s build:
| CPU | Intel Core i5-11600K |
| Motherboard | Asus ROG Strix Z590-I Gaming WiFi |
| Memory | G.Skill Trident Neo 16GB, 3600 MHz |
| Graphics | Zotac RTX 3080 Ti Amp Holo |
| CPU Cooling | Phanteks 240MP AIO with Noctua NF-A12x25 fans |
| Row 5 - Cell 0 | Noctua NT-H2 Thermal Paste |
| Storage | Corsair Force Series MP600 NVMe SSD, 480GB |
| Power Supply | Corsair SF750 750W SFF PSU |
With this build, we’re using the new ITX case test setup based on the 11th Gen Intel Core i5-11600K processor, paired with an Asus Z590 ITX motherboard and a large RTX 3080 Ti graphics card. That’s a lot of hardware to throw at an ITX case, but the Q58 shouldn’t be troubled by this. That said, the Zotac GPU might be too big, so I do have the RTX 2070 Super ready in case I need it.
Step 1: PSU Installation
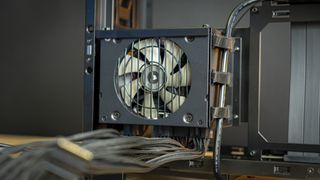
First, I installed the power supply in its designated location. By default, the case comes with the SFF bracket pre-installed, and the PSU slides right into place. If you have an SFF-L PSU, you may need to remove the bracket, install the PSU onto it, and re-install the lot.
Step 2: Motherboard Installation
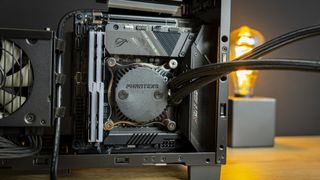
Then, I installed the Asus motherboard, with the AIO’s pump head already installed. I could try and get the PCIe riser cable out of the way and install the pump head afterwards, but that seems like an inefficient way of going about things.
Step 3: AIO Installation
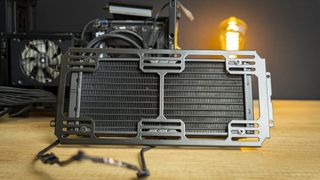
Then, it was time to install the AIO’s radiator at the top of the case. The Q58 supports 280mm radiators, as you can tell from the bracket I removed from the top of the chassis, but I don’t have a 280mm AIO available (yet). So, I installed the bracket and tried to put the radiator in place.
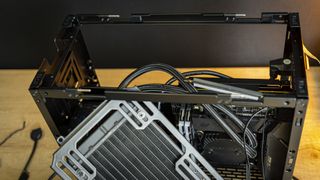
But I made a mistake: I installed the radiator on the bracket outside the case, and with the tubes not routed through the top opening, I couldn’t get it in place. So, I undid the radiator again, ran its tubes correctly, and re-installed the bracket. At this point, I decided that it would be easiest to leave the radiator uninstalled and off to the side, as this would give me extra clearance for cable management.
Step 4: Cable Management
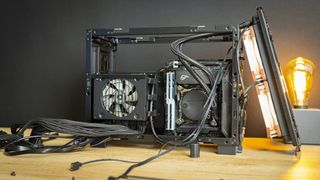
Next, I decided it was time to tidy up all the cables. I find that in ITX cases, this is easiest to do without the GPU installed, as it just gets in the way. About 30 minutes later, I achieved the below result, which is quite tidy.
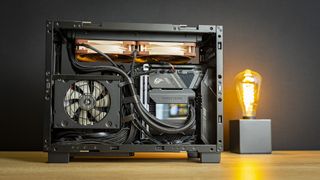
But there is a catch: The cable slack from the power supply had to go somewhere, and I shoved it right below the PSU. There is plenty of space here, but it is the spot where otherwise, you could install a 120mm intake fan. With some creativity and a lot of extra time, you could fit a fan here and use the standard cables that come with a power supply. There is some space behind the PSU, and you could jam things in a bit tidier – after all, the back of the fan has the prongs that hold up the motor, so you’re unlikely to get blade contact.
However, for best results, you may want to budget for a custom cable set that’s made to the exact lengths you require. This will lead to an easier build and much tidier looks.
Step 5: GPU Installation
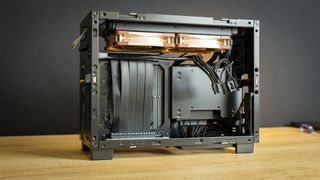
With all the cables tidied, and the PCIe power cables pre-routed, installing the large Zotac RTX 3080 Ti was a breeze. I did have to nudge the PCIe riser card over a bit, but with that done, the GPU slotted right into place.
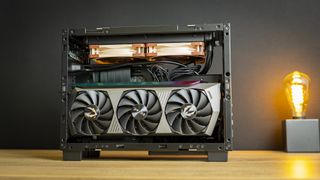
There’s just one thing I need to mention here: The GPU end of the PCIe riser cable could use some extra support. I was pushing down on the GPU, seeking that satisfying ‘click’ letting you know that it’s fastened into the slot, but I wasn’t getting it.
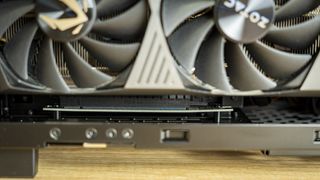
As you can see, I managed to bend the PCB a bit. This wasn’t a problem – I hadn’t damaged it and it did work just fine, but if you’re not careful, you might. Two simple standoffs to hold it up at each end isn’t enough to protect against uncareful installers bludgeoning the GPU in, so I’d like to see Lian Li add a support brace here.
Build Complete
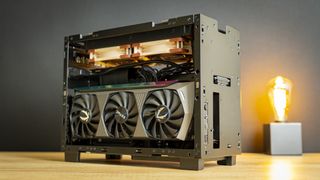
With that, the build was complete. Time to throw on the panels.


In the end, building a system into the Q58 wasn’t as tough as ITX cases used to be. Admittedly, this one was a little trickier with the cable management and cramped space for cable slack, but it was still perfectly manageable with some time and patience. The Hyte Revolt 3 certainly builds easier, but it doesn’t have as nice a finish as the Q58, and while the Louqe Raw S1 both builds easier and is way more premium, it does cost much more and offers far fewer storage, cooling, and PSU options.
Current page: Hardware Installation
Prev Page Features and Specifications Next Page Testing and ConclusionNiels Broekhuijsen is a Contributing Writer for Tom's Hardware US. He reviews cases, water cooling and pc builds.
-
Geef There is a damn good reason for NOT allowing a side with vents. Imagine your playing a game and bump! Whoops your Pepsi just tipped over and splashed right into that vent and this case has the video card right there with fans spinning to spray that liquid all over the inside of the case!Reply -
deesider Reply
That's no problem buddy, the panels are removeable, just pop them straight into the dishwasher.Geef said:There is a damn good reason for NOT allowing a side with vents. Imagine your playing a game and bump! Whoops your Pepsi just tipped over and splashed right into that vent and this case has the video card right there with fans spinning to spray that liquid all over the inside of the case!
If it happens alot, maybe invest in some sort of GPU diaper for those little accidents -
Geef Reply
No, only the ones who expect business from myself and other folks who have thought of it.King_V said:Is this a problem that is routine enough that you expect all PC cases to address it? -
Questors ReplyGeef said:There is a damn good reason for NOT allowing a side with vents. Imagine your playing a game and bump! Whoops your Pepsi just tipped over and splashed right into that vent and this case has the video card right there with fans spinning to spray that liquid all over the inside of the case!
Have you tried moving the drink away from the PC chassis? If you are clumsy like me and constantly knock things over, this prevents the liquid contents from spilling into or onto your PC. There are also many covered drinking cup solutions on the market from 99 cents all the way up to several hundred dollars depending on your tastes and wallet. Some cups offer the benefit of keeping your drink cold or hot for a much longer time.
Then again, all products are not for all people. ITX chassis is lesson in packing as much as one can into a small space. Air flow or cooling, in general, is paramount. Even if the case will accept an AIO and the builder uses one, there are other components that needs cooling. A bottled up ITX case is bad news even more so than a larger case.
As for the case, it is very nice really and has been thoughtfully designed. It is now one of the few being considered for the wife's new build. That is IF GPU availability improves and prices come down. -
escksu ReplyGeef said:There is a damn good reason for NOT allowing a side with vents. Imagine your playing a game and bump! Whoops your Pepsi just tipped over and splashed right into that vent and this case has the video card right there with fans spinning to spray that liquid all over the inside of the case!
Hope you know that without those vents, the GPU will overheat due to lack of ventilation. The fans will not be able to work because its only 1cm or less from the panels.
If there are no vents, only blower style coolers will work because hot air is expelled out of the rear of the casing instead of within. -
Findecanor Reply
If you're right-handed, place the PC on the left side of the desk, and keep your drinks on the right side of the desk with monitor and keyboard in the middle.Geef said:There is a damn good reason for NOT allowing a side with vents. Imagine your playing a game and bump! Whoops your Pepsi just tipped over and splashed right into that vent and this case has the video card right there with fans spinning to spray that liquid all over the inside of the case! -
ThunderBuddy ReplyGeef said:There is a damn good reason for NOT allowing a side with vents. Imagine your playing a game and bump! Whoops your Pepsi just tipped over and splashed right into that vent and this case has the video card right there with fans spinning to spray that liquid all over the inside of the case!
This has to be, without a doubt, the absolutely most nonsensical/strangest comment I have ever read in my life. Just yikes. First of all, you shouldn't have any liquids anywhere near your PC, if you put your drink right in front of your pc you legitmately have the IQ of a toad. Secondly, stop drinking soda pop. It's horrible for you. And lastly, not everyone is uncoordinated and careless, generally most people don't knock their drinks over on a regular basis. It seems like you have a lot of issues here and I suggest you work them out instead of formulating erroneous and nonsensical replies to people's posts. -
ThunderBuddy ReplyGeef said:No, only the ones who expect business from myself and other folks who have thought of it.
you are on an island of idiocy there my friend, so there are no other "ones" you speak of -
Geef Reply
Answer to King V: Yes I do think in general side vents are a bad idea. They are popular for random Gamer PC from local store! "Look it has a side vent. It must be better!"King_V said:Is this a problem that is routine enough that you expect all PC cases to address it?
---
Everyone who responds to this seems to hate the idea a side vent is a bad in general. In my OP I explained in detail. However other posters never seem to explain why, you only tell me what and how to drink near a PC.
deesider did his best by explaining what to do after a drink spill. Thanks
escksu mentioned how it wouldn't work without a vent.
escksu said:without those vents, the GPU will overheat due to lack of ventilation.
This case has fans on bottom and top so its an upward flow case. It does look cramped inside so that might be the reason for the side vent. Good reason, but most cases out there just had a side vent because they can and it looks cool, no airflow reason.
thunderbuddy just wanted to release his hate on me:
ThunderBuddy said:First of all, you shouldn't have any liquids anywhere near your PC
Captain Obvious strikes again! Like 98% of the people using PCs would have to stop if that rule was followed. Relax thundergirl, telling me not to drink soda pop does nothing to help the conversation. If yelling hateful things at me makes you relax then go for it, knock yourself out. After your done look back at my pic, I'm still smiling.

