System Builder Marathon: $625 Gaming PC
Assembly And Overclocking

Assembly and Overclocking
It fast became obvious that we were not dealing with the same enclosure quality this month. It’s important to stress that none of these items are outright reasons to avoid this case, but the following are just some observations of the differences between this enclosure and others we have been using.
First, no installation manual was included, so first-time system builders would need to look elsewhere if in need of installation help. There are no pre-installed rubber feet on the bottom of the case, so take caution in unpacking it and be sure to snap in the plastic feet or, better yet, protect the surface wherever the build will take place. The I/O shield is pressed from the case metal and must be twisted and snapped out, meaning it cannot be reinstalled should the need ever arise. The Gigabyte-supplied I/O shield was then a loose fit, but while it could potentially be a source of vibration, it was at least secure enough to stay in place. Instead of using replaceable brass standoffs, the motherboard is screwed directly into raised bumps in the motherboard tray, which should not be a problem seeing how this probably isn’t a case that will be used over and over. And lastly, the side panels were flimsy and the vented one was quite warped when removed and tedious to line up while reinstalling. Of course, we surely can’t expect the same quality at less than half the price, so it was time put these thoughts behind us and continue building the system.
Assembly was simple, quick, and pretty much went without a hitch. There was ample room within the deep Rosewill case in which to work. The motherboard and rear I/O ports all lined up properly, which is important for avoiding grounding issues and attaching input devices. The huge Sapphire HD 4870 easily fit inside, although cable routing would most likely eliminate the use of two hard drive bays. Before reinstalling the side panel, we needed to remove the mounted CPU duct to make room for our larger CPU cooler. In the end, our finished system booted fine, sat level on all four feet, and was free of any noticeable vibration noise.

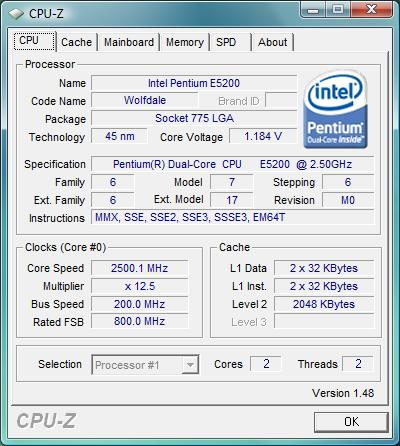
Having completed stock testing, it was time to raise the clock speeds and see what extra performance we could squeeze out of our $624 dollars. This may disappoint some of our readers, but as with past SBM value systems, we again used the cooler’s included thermal compound, since the use of our own Arctic Silver 5 would have required us to factor that added cost into the overall system budget. In the case of this Xigmatek, the supplied compound was basic white silicone thermal grease.
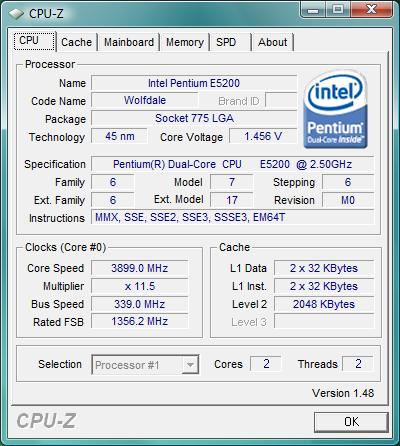
As expected, the E5200 once again completely refused to boot at a 1,600 MHz FSB no matter how low the multiplier was. Luckily, having a 12.5 maximum multiplier meant clock speeds could be pushed beyond 4.0 GHz at just a 1,333 MHz FSB. We didn’t get far without raising voltage, but found 3.66 GHz (11*333) was stable at 1.344 V. Surprisingly, the core temperature reading already was 58 degrees Celsius during Prime95 stress testing, while 3.83 GHz (11.5*333) required 1.408 V, and the stress-test temperatures now reached 65 degrees Celsius. From here, we started to raise the FSB rather than jump right to 4.0 GHz. Stability at 3.899 GHz (339* 11.5) was reached at 1.456 V, but now full CPU load temperatures were teetering at 70 degrees. Ambient room temperatures were not any higher this month, yet by pushing less voltage we had 8-9 degrees higher core temperatures.
Reapplying the thermal compound didn’t help, but removing the side panel of the case dropped CPU load temperature as much as eight degrees. It seemed that our budget case didn’t have sufficient and proper airflow for this level of overclocking and it simply paled in comparison to the Antec Three Hundred we’d been using.
Get Tom's Hardware's best news and in-depth reviews, straight to your inbox.
We were already a notch past the voltage of our previous E5200 needed for 4.0 GHz, but still far under what the E7300 needed for 3.8 GHz. With the side panel removed, we proceeded to see how much voltage it would take to reach 4.0 GHz this month and found stability at 1.504 V.

Deciding on the CPU speeds to use wasn't an easy decision. Core temperatures during performance testing would not reach anywhere near the 70 degrees Celsius we saw running Prime95 torture testing, so 3.899 GHz was chosen for our overclocked settings. This seemed to be a fair comparison to last month's 3.8 GHz E7300 overclock, which ran lower temperatures because of superior system cooling. But it also needed higher voltage to do so. Using a 120 mm front intake fan and better thermal compound is a good idea to run this system at these speeds year round.
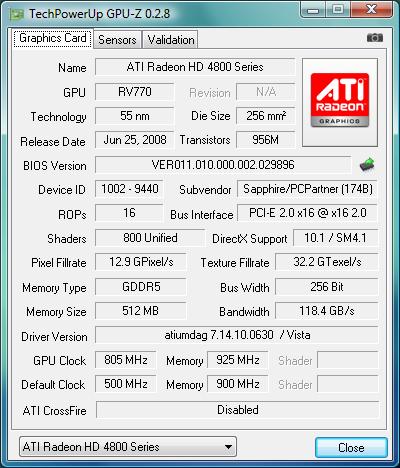
Our Sapphire Radeon HD 4870 topped out a little shy of expectations. The auto fan control did a good job of keeping the GPU cool and allowed us to reach 805 MHz on the core and 930 MHz for the GDDR5 memory. Manually setting the fan to 100% was extremely loud and only provided for 815 MHz core and 950 MHz GDDR5 speeds. Had manually increasing the fan RPM yielded a more significant increase in clock speeds, we may have chosen to put up with a louder, yet still tolerable, constant GPU fan speed of about 70%, but instead chose the slightly lower clock speeds that were stable with the quieter, and thus far more pleasant, automatic GPU fan control.
This Radeon HD 4870 idles much quieter than the HD 4850 we previously used, but it is louder when it ramps up after entering a 3D application.

Current page: Assembly And Overclocking
Prev Page Case, Power Supply, And Optical Drive Next Page Test System Configuration And Benchmarks-
xx12amanxx Yeah Games are definatly more GPU bound than CPU bound at this time.But what about the user who decodes? Next month might be a good time to intro the new am3 triple core seeing as its being sodl for around 150$ and has been seen Oced up to 1ghz over stock.Reply -
As I read this review I wonder, why this is only server I know that provides such a throughout testing and evaluation of OC benefit...Reply
*THUMBS UP* -
nerrawg Nice article guys, like how you seem squeeze the value out of the builds, definitely a good choice of build! My only question is one of personal interest, I wonder if disregarding the set price of $625, a crossfire set up of 2 4830s would give more bang for the buck in gaming then 1 4870? Of course as you have shown it would depend on the cpu, I was thinking around 4 Ghz on a dual core and 4 gigs ram. I am wondering because 2 x 4830 can be had for as little as $170-180 now, and thats pretty awesome.Reply -
nerrawg Looking at the "Radeon HD 4830: High-Speed, Cheap CrossFire" article the results look fairly similar to that seen from this build, with maybe some very small gains in Supreme commander and crysis, while World in Conflict appears to due better on this newer january build. However the 4830 CF was on a test bed without an OC'ed cpu and without overclocking the 4830's, hence my curiosity to know if doing this would significantly increase performance and value over the single 4870?Reply -
StupidRabbit great article as always.. but what happened to the international builder marathon?Reply -
jv_acabal $43 difference bang for the buck. How about in the long run? Sure you'll be paying more than 43 bucks for the electricity bill. I think January's build is better. It might be slower than this month's build but is still very playable at most games.Reply -
maxwellsmart_80 Why do you keep building the same system (practically) over and over again?Reply
It would have been awesome to see a system based on the Phenom II X3 "700 Series" at this price point....especially paired w/ the ATI 4830 or 4850. Dont'cha think a 4870 is a tad much for a "$625 system?" - you would have had a "Dragon Platform" - very doable at your price range. You wouldn't have had to do DDR3 either - DDR2 would have worked quite nicely. -
cangelini StupidRabbitgreat article as always.. but what happened to the international builder marathon?Reply
International competition is in edits--almost ready to go live! Interesting results there, too. -
Onus Excellent article. I think this was a good build.Reply
That Rosewill case (and all their cheap ones like it) will take a front mounted 120mm fan. You had $6 left over, so it would have fit in your budget. -
jcknouse THG Staff note:Here are links to each of the four articles in this month’s System Builder Marathon...Reply
I hate being picky...but...
The links aren't imbedded in those 4 article designations at the top of the article, as of the writing of this note.